Streetwize SWPP9 User manual

IMPORTANT WARNING: This product is supplied with a minimal charge at
manufacture, it is unable to function in any way unless the unit is fully charged
immediately after purchase. THIS IS ESSENTIAL BEFORE ANY USE.
Furthermore for maximum efficiency the power pack should be re-charged (particularly in
cold weather) regardless if the unit has been used or not (see manual for details).
Portable Power Station & Emergency Jumpstart
(& Air Compressor - SWPP9 ONLY)
Instruction Manual
Model No’s.
SWPP9 – WITH Air Compressor
SWPP10 – WITHOUT Air Compressor
Read and understand these instructions and retain for future reference.

IMPORTANT SAFETY INSTRUCTIONS
• This product is intended for domestic use only, in accordance with these instructions
• Check the rating plate to ensure that the correct input voltage is being supplied to the product.
• Always switch the product off and remove the plug from the wall socket when not in use and
before cleaning or changing accessories.
• Never leave this product unattended when connected to the mains supply.
• Always ensure the product is switched off before connecting it to the mains supply.
• Domestic electrical products are not designed for use by children. Any child using a domestic
electrical product should be closely supervised by a responsible adult to ensure all instructions and
safety precautions are adhered to.
• Never allow the mains cable to come into contact with a heat source, water or any other liquid.
Ensure sharp objects such as knives etc are never used close to a mains cable when the product is
in use.
• Never allow the cable of an electrical product to drape over the edge of a work surface where it
could be pulled by a small child. Always check the position of the mains cable when the product is
charging and wrap it around cable restraints when provided.
• Never carry an electrical product by the mains cable as this could cause damage resulting in
electrical failure when next used.
• Never operate this product if the cable or plug, become damaged. NOTE: Only a qualified person
should carry out repairs on this item.
• Be aware that many domestic electrical products become hot during use. Never touch hot surfaces
during use and ensure all users are informed of the risks.
• Where relevant, keep all ventilation slots clear from obstructions and observe safe working
distances from walls etc. Never insert anything into the ventilation slots of an electrical appliance.
• Never operate this product with wet hands. Always ensure your hands, the appliance and work
area, are dry before switching on.
• If this product stops working unexpectedly, switch off immediately. Seek professional advice
before attempting to re-use the product.

Figure 1. SWPP9 & SWPP10 Figure 2. SWPP9 (ONLY)
Front view showing control panel with Air Compressor
1. 12 Volt output socket with overload protection 12. Pressure Gauge
2. Color-coded battery meter 13. Compressor switch
3. Heavy duty 400 AMP booster clamp (–) 14. 3Pce Adaptor Kit
4. Switch 15. Inflation hose and cover of
5. Heavy duty 400 AMP booster clamp (+) compressor for storing of the hose
6. Impact resistant polyethylene case
7. 230V AC adapter/charger
8. 12V DC adapter/charger
9. Emergency light switch
10. Emergency light
11. DC charging LED and charging plug socket
FEATURES
1. 900 Amps peak, 400 Amps continuous jump starting power.
2. Starts cars, trucks, recreation vehicles and boats without the need of a host vehicle or booster cables.
3. 12V power socket with overload protection provides power for utilities and appliances that usually plug
into a vehicle or boat 12V power socket.
4. Provides up to 50-hours of DC power when use with 12V DC socket.
5. Use 12V appliances in remote sites and/or in emergency when commercial power is not available.
6. Solid-state, automatic operation and circuit protection.
7. Maintenance-free, 10Ah battery.
8. This system can be stored without risking acid leakage.
9. Heavy-duty cable with high current carrying capacity.
10. Easy-to-read, colour coded battery meter.
11. DC power cord allows recharging from 12V DC cigarette lighter socket.
12. Molded high-impact case is tough and durable.
13. Built-in light for emergencies and road side repair.

USAGE INSTRUCTIONS
The power booster is designed as a compact, durable and portable jump start system for vehicles
and boats. This self-contained system will start most vehicles and boats without the need for a
host vehicle or 230V AC power supply. This system can also be used as a safe, portable source of
12V DC electric power in remote location and emergencies.
The power booster has an easy to read, colour-coded battery meter that indicates charge level.
A 12V DC power socket is provided for use with appliances that would operate from a vehicle power
accessory socket. The power booster can be charged from a vehicle with the 12V DC charging cable
(provided). This allows maximum portability and useability when a mains plug is not available. Your
jumpstarter can also be recharged with the included 230V AC adapter/charger. The red LED will illuminate
when the battery is recharging.
Warning
Always wear eye protection when working on or around lead-acid batteries
If splashed with battery acid:
Immediately wash effected area such as face and particularly the eyes with clean water. Continue
washing the affected area until medical help arrives.
Warning
Lead-acid batteries generate hydrogen gas during normal operation. More gas is generated when
the battery is charging. Hydrogen gas is:
1.Explosive
2.Poisonous to breathe
3.Highly flammable
To avoid explosion and/or the possibility of being splashed with battery acid:
1.Never allow the red and black clamps to touch each other nor to both touch the same metal object.
2.Only attempt to jump start a vehicle or boat in a well ventilated area.
3.Always connect the red(+) clamp to the positive(+) battery terminal of vehicle
4.Do not connect the black(-) clamp to the negative (-) battery terminal
(see jumpstarting instructions).
Cautions
1.To avoid possible damage that may shorten the unit’s working life, protect this unit from direct
sunlight, direct heat and/or moisture.
2.This system is designed to be used on vehicles or boats with 12-Vo l t e l e c t r i c s y s t e m s only.
3.This system is not designed to be used as a replacement for a vehicle’s battery
4.Air Compressor Caution: Only run the air compressor for 10 mins at a time, allow a cooling period
of at least 10 minutes in between uses.

RECHARGING
1. For maximum battery life, your jump starter should be kept and stored fully charged at all times.
Battery life maybe shortened if the jump starter is stored in a discharged state. The table below shows the
relationship of the frequency of use between recharging and the expected number of charge/recharge
cycles.
Tabl e 1.-Battery life
Number of jump-starts between recharging
Discharge and recharge cycles
1
1000+
5
700+
10
500+
2. Battery Recharging Tips
The time required to fully recharge your jump starter after jump-starting an engine is a dependent on how
many jump starts are performed between recharging sessions. Table 2 shows the approximate recharging
times.
Tabl e2 .-Recharging times VS. Jump-starts
Number of
jump-starts
Recharging
Time(in hours)
1
8
2
16
3
24
4
32
5
40
6
48
3. To check the battery charge, press the red button next to the volt meter. This will show you the battery’s
internal charge level.
AC adapter/charger charging:
Plug the Adapter/charger into an AC power outlet and plug the other end (output DC 12V) into the charging
plug socket (beside DC charging LED (No.11, see figure 1) on the front panel of your power pack until the
battery meter shows full (15V DC).
12V DC power cord charging
Insert the power plug of the 12V DC adapter/charger (No.7, see figure 1) into the 12V DC power socket (on
your vehicle or boat) and plug the other end (output DC 12V) into the charging plug socket (beside DC
charging LED No.11, see figure 1) on the front panel of your power pack until the battery meter shows
full(15V DC)

OPERATION
To use your power booster as a 12V DC/DC power source:
1. Lift up the cover of 12V DC cigarette lighter receptacle (see No.1 of figure 1).
2. Insert the 12V DC cigarette lighter plug from the appliance into the 12V DC cigarette lighter receptacle
on the side of your booster.
The following table will give you an idea of what operation time you can expect when starting from a fully
charged system.
Appliance type
Estimated power consumption
(in watts )
Estimated usage time
(in hours )
Fluorescent lights cell phones
4
30
Radios, fans ,depth finders
9
21
Camcorders ,VCR’s spotlights
15
12
Electric tools ,bilge pumps
24
7
Electric coolers
48
3
Air compressors ,car vacuums
80
1.5
JUMP STARTING
For performance when using your power booster to jump start a vehicle or boat, please read and follow these
step by step instructions:
Negative Grounded Vehicle
Connect the red (+) crocodile clip to the red (+) positive battery terminal on the vehicle or boat.
Connect the black (-) crocodile clip to a non-moving metal part of the engine, NOT to the(-) negative battery
terminal.
Wait a minute or two
Switch the vehicle or boat engine ignition to “start” for no more than 5 to 6 seconds.
If the vehicle or boat engine does not start, wait at least 3-minutes before trying again.
Under no circumstances allow the red and black clamps to touch each other or a common contact
Once the engine is running, disconnect the black (-) clamp first and return this cable to its stored position on
the power booster.
Disconnect the red (+) clamp and return this cable to its stored position on the power booster.
As soon as possible connect your power booster system to one of the supplied chargers.
Compressor operation (SWPP9 ONLY): Air Compressor Caution, only run the air compressor for 10 mins
at a time, allow a cooling period of at least 10 mins in between uses.
Be sure main power switch on front face is in the “ON” position.
For tyre inflation use the universal adapter that is attached permanently to the air hose. Place this adapter
(see figure 2, 15) onto the tyre valve, press the adapter lever down to lock onto the tyre valve.
For inflation of leather balls, flotation devices, etc., use the applicable plastic nozzle.
Check pressure gauge (see figure 2, 12), determine the desired pressure.
Turn on power switch (see figure 2, 13)
When the desired pressure is reached turn the compressor switch (see figure 2, 13) off.
Remove the adaptor (see figure 2, 15) from tire or other item being inflated.
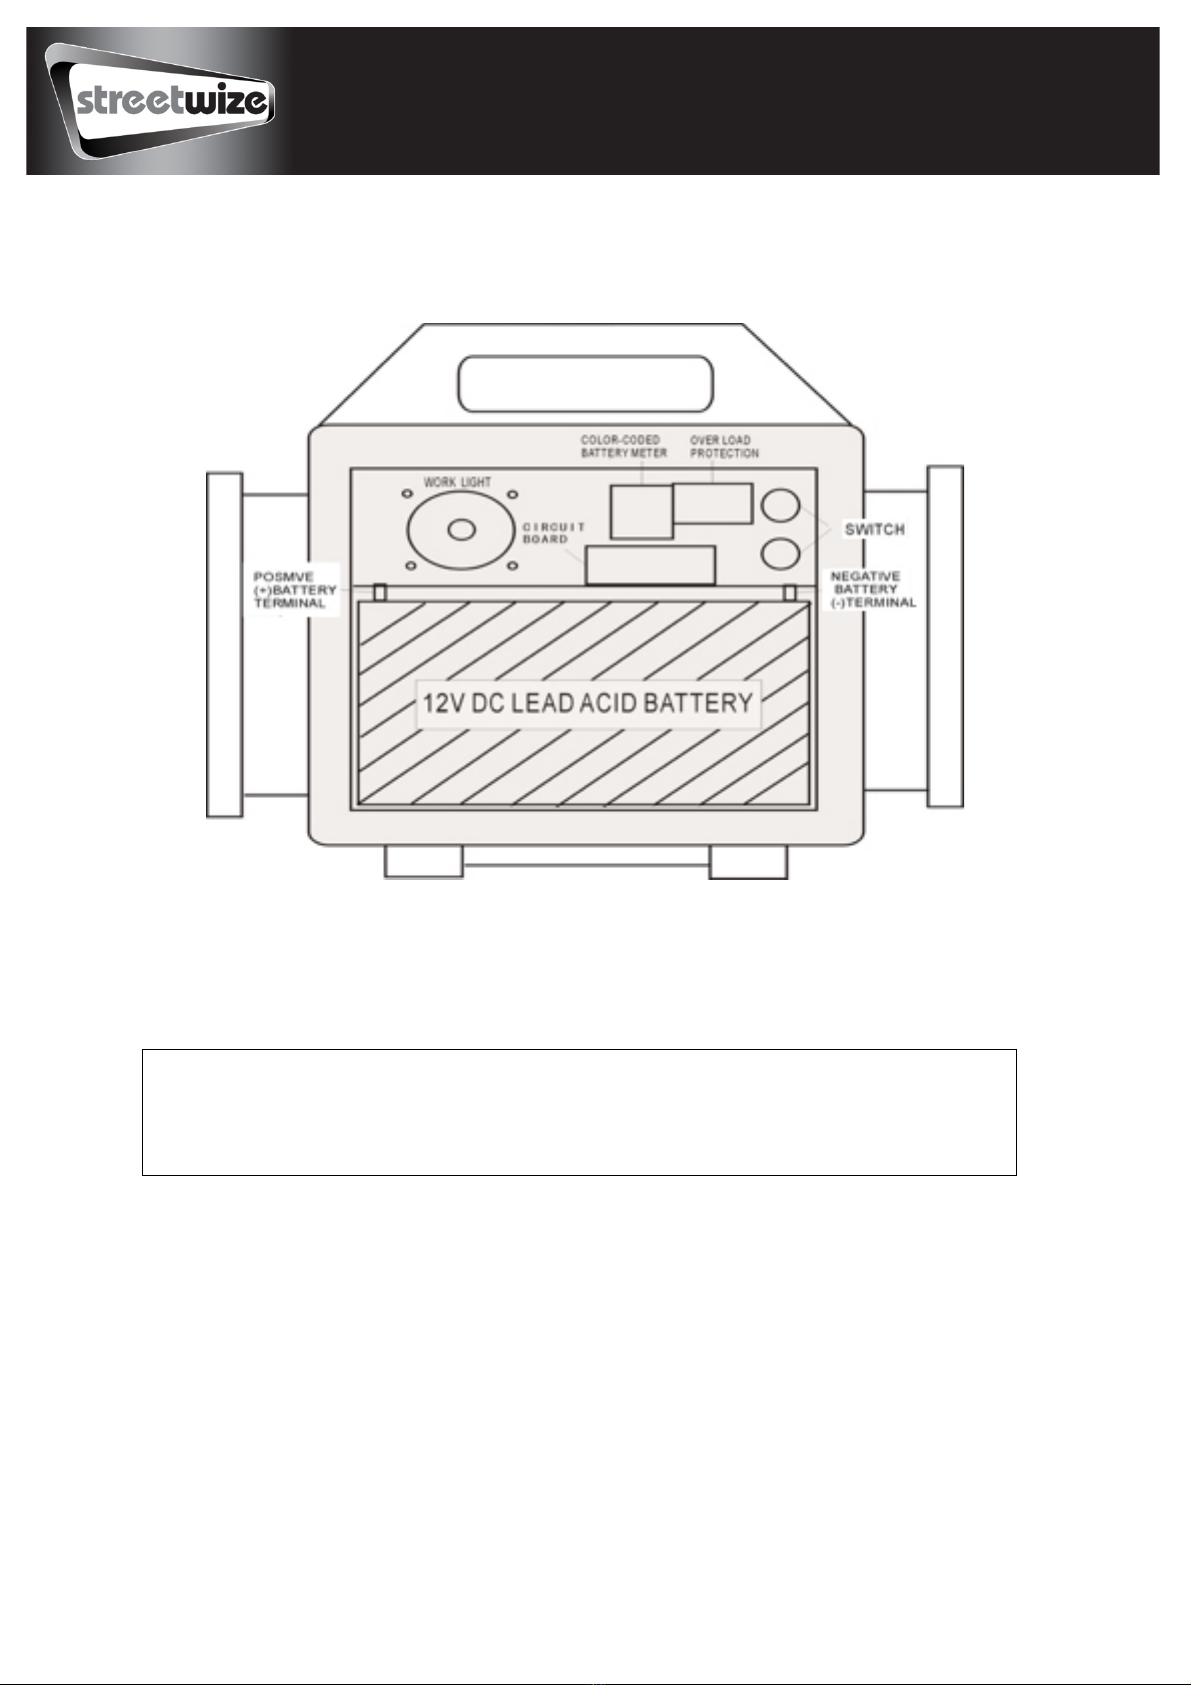
BATTERY REPLACEMENT
Figure 3. shows a back view of your power booster with the cover and eight screws removed. To replace the
battery follow these steps.
1. Unscrew and remove the eight cross-headed screws at the back of your power booster.
2. Lift off the cover plate to expose the battery compartment.
3. Unscrew the two cross-headed screws at the top of the battery.
4. Lift the battery out the battery compartment.
Cautions
To avoid possible damage that may shorten the unit’s working life, ensure that the red and black
recharging wires stay attached with the jumper cables and are not switched.
5. Detach cables and the red and black recharging wires from the battery terminals.
6. Ensure that the replacement battery is oriented with the label out.
7. Ensure that the red cable and red recharging wire are attached to the positive (+) battery terminal (also
marked with red). Attach cables and the recharging wires to the battery terminals.
8. Taking care NOT to damage the circuit board, slide the new battery into position.
EMERGENCY LIGHT-BULB REPLACEMENT
1. Gently squeeze the sides of the emergency light lens bezel together and remove the lens and bezel.
2. Unscrew and remove the faulty bulb.
3. Replace with a new bulb.
4. Snap the lens and bezel in place.

BATTERY DISPOSAL:
The lead acid battery contained in the power booster jump start system should be recycled once it has expired.
Please contact your local solid waste authority for recycling information.
Warning: Do NOT dispose of the battery in an open flame as this may result in an explosion.
Warning: Before disposing of the battery, protect exposed terminals with heavy-duty electrical tape to
prevent shorting (shorting can result in injury or fire). Do NOT expose battery to fire or intense heat
as it may explode.
ENVIRONMENTAL MESSAGE
The crossed out wheelie bin symbol on this item indicates that this appliance needs to be disposed of in an
environmentally friendly way when it becomes of no further use or has worn out. Contact your local authority
for details of where to take the item for re-cycling.
IMPORTANT ADDITIONAL INFORMATION:
This Power Pack is NOT intended for use by persons (including children) with reduced physical, sensory or
mental capabilities, or lack of experience and knowledge, unless they are supervised or have been given
instruction concerning use of the Power Pack by a person responsible for their safety.
Streetwize: Ashburton Road West, Trafford Park, Manchester M17 1RY
For product support:
For trade enquiries:
For spare parts:
www.streetwizeaccessories.com
EU Registered address: The Ace Supply Co (Europe) Ltd, 25 Herbert Place, Dublin 2, D02 A098 Republic of Ireland
This manual suits for next models
1
Table of contents
Other Streetwize Power Supply manuals


