Striking energy G3 1000 G User manual


Instruction Manual
G3 Models
** White Reflector Element (only used for process heating)
Introduction
Congratulations on purchasing South Africa's leading infrared heater. It will provide
you with years of economical and effective heating if properly installed. Our heaters
are virtually maintenance free and easy to install.
Reading through this instruction manual will assist you in installing and operating the
infrared heater in the best possible way.
Features
•Light and durable
•Completely rust free — units are constructed from high grade aluminium and
stainless steel
•Elements are quick and easy to replace
•Easy installation
•Improved and unique reflector design converts 98% electrical energy into heat (short
wave)
•5 year warranty on the body, 1 year warranty on electronics
•Integrated uni-body reflector
•Manufactured in South Africa
•Parts available locally
Short Wave - Quartz Elements
Gold Range
Ruby Range
WR Process **
1000 watt
G3 1000 G
G3 1000 R
G3 1000 WR
1500 watt
G3 1500 G
G3 1500 R
G3 1500 WR
3000 watt
G3 3000 G
G3 3000 R
G3 3000 WR

Safety instructions
•The appliances must be installed by a qualified electrician according to the legal
regulations as published.
•The heater must always be earthed.
•DO NOT cover the heater with anything.
•The heater must be installed at an angle to allow for sufficient airflow.
•If the heater is installed without a plug, or with other means for disconnection from
the supply, a double pole isolator should be used.
•The heater must not be installed in a recessed area. It must always be surface-
mounted and allow for proper ventilation. Do not allow any heat build-up.
•Do not install on any plastic or surface other than cement, steel or concrete.
•Ensure proper insulation when installing on a wooden surface.
•The minimum ventilation openings around the heater, after installation, must be
between 10 cm and 20 cm from the top and sides and at least 150 cm away from
any combustible materials (curtains, paper etc)
•Remove the foam that protects the lamp during transit before operating the heater.
•The heater MUST be installed above 1,8 m from the floor surface.
•Ensure that the heater is properly fixed using the supplied swivel brackets.
•Permanent wall plugs and or screws should be used.
•Do not use any form of adhesive tape or temporary fixing.
•If the supply cord is damaged, it must be replaced by the manufacturer, its service
agent or similarly qualified persons to avoid a hazard.
•When installed in a bathroom / Jacuzzi area, install in such a way that the heater,
switches and other controls cannot be touched by a person in the bath

Tools required for installation
Unpacking
•Carefully remove the heater from the box.
•Remove all plastic and white polystyrene packing aids.
•Remove the protective foam from behind the element.
•Ensure that the wall brackets, plugs and screws are removed from box.
•Never touch the element.
•For cleaning purposes, use an alcohol base cleaner.
Choosing your position
There are a number of products and installation methods you can choose from.
Understanding the characteristics of infrared heat will assist you in selecting your
ideal position. This is not an exact science and the averages discussed here should be
more than sufficient.

Shade: Infrared heat is actually light rays — like the sun. It therefore has shaded areas.
Imagine your heater is a light. The shadow areas will not receive direct heat, although
it receives a lower level of “scattered” light. The more heaters you install in an area,
the higher the “scattered heat” will be. If you use more than one heater in a specific
area, try and position them either in a zig-zag pattern or opposite each other.
Direction: At 12 o’clock (noon) the sun shines almost directly from above and is warmer
than during early morning, because there are less shadow areas. This is the same with
Infrared. The larger the angle (when wall mounted) the more shade is introduced.
Sensor and dimmer units must not face downwards.
Height vs wattage: The higher the installation, the less heat reaches the target. The
ideal height for a 1500 watt heater is between 1,8 m and 2,5 m. If installation is only
possible higher than 3 m, then consider the 3000 watt heater. Sometimes it is more
economical in terms of cost to rather use a 3000 watt heater at a height of 3,5 m to
cover an area, than 2 x 1500 watt heaters at the same height.
Current available: Each 1500 watt heater draws about 8 ampere, while a 3000 watt
heater draws about 16 ampere. A typical residential “trip switch” can accommodate 2 x
1500 watt heaters or 1 x 3000 watt heater. If you require more than that, you will have
to run a separate supply from the distribution box. Industrial clients must ensure that
they have sufficient amperes available for larger installations. To be legally complaint,
all installations must be done by an electrician.
Location: Always keep the area that you are living in or the positioning of the
installation (e.g., south) in mind. You will have to compensate for this. You can either
install more heaters by moving them closer together, or use the double element units.
If you stand beneath the heater the effective heating area will be:
•Single element heaters: 4 metre to the front and 2 metres to each side of the
heater
•Double element heaters: 5 - 6 metres to the front and 2.5 to 3 metres to each side
Position the heater according to this heat spread.
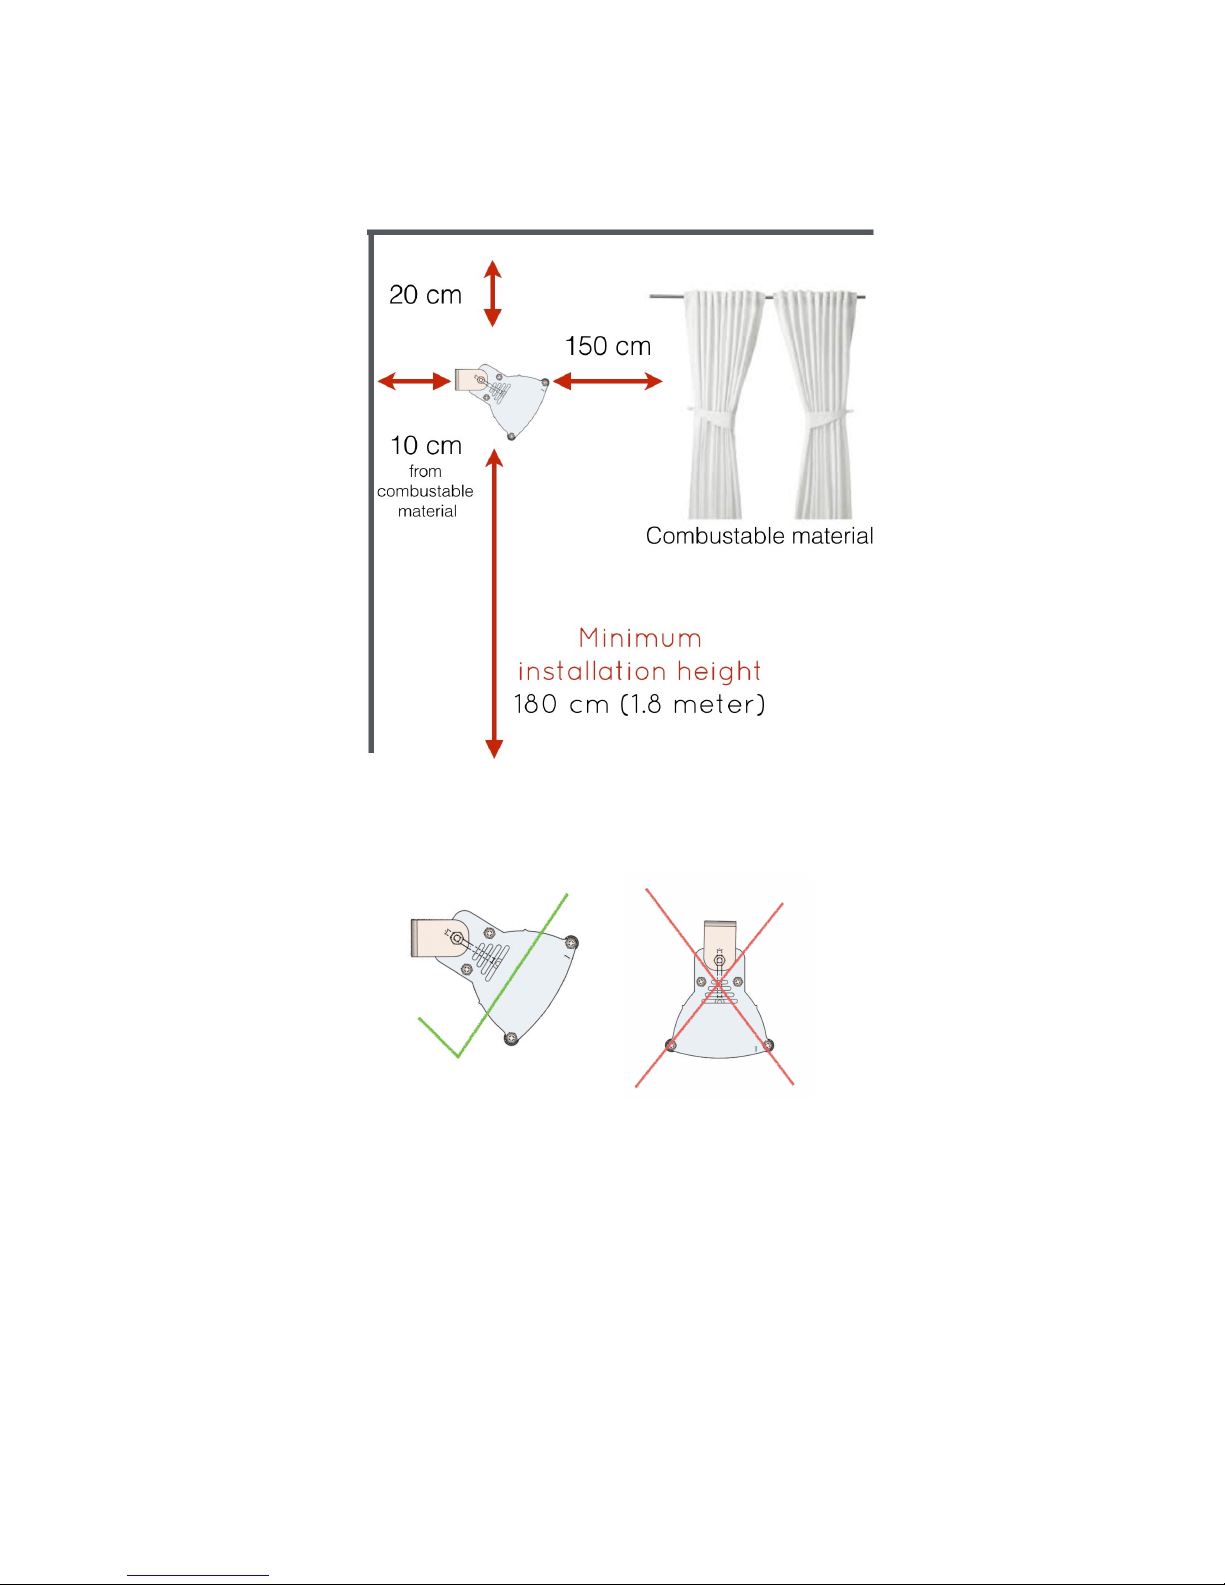
Safety installation distances
!
Limited Ventilation on all heaters - Do not mount heaters facing
straight down in areas with limited ventilation.
Always ensure that heaters are mounted on non-combustable
material.

Installation
•Mark two holes on the wall, indicating the position that you want to install the
heaters. The different distances between the respective holes are:
•Single element models: 300 mm
•Double element units: 660 mm
•The recommended installation height is as follows:
•1500 watt models: 1,8 m — 2,5 m above floor height
•3000 watt models: 2500 mm — 4000 mm above floor height
•Ensure that you adhere to all safety distances as per the diagram in this manual.
•Drill a 6 mm hole about 70 mm deep on both positions
•Fix the L-bend wall brackets using the supplied 6 mm anchor screws. The slotted part
of the bracket goes against the wall and the 5 mm hole against the heater. Do not
tighten the bracket yet.
•If you mount the heater on wood, or drywall, etc., ensure that you use the appropriate
screws and isolation between the bracket and the surface.
•Fix the heater to the wall brackets using the supplied M5 washer and hex bolt. Move
the wall brackets either left or right in the slot to ensure a tight fit.
•Swivel the heater to the desired position and tighten the bolts.
•Connect the electrical wire to the supply as per building regulations.
Installation on a portable stand
•Do not use this heater in the immediate surroundings of a bath, a shower or a
swimming pool.
•Do not use the portable stand indoors or near any combustible materials, couches,
carpets, etc.
•Ensure that the electrical cable is secure and not crossing any walkways.
•Remove any wall brackets from the heater
•Fit the Supplied stand bracket to the centre of the heater using the M5 Hex screw.
•Fit the complete unit on the stand using the M10 wing nut
•Let the heater cool down for 5 minutes before you move the stand.

Operating the heater
•This appliance is not intended for use by any persons (including children) with
reduced physical, sensory or mental capabilities, or lack of experience and
knowledge, unless under supervision or if they have been given instruction
concerning the use of the appliance by a person responsible for their safety.
•Children should be supervised to ensure that they do not play with the appliance.
•Do not cover or obstruct the heater at any time.
•Do not use this heater with a programmer or timer that switches the heater on
automatically, since a fire risk exists if the heater is accidentally covered or
positioned incorrectly.
•The fireguard grid does not give full protection. Refrain from touching the element.
•Do not insert any object through the front grid or opening in the heater.
•Do not leave the heater unattended. Always switch off before leaving the room/area.
•Do not stare at the element while it is switched on. Since infrared is actually light,
prolonged staring at the element may cause damage to the eyes.
•Keep combustible materials such as furniture, papers, clothes and curtains at least 1,5
m away from the front of the heater.
•The heater can be used outside, but must be sheltered from any rain/water.
•The heater is NOT waterproof, but is safe for using in a humid environment.
•Disconnect the unit from the mains during installation, when cleaning and/or when
replacing the element.
•To avoid risk of burns, always ensure that the element and heater body had sufficient
time to cool down before cleaning.
•Do not handle the halogen element with bare hands. If it is inadvertently touched,
remove any and all finger marks with a soft cloth and methylated spirit or alcohol.
Otherwise, the marks will burn into the element causing premature heater failure.
•Do not touch the element with any object (including cigarettes).
Cleaning the heater
Your infrared heater should be cleaned once a year. Installations in coastal areas will
require more frequent cleaning, possibly once a quarter.
•Ensure that you have disconnected the heater from the electrical supply and that the
unit has sufficiently cooled down.
•If there is only dust on the inside, you can clean the inside by blowing compressed air
over the surface.
•Remove the fire grid in front of the heater by pulling it carefully to the front.
•Unclip one side first then the other.
•General dishwasher soap and water will clean the inside and outside of the body.
•Be sure not to touch the element with bare hands.
•Should you accidentally touch the element, clean the element with a paper towel
dipped in either alcohol or acetone (like Cutex remover). Never use soap to clean the

element, as any fatty/soapy marks on the element will permanently damage the
element when switched on.
•Clean the inside of the heater at least annually to remove any dust and dirt build-up.
This will ensure optimal reflection of the infrared beams and prolong the life of the
heater.
Element Replacement
Replacing the glass element
(Tools required: Pliers, 3 mm Allen Key, Philips screwdriver.)
** These steps are for earlier units with 2 Screws holding the element holders in place:
1. Disconnect the power supply completely and ensure that the element is not
illuminated and that the heater body and element are cool.
2. Remove the grid by pulling it carefully to the front. It should “pop out” of the
grooves. It will help pulling on the centre part while keeping the sides down with
your hands
3. ** Remove the 2 screws in the element holders using a Philips screw driver. Keep all
parts safe.
4. Remove the back cover slowly while feeding the grey silicone wire through the hole.
5. Tilt the heater facing downwards or should you prefer — remove the heater from
the brackets and place on an even surface.
6. Unscrew the 2 screws at the back using the 3 mm Allen key. Keep the M5 x 25 mm
screws safe.
7. Slowly pull the element out to the front while feeding the wires.
8. ** Take the 2 spacing washers out that are on the element wires and keep them safe.
Discard the element.
9. Remove your new element from its box. Rather tear the box than pull on the
element. Be careful not to break the white end caps. Leave the white sponge around
the element.
10.Slowly and carefully insert the new element from the front through the holes and
clip the white ceramic blocks onto the lamp holder clips.
11. Be careful not to touch the element with your bare hands
Assemble
1. ** Replace the lamp holders and tighten lightly using a Philips screwdriver.
2. Connect the new wires with the same ceramic connectors.
3. Replace the back cover and secure with the Allen key.
4. Remove the sponge from the element
5. Tilt the heater and fix.
6. Clip the grill back in.
7. Reconnect the electricity.

Original Model 3: Parts diagram and exploded view
Updated Model 3 : Parts diagram and exploded view
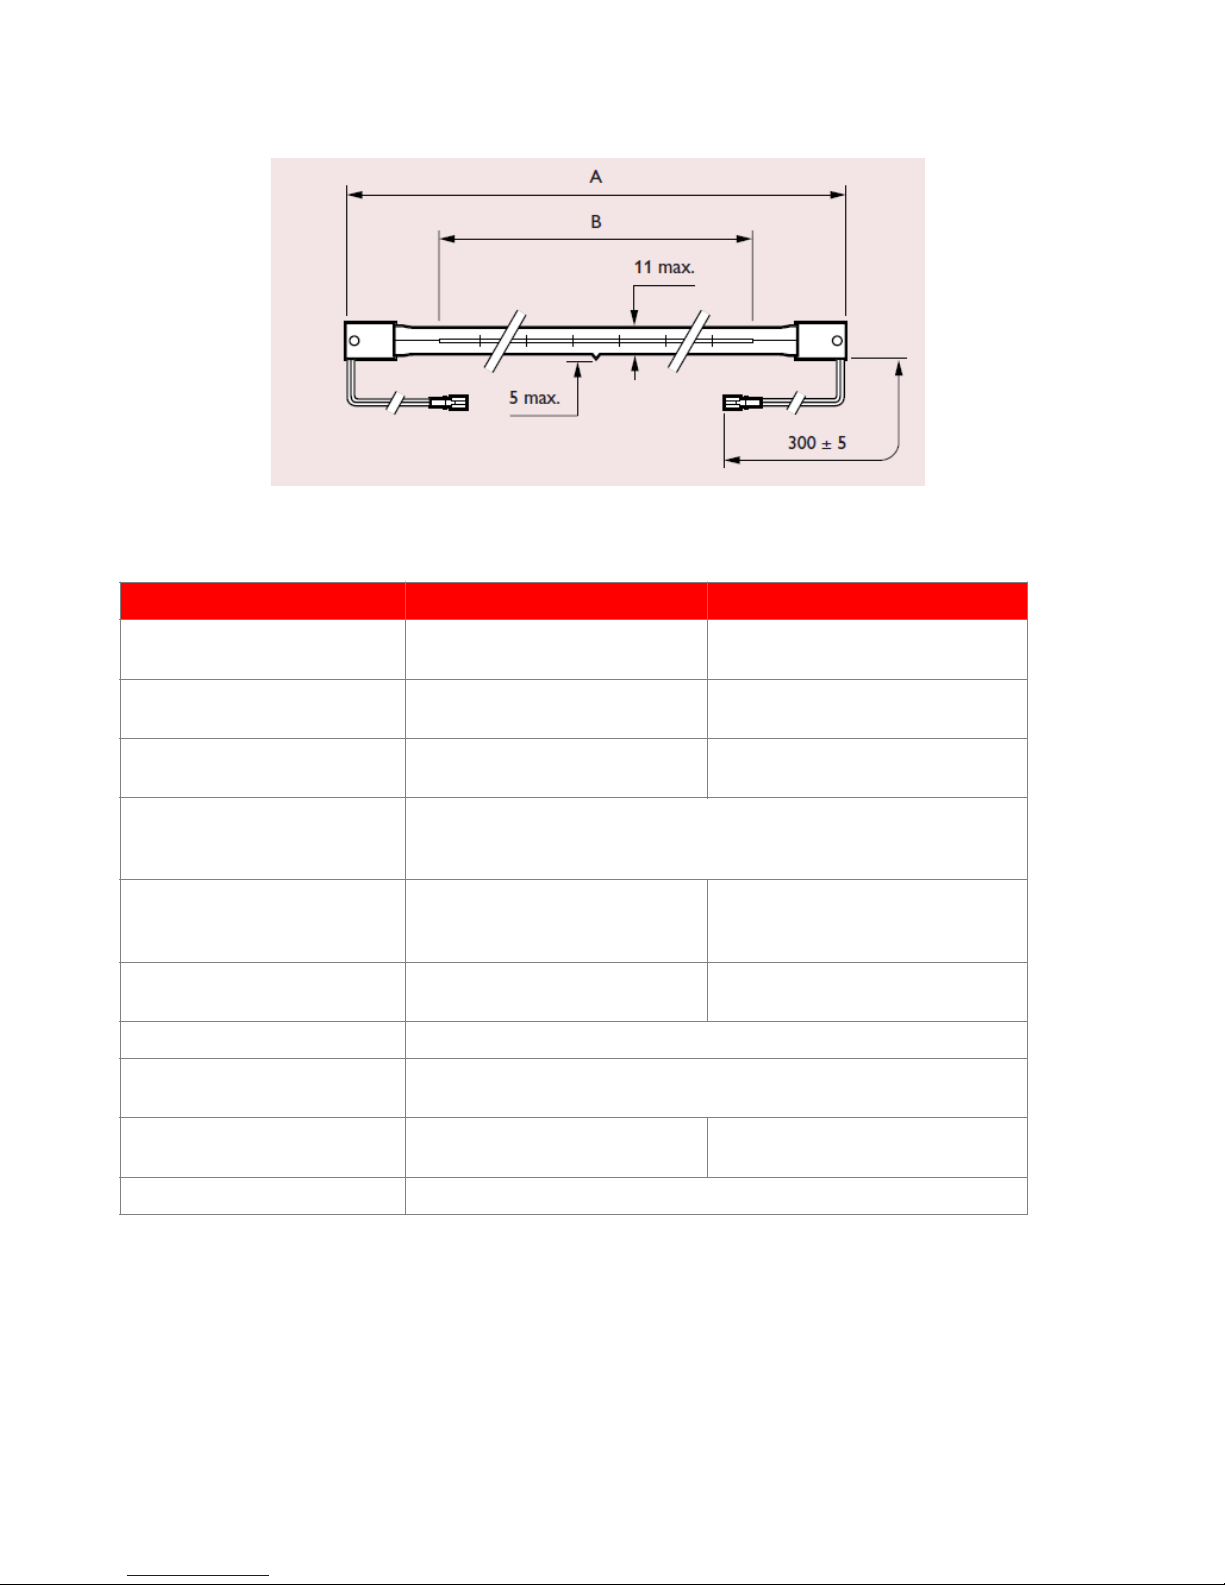
Heating element
specifications
LampType / wattage
Single Element
Double Element
Gold Range
1000 watt
1500 watt
3000 watt
Ruby Range
1000 watt
1500 watt
3000 watt
White Reflector Range
1000 watt
1500 watt
3000 watt
Material
Aluminium (6063,1200H4), Stainless Steel 304
Safety grid: Electro polished Stainless Steel
Electrical requirements
230 Volt
50 Hz
1500 watt – 7 Amp
230 Volt
50 Hz
3000 watt – 14 Amp
Overall Dimensions
(Width x Height x Depth)
370 x 84 x 105 mm
730 x 84 x 105 mm
Burning position
Horizontal as well as vertical position.
Element Life
Half life of 5000 hrs for Ruby and Gold
Electrical Cable
3 Core 1,5 mm Silicone heat
resistant cable. Open ended
3 Core 2,5 mm Silicone heat
resistant cable. Open ended
Warranty
5 Years on body, 1 year on electronics

Updates to these instructions are available from our website.
Visit www.striking.co.za
VERSION 5 April 2017
© Striking Energy
This manual suits for next models
8
Table of contents
Other Striking energy Heater manuals


