Strong SRT 5500 User manual

Twin Tuner DVR
User’s Manual


1
Table of Contents
Table of Contents……………………………………………………….1
Safety Instructions……………………………….………………2
About the Twin Tuner DVR…………………...………………3
Front Panel and Rear Panel……………………………….……………4
Front Panel……………………………………………………………..4
Rear Panel………………………………………………………………4
Remote Control………………………………………………………..5-6
Using the remote control………………………………………………7
Connecting to Equipment…………………………………………8-10
Main Menu…………………………………………………11-15
Basic Operation………………………………………………16-21
Recording function………………………………………….22-27
Electronic Program Guide (EPG)……………………29-31
Network …………………..………………………………………….32-43
Troubleshooting………………………………………………………44
Technical Specification……………………………………………45-46
Warranty Information……………………………………..………47

2
Safety Instructions
•Always read the safety instructions carefully.
•Keep this User's Manual for future reference.
•Keep this equipment away from humidity.
•Lay this equipment on a stable flat surface before setting it up.
•Do not place it on soft furnishings.
•If any of the following situation arises, get the equipment checked by a service
technician:
- The equipment has been exposed to moisture.
- The equipment has been dropped and damaged.
- The equipment has obvious signs of breakage.
- The equipment has not been working well or you cannot get it to work according to
the User's Manual.
Warning
•To prevent the risk of electric shock, do not open the cover or the back of the
receiver.
•Do not block the ventilation holes of the device. Leave appropriate gap above and
around it to allow for adequate ventilation.
•Do not place the device in an unventilated cabinet or on top of a unit which emits
heat.
•To reduce the risk of fire or electric shock, do not expose this apparatus to any
liquids or extreme heat.
Copyright Statement
No part of this publication may be reproduced in any form by any means without the
prior written permission. Other trademarks or brand names mentioned herein are
trademarks or registered trademarks of their respective companies.
Disclaimer
Information in this document is subject to change without notice. The manufacturer
does not make any representations or warranties (implied or otherwise) regarding the
accuracy and completeness of this document and shall in no event be liable for any
loss of profit or any commercial damage, including but not limited to special, incidental,
consequential, or other damage.
This symbol indicates that this product incorporates double insulation
between hazardous mains voltage and user accessible parts. When
servicing use only identical replacement parts.

3
About the SRT 6100
Thank you for choosing the SRT 6100. With its Twin Tuner’s and HDMI 1080i
connection, you can watch all new digital DVB-T channels in High Definition.
To get the best of the High-Definition programs, we advise you to connect the
receiver:
-To your television with an HDMI cable for superior picture quality.
-To your home theatre via digital coaxial or optical cable output for a superior
sound quality.
Please note HDMI and digital coaxial cables are sold separately
Main Features:
zDVB-T Twin Digital Turners
zDVR Recording: Record two channels while watching a 3rd from same network
zSmart Series Record feature to record a whole series at a touch of a button
z3.5” Sata Hard disk: 1TB
zTimeshift Function
zHDMI Digital Output
zDigital Optical and Coaxial output 5.1
zCVBS/ YPbPr/SPDIF connectors
zSupports TV formats 4:3 and 16:9
z7 + 1 Days Electronic Guide Program (EPG)
zParental Control
zCopy files from internal HDD to external HDD
zUSB 2.0 Interface
Package Contents
Before installation, please check the items of the package.
The package should contain the following items:
zHDDVR x1
zRemote Control x1
zUser Manual x1
zInsert Card x1
zAV Cable x1
zY/Pb/PrCable x1
z“AAA” Batteries (for remote) x2

4
Front Panel and Rear Panel
Front Panel
1. STANDBY button: To turn ON/OFF the Standby Mode.
2. USB Slot: Connect for software upgrades.
3. MENU: To enter the Main Menu.
4. OK: To confirm the selected menu item.
5. CH-/+ : To change the channel up/down.
6. VOL-/+ : To control the level of the volume.
Rear Panel
1. LOOP OUT: Loop Out RF signal to second tuner.
2. ANT OUT: RF signal output to other reception equipment such as TV.
3. ETHERNET: Connect to network.
4. OPTICAL: Digital audio output.
5. USB: Connect for software upgrades.
6. HDMI: HDMI to connect to your TV in high definition.
7. Y/Pb/Pr: Output Y/Pb/Pr video signal to TV (support high definition output).
8. ANT IN: Ant In is where you connect theAntenna.
9. LOOP IN: RF signal input to connect RF loopback cable.
10. VIDEO: VIDEO output to connect to your TV.
11. Audio(L/R) Outputs: Output left/right audio signal to TV or amplifier.

5
Remote Control
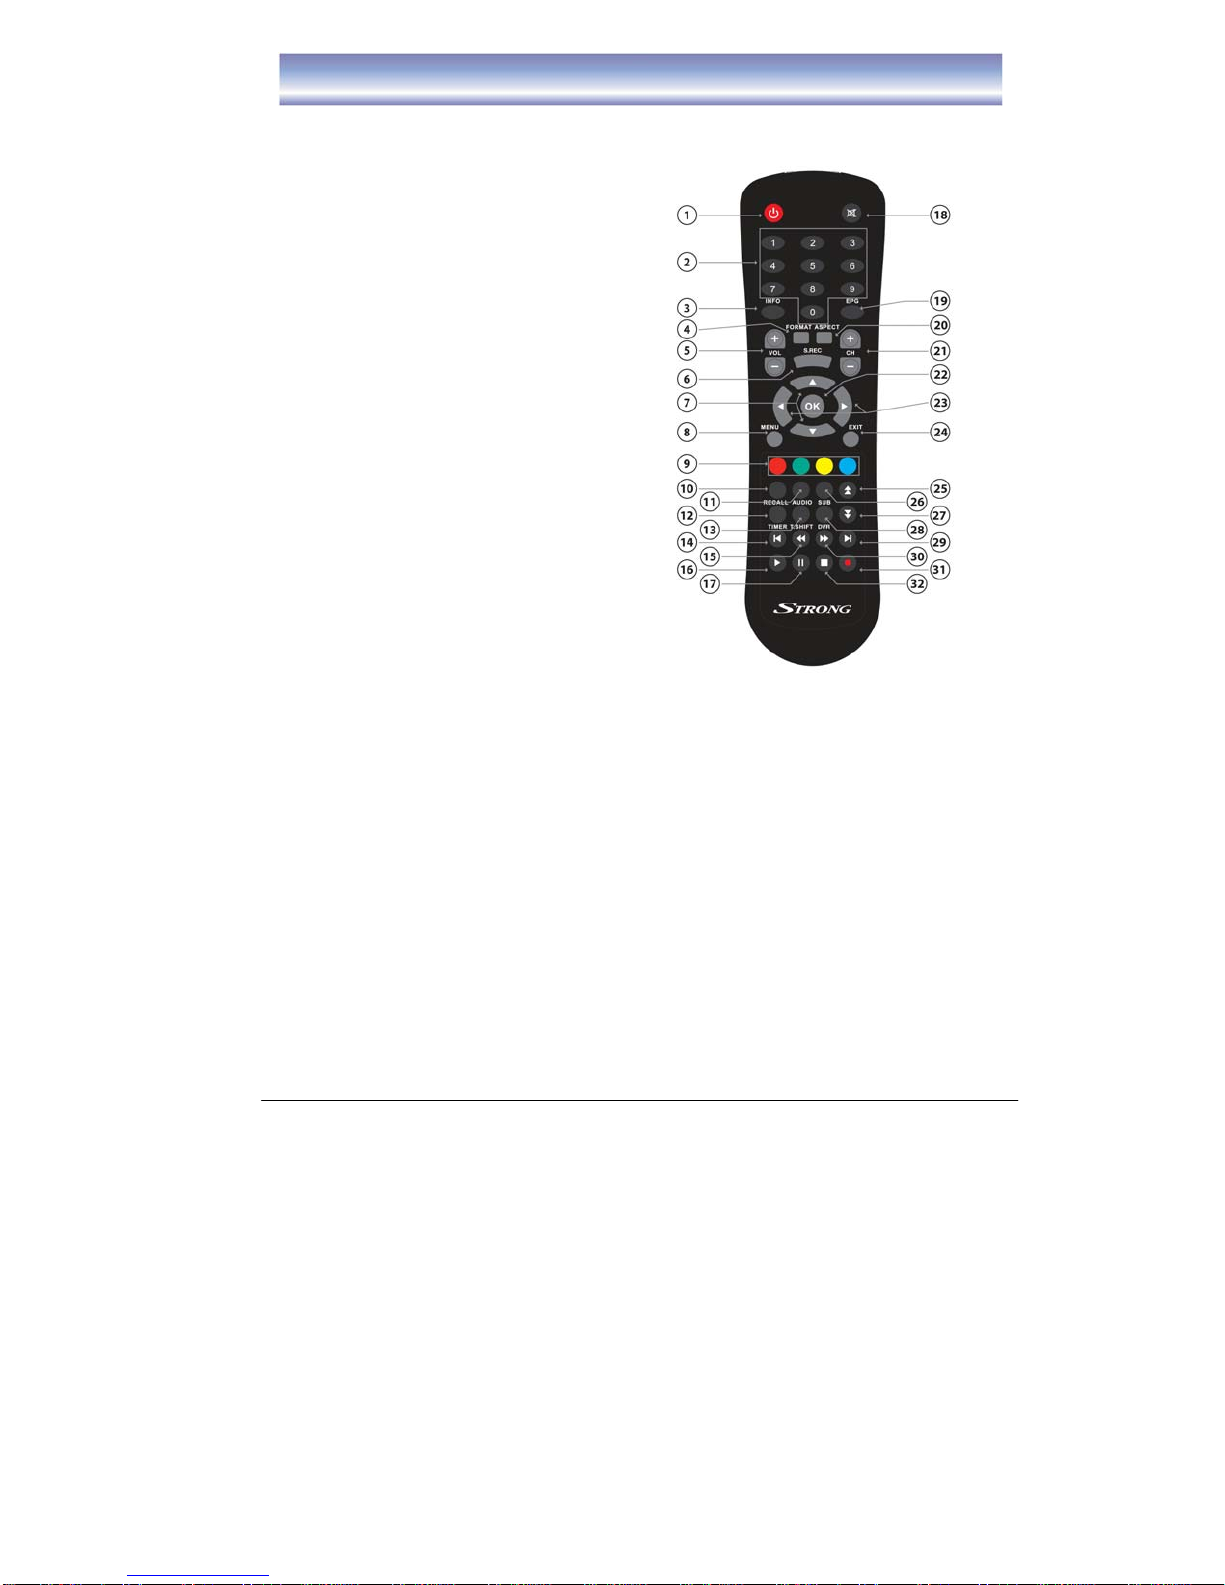
Remote key functions:
1. POWER: To turn the standby mode
ON/OFF.
2. Numeric buttons (0-9): To enter
numeric options in menus and to enter a
channel number directly.
3. INFO: To display the current program
information.
4. FORMAT:To switch between the
different video resolution options
(1080p, 1080i, 720P, 576i supported).
5. VOL+/-: To control the level of the
volume, up or down.
6. S.REC: To select series recording
7. ▲▼: To change the program up or
down or to move the selection up/down
in the menu mode.
8. MENU:To enter into the main menu,
Press again to return to previous menu.
9. 4 COLOR KEYS: Used in DVR
function.
10. RECALL: To view the previous
program.
11. AUDIO: To display the Audio info of the
selected program.
12. TIMER: To add a new timer for
recording.
13. TIMESHIFT: To activate and cancel time shift feature.
14. SKIP BACK: To skip back 30 seconds of a recorded program during playback
(in time shift or DVR mode).
15. REW: To rewind a recorded program during playback or time shift (supported 2X,
4X, 8X, 16X, 32X, 64X).
16. PLAY: To play a recorded program or to resume time shift.
17. PAUSE:To pause the current program and activate Timeshift or recorded
program during playback. Press again to resume program or playback.
18. MUTE: To mute the sound, press again to restore sound.
19. EPG:To access Electronic Program Guide
20. ASPECT: To change aspect ratio(16:9, 4:3 letter box, Pan Scan)
21. CH+/-: To change the channel up or down.

6
Remote Control
22. OK: To confirm the selected menu item or to open the program list.
23. ◀▶:To control the level of the volume or to move left/right in menu mode.
24. EXIT: To cancel an operation or exit the menu directly.
25. PAGE UP:To move to the next or previous page.
26. SUB:To switch the subtitles ON/OFF.
27. PAGE DOWN:To move to the next or previous page.
28. DVR: To enter the recorded programs list.
29. SKIP FWD: To skip forward 30 seconds of a recorded program during playback
(in time shift or DVR mode).
30. FF: Tomove forward a recorded program during playback or time shift (support
2X, 4X, 8X, 16X, 32X, 64X).
31. REC:To start an instant recording on current channel.
32. STOP: To stop playback of recorded program or to stop time shift.

7
Using the Remote Control
1. To use the remote control, point it towards the front of the SRT 6100.
2. The remote control has a range of up to 7 meters from the SRT 6100 at an angle of
up to 60 degrees (30 degrees for left hand side, 30 degrees for right hand side).
3. The remote control will not operate if its path is blocked.
Note: 1. Sunlight or very bright light will decrease the sensitivity of the remote
control.
2. Old Batteries will decrease the sensitivity of the remote control.
Installing the Batteries
Remove the battery cover from the remote control and put two AAA size batteries
inside the compartment.
The diagram inside the battery compartment shows the correct way to install the
batteries.
Caution:
1. Keep batteries out of children’s reach.
2. Don’t attempt to recharge, short-circuit, disassemble, heat or throw the batteries
into the fire.
3. Always replace both batteries at the same time. Never mix new and old batteries or
batteries of a different type.
4. If you don’t intend to use the remote control for an extended period, remove the
batteries to prevent possible leakage and corrosion.
5. Do not drop, apply shock or step on the remote control.
6. Do not spill water on the remote control.
Notes: If the receiver does not operate when operating the remote control from a
close range, you need to replace the batteries.

8
Connecting to Equipment
How to get good reception
• You do not need to change or replace your existing TV antenna to receive digital
signal. However, if your antenna is not in a good condition it is recommended that you
consider replacing it to ensure uninterrupted digital television viewing.
•Viewers in areas of poor analog reception may need specialists’ advice about
antenna requirements for digital reception in their area.
•It’s recommended that viewers use quad shielded cable from the antenna to the
receivers.
Connections to a TV
There are several ways of connecting this unit to the TV and Hi-Fi System. For High
Definition viewing your TV must support either, 720p, 1080i, 1080p resolution. Also
the connection between the unit and TV must be either YPbPr Component or HDMI.
Other connections will provide Standard Definition viewing.
Warning
Please switch OFF the mains power before plugging or unplugging connected cables,
otherwise, it may damage this unit!
Connect the unit via Video and Audio
(for Standard Definition viewing)
1. Connect the antenna with ANT IN of the unit.
2. Connect the RF loop cable via LOOP IN and LOOP OUT.
3. Connect the unit via Video/Audio L/R.

9
Connecting to Equipment
Connect the unit via YpbPr output and Audio output
(for high definition viewing)
1. Connect the antenna with ANT IN of the unit.
2. Connect the RF loop cable via LOOP IN and LOOP OUT.
3. Connect the unit to TV via YPbPr cable as below.
Connect the unit via HDMI output
(for high definition viewing)
1. Connect the antenna with ANT IN of the unit.
2. Connect the RF loop cable via LOOP IN and LOOP OUT.
3. Connect the unit to TV via HDMI cable as below.

10
Connecting to Equipment
Audio connections via SPDIF/Mixed Audio L/R Output
1. Connect the antenna with ANT IN of the unit.
2. Connect the RF loop cable via LOOP IN and LOOP OUT.
3. Connect the unit to TV via AV cable as below.

11
MAIN MENU
Press [MENU] to open MAIN MENU. Description of each item is listed below:
Channels
Press [OK]/[▶]to enter the Channel List.
Electronic Program Guide Menu
Press [OK]/[▶]to enter EPG List.
zVertical EPG
zHorizontal EPG
DVRMenu

12
Press [OK]/[▶]to enter DVR List.
zMedia Browser for playback of media files.
Files supported- mpg,ts, trp, wmv, mp4, mkv, flv, avi, mov, vob, mp3, wav format.
zTimer List
To manage your timer recordings
zStorage
zTo view the status of the Hard disk
zFormat the HDD (this will delete all files)
zDVR Setting
zTime Shift Function
-Enable or Disable Timeshift
zTime Shift Duration
-To set the desired Time Shift time, 30
minutes to 2 hours is available.

13
MAIN MENU
zRecording Storage
-To select the storage device for recording. All related files for incoming
recordings will be stored on the selected drive.
-There are 3 options: Inner HDD (Built-in Hard disk), external HDD
connected to either USB1 (rear USB slot) or USB2 (front USB slot).
zPlayback Start Position
-To select the start point for playing recorded programs
-Available option: Beginning, Continuing (Continuing will begin playback
from last viewed position)
zAuto Play Next Program
-Available option: Enable or Disable
-Selecting “Enable”, the SRT 6100 will play the next recorded program in
the list once the current program is finished.
-Selecting “Disable” the SRT 6100 will
only play the program which was
selected.
NETWORK Menu
Press [OK]/[▶]to enter Network Menu.
zInternet Radio
zNetwork Neighborhood
zWeather
zNetwork State

14
INSTALLATION Menu
Press [OK]/[▶]to enter Installation Menu.
zAuto Channel Search (please refer to page 15 for detailed instructions)
zManual Channel Search (please refer to page 15 for detailed instructions).
SETTINGS Menu
Press [OK]/[▶]to enter Setting Menu.
MAIN MENU
Audio & Video Output Setting
zVideo Resolution: Select video output
resolution
Available options: 1080p, 1080i, 720p,
576p and 576i
zTV Aspect Ratio: Select the suitable
aspect ratio for your TV
Available options: 16:9, 4:3
zAspect Ratio Conversions:
Available options: Full, Letter Box, Pan
Scan
zDigital Audio Format
Available options: PCM, Bit Stream
zStandby Mode
Available options: Passive, Active
zTime
zMode
zDisplay current date
zDisplay current Time
zDaylight Saving Time
zRegion

15
zParental Control
zCensorship
zInstallation Menu
zSetting Menu
zDVR Menu
zNew Password
zConfirm Password
Note:
(1) If you select “Lock” in the Installation Menu/Setting Menu and DVR Menu, when
you select these menu options in the future you will need to enter a password to gain
access.
(2) The Factory default password is “0000”.
MAIN MENU
OSDSettings
zOSD Transparency
zInfo Box Display Time
zSystem Information
Press OK to view the system information of
the unit.
zFirmware Update
-To upgrade the software of the unit.
(Details please refer to page 18)

16
zFactory Default
-Restore to factory default setting
(Details please refer to page 18)
Basic Operation
Scanning for channels
1. Press [MENU] and then press [LEFT]/[RIGHT] and highlight [Installation].
2. Press [OK] /[▶] to enter [Installation] menu.
3. Press [UP]/[DOWN] to select “Auto Search” and press [OK], the unit will start
to scan all available channels.
4. OR you can use the Manual Search option to search for specific channels.
Once you have entered the [Installation] menu, use [UP]/[DOWN] to select and
enter “DTV Manual Search”.
a) Press [▲][▼] to view the channel frequency
b) Press [OK] to confirm the channel frequency to search
c) Press RED button to begin scan

17
Changing Channels
1. Open Channel List menu by pressing [OK]
in Live TV Mode.
2. Press [UP]/ [DOWN] key to navigate
through available channels.
3. Press [OK] key to view the selected
channel.
4. Channel Change can also be done by:
zPress [CH+][CH-] in Live TV Mode.
zInput the Channel number using the
numeric keypad in Live TV Mode.

18
Note: When recording 2 programs, only channels associated with the 2 networks will
be able to be viewed. A red square indicates channels being recorded.
Basic Operation
Channel Info Banner
1. Open Info Banner by pressing [INFO] in Live
TV Mode.
2. Info banner shows the current and next
program and the relative information of the
program.
3. To clear info banner press [EXIT].
4. When recording, the record status will be
shown in the top right corner of the screen.
Changing Volume
This manual suits for next models
1
Table of contents
Other Strong DVR manuals