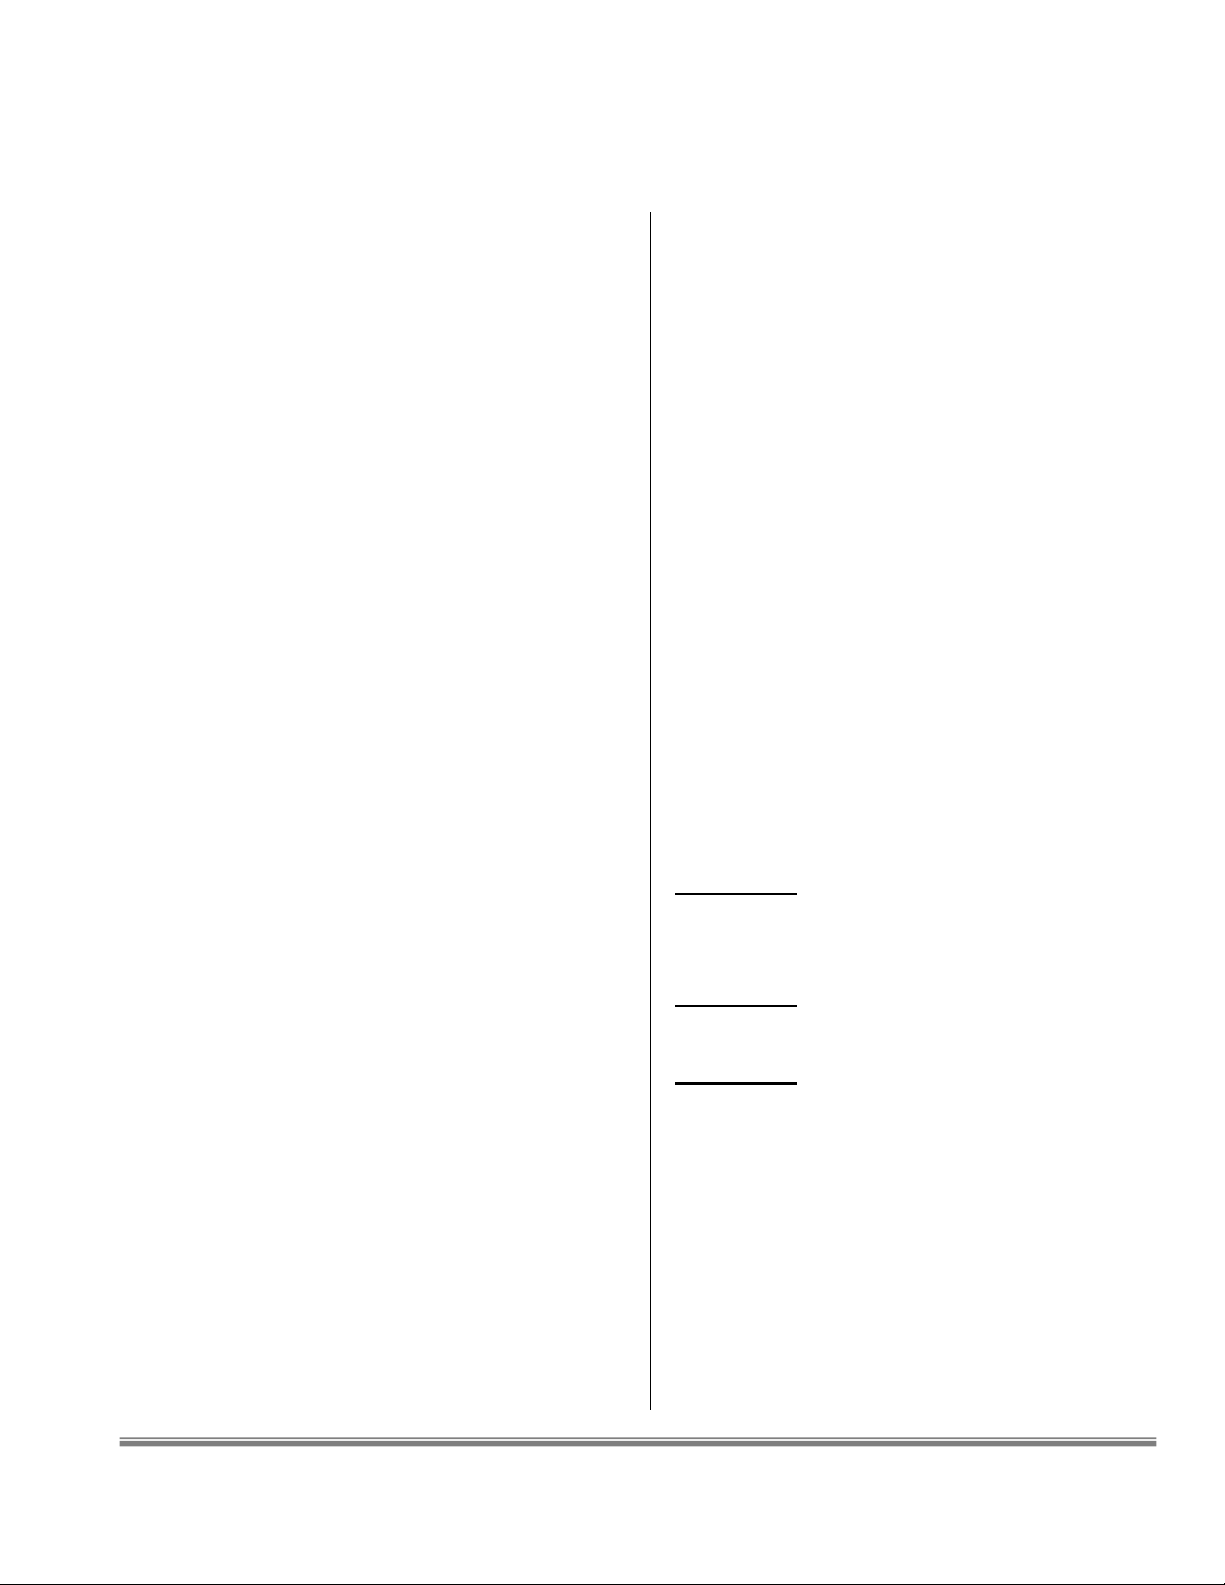
DEZ SERIES 1000 INSTALLATION,OPERATION AND MAINTENANCE MANUAL
4
Whenever the nature of the
operation permits, keep one hand away from
the equipment to reduce the hazard of current
flowing through vital organs of the body.
Never work on electrical
equipment unless there is someone nearby
who is both familiar with the operation and
hazards of the equipment and competent to
administer first aid. When operators aid the
technician, the technician must warn them
about dangerous areas.
Do not be misled by the term
"low voltage" which may appear in this manual
or on drawings or documents in the Technical
Data Package. Electrical voltages as low as 50
volts can cause death under certain conditions.
Multiple power sources may be
used in the unit. Ensure power is disconnected
from all sources before servicing powered
components.
Do not touch hot system
components. The design reactivation
temperature range is 250–300 °F. The
components of the reactivation system may be
extremely hot during operation. Be absolutely
certain that the unit and/or reactivation
components are cool before attempting to work
on or near them.
Unless otherwise specifically
instructed, do not operate the equipment
without all grilles, guards, louvers and covers
in place and tightly secured. When instructed
to operate without a grille, guard, louver or
cover in place, do so with care.
Blower motors may start
unexpectedly when the unit is running due to
an automatic resetting of the internal overload
device.
Do not allow anyone under the
equipment while it’s suspended from a lifting
device.
Do not allow the unit to swing
while suspended from a lifting device. Failure
to observe this warning may result in injury to
personnel and damage to the equipment.
!
CAUTION
Ensure that the dehumidifier is
properly phased. Improper phasing can cause severe
damage to the equipment.
!
CAUTION
Air intake and discharge openings
must be completely free of obstructions. Ensure
panels are on and properly secured into position.
!
CAUTION
Do not operate the unit without
filters. It is better to operate the unit with dirty filters
than no filters. Operating the unit without filters may
void the warranty.
1.4 Theory of Operation
The DEZ Series 1000 dehumidification system is
designed to dehumidify a space to a level below that
attainable with a refrigeration-based dehumidification
system. Moisture is removed from the air by being
passed through a desiccant wheel (called the “rotor”)
that is impregnated with a dry desiccant. Process air
(the air being dehumidified) is filtered, dehumidified
and supplied to a conditioned space at a lower relative
humidity and a slightly higher dry bulb temperature
than its inlet condition.
Simultaneously, a second airstream (reactivation air)
is filtered and heated by a reactivation heater system,
then passed through a separate segment of the rotor.
This heated reactivation air removes the previously
adsorbed moisture from the desiccant rotor and
exhausts it to an area other than that being
conditioned. During operation, the desiccant rotor
rotates through the process and reactivation
airstreams of the dehumidifier at a constant speed.
The two airstreams are separated by face and
peripheral seals and by internal fluting in the desiccant
rotor. Process and reactivation airstreams are
counter-flow to maximize the efficiency of the
adsorption process and to help prevent the rotor's
flutes from fouling.
The reactivation heater is sized to raise the
temperature of the reactivation air entering the
desiccant rotor approximately 180 ºF above ambient
(depending upon moisture adsorbed from the process
air and reactivation airflows). The energy from the
heated reactivation air is used to desorb the moisture.
Reactivation discharge air temperature will vary and
can be as high as 150 ºF and moist. Controls are
included in the unit to vary reactivation heat based
upon the amount of moisture adsorbed from the
process airstream.