manuals.online logo
Brands
  1. Home
  2. •
  3. Brands
  4. •
  5. Sulastic
  6. •
  7. Automobile Accessories
  8. •
  9. Sulastic SA-01 TU User manual

Sulastic SA-01 TU User manual

SULASTIC
S U S P E N S I ON S
SA-01 TU WITH REVERSE
HANGER AND EXTENSION
LIFT INSTALLATION KIT
(Repeat steps 7,8 and 9 on the other side)
INSTALLATION’S NECESSARY TOOLS
-Hydraulic Floor Jack - Wrenches Set - Jack Stands - Bottle Jack.
SPRING SOCKET
LEAF
SPRING
SHACKLE
HANGER
USED TERMS
Make sure the hydraulic jack and jack stands have enough capacity
to support the vehicle.
1.-
Chock your front wheels to avoid tires from moving forward .
Use the jack to lift the truck on the left side
until the tire is 2” above from the ground.
2.-
Position the jack stand under the truck’s left side
to increase protection and safety.
3.-
Repeat step 2 & 3 on the right side
using the other jack stand.
Put the hydraulic jack between the frame and
leaf spring and slowly lift it until you are able
to remove the bolts from (lower and upper ).
4.-
5.-
2”
Shackle
Hanger
Repeat step 4 on the other side
Remove shackles.(both sides)
7.-
8.-
9.-
6.-
Install the main body extension to the frame
( G1 outside frame and G2 inside frame)
use the 9/16” Threaded rod to attach both parts
(the thread on each side should be equal.)
( Do not tight yet.)
Install the frame clamp using (J) and (I) parts
just in front the first bed support between
the main body extension and axle. Using two bolts
I/2” x 5 ½” (install the bolts upside down to where the
heads of the bolts are facing towards the ground)
(do not tight The bolts yet.)
Install the (H) brackets using the 9/16” x 5 ½”
bolt to attach the brackets to support (I) you should
install three washers on each side of the clamp support
(Between each bracket and the clamp it is very
important)
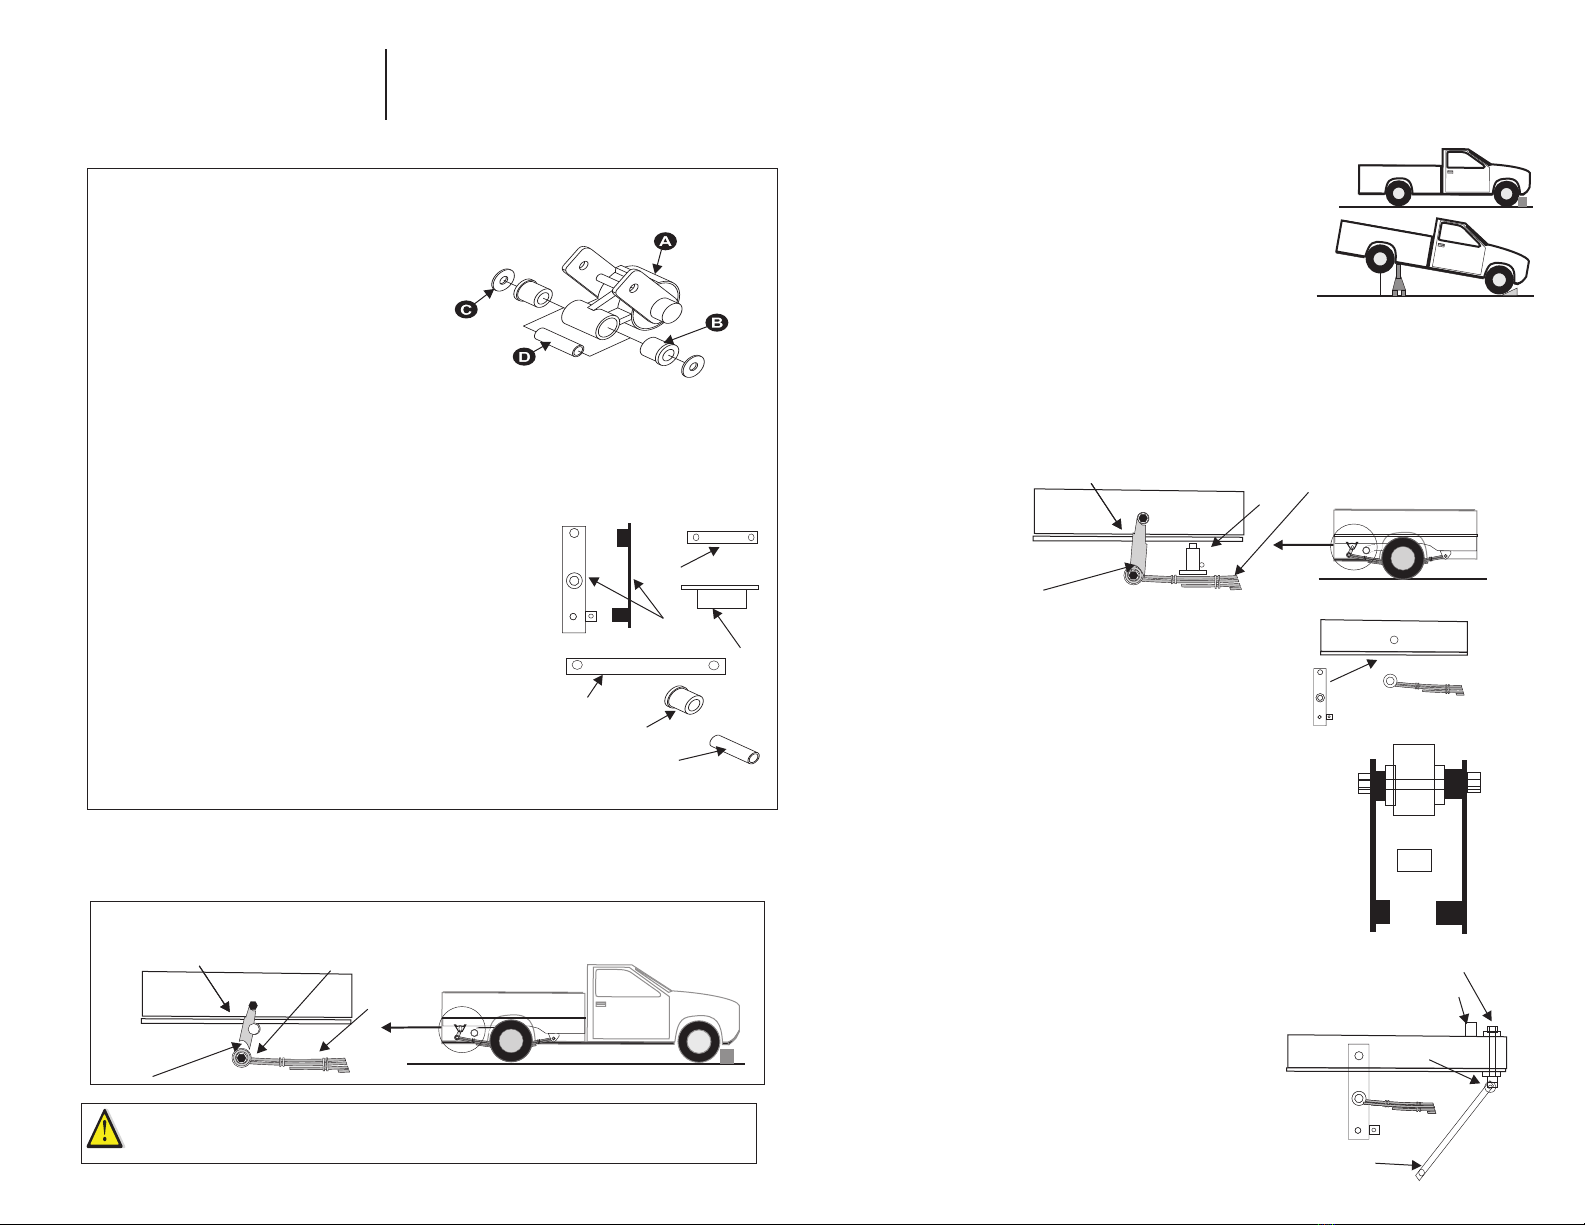
SULASTIC REVERSE HANGER LIFT KIT CONTAINS.
G) 4 - MAIN BODY EXTENSION.
G1,G2 PASANGER SIDE , G3,G4 DRIVER SIDE.
H) 4 - BRAKETS
I) 2 - SUPPORT BRACKET CLAMPS DOWN SIDE.
J) 2 - SUPPORT BRACKET CLAMPS UP SIDE
K) 4 - RUBBER BUSHINGS.
L) 2 - SLEEVES .
2.-9/16” X 5 ½” BOLTS WITH NUT FLAT AND LOCK WASHERS
2.-9/16” X 4 1/2” BOLTS WITH NUT, FLAT AND LOCK WASHERS
4.-½”X 1 ½”BOLTS WITH NUT, FLAT AND LOCK WASHERS.
4.-9/16’ X 8”THREADED ROD WITH 2 NUTS 2 FLATS AND 2 LOCK WASHERS EACH ONE.
12.- FLAT WASHERS ZINC COLOR. (SPACER FOR BRACKETS
SULASTIC SA-01 TU KIT CONTAINS
A) 2 - SUSPENSION
B) 4 - BUSHINGS
C) 4 - WASHERS
D) 2 - SLEEVES
E) 1 - INSTALLATION GUIDE
F) 1 - WARRANTY POLICY
SULASTIC
BOLTS AND WASHERS.
start with passenger side.
Before you start the installation,remove the spare tire
Frame
Bed support
Clamp
(H)Brackets
J
I
FRAME
Bottle Jack
Leaf spring
G
H
I
J
K
L
Once the Sulastic and washers are in place, (position
the bolt as shown in figure below) the nut should
be in the outside where there is more space.
.
Repeat steps 10 to 11 to the driver side of the truck.
12.-
11.-
10.-
Position the corresponding Sulastic to the
leaf spring if necesary use 1 or 2 washers
to fill any loose slack on the Sulastic.
Make sure nothing is interfering with the sulastic function including clips, body parts,
bumper, rear lights, hitch and that the muffler’s exit is not in way of the suspension.
Slowly adjust up or down the jack until you are able to
put lower threaded rod in position as shown below.
Now tight all the nuts on both sides
Lower the hydraulic jack and remove the jack stands
following the installation process backwards.
2 WASHERS
FRAME
Bed support
Clamp
Brackets
J
I
Now install the brackets to the main body extension
using the bolts ½” x 1 ½”the brackets should be
outside of the main body extension in order to leave
free space betwen brackets and leaf spring.
2 WASHERS
FRAME
13.-
Repeat step 13 to the driver side of the truck.
Lower the bottle hydraulic jack and take it out.
Pasanger side rear view
Spare tire side

Popular Automobile Accessories manuals by other brands

RV SnapPad XTRA installation instructions

RV SnapPad

RV SnapPad XTRA installation instructions

Cruz 934-717 Assembly instructions

Cruz

Cruz 934-717 Assembly instructions

Brink 6050 Fitting instructions

Brink

Brink 6050 Fitting instructions

Prime Design AR1221 manual

Prime Design

Prime Design AR1221 manual

Tellur TLL171251 user guide

Tellur

Tellur TLL171251 user guide

OMNISTOR OMNI-BIKE plus Caravan Special manual

OMNISTOR

OMNISTOR OMNI-BIKE plus Caravan Special manual

RVE ROLLER SHUTTER LID MAINTENANCE CARE INSTRUCTIONS MANUAL

RVE

RVE ROLLER SHUTTER LID MAINTENANCE CARE INSTRUCTIONS MANUAL

Prorack K701 Fitting instructions

Prorack

Prorack K701 Fitting instructions

Prorack K078 Fitting instructions

Prorack

Prorack K078 Fitting instructions

Brodit ProClip 852502 quick start guide

Brodit

Brodit ProClip 852502 quick start guide

FVC TR0109B installation guide

FVC

FVC TR0109B installation guide

Intrepid Control Systems RAD-Star user guide

Intrepid Control Systems

Intrepid Control Systems RAD-Star user guide

Kia Sorento 2022 quick start guide

Kia

Kia Sorento 2022 quick start guide

Directed 403.TL10 installation guide

Directed

Directed 403.TL10 installation guide

Brink 6696 Fitting instructions

Brink

Brink 6696 Fitting instructions

Griots Garage Battery Manager IV manual

Griots Garage

Griots Garage Battery Manager IV manual

Whispbar K732W Fitting instructions

Whispbar

Whispbar K732W Fitting instructions

egton Sunvisor Bluetooth Handsfree Car Kit user manual

egton

egton Sunvisor Bluetooth Handsfree Car Kit user manual

manuals.online logo
manuals.online logoBrands
  • About & Mission
  • Contact us
  • Privacy Policy
  • Terms and Conditions

Copyright 2025 Manuals.Online. All Rights Reserved.