Sumiko Premier FT-3 Service manual

Parts Identification
(1) arm rest
(2) arm rest lock
(3) arm rest height adjustment screw
(4) cue platform
(5) cue height adjustment screw
(6) cue cylinder
(7) damping adjustment knob
(8) anti-skate adjustment knob
(9) serial number
(10) tone arm pillar
(11) elevation collar
(12) elevation collar lock screw
(13) VTA locking set screw
(14) elevation screw
(15) mounting base
(16) stylus force indicator dial
(17) counter weight
(18) elevation adjustment tool
(19) headshell
(20) headshell lock set screw


Note: If your turntable was purchased with a mounting board predrilled for the FT-3, start with section 10.
Drilling the Holes for the
VTA-16 Mounting Base
Equipment needed to mark and drill holes:
2 needles at least 2" long, high-quality metal metric ruler, sharp pencil, tape, scissors, drill or drill press, drill bits -
5/32", 1/2", 3/4", 1 1/2", file.
1. Unfold and flatten template sheet. Cut out arm mounting template and base template along dotted lines. Note
die-cut spindle hole on arm mounting template. Pin-point holes have also been made at pivot point A and index
point B.
2. Place the mounting template on the spindle. When marking the centers of the holes on the tone arm mounting
board, it is important to keep the template taut and parallel to the platter.
3. Rotate template on spindle to find the correct hole drilling location. Although the hole can be located anywhere on
the mounting arc (and still maintain the correct 221.7 mm spindle-to-pivot mounting distance), please take extreme
care to be certain that the counterweight, cue lever, anti-skate platform and fingerlift clear the side and back of the
dust cover. Note that some dust covers slope inward and therefore have less clearance as the height above the
mounting surface increases. Also note that the position of the tone arm on the template is identical to the position
the tone arm will have when mounted. If possible, the template should be positioned in such a way that the arm
tube is parallel to the right edge of the turntable.
Note: If your tone arm mounting board is made of very hard material (i.e., metal), it may be difficult to mark the
mounting board with a needle. In the following steps you may substitute a small drill bit for a needle when marking
the tone arm mounting board.
4. Push a needle through the template at pivot point A. Keeping the needle perpendicular to the template, push the
needle down until it contacts the tone arm mounting board below. Press firmly on the needle to mark the tone arm
mounting board. Keep the needle in place at pivot point A and push a second needle through the template at index
point B. The needle should be kept perpendicular to the template and pushed down until it contacts and marks the
mounting board below. Remove the template from the turntable. With a pencil and straight edge, draw a line
between the two marks that you have made on the mounting board. Also label points A and B. Because the paper's
accuracy can be affected by environmental conditions, double check by using a metal ruler to measure the 221.7
mm distance between the center of the spindle and the needle mark at pivot point A. If adjustment of the position of
point A is necessary, the new A should be placed on (or just beyond) the line that was drawn on the mounting
board. The exact position of index Point B is not critical, so no check measurement is necessary. If the tone arm
mounting board on your turntable is removable then remove it at this time.
5. Now push a needle through the mounting base template at point C. Push the needle down until approximately 1/2"
of the needle protrudes through the bottom of the template. Place the template, with the needle in place, over the
tone arm mounting board. Adjust the position of the template so that the point of the needle seats in the mark for
point A on the mounting board. Hold the needle in place at point A and perpendicular to the surface of the tone arm
mounting board. Slide the template down the shaft of the needle until it contacts the mounting board. Keep the
needle in place while you rotate the template until the index line on the template is aligned with the pencil line that
was drawn on the tone arm mounting board. The template is now in the proper position for marking holes D through
F; it must remain in this position when the holes are marked. Tape may be used to hold the template in the proper
position. With a needle, mark the centers of holes D1, D2, D3, E and E Remove the mounting base template from
the tone arm mounting board. With a pencil, carefully label the marks you have made on the mounting board so that
they correspond with the points on the template that was just removed.
6. Drill three 5/32" holes through the mounting board at points D1, D2 and D3. These holes are intended to be slightly
larger than the bolts that go through them to allow fine adjustment of the mounting base position
7. Drill a 3/4" hole through the mounting board at point E.
8. Drill a 1/2" hole through the mounting board at point E

9. Drill a 1 1/2" hole through the mounting board at point C. Use a file to remove burrs from around all the holes after
drilling so that the mounting base will sit level on the mounting board. Reinstall the mounting board on the turntable.
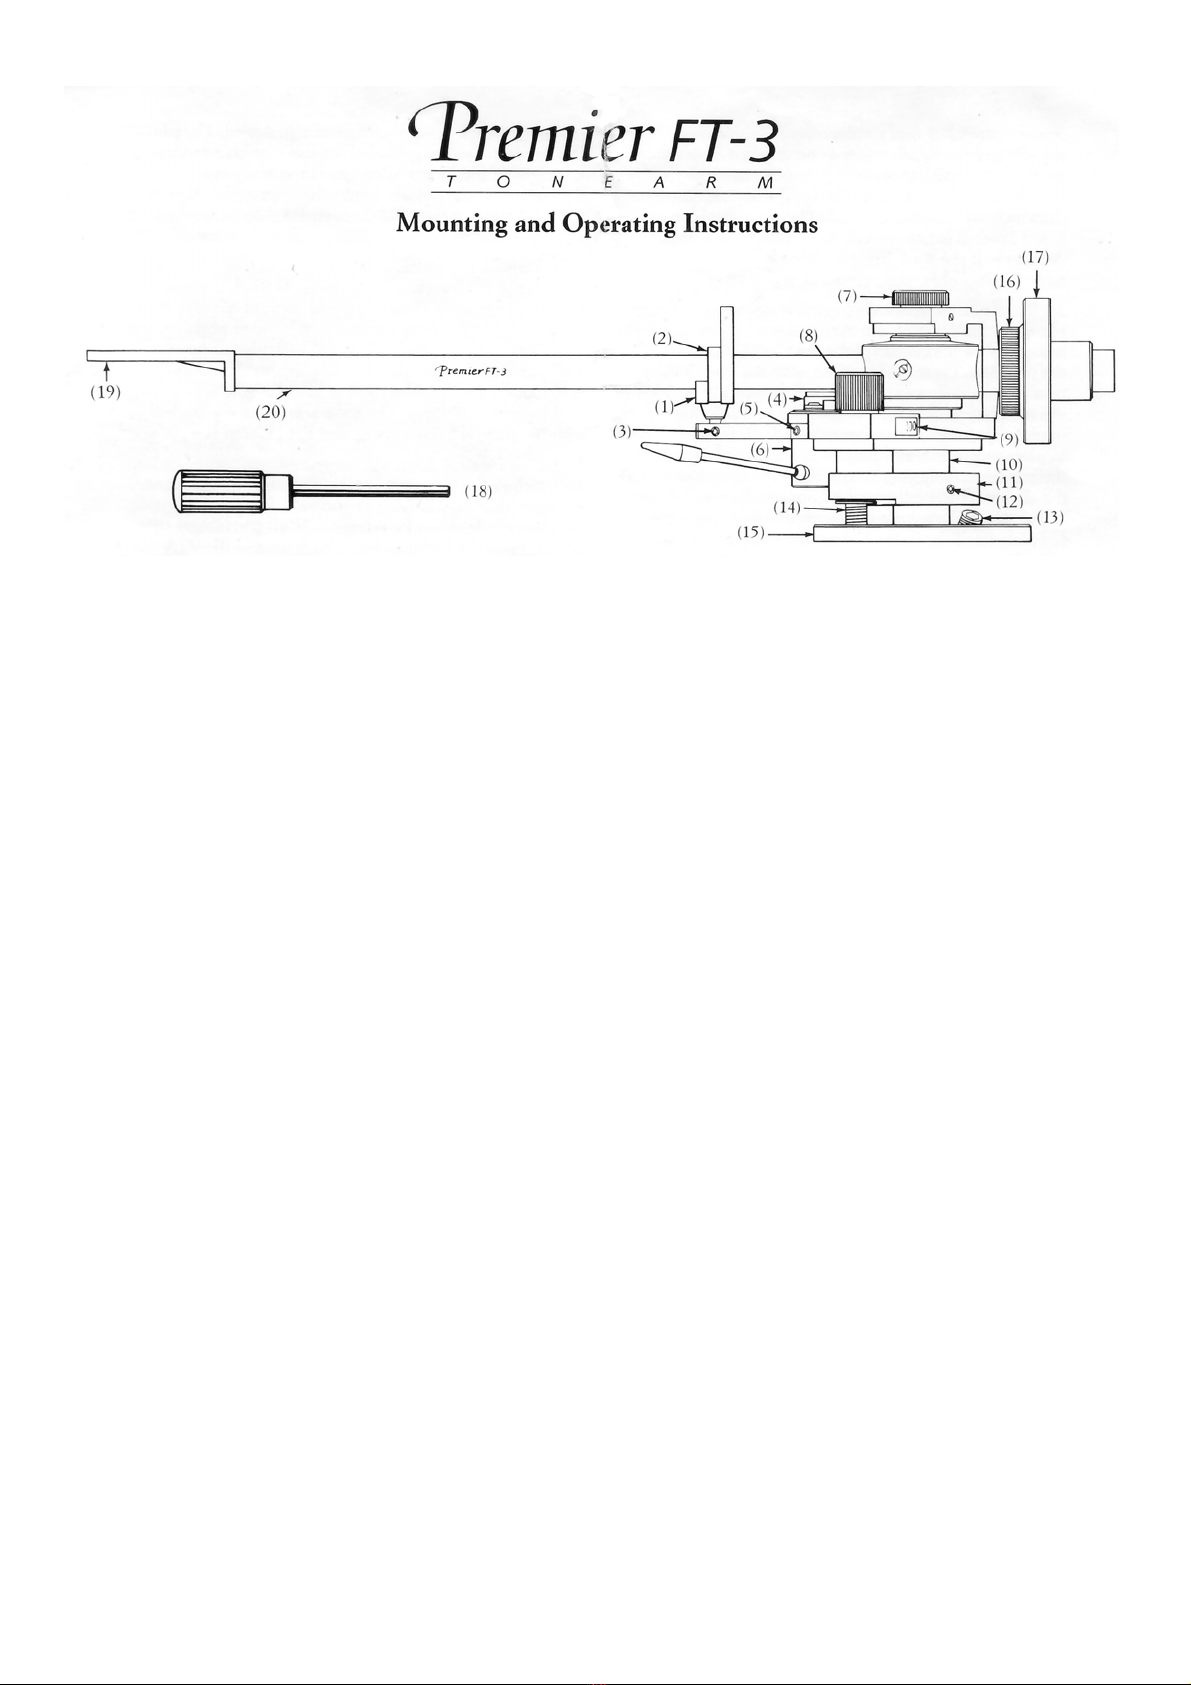
Mounting the Tone Arm
10. Separate the elevation collar (with elevation screw attached) from the mounting base by rotating the elevation
screw counterclockwise. These two parts may be packed individually in the box and need not be separated. Set the
elevation collar aside. Position the mounting base over the cut-out area on the mounting board so that the circular
cut-away on the lip of the base faces forward. The mounting base should now fit into the cut-out on the mounting
board, and the screw holes at points D1 through D3 should line up. If the holes were not drilled accurately, it may
be necessary to remove the mounting board from the turntable and use a file to enlarge the cut-out for a proper fit.
11. The mounting base should now be bolted to the mounting board using the hardware provided. The Phillips head
screws are provided for use with thin mounting boards, and the longer allen head screws are used for thicker
mounting boards. Insert the appropriate screws from the top at points D 1 through D3. Mount washers and nuts
from the bottom. Finger-tighten the nuts.
12. Remove the stainless steel finger lift from the package. Use of the finger lift is optional. If used, it should be placed
on top of the headshell and secured in place with the cartridge mounting hardware. Whenever possible, the stylus
guard should be kept on the cartridge to protect the fragile stylus assembly. Loosely mount the phono cartridge to
the headshell and attach the tone arm wires to the phono cartridge. The tone arm wires are marked with the
standard color code: Red R+, Green R-, White L+, Blue L-.
13. Before the tone arm can be inserted into the mounting base, the brass-locking piston (which is located inside the
center hole) must be retracted. With your finger or a pencil, press the locking piston back toward the VTA locking
set screw If the locking piston still protrudes into the center hole, rotate the VTA locking set screw a half turn or
more counterclockwise to allow the piston to be pushed further back.
14. Place the arm into the mounting base, letting it slide down as far as it will go. Tighten the VTA locking set screw
with the 3 mm hex key that has a knob attached to it. Measure the horizontal distance between the center of the
spindle and the pivot point of the arm. Adjust the position of the base until this distance is 221.7 mm. Tighten the
two accessible base mounting nuts to fix the position of the mounting base. Recheck spindle-to-pivot distance to be
sure that the mounting base did not move when the mounting nuts were tightened. Loosen the VTA locking set
screw and remove the arm from the mounting base. Now firmly tighten all three base mounting nuts.
15. Position the elevation collar so that the attached elevation screw points down and over the threaded hole in the
mounting base. Use the elevation adjustment tool to screw the elevation screw into the hole in the mounting base.
Continue turning the elevation screw clockwise until the bottom of the elevation collar is approximately 5 mm from
the top surface of the mounting base. Align the main (16 mm) hole in the elevation collar with the center hole in the
mounting base. Check and adjust, if necessary, the position of the locking piston as described in section 13. Insert
the tone arm pillar through the elevation collar and into the mounting base. Rotate the arm in the hole until the
chrome cue cylinder lines up with the circular cutaway on the mounting base. Adjust the height of the tone arm so
that the arm tube will be parallel to the platter when the stylus is on a record. Tighten the VTA locking set screw on
the mounting base to secure the arm in the proper position. Tighten the elevation collar lock screw.
Tone Arm Adjustment and Operation
16. If your turntable has not been leveled previously, level it now Twist the counterweight onto the back of the tone arm.
For cartridges weighing up to 8 grams, only the main counterweight is necessary. For cartridges between 8 and 14
grams, the accessory counterweight should be fastened to the back of the main counterweight. To secure the
accessory counterweight, tighten the set screw. Be sure the accessory counterweight rests firmly against the back
of the main counterweight disk. Set anti-skate force to zero by turning the knob on the right side of the arm pivot
completely counterclockwise. Remove the stylus guard from the phono cartridge. Unlock the arm rest. Ignoring the
calibrations on the indicator dial, roughly balance the arm by moving the counterweight backward and forward until
the arm "floats" parallel to the platter. Return the tone arm to the arm rest and lock in place. Note that the stylus
force indicator ring has two scales. The inner scale is calibrated for use when both the main and accessory
counterweights are used. Rotate just the stylus force indicator dial (not the counterweight) until the 0 lines up with
the white line on the counterweight support shaft. Grasp the entire counterweight; rotate it and the indicator ring
counterclockwise until the 1 gram mark on the appropriate scale lines up with the white line.

17. Using a high quality alignment protractor, such as the Denneson Soundtractor, adjust the cartridge overhang (17.3
mm) and horizontal tracking angle. Tighten the cartridge mounting screws.
18. Before checking the azimuth alignment of the cartridge, be sure that there is still 1 gram of tracking force and zero
anti-skate force applied to the tone arm. Place an unwarped record on the non-rotating platter of your turntable.
Cue the cartridge down onto the record surface. Azimuth is correct when the center axis of the stylus (as viewed
head-on) is perpendicular to the record surface. If the cartridge was manufactured correctly, the center of the axis
of the stylus is perpendicular to the top mounting surface of the cartridge body. If this is true, you can compare the
front edge of the headshell to the plane of the record to check for proper azimuth adjustment. When they are
parallel, the azimuth is correct. If the center axis of the stylus is not perpendicular to the top mounting surface of the
cartridge, then the front edge of the headshell cannot be used as a guide. Only the axis of the stylus relative to the
record surface can be used for determining correct azimuth. If azimuth adjustment is necessary, return the arm to
the arm rest and lock in place. With one hand, insert the small (1.5 mm) hex key into the headshell lock set screw
located on the underside of the tone arm close to the headshell. Hold the rear part of the headshell with the other
hand. Loosen the headshell lock set screw by turning it clockwise (as viewed from above). It should need at most a
quarter turn. Rotate the headshell to correct for the observed azimuth error. Be sure the back surface of the
headshell is contacting the end of the arm tube; then tighten the headshell lock set screw by turning it
counterclockwise (as viewed from above).
Caution: Do not over tighten the headshell lock set screw. Over tightening this screw can damage the headshell and is
unnecessary because of the large surface area inside the arm tube for rigid mechanical coupling. Tighten only until the
headshell does not rotate in the arm tube. This can be checked by holding the arm tube with one hand and the headshell
with the other hand and then twisting. Do not twist the headshell without holding the arm tube as this will stress the
bearings. Recheck the azimuth and readjust if necessary. Recheck cartridge overhang and horizontal tracking angle with
an alignment protractor and adjust as necessary.
19. Plug the five-pin female connector of the tonearm cable or PIB-1 interface box into the bottom of the tone arm. It is
preferable to mount (with the supplied screws) the PIB-1 box onto the back of the turntable. The connectors on the
box should point to the left rear corner of the turntable as viewed from the front. Alternatively, the box can be
mounted to the surface that the turntable sits upon. After the PIB-1 has been secured in place, plug a set of your
favorite RCA-RCA interconnect cables (with ground wire) into the PIB-1. Plug the other end into your preamp phono
or step-up device input. Connect one end of the ground wire to the ground post on the PIB-1 and the other to the
chassis or ground post of your preamp or step-up device.
20. Carefully rebalance the tone arm as described in step 16 and set the tracking force per cartridge manufacturer's
recommendation. Rotate the anti-skate knob clockwise until the indicated anti-skate force equals the cartridge's
tracking force. Fine adjustments of the antiskate force can be made later by listening for fine detail and proper
sound stage width and depth.
21. The VTA-16 mounting base was designed specifically for ease of adjustment of the tone arm height, which is
sometimes erroneously called VTA (vertical tracking angle) adjustment. When adjusting the tone arm height one is
actually trying to optimize the SRA (stylus rake angle). The SRA of the reproduction stylus on your cartridge should
match the SRA of the cutting stylus on the record lathe on which your record was cut. This is analogous to having
the correct azimuth adjustment on a tape playback head. To avoid confusion we will refer to tone arm height
adjustment as VTA adjustment. The best way to find the correct VTA is by listening. Listen for a focused image and
proper placement of instruments in space. Unfortunately, record manufacturers do not adhere to a standard for the
angle of the cutting stylus on record lathes. Therefore, the proper angle of the reproduction stylus will vary from
record to record. The type of stylus on your cartridge will determine its sensitivity to proper VTA adjustment. A
cartridge with a conical stylus will work well over a wide range of vertical tracking angles and is therefore relatively
insensitive to adjustment. Elliptical styli are more sensitive to adjustment. Cartridges using line contact, micro ridge,
or van den Hul styli are extremely sensitive to proper adjustment of the VTA and will often perform poorly if not
adjusted correctly. However, these line contact styli are capable of extracting the best reproduction of music from
your records. If you use a line contact stylus, it is worth the effort to spend a little extra time to adjust the VTA
correctly.

CAUTION! If care is taken, on certain turntables the VTA can be adjusted while the record is playing. However,
the VTA locking set screw on the mounting base should only be loosened or tightened when the stylus is off the
record. The user must determine if he/she can adjust the VTA during play with their turntable. Sumiko, Inc. will
not be responsible for styli or cantilevers damaged by users making VTA adjustments during play. Adjustments
of the VTA during play is useful only if your turntable is located at your listening position or if it can be adjusted
by an assistant while you listen to the results. (Note: Using a spouse or friend to help you set the VTA while you
listen can jeopardize your relationship with that person.) If you can not be in a position to accurately judge the
results of your adjustments, to assure the safety of your stylus and cantilever, always make VTA adjustments
with the stylus off the record. The elevation screw should be turned 1/4 to 1/2 turn at a time before listening for
the results.
The VTA is adjusted by using the elevation adjustment tool. This tool is a 3 mm hex key with a knob attached to it. Cue
stylus off of the record or lock the tone arm on the arm rest. To unlock the arm pillar, insert the end of the elevation
adjustment tool into the VTA locking set screw on the mounting base and rotate the tool 1/4 turn counter clockwise.
Remove the elevation tool from the VTA locking set screw and insert it into the top of the elevation screw. Rotating the
elevation screw clockwise will lower the rear of the tone arm. Rotating the elevation screw counter clockwise will raise the
rear of the tone arm. If you are going to adjust the VTA while playing, cue the stylus to the record now and, using the
elevation adjustment tool, rotate the elevation screw until the correct VTA is obtained. Cue the tone arm off of the record
and lock the arm pillar into the mounting base by tightening the VTA locking set screw.
The VTA adjustment system works best when the elevation collar is close to the mounting base (within 10 mm). Gross
adjustment of the VTA should be made by loosening both the VTA locking set screw and the elevation collar lock screw
and then moving the arm pillar up or down as necessary. When the tone arm is set at the center of the adjustment range
for the records in your collection, the bottom of the elevation collar should be between 5 and 10 mm above the top surface
of the mounting base.
Variable Fluid Damping
The Premier FT-3 tone arm can be used either with or without fluid damping. We recommend using the fluid damping only
when the cartridge being used has very low dynamic compliance (below 10 x 10-6 cm/dyne).
The top of the tone arm has a hemispherical reservoir for holding the damping fluid. The knob on the top of the bearing
housing is used for adjusting the amount of damping. Turn clockwise to increase or counter clockwise to decrease
damping action. To install damping fluid, cut the tip off the fluid vial and carefully empty contents of the vial into the
opening in the top of the damping knob.
Important Note: When removing the arm for shipment or service, the damping fluid must be removed. If the fluid is not
removed and the arm is tipped on its side, fluid will flow out of the reservoir cup and may contaminate the tone arm
bearings. Damping fluid in the bearings will cause excess friction and may necessitate expensive repairs.
To remove the damping fluid, the housing that holds the damping knob must be removed. Remove the tone arm from the
turntable by loosening the VTA locking set screw and the elevation collar lock screw. Keep the tone arm upright while
looking at the underside of the-bearing housing. You will see six #0 Phillips screws. Remove the two screws that are
farthest away from the tone arm pillar. The housing that holds the damping knob can now be removed, revealing the
hemispherical reservoir on the top of the tone arm. Use the damping fluid vial as an eyedropper to remove the fluid from
the reservoir cup. Any fluid that can not be removed with the vial should be removed with a cotton swab. Clean the
damping fluid off of the damping piston that is attached to the damping knob. Alcohol may be used as a solvent to remove
damping fluid from the tone arm. Reassemble the tone arm before shipping to avoid losing parts. Replacement damping
fluid is available at a nominal price.
Bearings
Each Premier FT-3 tone arm undergoes careful quality control, both at the factory and at Sumiko's Berkeley CA
headquarters. Among our Quality Assurance procedures are inspection of bearings for freedom of movement and lack of
play. Please do not attempt to make bearing adjustment yourself as this may permanently damage the bearings and will
void your warranty. Should repairs or adjustments be necessary, please contact your dealer or Sumiko, Inc.

Specifications
Overall length 305 mm
Effective length (pivot to stylus) 239 mm
Overhang 17.3 mm
Offset angle 23.0°
Mounting distance (record center to pivot point) 221.7 mm
Maximum backswing 64 mm
Cartridge weight range Standard counterweight up to 8g. With extra weight, 8-14g
.
P.O. Box 5046, Berkeley, CA 94705415/843-4500
Table of contents
Other Sumiko Turntable manuals