Summerset SSRFR-24DWC Service manual

WINE COOLER


SUMMERSET WINE COOLER INSTALLATION INSTRUCTIONS
& OWNERS MANUAL
24” 5.3C DELUXE OUTDOOR RATED
WINE COOLER
NAME:
SSRFR-24DWC
PART #:
THANK YOU
Thank you for your purchase. We’d like to welcome you to the Summerset family of luxury outdoor
kitchen products and look forward to being a part of your home for years to come. As a family business
with over 30 years of industry experience, we aim to deliver exceptional quality and personal service.
Welcome to the Summerset family and we hope you love your new wine cooler!
INSTALLER:
Please leave this manual for the owner.
Serial Number:
Model:
Date of Purchase:
Place of Purchase:
To view on your phone, scan the QR code on your smart phone’s
camera app. (For Android devices, use Google Lens.)
For warranty information and to register your wine cooler
visit, Summersetgrills.com/register/refrigeration

SAFETY AND INSTALLATION INSTRUCTIONS
1. Child entrapment and suffocation
are not problems of the past. Junked
or abandoned appliances are still
dangerous, even if they will “just sit for
a few days.”
2. Before discarding your old refrigerator:
Take out the drawers.
RISK OF CHILD ENTRAPMENT
WARNING!
1. Stainless steel models exposed to
chlorine gas and moisture such as areas
with spas or swimming pools, may have
some discolorations of the stainless
steel. Discoloration from chlorine gas is
normal.
2. NEVER USE CHLORIDE TO CLEAN
STAINLESS STEEL.
CAUTION!
• Plug into a grounded 3 prong outlet,
do not remove prong, do not use an
adapter and do not use an extension
cord.
• Replace all panels before operating
• It is recommended that a separate circuit
serving only your appliance be provided.
Use receptacles that cannot be turned
off by a switch or pull chain.
• Never clean appliance parts with
flammable fluids. These fumes can
create a fire hazard or explosion.
• Do not store or use gasolines or other
flammable vapors and liquids in the
vicinity of this or any other appliance.
The fumes can create a fire hazard or
explosion.
• Do not connect or disconnect the
electric plug when your hands are wet.
• Unplug the appliance or disconnect
power before cleaning or servicing.
Failure to do so can result in electrical
shock or death.
• Do not aempt to repair or replace
any part or your appliance unless it
is specifically recommended in this
manual. All other servicing should be
referred to a qualified technician.
WARNING!
Most power failures are corrected within a few
hours and should not affect temperature of your
appliance if you minimize the number of times
the drawer is opened. If the power is going to be
off for a longer period of time, you need to take
the proper steps to protect the contents.
Short Vacations: Leave the appliance operating
during vacations of less than three weeks.
Long Vacations: If the appliance will not be used
for several months, remove all items and turn
off the appliance. Clean and dry the interior
thoroughly. To prevent odor and mold growth,
leave the drawer open slightly, blocking it open if
necessary.
• Remove all items.
• Securely tape down all loose items inside
your appliance.
• Turn the adjustable legs up to the base to
avoid damage.
• Tape the drawers shut.
• Be sure the appliance stays secure in the
upright position during transportation. Also
protect the outside of the appliance with a
blanket or similar item.
Before the appliance is used, it must be
properly positioned and installed as described
in this manual, so read the manual carefully.
To reduce the risk of fire, electrical shock or
injury when using the appliance, follow basic
precautions, including the following:
POWER FAILURE
VACATION TIME
MOVING YOUR APPLIANCE

• The appliance should be located in the
coolest area of the room or outdoor location,
away from heat producing appliances and
out of direct sunlight.
• Ensure that the unit is adequately ventilated.
Never cover air vents.
• Do not keep the door open any longer than
necessary.
• Organized and labeled stored items reduce
door openings and extended searches.
• Remove as many items as needed at one
time and close the door as soon as possible.
ENERGY SAVING TIPS
GENERAL SAFETY REQUIREMENTS
FOLLOW WARNING CALL OUTS BELOW ONLY
WHEN APPLICABLE TO YOUR MODEL
• Use two or more people to move and
install appliance. Failure to do so can
result in back or other injury.
• To ensure proper ventilation for your
appliance, the front of the unit must be
completely unobstructed.
• Choose a well-ventilated area with
temperatures above 50°F (10°C) and
below 109.4°F (43°C).
• The appliance should not be located
next to ovens, grills or other sources of
high heat.
• The appliance must be installed with all
electrical, water and drain connections in
accordance with state and local codes. A
standard electrical supply (115 V AC only,
60HZ), properly grounded in accordance
with the National Electrical Code and
local codes and ordinances is required.
• Do not kink or pinch the power supply
cord of the appliance.
WARNING!
• The size of the fuse (or circuit breaker)
should be 1.3 amperes.
• It is important that the appliance be leveled
in order to work properly. You may need to
make several adjustments to level it.
• All installations must be in accordance with
local plumbing code requirements.
• Never allow children to operate, play with
or crawl inside the appliance.
• Do not use solvent-based cleaning agents
or abrasives on the interior. These cleaners
may damage or discolor the interior.
• Use this appliance only for its intended
purposes as described in this instruction
manual.
• Keep fingers out of the “pinch point”
areas. Clearances between the drawer and
cabinet are necessarily small. Be careful
closing drawer when children are in the
area.

6

7
TABLE OF CONTENTS
Before Operating
Troubleshooting
Operating Your Appliance
Installation
Warranty
1
2
3
4
6

1
BEFORE OPERATING
SHIPMENT ARRIVING DAMAGED: TEMPERATURE ALARM
DOOR LOCK
CLEANING YOUR APPLIANCE
POWER FAILURE
IMPORTANT NOTES:
VISIBLE DAMAGE
If your shipment arrives with visible damage to
the box/carton, be sure the damage is noted on
the bill of freight or express receipt and signed
by the person making the delivery. File claim for
damages immediately, regardless of the extent
of damage.
Disconnect all power supplies and baeries
before servicing
CONCEALED DAMAGES
If damages are unnoticed until the wine cooler is
unpacked, notify the transportation company or
carrier immediately and file a concealed damage
claim with them. This should be done within (5)
days of the delivery date. Be sure to hold on to
the box/carton for inspection. We cannot assume
responsibility for damage or loss incurred in
transit.
CONSTRUCTION ZONES
Keep all stainless steel products away from
construction zones. Construction debris such as
(but not limited to) stone dust, stucco, and lime
dust could damage or permanently discolor
stainless steel products. Keep all caustic chemicals
including chlorine and pool cleaning products
away from stainless steel at all times.
An audible alarm sounds if the storage
temperature is not cold enough. The temperature
display flashes at the same time.
The cause of the temperature being too high
may be:
• Too much warm ambient air flowed in
when rearranging and removing stored
items.
• Power failure for some time.
• The appliance is faulty.
The audible alarm is automatically silenced and
the temperature display stops flashing when the
temperature is sufficiently cold again.
If the door has been le open for more than 60
seconds, the alarm will sounds. Pressing any key
once can switch off the audible alarm
The unit is provided with a lock and key
combination. The keys are located inside the
plastic bag that contains the Instruction manual.
Insert the key into the lock and turn it counter-
clockwise to unlock the door. To lock the door, do
the reverse operation making sure the metal pin
is engaged completely. Remove the key and put it
in a secure place for safekeeping.
• Turn off the power, unplug the appliance,
and remove all items, including shelves.
• Wash the inside surfaces with a solution
of warm water and baking soda (about 2
tablespoons of baking soda to a quart of
water).
• Wash the shelves with a wet cloth.
• Wring excess water off of the sponge or
cloth when cleaning the area where the
controls are located or any electrical parts.
• Wash the outside cabinet with warm water
and mild liquid detergent. Rinse well and
wipe dry with a clean so cloth.
• Use an approved stainless steel cleaner to
clean the door and handle. Do not sue steel
wool or a steel brush on stainless steel.
• Caution: Failure to unplug the appliance
during cleaning could result in electrical
shock or other personal injury.
Most Power Failures are corrected within a few
hours and should not affect the temperature of
your appliance if you minimize the number of
times the door is opened. If the power is going
to be off for a longer period of time, you need
to take the proper steps to protect the contents.
ELECTRICAL PARTS AND COMPONENTS
WARNING!
Remove the exterior and interior packing.
Before connecting the appliance to the power
source, let it stand upright for approximately
24 hours. This will reduce the possibility of a
malfunction in the cooling system from handling
during transportation.
Clean the interior surface with lukewarm water
using a so cloth.
Install the handle on the door if not already
aached.
BEFORE USING YOUR APPLIANCE

2
TROUBLESHOOTING
You can solve many common problems easily, saving you the cost of a possible service call. Try the
suggestions below to see if you can solve the problem before calling the servicer.
PROBLEM POSSIBLE CAUSE REMEDY
Appliance does not
operate
Appliance is not connected to a power
supply.
The appliance is turned off.
Tripped circuit breaker or a blown a fuse.
Connect the appliance.
Switch on the appliance.
Switch on the circuit breaker or replace fuse.
Appliance is not cold
enough
The temperature is not set correctly.
The ambient temperature could require a
lower temperature seing.
The door was not closed completely.
Door is not hermetically sealed.
The condenser is too dirty.
The ventilation opening is blocked or too
dusty.
Check the set temperature.
Set a lower temperature.
Do not open the door more oen than
necessary.
Close door properly.
Check the door seal and clean or replace.
Clean the condenser when necessary.
Clear the obstructions and clean the dust.
Appliance turns itself on
and off frequently
The room temperature is higher than
average.
The door is open too oen.
The door is not closed completely.
The door gasket does not seal properly.
Put the appliance in a cooler place.
Leave the appliance to work for a while until
the set temperature has been reached.
Do not open more than necessary.
Close door properly.
Check the door seal and clean/replace.
The light does not work Appliance is not connected to a power
supply.
Tripped circuit breaker or blown a fuse.
The light was switched off on the control
panel.
Connect the appliance.
Switch on circuit breaker or replace fuse.
Switch on the light.
Vibrations The appliance is not properly leveled. Level the appliance with the adjustable feet.
The appliance seems to
make too much noise
The raling may come from the flow of the
refrigerant, which is normal. As each cycle
ends, you may hear gurgling sounds caused
by the flow of refrigerant in your appliance.
If the temperature fluctuations occur, the
contraction and expansion of the inner walls
may cause popping and cracking noises.
The appliance is not properly level. Level the appliance with the adjustable feet.
The door will not close
properly
The appliance is not properly level.
The door was reversed and not properly
installed.
The gasket is dirty.
Level the appliance with the adjustable feet.
Check the door hinge and reassemble
correctly.
Clean the door gasket.
The alarm sounds and
the temperature display
flashes
Has the appliance door been open for
longer than 60 seconds? If not, then the
temperature has risen higher or fallen lower
than the temperature that has been set.
This could be due to:
The appliance door being opened too oen.
The ventilation opening being covered or
too dusty.
A lengthy interruption in the power supply.
If yes, close the door.
Do not open the door more oen than
necessary.
Clear the obstructions and clean the dust.
Leave the appliance to work for a while until
the set temperature has been reached.

3
OPERATING YOUR APPLIANCE
It is recommended that you install the appliance
in a place where the ambient temperature
is between 50°F and 109.4°F (10°C-43°C). If
the ambient temperature is above or below
recommended temperatures, the performance
of the unit may be affected. For example, placing
your unit in extremely cold or hot conditions
may cause interior temperatures to fluctuate.
The operating temperature range may not be
reached.
Your outdoor wine cooler has been designed
for both built-in and free standing applications.
When built-in, your wine cooler door does not
require additional air space for top, side or rear.
The front grille must not be obstructed.
1. Position the unit on a flat, level surface
capable of supporting the entire weight
of the unit. Remember the unit will be
significantly heavier once it is fully loaded.
2. Connect the unit to a Ground Fault
Interrupter (GFI).
It is recommended that you do not install the
appliance near an oven, radiator or other heating
source, as heat sources may increase electrical
consumption. Do not install in a location where
the temperature will fall below 50°F (10°C). For
best performance, do not install the appliance
behind a cabinet door or block the base grille.
Plug the appliance into an exclusive properly
grounded wall outlet.
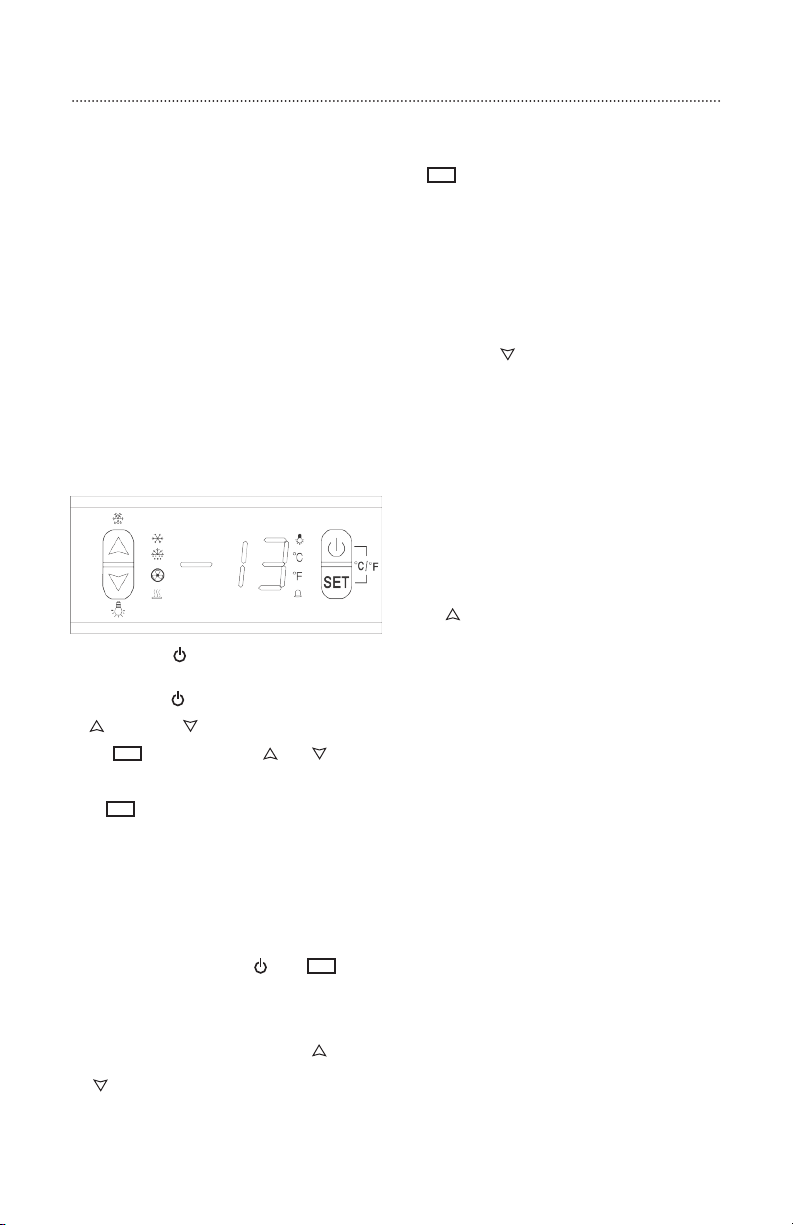
Press first, then press or buon
to increase (warm) or decrease (cool) the set
temperature by 1°C/ 1°F.
Press again, the temperature is selected and
shows the actual temperature. If no other further
operation in 6 seconds, display will show actual
temperature in the cooler
CONTROL PANEL
°F/°C SELECTOR
SETTING THE TEMPERATURE CONTROL
INSTALLATION OF YOUR APPLIANCE
SITE PREPARATION
NOTE:
ON/OFF Power
To turn the appliance ON or OFF, press and hold
the POWER key for 5 seconds.
UP and DOWN
SET
SET
Selects the temperature display seing in
Fahrenheit or Celsius degrees. To change the
temperature from Fahrenheit to Celsius or from
Celsius to Fahrenheit, press and at the
same time, then hold for 6 seconds.
SET
The temperature you are seing will increase by
one degree each time you press the key and
will decrease by one degree each time you press
the key.
The range of temperature control is from 32°F
to 50°F.
SET
• USE OF ABRASIVE PADS SUCH AS
SCOTCHBRITE WILL CAUSE THE GRAINING
IN THE STAINLESS TO BECOME BLURRED.
• Rust that is allowed to linger can penetrate
into the surface of the stainless steel and
become impossible to remove.
To view the set temperature at any time, press
the key. The set temperature will flash in the
display window for 6 seconds. Aer 6 seconds, the
temperature inside the until will reappear in the
display window.
(The temperature preset at the factory is 36°F)
CLEANING AND MAINTENANCE (CONTINUED)
INTERIOR LIGHT
DEFROSTING
This unit is equipped with an interior LED light
which will be turned ON when the door is open
and the interior fan is stopped at the same time.
You can press to manually turn on or tun off
the light.
The unit defrosts automatically in normal
operating conditions. The evaporator behind the
rear wall of the unit defrosts automatically. The
condensation collects in the drainage channel
behind the rear wall of the unit and flows through
the drainage hole into the drip tray by the
compressor where it evaporates.
However, frost may accumulate on the evaporator
if the unit is repeatedly opened in a high heat or
high humidity location. If this frost paern does
not clear within 24 hours, your unit will require
manual defrosting.
Press and hold for 6 seconds, the unit will be
defrosted.
To stop defrost, please repeat the same
interaction.

4
INSTALLATION
Position the unit on a flat, level surface capable
of supporting the entire weight of the unit
when full. The unit contains four (4) adjustable
leveling legs. Turn the leg’s clockwise to raise and
counterclockwise to lower.
To install the handle, follow the instructions
below.
1. Remove the gasket on the right side.
2. Take out the screws from bag in cabinet. Put
the screws in the holes where the handle is
to be installed.
3. Align the handle with screws, tighten the
screws using a screw driver until the handle
is both flush and secured tightly against the
door side. (DO NOT over-tighten as this
may cause damage to the door surface.).
Put the screws on top of the drawer where the
handle is to be installed. Align the handle with
screws, tighten the screws using the screwdrivers.
1. Position the unit to allow free air flow through
the front grille.
2. Wipe out inside of the unit with a damp cloth.
3. Be sure to install the Anti-Tip Bracket. Follow
instructions provided with the Anti-Tip Bracket.
LEVELING THE UNIT
INSTALLING HANDLE
LOCATION OF PARTS
ELECTRICAL CONNECTION
Improper use of the grounded plug can
result in the risk of electrical shock. If the
power cord is damaged, have it replaced by a
qualified electrician or an authorized service
center.
WARNING!
3. The unit must be installed according to your
local codes and ordinances.
4. ELECTROCUTION HAZARD!
• Electrical Grounding Required - This
appliance is equipped with a three
prong (grounding) polarized plug for
your protection against possible shock
hazards.
• NEVER remove the round grounding
prong from the plug.
• NEVER use a two prong grounding
adapter.
• NEVER use an extension cord to connect
power to the unit.
• Where a two-prong wall receptacle is
encountered or a longer power cord is
required, contact a qualified electrician
to have it replaced in accordance with
applicable electrical codes.

5
This appliance should be properly grounded for
your safety. The power cord of this appliance is
equipped with a three-prong plug which mates
with a standard three-prong wall outlet to
minimize the possibility of electrical shock.
Do not under any circumstance cut or remove
the third (ground) prong from the power cord
supplied. For personal safety, this appliance must
be properly grounded. Any questions concerning
power and/or grounding should be directed
toward a certified electrician or an authorized
service center.
The appliance requires a standard 115/120 Volt
AC-60HZ three-prong grounded electrical outlet.
Have the wall outlet and circuit checked by a
qualified electrician to make sure they outlet is
properly grounded. When a standard 2-prong
wall outlet is encountered, it is your responsibility
and obligation to have it replaced with a properly
grounded 3-prong wall outlet.
To prevent accidental injury, the cord should
be secured behind the appliance and not le
exposed or dangling.
The appliance should always be plugged into
its own individual electrical outlet which has a
voltage rating that matches the rating label on
the appliance. This provides the best performance
and also prevents overloading house wiring
circuits that could cause a fire hazard from over
heating. Never unplug the appliance by pulling
on the power cord. Always grip the plug firmly
and pull straight out from the receptacle. Repair
or replace immediately all power cords that have
become frayed or otherwise damaged. Do not
use a cord that shows cracks or abrasion damage
along its length or at either end. When moving
the appliance, be careful not to damage the
power cord.
Because of potential safety hazards under certain
conditions, it is strongly recommended that you
do not use an extension cord with this appliance.
However, if you must use an extension cord it is
absolutely necessary that it be a UL/CUL-Listed,
3-wire grounding type appliance extension cord
having a ground type plug and outlet and that
the electrical rating of the cord be 115 volts and at
least 1.3 amperes.
ELECTRICAL CONNECTION CONTINUED EXTENSION CORD
INSTALLATION

6
WARRANTY:
(3) year warranty on the compressor. (1) year
warranty on all electrical
WARRANTY LIMITATIONS & EXCLUSIONS
This warranty shall apply only to the products
purchased and located in the continental United
States and Canada. The warranty coverage
begins on the original date of purchase and
proof of date of purchase is required. In order to
activate the warranty, we require that you send
in the aached warranty registration card. This
warranty applies only to the original owner and
may not be transferred.
This warranty does not apply to damages
resulting from negligence, alteration, misuse,
abuse, accident, natural disaster, improper
installation or improper operation, unauthorized
adjustments or calibrations, dings, dents,
scratches, or damages due to harsh cleaning
chemicals. This warranty does not apply to
commercial use, or to products with altered or
removed serial numbers. The Manufacturer shall
not be liable for incidental, consequential, special
or contingent damages resulting from its breach.
SUMMERSET REFRIGERATION WARRANTY
WARRANTY SERVICE & REPLACEMENT PARTS:
Call your authorized selling dealer or call
Summerset directly at 800-966-8126
Be prepared to furnish the following information:
Purchaser’s name, model and serial number of
the refrigerator, date of purchase and the accurate
description of the problem. The Manufacturer
will not pay for service calls for correcting an
installation problem. Owner shall be responsible
for proper installation, providing normal care and
maintenance, providing proof of purchase upon
request and making the Refrigerator accessible
for service.
In the event of any warranty replacement, all
removal, replacement, installation and shipping
costs are the responsibility of the Refrigerator
owner.
Some states do not allow limitations on how
long an implied warranty lasts, or the exclusions
of or limitations on consequential damages. This
warranty gives you specific legal rights and you
may have other rights, which vary from state to
state.

ACCESSORIES
Summerset’s full line of stainless steal outdoor kitchen compo-
nents makes sure you have everything you need for the perfect
outdoor kitchen experience. Double-lined construction provides
the extra insulation and resilience needed against the elements,
so closing drawers offer a luxurious feel, and a thicker flange
provides a sturdy, seamless fit and elegant style that will work
with any countertop and island finish.
Summersetgrills.com 17322 Gothard St., Huntington Beach, CA. 92647 800.966.8126
WE MAKE IT ALL
SINKS AND BAR PREP
Take your outdoor kitchen to the next level with our sinks
and ice chests. The Summerset Beverage Center is complete
with an ice compartment, sink, towel holder, speed rail with
condiment tray, LED lights, and a built-in bole opener. When
you’re grilling, we want to make sure you have everything you
need conveniently on hand.
Summerset Professional Grills strives to meet every outdoor living expression. We offer a wide
range of products from grills, refrigeration, sinks, accessories and more. Our goal is to ensure
you have everything you need to create your perfect outdoor atmosphere. No maer the style
or budget, Summerset will deliver an experience that will help create the ultimate backyard
getaway.
We are a family owned and operated business that is located in beautiful Huntington Beach, California. We pride
ourselves in using only the best materials, and our commitment to quality is reflected in the crasmanship of
the entire Summerset line of barbecue Power Burners, components, and more. With over 20 years of leadership
in branding and manufacturing, our core focus is to provide exceptional customer service with an unparalleled
warranty.
GRILLS
Summerset Professional Grills offers a complete line of
commercial grade stainless steel Power Burners, Power Burner
carts, power burners, and side burners for any style, use, or
budget. Whether you’re looking for a simple, clean, entry-level
grill, or a heavy-duty grill that supports charcoal, lump coal,
and wood chunks, we have it all.
Table of contents
Popular Wine Cooler manuals by other brands

U-Line
U-Line Wine Captain UHWC518 User guide & service manual

Eico
Eico VKG 671 W Instructions for use

Haier
Haier HVR036ALL user manual

Falcon
Falcon FDZ60 Installation, operation and maintenance instructions

KitchenAid
KitchenAid KUWS246EBL01 cabinet parts

KitchenAid
KitchenAid KUWO24LSBX - Left Swing / Accepts Custom Panels ARCHITECT... Use and care guide