Sumner Fab-Mate User manual

OPERATOR’S MANUAL
Fab-Mate
WARNING
Beforeoperatingthislift,read
andunderstandthisOperator’s
Manual. Becomefamiliar with
thepotentialhazards ofthislift.
Call Sumner ifyouhaveany
questions
7514 Alabonson Rd. Houston, Texas 77088 281-999-6900 281-999-6966 (fax)
1721 Bishop St., Unit #4 Cambridge, Ontario N1T 1N5 519-623-2300 519-623-0744 (fax)
Haybrook Industrail Estate, Halesfield 9, Unit A6, Telford, Shropshire, UK TF7 4QW 011-44-1952-586517

INDEX
Operator Safety Instructions 3
Specifications 4
AssemblyInstructions 5
Moving Fab-mate to work area (no load) 5
Moving Fab-mate (with load) 5
Attaching Lift Cable to Object 6
ElevatingLoad 6
LoweringLoad 6
RemovingMast 6
CasterBrakes 6
Lift Diagram 7
Maintenance Instructions 8
InstallingNewCable 8
LoadLiftingCable 8
TroubleShooting 9
Maintenance Record 10
OWNER’S RESPONSIBILITIES
Throughout this publication, the words WARNING, CAUTION and IMPORTANT will be
used to alert the user to special instructions concerning a particular operation that may be
hazardous if performed incorrectly or carelessly.
OBSERVE THEM CAREFULLY !!
Hazards or unsafe practices which could result in severe
personal injury or death.
Hazards or unsafe practices which could result in minor per-
sonal injury, product or property damage.
Indicates information or instructions that are necessary for
proper operation and/or maintenance.
WARNING
CAUTION
IMPORTANT

IMPORTANT
Read and understand Operators Manual before using
Fab-Mate
Inspect cable before use. Do not operate if cable
is frayed, worn or damaged.
Use only on solid level surface. Keep work area
clear of clutter and debris.
Test load balance before lifting. Do not exceed rated
load capacity. Never use two Fab-mates to lift a
load which exceeds the capacity of a single lift.
Stay clear of overhead wires and obstructions.
Do not operate in gusty winds.
Never allow anyone under an elevated load.
Never leave Fab-mate unattended with an
elevated load.
Do not climb on Fab-mate or put side load on mast.
Do not operate during storms.
OPERATOR SAFETY INSTRUCTIONS
Never lift a load over the short legs unless a
counter weight equal to the load is applied to
the long legs.
Do not pull or drag load.
Do not move the Fab-mate by pulling on load
line.
Do not use accessories with the Fab-mate that
are not supplied by the manufacturer.

OPERATOR SAFETY INSTRUC-
TIONS (CONTINUED)
Wear proper clothing. Hard hat, safety shoes,
and gloves should be worn as a precaution while
operating this lift.
Avoid horseplay around equipment, and keep
bystanders at a safe distance. Do not allow chil-
dren to operate this unit and always keep them
out of work areas.
SPECIFICATIONS
Model Maximum Lifting
Capacity* Maximum Height
1000 lbs (450 kg) 7 ft. (2.1 m)
Model A B C D Base
Dimensions Ship-
ping
Wt.
88.5”
224 cm 14”
35.5 cm 24.5”
62 cm 7.5”
19 cm 31 x 40
79 x 101 cm 206 lb
93 kg
A
ASSEMBLY INSTRUCTIONS
1. Turn base upside down.
2. Insert the four casters into the base legs.
3. Secure the casters into the base by installing
the four supplied setscrews into the base legs
and then tighten with allen wrench. Ensure
screw is tightened onto caster stem.
4. Turn base over and lock caster brakes.
5. Insert the Tee-Head into the bracket on top of
the mast assembly and secure with the two
supplied bolts. The long end of the Tee-head
should be on the opposite side of the winch.
6. Insert mast assembly into base assembly
socket with winch to rear of base, rear being
the side of base with the shorter legs.
7. Lower the lift cable so the end of the cable
can be reached by operator.
8. Attach counterweight and line shackle directly
to loop on end of lift cable.
WARNING
Operators should be thoroughly familiar
with the preceding safety precautions
before attempting to operate this equip-
ment.
B C
D

WARNING
When properly
installed, the
winch handles
should be mounted 180 de-
grees apart. Do not attempt
to raise or lower a load with
the handles mounted in any
other manner.
2. MOVING FAB-MATE TO WORK
AREA (NO LOAD)
1. The load line shackle
should be attached to
winch mount bracket
prior to transporting
unit to prevent the ca-
ble from swinging and
striking operator or by-
standers.
2. Attach winch handles
to both sides of winch,
which will allow them
to be used as a handlebar to steer the unit.
3. Release caster brakes.
4. Grasp winch handles and make a forward “S”
motion to align casters for forward movement
to work area.
WARNING
Fab-mate should only be operated on
level and smooth surfaces to avoid tip-
ping and possibility of operator injury.
3. MOVING FAB-MATE TO WORK
AREA (WITH LOAD)
1. When the Fab-Mate is used to transport a
load, the load should be placed on the base
legs for positive control of the lift.
2. The loaded Fab-Mate should only be moved
in the forward direction, whenever possible.
3. Repeat steps 2, 3 and 4 from previous sec-
tion.
To place the winch
handles in the operating
posistion, pull up on the
locking pin and slide
the handle off of the
winch shaft. Rotate the
handle assembly
around so that the black
plastic grip is facing
away from the winch.
While pulling up on the
locking pin, slide the
handle back on to the
winch shaft. Repeat
this procedure for the
other handle
1. UNPACKING THE LIFT
The winch handles have
been placed in the stored
position at the time of ship-
ment.
OPERATING PROCEDURE

1. Turn handle on winch clockwise to elevate.
2. Never allow lift cable loop,
Counter Weight, or line
shackle to contact “Tee
Head” while elevating mast.
Continued cranking in this
condition will cause “Tee
Head” to bend.
4. Attaching Lift Cable to Object
1. Lower lift line to load by rotating the winch
handles counter clockwise.
2. Lower the hook until the cable is long
enough to securely attach to the load.
Note: Secure load line using approved rigging
practices and equipment only.
WARNING
Always lift load slightly to check rig-
ging and balance before elevating.
5. Elevating Load
1. Raise the load by turning the winch handles
in a clockwise direction.
WARNING
Never allow anyone under an
elevated load.
6. Lowering Load
1. Lower the load by turning the winch handles
in a counterclockwise direction.
7. Removing Mast
Note: Caster brakes should always be locked
when removing mast.
1. Place crowbar
under pry tab
and raise mast
from base un-
til the locating
ring rests on
top of the
base.
2. Remove mast
from the base.
Pry tab
8. Caster Brakes
1. Set brake by pressing down on brake lever
as shown.
2. Release brake by lifting up on brake lever.

Caster Brake
Caster
Base
Winch
Winch Handle
Line Hook
Counter Weight
Load Line
Tee Head
Mast
9. Lift Diagram

Before each use:
1. Inspect the cable for kinks and frays. If kinked
or more than 3 wire strands are broken (small
wires) do not use the lift until the cable has
been replaced.
2. Make certain winch operates freely and cable is
not tangled on the winch drum.
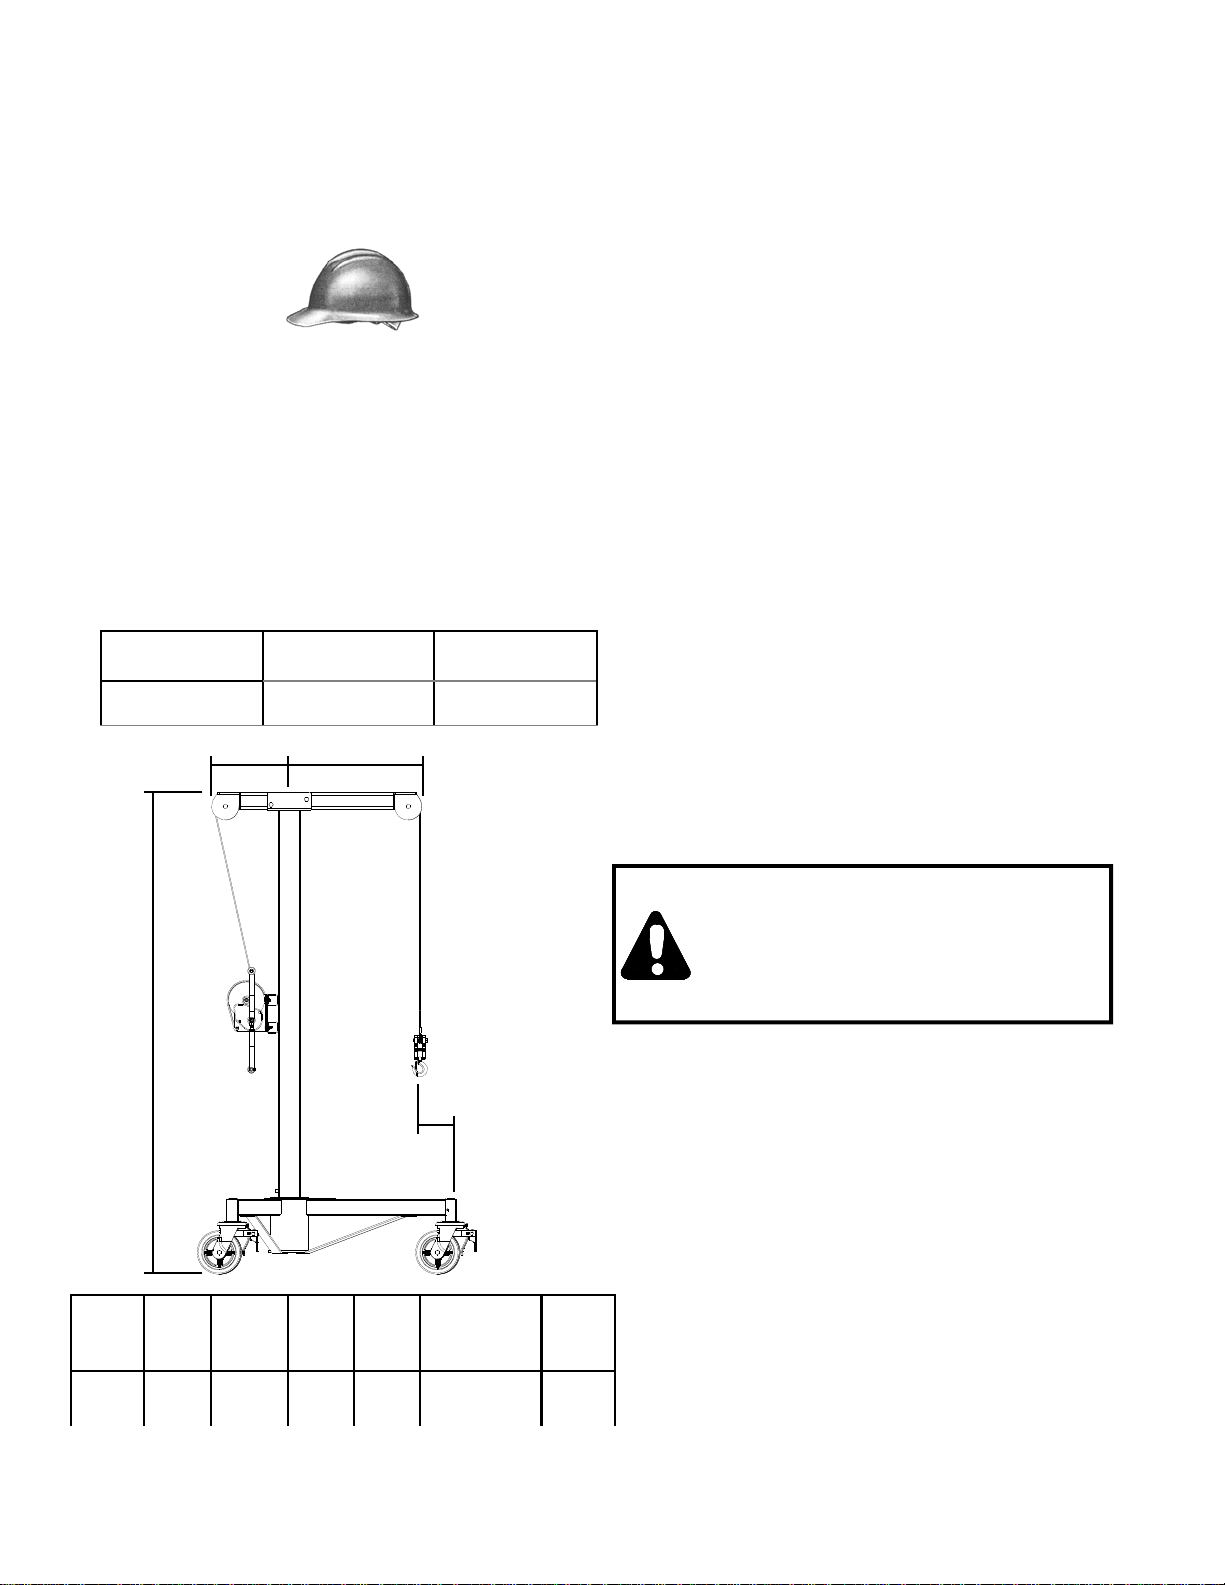
3. Inspect mast, legs, and base for bends.
4. Make sure caster wheels move freely.
Recommended Inspection Every 6 Months:
1. Inspect cable for frays and kinks (see point 1
above)
2. Make certain winch works freely and that there
are no loose or damaged parts.
Winch Maintenance:
1. Refer to the winch assembly drawings in this
Operators Manual.
2. Be sure that the winch cover is on the winch.
3. Check ratchet dog and brake ratchet for wear.
If any wear is visible, replace the part.
4. Inspect gear teeth for wear. If there is no sign
of visible wear, brush teeth with 50-wt. Motor
oil.
5. For proper brake adjustment see
“Troubleshooting” section on page 9.
Replacing the Cables:
A. Load Lifting Line
1. Lay Fab-Mate across supports with the winch
facing up.
2. Remove the gear cover.
3. Disengage load ratchet dog and pull wire rope
off of drum.
4. Loosen set screw on drum and pull wire rope
out of keeper.
5. Pull Load Line out through front of Tee head.
6. Reverse for installing new Load Line.
General Maintenance:
1. Check winch handle for wear or bends.
2. Examine all bolts and nuts to be sure they are
tight.
3. Legs, braces and base should be dent free and
damage free.
4. Check pulley housings for damage
(indentations) which can restrict the rotation of
the pulleys.
5. Make sure all lines are seated in all pulleys and
that pulleys rotate without obstruction.
7. Make sure caster wheels rotate freely and are
undamaged.
MAINTENANCE INSTRUCTIONS

WARNING
Replace all worn or damage parts only
with Sumner parts.
WARNING
Modifying the Fab-Mate in any way
can cause injury or death!
TROUBLESHOOTING
PROBLEM CAUSE SOLUTION
Fab-Mate not holding the
load. Winch Brakes need adjusting. See below
Brake pads are worn. Replace Brake pads.
Ratchet Dog or Brake Ratchet are
worn. Replace the Ratchet Dog
and/or Brake Ratchet
Ratchet Spring is broken or worn. Replace the Brake Ratchet
Spring.
The winch is hard to crank
down The brake is over-engaged. See illustration and instruc-
tions below.
The brake will not disengage. See illustration and instruc-
tions below.
The idler gear is displaced. Make sure that the idler
rotates freely and the teeth
on the idler gear are now
worn.
You have serviced the winch
and now the brake does not
work at all.
The brake ratchet or ratchet dog
are not installed correctly.
Important
For proper adjustments on the MX winch,
the pinion and drive shaft must be in the po-
sitions shown when the lock nut is tightened
against the O.D. brake disc to 15 ft-lbs.
* Correct alignment is only visible when
load is applied to lift.
*

MAINTENANCE RECORD
Lift Model Number_____________________
Lift Serial Number_____________________
Service Performed:
__________________________________________________________________________
Action Date
__________________________________________________________________________
Action Date
__________________________________________________________________________
Action Date
__________________________________________________________________________
Action Date
__________________________________________________________________________
Action Date
__________________________________________________________________________
Action Date
__________________________________________________________________________
Action Date
__________________________________________________________________________
Action Date
__________________________________________________________________________
Action Date
__________________________________________________________________________
Action Date
__________________________________________________________________________
Action Date
__________________________________________________________________________
Action Date
__________________________________________________________________________
Action Date
Table of contents
Other Sumner Lifting System manuals
Popular Lifting System manuals by other brands

REMA
REMA TLM77 CNM Series owner's manual

Majic Stairs
Majic Stairs MAJIC ATTIC LIFT installation instructions

Huchez
Huchez CT3 instruction manual

Vestil
Vestil LLW-PAILD Series Use and maintenance manual

Savaria
Savaria DELTA owner's manual

Challenger Lifts
Challenger Lifts CL4P7 Installation, operation & maintenance manual

Magliner
Magliner CooLift CPA48 owner's manual

Stratus
Stratus SAE-UT8000 Installation, operation & maintenance instructions

WHEELTRONIC
WHEELTRONIC SPACESAVER 9000 Series Installation and operation manual

AMSAN
AMSAN AM-TPL11CF manual

Turner Access
Turner Access BetaGuard 1450 Assembly guide

S.R.Smith
S.R.Smith aXs2 Owners manual & maintenance procedures