Sun Heat 1500-RC User manual

12
OPERATION MANUAL
AND
WARRANTY
ELECTRONIC ZONE HEATING SYSTEMS
Model # 1500-RC
MOVABLE AIR HEATER
SAFE-SOFT-COMFORTABLE
PLEASE READ THIS MANUAL

2
Important Instructions…………………………………....….............3-4
Welcome………...………………………………………..…….......................4
System Control & Display Identifier……………………...................5
Control Systems peration……………………………….................6-8
Placement Suggestions……………………………................................8
Filter Maintenance………………………………………….......................9
Warranty……………………………………………………….......................10
11
WARRANTY CARD
SUNHEAT
3724 Arch Ave.
Grand Island, NE 68803
877-467-8643
TO REGISTER WARRANTY ONLINE OR FOR DEALER
INQUIRIES
GO TO
www.sunhe t.com
OR
CLIP AND RETURN THE WARRANTY CARD BELOW.
————————————————————————
SUNHEAT W rr nty Registr tion
Ple se return this c rd within 30 d ys of purch se to
ctiv te your w rr nty.
THANK YOU
NAME:_________________________________________PH NE:_____________________________
ADDRESS:____________________________________________________________________________
CITY: __________________________________________STATE:________ZIP:__________________
EMAIL ADDRESS:___________________________________________________________________
DEALER PURCHASED FR M:______________________________________________________
DEALER’S ADDRESS:_______________________________________________________________
DEALER’S PH NE: __________________________________________________________________
M DEL #: _________________SERIAL #: ________________________
DATE PURCHASED: __________________________________________
I am interested in becoming a SUNHEAT dealer. Please send me
information._______

10
LIMITED THREE YEAR WARRANTY
WARRANTY: The Company warrants this product to the original purchaser or gift recipient,
to be free from defects in workmanship and material under normal use and service, for a
period of three years from the date of purchase.
LIMITATI NS: ALL WARRANTIES IMPLIED BY LAW, INCLUDING THE IMPLIED WARRAN-
TIES F MERCHANTABILITY AND FITNESS F R A PARTICULAR PURP SE, ARE EXPRESSLY
LIMITED T THE DURATI N F THE LIMITED WARRANTIES SET F RTH AB VE. IN N
EVENT SHALL THE C MPANY BE LIABLE F R ANY INCIDENTAL R C NSEQUENTIAL
DAMAGES, L SS F PR FIT R MEDICAL EXPENSES CAUSED BY ANY DEFECT, FAILURE,
MISUSE R MALFUNCTI N F THIS PR DUCT.
Some jurisdictions do not allow the exclusion or limitation of incidental or consequential
damages, so these limitations or exclusions may not apply to you. The Company will not be
responsible for damages or losses, direct or indirect, caused by misuse, abuse, accident, neg-
ligence, product alteration, connecting to an improper electrical supply, acts of God, condi-
tions of transportation or storage, or failure to follow instructions. The Company will not be
responsible for any statements that are made or published, written or oral, that are incon-
sistent with this written warranty, or which are misleading or inconsistent with the facts as
published in the literature or specifications by the company.
WARRANTY CLAIM PROCEDURE: Any product that proves to be defective within the war-
ranty period must be delivered to the nearest SUNHEAT Warranty Service Center or to the
address below. All transportation charges are the responsibility of the consumer. A copy of
the original receipt must accompany all warranty claims.
SUNHEAT International
3724 Arch Ave
Grand Island, NE 68803
877-467-8643
www.sunheat.com
3
IMPORTANT INSTRUCTIONS
READ ALL INSTRUCTIONS BEFORE USING THE HEATER.
IMPROPER USE COULD RESULT IN RISK OF
ELECTRIC SHOCK, FIRE AND INJURY TO PEOPLE.
(1) The grill of the heater is hot when in use. To avoid burns, do not let bare skin touch
hot surfaces. If provided, use handles when moving this heater. Keep combustible
materials such as furniture, pillows, bedding, papers, clothes and curtains at least 3
feet (0.9m) from the front of the heater and keep them away from the sides and the
rear.
(2) Extreme caution is necessary when any heater is used by or near
children or invalids and whenever the heater is left operating and unattended.
(3) Always unplug heater when not in use.
(4) Do not operate any heater with a damaged cord, plug or after the
heater malfunctions, has been dropped or damaged in any manner. Return
heater to authorized service facility for examination, electrical or mechanical
adjustment, or repair.
(5) Do not use the heater outdoors or for heating construction sites.
(6) The heater is not intended for use in bathrooms, laundry areas and similar indoor
locations, areas with standing water, a shower or swimming pool. Never locate
heater where it may fall into a bathtub or other water container.
(7) Do not run cord under carpeting. Do not cover cord with throw rugs, runners,
or similar coverings. Arrange cord away from traffic area and where it will not
be tripped over.
(8) To disconnect heater, turn controls to off, when the fan shuts off remove plug
from outlet.
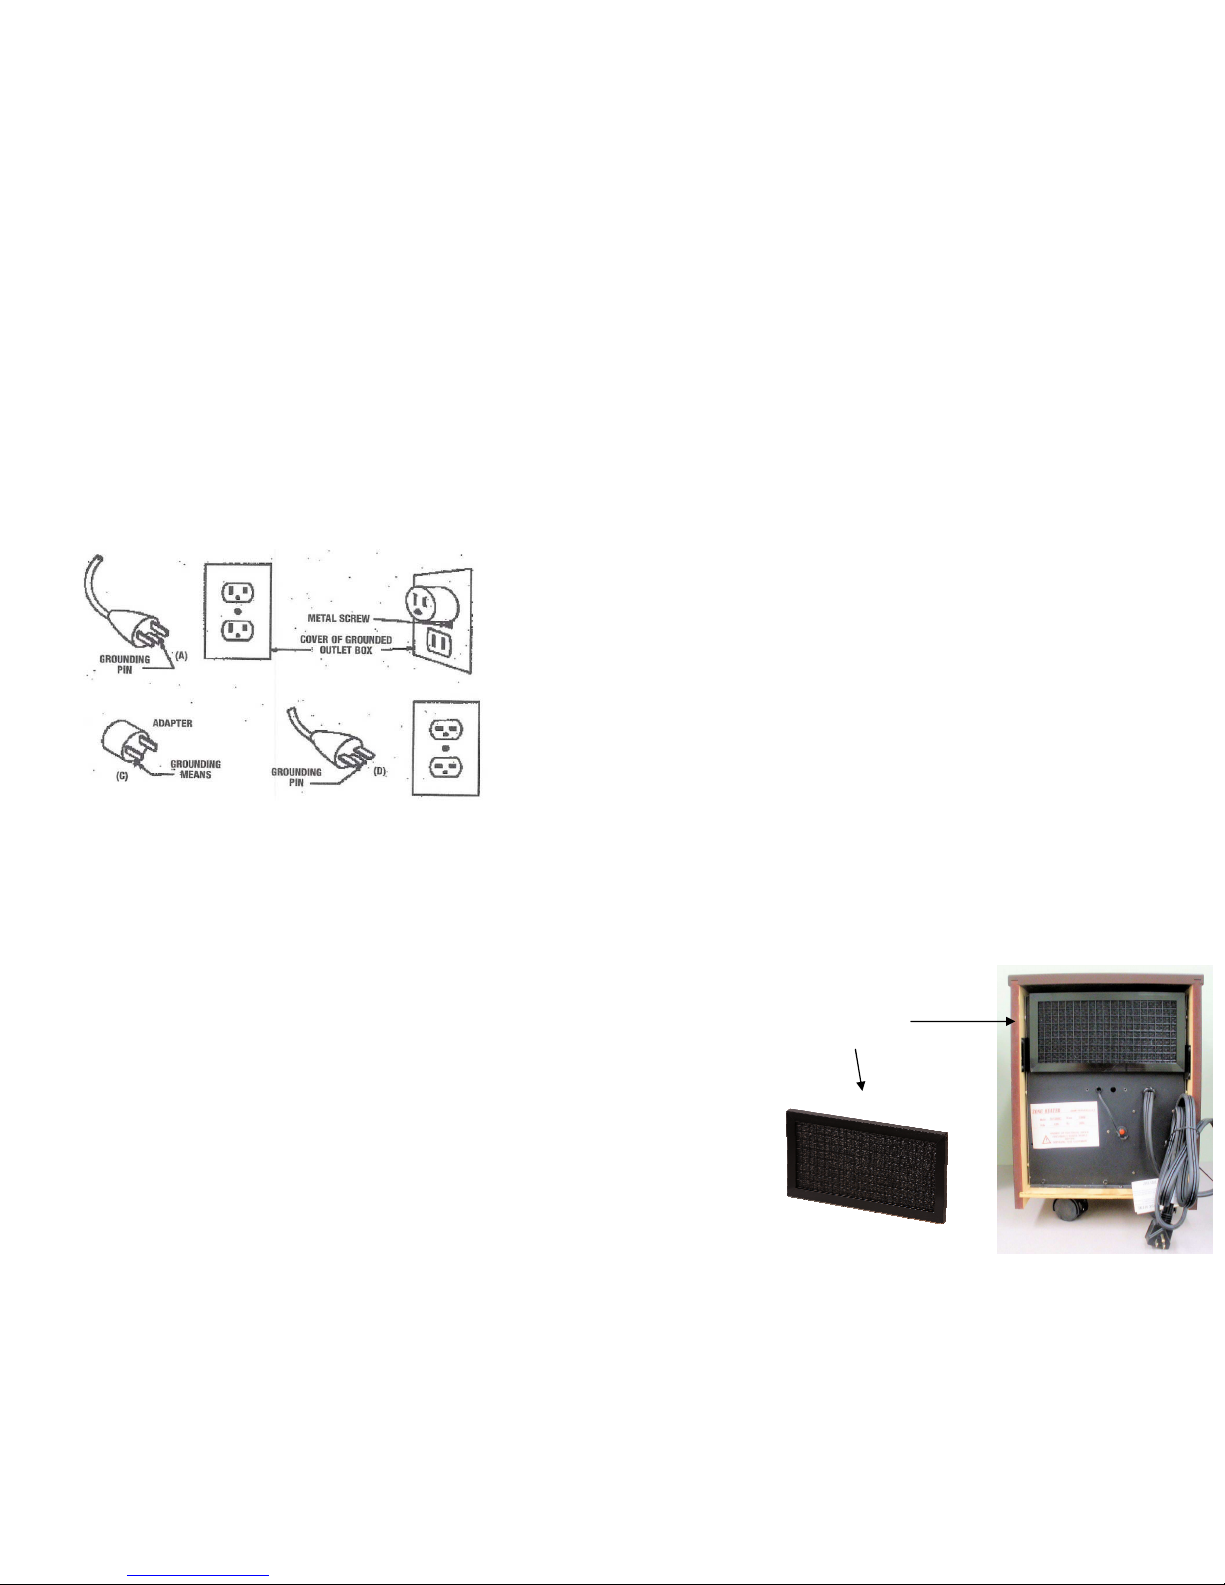
(9) Do not plug heater into any other cord connected device such as a power strip,
surge protector, multiple outlet adapter, grounding adapter or outlet-type air
fresheners. Plug into a 3-prong 120v 15amp or higher grounded circuit recepta-
cle only.
(10) Do not insert or allow any foreign object to enter any ventilation or
exhaust opening as this may cause an electric shock or fire, or damage the
heater.
(11) To prevent a possible fire, do not block air intakes or exhaust in any
manner. Do not use on soft surfaces, like a bed, where openings may become
blocked.
(12) Do not block the front or rear of the heater.
(13)Do not place anything directly in front of the heater.
(14)Do not use it in areas where gasoline, paint, or flammable liquids are used or
stored. A heater has hot or arcing or sparking parts inside.
(15) Do not plug the heater into a loose fitting or broken receptacle.
(16) Do not alter the heater’s design or you will void the warranty.

4
(17) The heater must not be located immediately below a socket outlet.
(18) Avoid the use of an extension cord because the extension cord may overheat and
cause a risk of fire. However, if you have to use an extension cord, the cord should
be No. 14 AWG minimum size and rated not less than 1875 watts. The extension
cord shall be a 3 wire cord with a grounding type cord and plug connector.
(19) The heater is for use with 120 volt outlets. The cord has a plug as shown at “A” in
Figure below. An adapter as shown at “C” is available for connecting three-blade
grounding type plugs to two-slot receptacles. Figure (B), the green grounding wire
extending from the adapter must be connected to a permanent ground such as
properly grounded outlet box. The adapter should not be used if a three-slot
grounded receptacle is available. Figure (D) European type plug.
WARNING
Un
authorized repair work by anyone other than the manufacturer or
an authorized SUNHEAT dealer or team member you purchased from is not recom-
mended. Please contact the company you purchased from or call SUNHEAT at 1-877-
467-8643 if you have questions regarding your heater not working properly.
SAVE THESE INSTRUCTIONS
(B)
9
1. For best results, do not locate the SUNHEAT Heater in an area with a
high rate of air flow.
2. For maximum efficiency, a 40% (minimum) relative humidity should be
maintained in the heated environment.
3. The SUNHEAT Quartz Infrared Portable Heater is designed to operate at
maximum efficiency up to the 70-72˚F range. Due to this unique heat
concept, a temperature of 68˚F feels as though it were 72˚F. Similar to a
summer heat index, the moisture in the air holds the heat and transfers
it evenly throughout the entire area.
4. For efficiency, the riginal SUNHEAT is not recommended for use in ar-
eas with exposed, non-insulated, concrete, or metal walls. You can use
the SUNHEAT in any room, whether insulated or not. However, a non-
insulated room will allow for greater heat loss that will impact the effec-
tiveness of the heater.
FILTER MAINTENANCE
STATIC FILTER SYSTEM
The SUNHEAT Heating System comes equipped with a lifetime washable
static filter which is easy to clean. The manufacturer recommends the
filter be cleaned once per month or as needed.
To do this, follow these steps:
1. Remove the filter from the rear of the unit by tilting out.
2. Run warm water over the filter, the opposite direction of air flow, un-
til sufficiently clear of dirt and dust. A small amount of mild detergent
may be used.
3. Shake the filter until excess water is removed. Allow to air dry. Do
not use alternative methods to dry the filter.
Filter

8
Beginning with the power ON. If you want the heater to turn OFF at a later time,
start by pressing the TIMER SELECT (6) button and the first OFF TIMER (10)
will be displayed. Next press the + (3) or the—(5) buttons to move the desired
time up or down. After you have reached the desired time, press the SET (2)
button . This activates the first Off TIMER and the heater will shut OFF once
the clock reaches the set time.
When using the hand control and starting with the power in the ON position.
Start by pressing the TIMER SELECT (H5) button and the first OFF TIMER (10)
will be displayed. Then press the (H2) or the (H6) to set the time. After you
have reached the desired time, press the CLOCK/TIMER SET (H3) button. This
activates the first OFF TIMER and the heater will shut FF once the clock
reaches the set time.
TIMER SETTING
Follow the previous programming instructions to set the timers as you wish.
Each time the TIMER SELECT (6) button on the control panel or the TIMER
SELECT (H5) button on the hand held control is pushed the timers will initiate
in sequence for programming.
The timer system will not function properly if you activate two ON TIMERS
without having an OFF TIMER active in the sequence. After an active timer has
been initiated, that timer will disappear from the display screen and will not
activate again unless set again. (In order for timers to run, they must be cti-
v ted on d ily b sis).
If you choose you can delete any timer that has been made active by simply se-
lecting the desired timer and then pressing the TIMER DELETE (7) button.
If using the hand controller simply select the desired timer then press the
TIMER DELETE (H4) button.
IN THE EVENT OF A POWER FAILURE OR JUST MOVING THE HEATER FROM
ROOM TO ROOM, THE HEATERS ELECTRONIC SYSTEM IS DESIGNED WITH A
PERMANENT BACKUP BATTERY. THIS WILL ALLOW ALL OF THE PREVIOUSLY
SET FUNCTIONS: POWER ON/POWER OFF/TIMER SETTINGS & EVEN THE
CLOCK WILL CONTINUE TO KEEP ACCURATE TIME. WHEN THE POWER IS RE-
STORED EVERYTHING WILL RETURN JUST THE WAY YOU HAD THEM BEFORE
THE POWER FAILURE.
PLACEMENT SUGGESTIONS
To assure maximum performance of your riginal SUNHEAT Electronic In-
frared Portable Zone Heater, please note the following recommendations.
1. Place the SUNHEAT near the center of the home next to a warmer inside
wall with the heat being blown toward the colder outside walls of the
home. This will allow the thermostat to more accurately moderate the
temperature.
5
SYSTEM C NTR L & DISPLAY IDENTIFIER
1 = P WER N/ FF
2 = CL CK SET/TIMER SET
3 = INCREASE (+)
4 = REM TE SENS R
5 = DECREASE (-)
6 = TIMER SELECT
7 = TIMER DELETE
8 = FF TIMER
9 = N TIMER
10 = FF TIMER
11 = N TIMER
12 = CL CK
13 = L G
14 = SET TEMPERATURE
15 = TEMPERATURE
16 = R M TEMPERATURE
WELCOME
Congratulations! You have made a wise choice for quality heat. The Original
SUNHEAT is the safest and most effective infrared zone heater available.
The Original SUNHEAT will provide safe, soft, comfortable heat for many
years to come. The Infrared Quartz Heating Tubes produce no fumes or deadly
monoxides. The ambient room air processed through The Original SUNHEAT
passes through a lifetime washable filter – it is truly clean healthy heat!
The Original SUNHEAT does not dry out or remove the oxygen from the air.
Instead it uses the moisture in the air to transfer soft infrared warmth to you and
everything in the room. The entire zone is evenly filled, from floor to ceiling
and wall to wall, with comfortable even heat.
13
14
15
16
12
11
10
9
8
1 2 3 4 5 6 7

6
H1 = P WER N/ FF H2 = INCREASE (+) H3 = CL CK SET/TIMER SET
H4 = TIMER DELETE H5 = TIMER SELECT H6 = DECREASE (-)
SYSTEM C NTR L & DISPLAY INDENTIFIER
HAND HELD C NTR LLER
GENERAL OPERATION
Plug the power cord into any unused grounded 120 volt 15 amp or higher cir-
cuit receptacle. Located on the front of the heater is a control panel / display
screen. Simply press the POWER ON/OFF (1) button. If using the hand control
simply press the POWER ON/OFF(H1) button and the unit will turn n.
SET DESIRED TEMPERATURE
To set the desired temperature that you want the heater to maintain, simply
press the + (3) or the - (5) buttons to move the desired set temperature up or
down. If using the hand control simply press the (H2) or the (H6) to set
the temperature. After a few seconds the Set Temperature Display will stop
flashing and the heating elements light up. In about one minute, the fan will
come on delivering safe, comfortable, soft heat out of the front of the grill.
Note: After setting the desired temper ture & the displ y stops fl shing.
The ctu l room ir temper ture t the re r of the he ter will be dis-
pl yed. To check the Set Temper ture, t ny time simply press the + (3)
or — (5) button on the control p nel or by pressing the or the button on
the h nd control.
H6
H5
H4
H3
H2
H1
7
nce the room you are heating reaches the desired set temperature, the ther-
mostat will maintain your desired comfort setting by turning the heating ele-
ments on and off automatically. If you do not need the SUNHEAT to run, simply
press the POWER (1) button . If using the hand control simply press the (H1)
button, and the unit will turn FF.
After turning the power FF the fan will continue to run until the heater has
exhausted all of the stored up heat inside.
The heater is equipped with an internal high limit switch that cuts off the power
to the infrared heat tubes if air flow is blocked to the unit. To restore power to
the heating tubes, remove the power cord from wall outlet and let the unit cool
down for approximately 30 seconds before plugging power cord back into the
wall outlet. If the heater has cooled sufficiently the high limit switch will auto-
matically reset and the heat tubes will begin to work again
.
SETTING THE CLOCK
To set the clock on the SH-1500RC turn the power ON. Press the SET (2) button
(2) two times to enter the clock program. Then press the + (3) or the — (5)
buttons to move the desired time up or down. After you have reached the de-
sired time the display will flash for a few seconds and then the time will be set.
TIMER SETTING
The SH-1500-RC has four timers built into the system for convenient setting of
two different start times & two different stop times.
Beginning with the power OFF. If you want the heater to turn N in the morn-
ing and warm things up before you get out of bed, simply press the TIMER SE-
LECT (6) button and the first ON TIMER (11) will be displayed. Next press the
+ (3) or the—(5) buttons to move to the desired time, then press the SET (2)
button. This activates the first timer and the heater will begin to run once the
clock reaches the set time. At this point the heater will continue to run unless
manually turned off.
When using the hand control and starting with the power OFF. Start by press-
ing the TIMER SELECT (H5) button and the first ON TIMER (11) will be dis-
played. Then press the (H2) or the (H6) to set the time. After you have
reached the desired time, press the CLOCK/TIMER SET (H3) button. This acti-
vates the first timer and the heater will begin to run once the clock reaches the
set time. The heater will continue to run unless manually turned off.
In a scenario where you will be leaving the house before your spouse or chil-
dren do, it may be desirable to have the heater programmed to turn itself off on
its’ own. To achieve this follow the instructions below.
Table of contents
Other Sun Heat Heater manuals