Sun2Solar 902534 User manual

Item# 902534, 902535
REV:09152022

Safety Instrucons
Read through these instrucons carefully before you use
the product.
CAUTION: Failure to comply fully without instrucons for
use, or safety instrucons, may cause damage to the unit or
injury to individuals.
• Please read the instrucon manual and the
direcons shown
• Do not allow children to handle this equipment
• Do not posion the equipment too close to the pool
• Do not use any petroleum-based lubricants.
Petroleum aacks the product’s plasc components
• This equipment is not intended for use by anyone
(including children) with restricted physical, sensory
or mental ability, or with limited experience and /
or limited knowledge, unless they are supervised by
someone responsible for their safety, or they receive
instrucon from them regarding the use of the
equipment
• Children must be supervised to ensure they do not
play with the equipment
General Informaon
Condions for the Installaon of a Solar Heater
The Sun2Solar® Deluxe Solar Heater you have purchased is
intended for use with inground and above-ground pools. And
is easy to install and handle. The installaon instrucons are
based on the following condions:
1) You have a pool which is fully built and lled with water
2) Your pool has a lter system
3) You have the required connector hoses to supply the
pool and lter system with water (1 ¼” – 1 ½”)
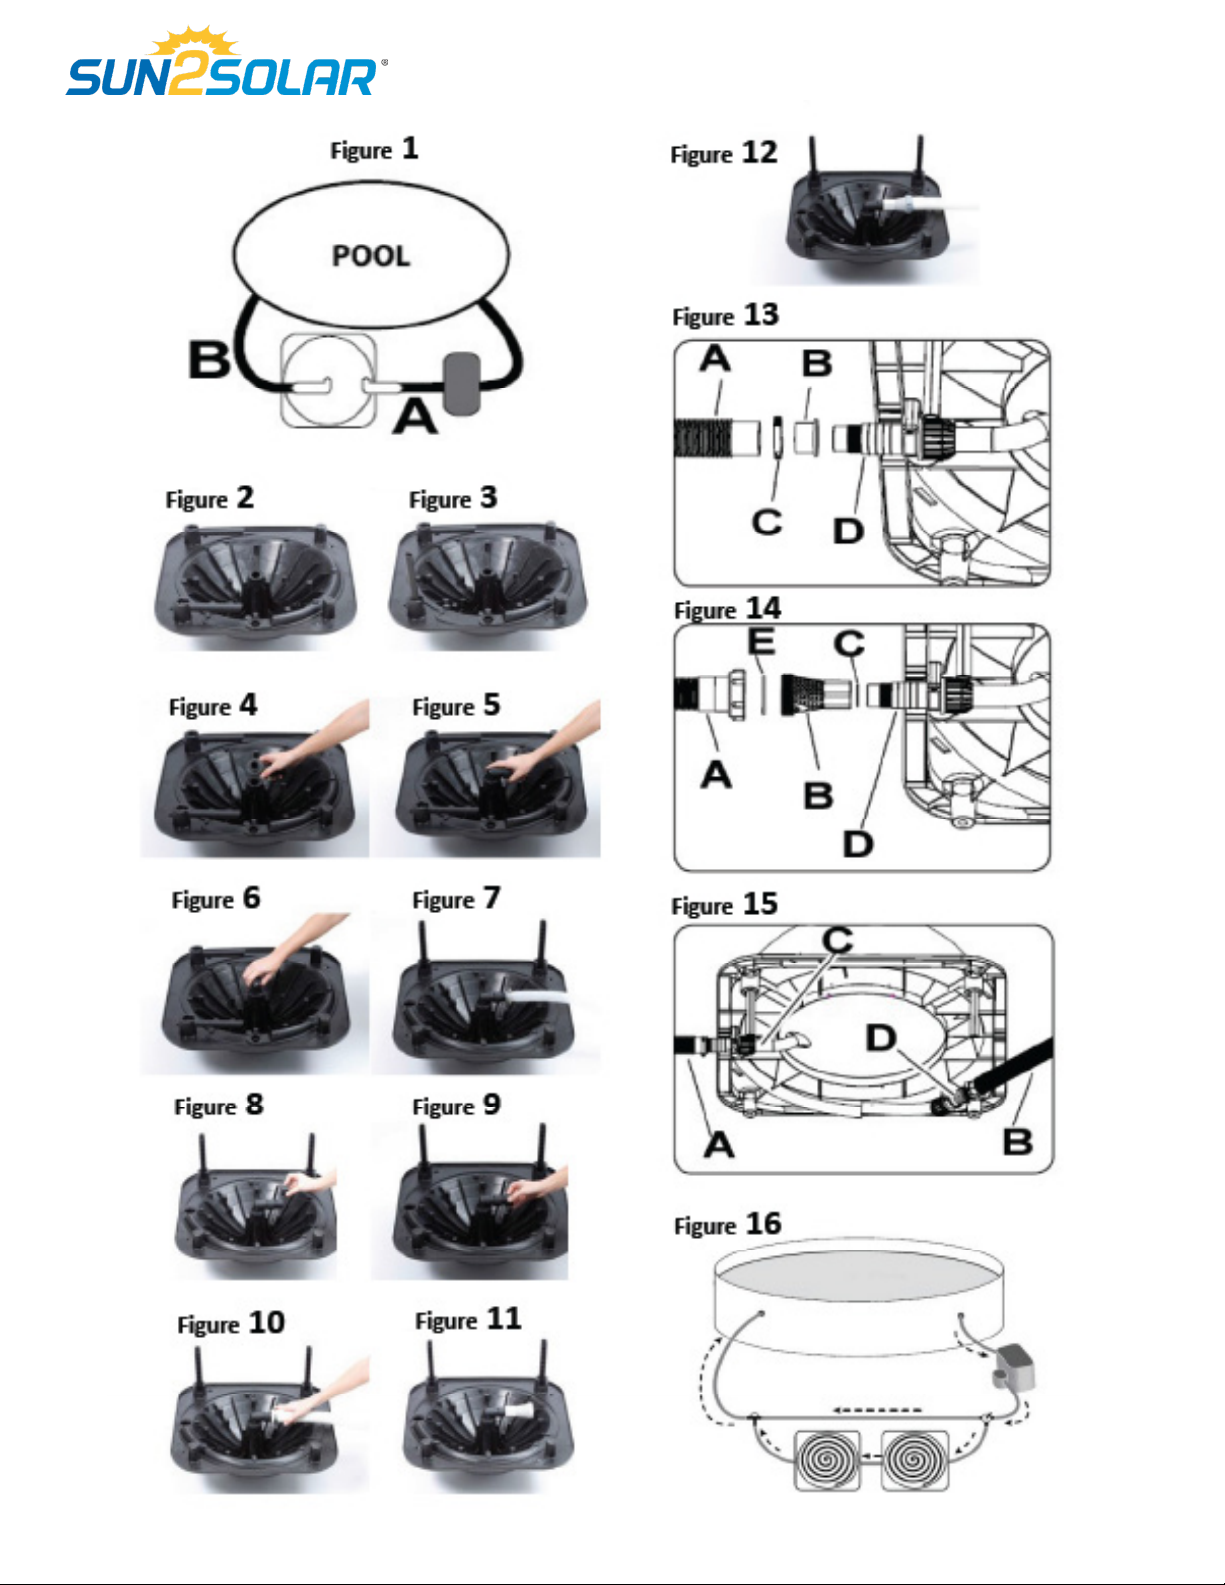
Once the equipment is installed, it is connected between
your lter system and your pool using the two hose
connectors. (Fig 1) The connector hose forces the cold water
from your lter unit into the solar chambers of your solar
heater. Here it is heated by the sun’s energy and then fed on
to the second connector hose towards the pool.
A = Feed from the lter unit to the solar collector
B = Feed from the solar collector to the swimming pool inlet
nozzles
Water heang depends on the following factors: Flow rate
and level of exposure to the sun
Solar heang only funcons eciently in sunshine. It can
remain connected to the pump in poor weather as this only
causes a slight loss of pressure in the pump.
Tools and Accessories Required
These tools are required for assembly, but are not included in
your set:
• Phillips screwdriver
• Flat head screwdriver
The Ideal Locaon for Your
Sun2Solar® Deluxe Solar Heater
Your solar heater needs to be in a locaon with as much
sunlight as possible
• Never posion the solar heater over the surface of
your pool
• Keep it an adequate distance away from your pool
(keep a safe distance)
• The solar heater is designed to allow maximum
possible penetraon of sunlight
Product Care
The solar heater should not be exposed to cold weather. The
solar heater should be stored in an area protected from frost
before the rst frost, or at the end of the pool season.
All parts must be rinsed or cleaned with water only.
Detergents may damage the protecve cover
Wintering
Drain all the water from the solar collector be closing o
the pipes. Store the equipment away for winter in an area
protected from frost. Remove the pool return pipes.
Make sure there is no water le inside the equipment as this
can freeze. Water expands as it freezes and so can damage
the solar chambers.
Technical Data
Sun2Solar® Deluxe Dome
Above Ground Pool Heater:
• Dimensions: L x W x H – 55” x 55” x 27”
• Maximum Pressure 1 Bar at 68° F
• Water ow rate max 7,500 l/h
• Water content collector 10 I
Sun2Solar® Deluxe Dome
Inground Ground Pool Heater:
• Dimensions: L x W x H – 78” x 78” x 42”
• Maximum pressure 2 bar at 65° F
• Water ow rate max 10,000 l/h
• Water content collector 10 I

Assembly Instrucons
Before you begin installaon of the solar heater, turn o
the lter pump and close o all water connecons.
Sun2Solar® Deluxe Dome
Above Ground Pool Heater
• Aach the feet to the underside of the solar
collector (Fig. 2,3)
• Fit the 2 connecon adapters to the underside of
the solar heater (Fig 4,5,6)
• Connect the hoses between the lter unit, the
solar collector and the pool
• Assembly with a 1 ¼” hose connector. This is
pushed directly over the connecon adapter and
fastened with the hose clamp (Fig 7)
• Assembly with a 1 ½” hose connector (Fig 8,9,10)
First push the rubber reducer ng 1 ¼ - 1 ½”
over the connecon adapter. Then push the 1 ½”
hose over the reducon ng and fasten with a
hose clamp
• Intex® special adapter: This is needed on large
Intex® pools which have swimming pool hoses
with gate valves (Fig 11, 12)
Sun2Solar® Deluxe Dome
In-Ground Pool Heater
Connecon between solar collector and pool
For pools with a 1 ¼” or 1 ½” swimming pool hose follow
the instrucons below:
• Aach the hose to the return connector on the
underside of the solar heater
• Use a hose clip to connect the hose to the return
connector (Fig 13)
A) Pool Return Hose
B) Reducon Fing (if required)
C) Hose Clip
D) Return Connector
For large Intex® pools (which have swimming pool hoses
with gate valves) follow the instrucons below (Fig 14)
• Connect the Intex® special adapter and the O Ring
with the return connector. Make sure the O Ring
is in the Intex® special adapter
• Screw on the pool hose with the Intex® special
adapter. Makes sure that the seal between the
hose and the Intex® special adapter is correctly
inserted.
A) Intex® Special Hose
B) Intex® Special Adapter
C) O Ring
D) Return Connector
E) Flat Seal
Correct Posioning of the Solar Heater
Aach both legs to the underside of the device and adjust
posion to maximize exposure to the sun. Make sure the
surface is stable and level
The device should be assembled as show (Fig 15)
A) Swimming pool hose to the pool
B) Swimming pool hose from the lter / pump
C) Return connector
D) Connector ow
Make sure that all hose connecons are waterght and
the hose is not kinked or have any sharp corners. If the
hoses are not waterght, check whether the O Rings are
correctly posioned and all connecons are screwed
together rmly. Do not over-ghten the hose clamps.
Connecng Several Solar Heaters
If you would like to increase the heang power, you can
connect several collectors together. For this you will need
an addional swimming pool hose 1 ¼” – 1 ½”.
We recommend connecng a maximum of 4 collectors,
depending on the power of your lter unit.
We recommend use of a Sun2Solar® bypass kit (Fig 16)
(Item# 902518A)
Not only does this help opmal control of heat output,
it also helps targeted control of the water ow rate,
depending on the power of the lter unit.
Inial Use
Once the solar heater is assembled and the hoses are con-
nected to the lter pump and the pool. Open the water
supply and ensure that water is owing through the hose.
Then turn on the lter system. Air bubbles will rise from
the inlet nozzle in the pool. This happens as the air is
expelled from the solar heater. If this connues for more
then 2-3 minutes, check the ghtness of the connecons
in your system.
Please Note: Cover your pool overnight to avoid loss of
heat.

Trouble Shoong
Problem Cause / Soluon
The pool does not
warm up
• Make sure that water is owing through the hoses
• Has it been sunny enough?
• Exploit the maximum amount of sunlight and increase the running
me of the lter pump
• Cover your pool overnight to avoid loss of heat
• It is possible that you may need several solar collectors
No bubbles appear aer the
equipment has been aached
to the pump
• Check the lter system and ensure that water from the pool is
owing through the lter pump, then through the solar collector
and nally through the connector house back to the pool
Air bubbles come out of the
pool return aer the pump has
been turned on
• Check the connector hoses for any damage
• Check that the hose clamps have been properly ghtened
Water escaping
• Check the seals in the systems of pipes
• Check whether you have ghtened the hose clamps ghtly enough
• Check the connector hoses for any cracks
Intex® is a registered trademark of the Intex® Recreaon Corp.
There is no aliaon or relaonship between Sun2Solar® and Intex® Corp.

This manual suits for next models
1
Table of contents
Other Sun2Solar Heater manuals
Popular Heater manuals by other brands

Star Progetti
Star Progetti HELIOS INFRARED IRK TITAN Super Power operating instructions

Malmbergs
Malmbergs DF-150P3-7 instruction manual

Plumbworld
Plumbworld PWLPRADC10 Assembly instructions

Goldair
Goldair PLATINUM GPCH360 operating instructions

DeLonghi
DeLonghi TCH7915ER quick start guide

Sealey
Sealey PEH2001 instructions