Sunbeam SB08 User manual

Sunbeam Mini Sewing Machine
Operating Instructions
Model No. SB08
Read all instructions carefully before using this item
SMT122911
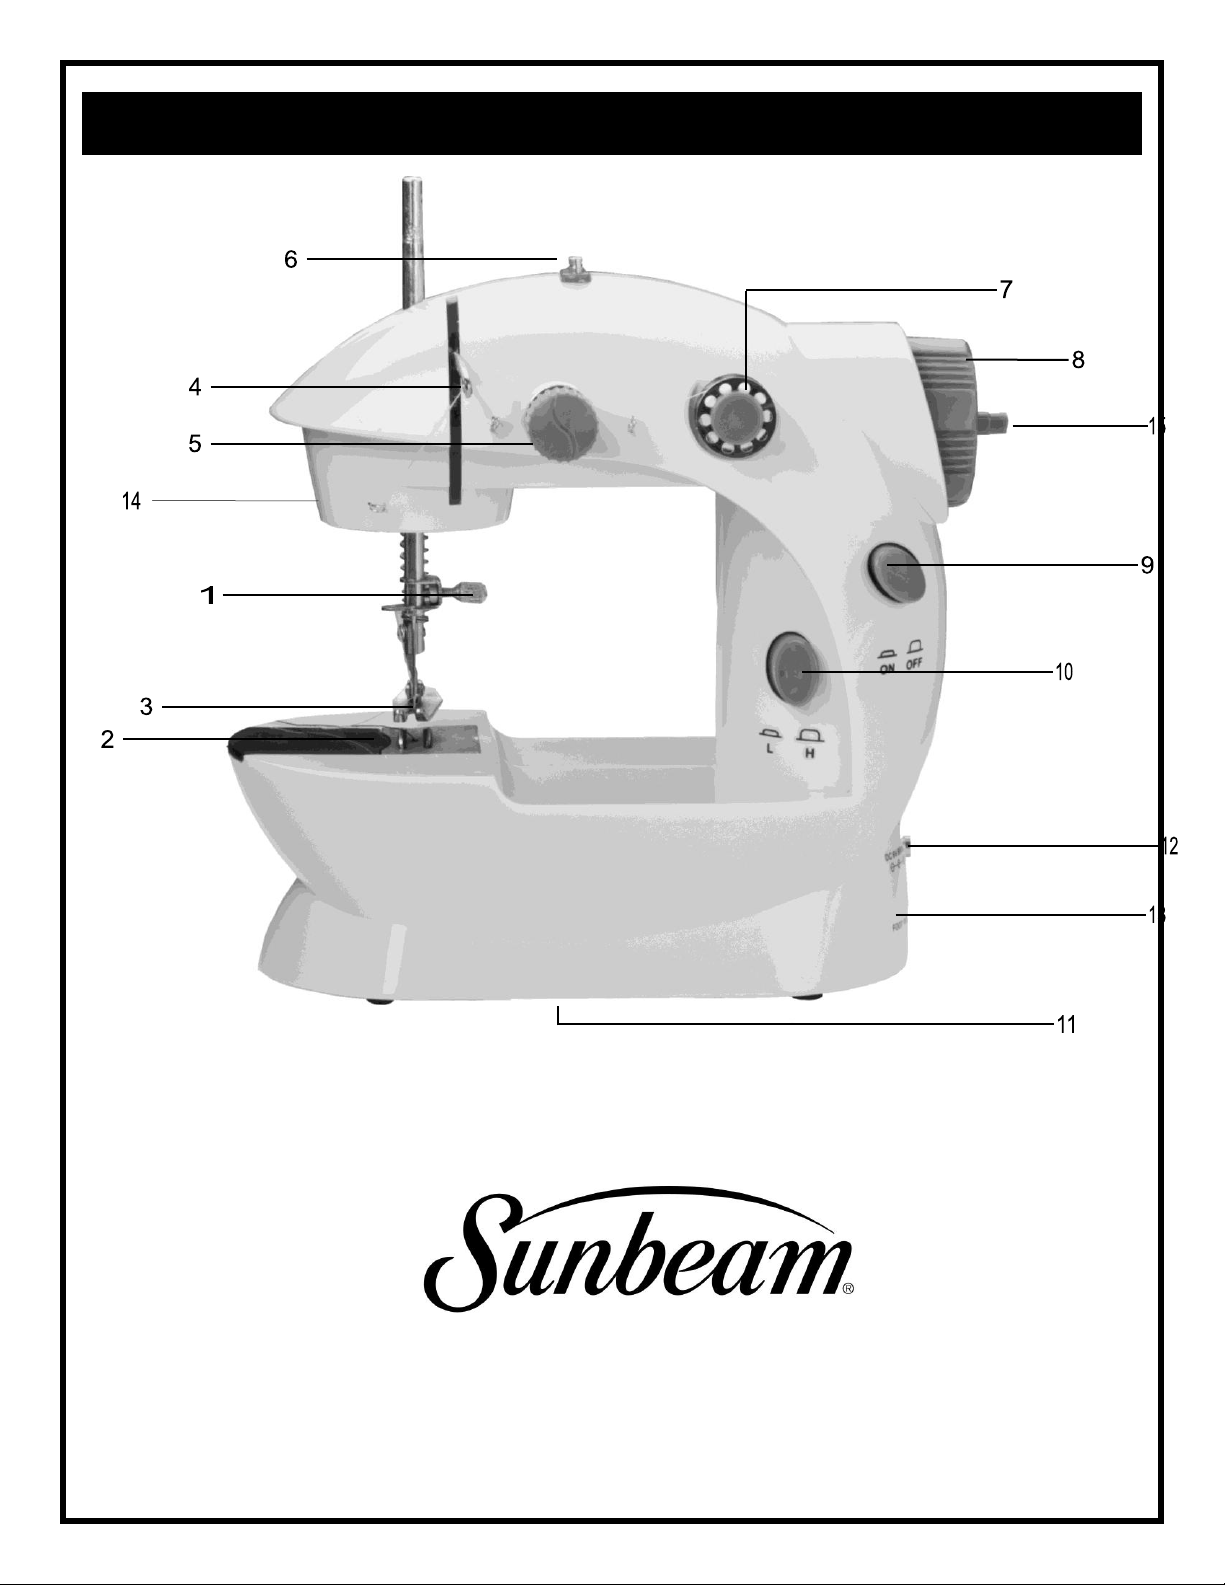
Component Identification

Threading the Machine:
1. Needle Clamp
2. Bobbin Compartment
3. Needle
4. Take-up Lever
5. Tension Screw
6. Thread Spindle
7. Bobbin Holder
8. Hand Wheel
9. On/Off Switch
10.Speed Button
11.Battery Compartment
12.DC Jack
13.Foot Pedal Jack
14.Presser Foot Lever
15.Bobbin Winder
1. Make sure the OFF before inserting batteries.
2. Put 4 AA batteries into the battery compartment on the bottom of the machine.
3. Turn ON the sewing machine and the machine will start sewing immediately
(note: if the machine is used with included pedal, the machine should stay on
OFF. It will only work when you push down the pedal).
4. Make sure the machine is properly threaded and fabric is in the right position for
sewing before you turn the machine on.
Operating Instructions:

Bottom Bobbin Placement:
1. Raise thread spindle by pulling it upward until it’s fully extended.
2. Place thread spool on the thread spindle. (for bobbin spindle: pull out the spindle
and guide it through the hole in the bobbin and replace the spindle)
3. Pull the thread from the spool through the first thread guide (1) in the direction
toward front of machine.
4. Bring thread across to the second thread guide (2). Thread goes over the tension
adjusting screw and must be positioned between the 2 washers behind the
tension adjusting screw. This is what provides the lock stitch tension to the
thread.
5. Pull thread from the tension adjusting screw guide through thread guide (3).
6. Pull thread toward thread guide (4) through the take up lever hole.
7. Pull thread down to thread guide (5) and insert thread from the top downward.
8. Pull thread downward through thread guide. If necessary, lower the needle to
reach this thread guide by turning the hand wheel slightly counter-clockwise to
lower the needle.
9. Insert thread through eye (6) of the needle from the front towards the back of
the machine (use the included threader if necessary).
10.Raise the presser foot by lifting up on the lever at the rear of the machine
11.Pull about 10 inches of thread through the needle and leave it on the deck under
the presser foot towards the back of the machine.
1. Remove bobbin cover and place the bobbin with thread of your choice in the
bobbin holder leaving about 10 inches of thread extended out from the bobbin
holder and replace the cover.
2. Turn hand wheel counterclockwise (towards you). The needle will go down,
picking up the bobbin thread. Turn hand wheel until needle has descended
completely and came up again to its highest raised point.
3. Raise the presser foot and bring the spool thread around to the front. Pull it
gently up and you will see it has caught the bobbin thread. Pull the two threads
towards the back (away from you) and lay them under the presser foot.
Note: make sure that the machine was threaded properly, before you begin to sew.
Note: The machine comes pre-threaded; take a minute to review how it’s done to make it easier
when you do it yourself.

1. Lift the needle above the presser foot by turning the hand wheel slightly in
clockwise direction.
2. Raise the presser foot by lifting up on the lever in back of the machine above the
presser foot bar.
3. Position fabric to be sewn under the presser foot with presser foot in raised
position. Make sure seam direction is aligned with the presser foot, with seam
location.
4. Lower the presser foot.
5. Select speed by pressing speed button on the front of the machine. High speed,
button is extended out. Low speed, button is in. Use low speed for difficult
projects which require a lot of stopping and turning fabric. Use high speed for long
uninterrupted seams.
6. Turn power switch to ON position. (Note: when using the foot pedal, the machine
should be on OFF and would only work when you press the pedal)
7. Gently guide the fabric to keep the seam straight by pressing lightly down with
your fingertips on both sides as it feeds through the presser foot.
8. When the seam is finished, turn switch off.
9. Raise the needle above the fabric by turning the hand wheel slightly in a clockwise
direction.
10.Raise presser foot by lifting the presser foot lever.
11.Pull fabric towards you leaving about 10 inches of thread between the fabric and
the machine.
12.Cut thread close to fabric, leaving excess thread loosely lying on the sewing deck
in the direction of the presser foot and towards you.
1. Tension for maximum performance and has been set and adjusted by the factory.
However, if you find that stitches are too loose or too tight, you can adjust the
stitch.
2. Loosen stitch by turning the tension screw counter clockwise.
3. Tighten the stitch by turning the tension screw clockwise. Sewing heavier fabric
may require loosening the stitch. Very light fabric may require tightening the
stitch. Bobbin tension cannot be adjusted.
Sewing Instructions:
Adjusting Tension:

1. Turn the hand wheel clockwise to raise the needle to its highest position.
2. Loosen the needle clamp screw by turning it counter clockwise. You may need to
use a short slotted screwdriver or small piece of metal (e.g. dime).
3. Remove the needle, pulling down, away from the needle clamp.
4. Place the new needle with the flat side facing in against the needle clamp. Push it
gently as far up as it will go.
5. Tighten the needle clamp screw while holding the needle in place.
Note: Needles come in various sizes designated by numbers. The smaller the number, the thinner the
needle. Use smaller needles for more delicate fabrics and larger needles for heavier fabrics.
You can wind your own bobbins with thread from spools you purchase separately to have a virtually
unlimited color selection. Match your fabrics or contrast with the thread shades of your choice.
1. Always remove the bobbin from the bobbin case on the machine before you wind
a new bobbin.
2. Place the thread spool on the thread spindle.
3. Take an empty bobbin in one hand. Pull the thread down from the thread spool
and thread the loose end through the small hole on the bobbin rim from the
inside.
4. Leaving the loose end on the outside of the bobbin, wind the thread several turns
around the INSIDE of the bobbin.
5. Place the bobbin on the bobbin winder, located on the hand wheel.
6. Make sure that the thread is winding onto the bobbin in a counter clockwise
direction. (This would mean the thread should be winding under the bobbin, not
over it).
7. Hold the thread lightly, guiding it gently through your thumb and index finger and
turn the machine ON.
8. When the bobbin is full, turn the OFF the machine. Insert the bobbin into the
bobbin case using the instructions for threading the machine.
Changing Needle:
Winding a Bobbin:

Always disconnect or remove power supply including batteries when changing
needles or threading machines
Never open the main motor case of the machine. The mechanism has been
factory adjusted.
Always check the threading of the lockstitch before beginning to sew a seam.
Improper threading or placement of the bobbin will result in damage to the
machine and clothing.
Do not pull on fabric as you sew. Gently guide the material. Pulling could break
the needle and result in damage to the machine.
Remove batteries when the machine is not in use for long periods, this saves
battery life and protects the machine. Keep extra batteries on hand so projects
will not be interrupted when batteries need to be replaced.
KEEP AWAY FROM CHILDREN: This sewing machine is not a toy and not meant to
be used by or near children.
The sewing machine is an electrical appliance when used with the adaptor (not
included). Do not submerge the unit or any other parts in water. Do not operate
the sewing machine with wet hands.
Do not change needles or thread machine while unit is on. Do not touch the
needles before you turn off the power.
Never use with damaged power cord or plug.
Keep the power cord away from heated surfaces.
Do not unplug by pulling or tugging on the cord. Grasp the plug with dry hands to
remove the plug from the outlet.
Do not attempt to sew clothing while it is being worn.
Power adaptor NOT INCLUDED. Use only Dc 6v 800mA. Any other adaptor may
cause injury or damage to the machine.
Never leave the sewing machine unattended while plugged in. Turn switch off
and unplug the cord when not in use.
For Your Safety:

The SB08 Mini Sewing Machine is warranted for 6 months from provable date of
purchase against defects in material and workmanship. During this period such
defects will be repaired, or the product will be replaced without charge.
This warranty does not cover damage caused by misuse, negligence or improper
installation. Warranty is also invalid in any case that the product is taken apart or
serviced by an unauthorized service station.
TO CLAIM
Purchaser must receive a Return Authorization Number by calling our service
center at 1-877-678-6232.
Once your return has been authorized, please send your package, postage
prepaid, with a copy of your proof of purchase. You will also need to enclose a
letter explaining the nature of your difficulty in detail. Please allow 2-4 weeks for
return shipping.
Smartek USA Inc.
49 Bartlett Street Brooklyn, NY 11206
1-877-678-6232
Sunbeam® logo is a registered trademark of Sunbeam Products, Inc. used under license.
6 Months Limited Warranty
Table of contents
Other Sunbeam Sewing Machine manuals


