ZOJE 5780BS User manual

5780A
Z- - -91 172348 95
00
HIGH SPEED COMPUTER CONTROLLED LOCKSTICH STRAIGHT BUTTON HOLING SEWING MACHINE- -
OPERTION MANUAL
PARTS BOOK
10051884

I.使用时的注意事项/IMPORTANT SAFETY INSTRUCTION
1)没有往油盒加油时,请绝对不要运转缝纫机。
2)缝制结束之后,请清扫旋梭、切刀部的灰尘和线绒。并确认油量是否充足。
3)使用启动踏板时,缝纫机启动后请把踏板返回到原来的位置否则会连续缝制。
4)本缝纫机装有安全开关,当缝纫机头放倒时,不让缝纫机运转。
要运转缝纫机时,请把缝纫机头正确地放置到台板上之后,再打开电源开关。
1 ) Never operate the machine unless the oiling tank has been properly lubricated.
2 ) Be sure to remove any dust from the hook or bobbin thread cutting knife section at the end of the
day, and check the amount of oil remaining.
3 ) Be sure to return the activating pedal to the home position after the machine has started to run.
4 ) A safety switch is installed so that this sewing machine can’t be operated in the state that the
machine head is tilted. When operating this sewing machine, turn the power switch ON after
setting the sewing machine to the bed base properly.
II.规格/ SPECIFICATIONS
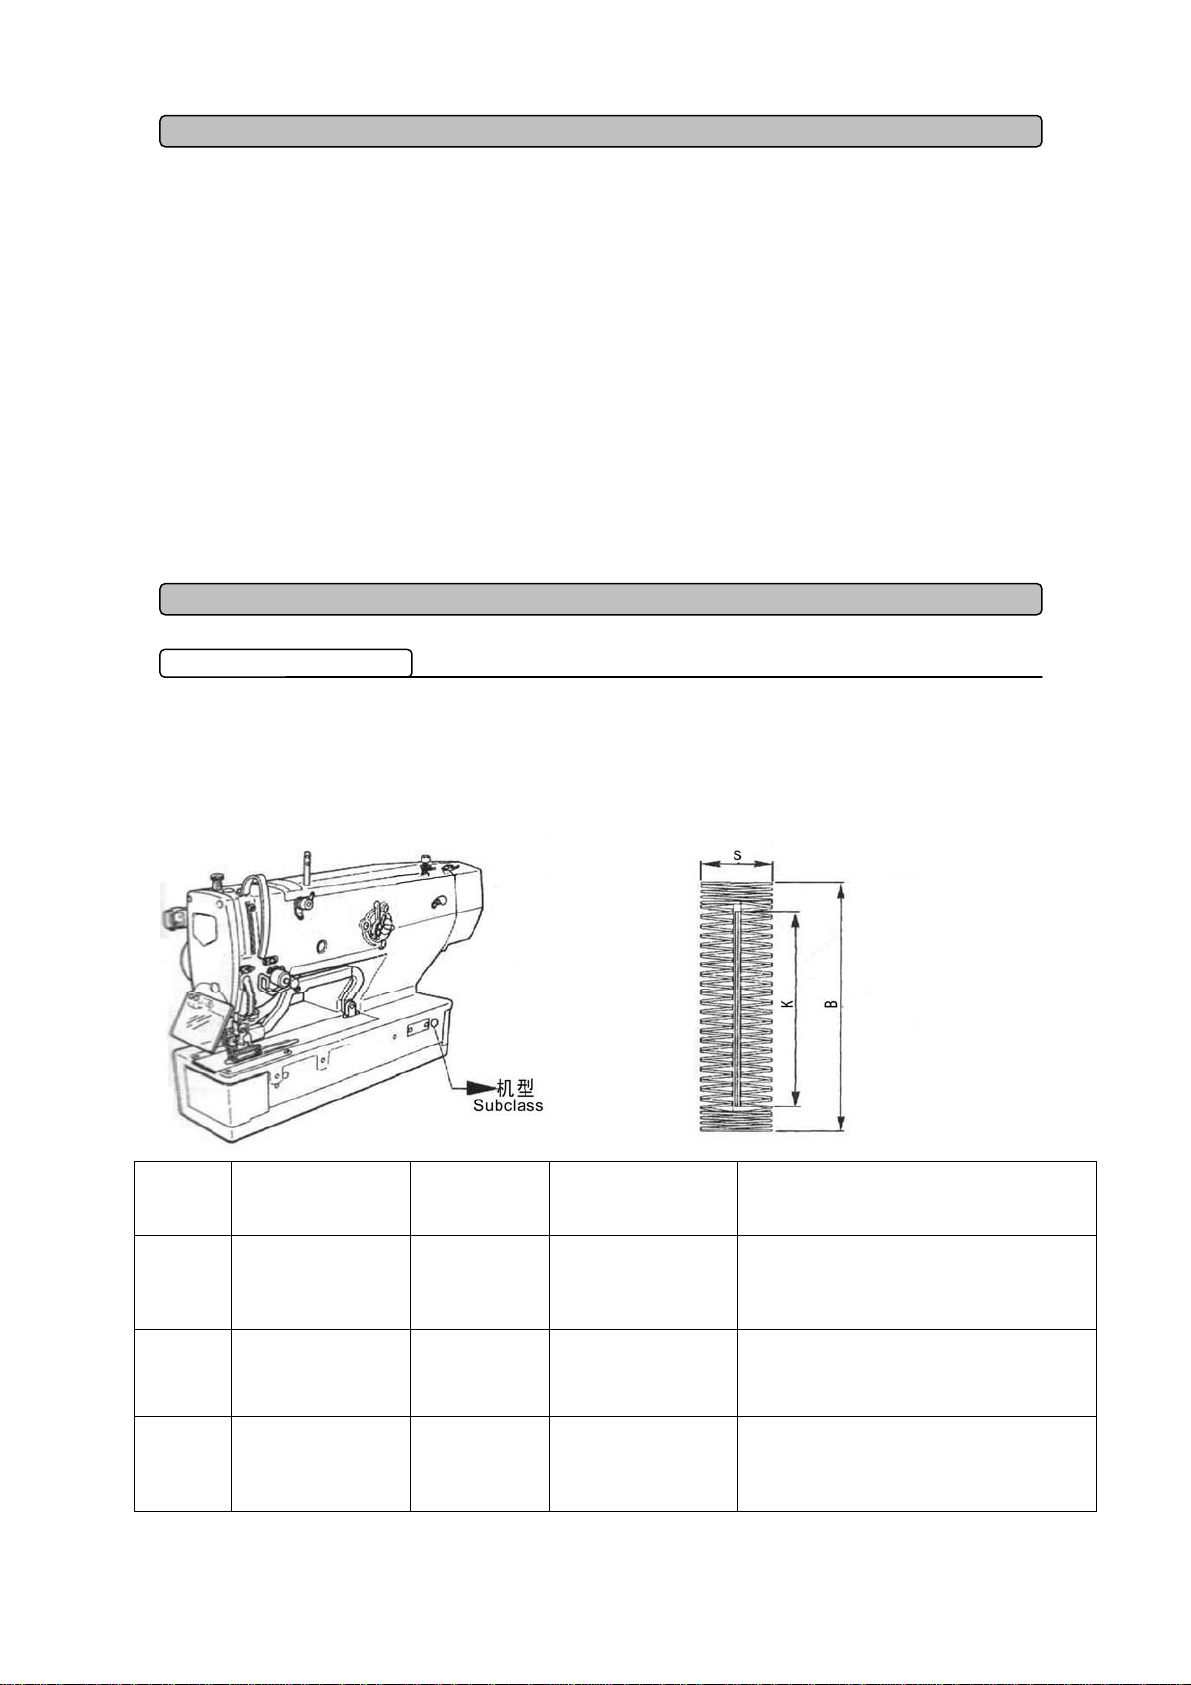
1. 机种/Subclass
5780B 系列高速电子平头锁眼机有以下系列机型。
5780BSerise Computer-controlled high-speed lockstich Straight Button-holing Industrial Sewing
Machines has the subclass machines below.
机型
Subclass
套结宽幅(S)
Width of noose
切刀尺寸
Sise of cutter
缝制长度(B)
Sewing length
主要用途
Major application
5780BS 最大 6mm
The maximum 6mm
6.4~31.8mm
(1/4”~1-1/4)
最大 41mm
The maximum 41mm
缝制衬衣、衬衫、工作服、女装等棉布扣眼
Buttonholing of cloth such as men’s
shirts,blouses,work uniforms
5780BK 最大 6mm
The maximum 6mm
6.4~31.8mm
(1/4”~1-1/4)
最大 41mm
The maximum 41mm
T恤、 POLO 衫等针织料纽扣
T-shirt polo shirt knitted material
5780BL 最大 6mm
The maximum 6mm
6.4~31.8mm
(1/4”~1-1/4)
最大 120mm
The maximum 120mm
缝制衬衣、衬衫、工作服、女装等棉布纽扣
Buttonholing of cloth such as men’s
shirts,blouses,work uniforms
1

2. 规格/Specifications
名称 规格
套结宽幅 标准 5mm
缝纫速度 标准 3600rpm(最高 4200rpm)
使用机针 DP×5 #11J ~ #14J
针杆行程 34.6mm
旋梭 DP 型全自动旋转供油旋梭
压脚上升量 6mm(可任意设定) 最大 17mm(逆转抬压脚时)
抬压脚驱动方式 脉冲马达式(1个踏板·2个踏板)
绕线功能 机头内置式(在机器驱动中可绕线)
送布驱动方式 脉冲马达式
摆针驱动方式 脉冲马达式
切刀驱动方式 脉冲马达式
面线张力机能 电磁铁张力方式通过控制面板操作可对各部位进行数据设定(平行部、套件部张力)
缝迹形状 角型、放射型、圆型(控制面板选择)等 30 种
记忆花样数 500 个花样
外形尺寸 机床宽度 200mm、高度 360mm、长度 570mm
机头重量 55Kg
电源 单向 220V
2. 规格/Specifications
Name of Controller specifications
Width 5mm(Min: 0.05mm)
Sewing Speed Standard 3600rpm Max 4200rpm
Needles DP×5 # 11J ~ # 14J
Stroke of Needle Bar 34.6mm
Shuttle Type DP, All-auto Rotation Oil-supply Shuttle
Presser Height 6mm (Customized Setting) Max 17mm(Reverse pressure lifting foot )
Winding Build-in Type (winding at machine running)
Cloth-feeding Driving Device Pulse Motor
Swing Needle Driving Pulse Motor
Knife Driving Device Pulse Motor
Upper-thread Tension Function Solenoid Tension Method User can set the data at control panel to adjust each
part (Parallel Part, Doubling Part Tension)
Stitch Form Angle, Radial, Round (Selected at Control Panel) and other 30 types
Patterns in Memory 500 Patterns
Size Width 200mm、Height 360mm、Length 570mm
Head Weight 55Kg
Motor used single phase 220V
2

3. 标准缝衣形状一览表/Standard sewing shape list
3

3. 标准缝衣形状一览表/Standard sewing shape list
4

4. 构成
5780B 系列由以下部分所构成:
电源 ON/OFF 开关 Power ON/OFF switch
缝纫机机头(5780B 系列) Machine head (5780B Series)
操作板 Operation panel
电控箱 Control box
抬压脚、启动踏板 Presser lifting pedal and start pedal
线架装置 Thread stand device
5

III.安装/INSTALLATION
★危险:搬运缝纫机时,请至少 2人以上进行。
★WARNING:To prevent possible accidents caused by fall of the sewing machine,
perform the work by two persons or more when the machine is moved.
(1)板的安装/Set-up of the table
1)把控制箱 、电源开关 、固定到台板 上。
2)用固定条把电源开关 的电缆线固定起来。
3)把底座锁紧螺钉⑩(4个)穿过底座 。
4)把减震橡胶安装到台板的底座固定孔 (4处),然后固定底座 。
5)把机头支撑杆 固定到台板 上。
6)把缝纫机主机放到台板 上后,把踏板和踏板开关 和附件的连接杆 连接起来。
注意:请调整踏板位置,不让连接杆 和控制箱 相碰。
1) Securely install control box and power switch on table .
2) Securely fix the respective power cables of power switch .
3) Pass four bed base fixed screws (10)through bed base .
4) Set rubber cushions (5)to holes (6)and then fix on the base.
5) Fix head support bar on table .
6) After placing the sewing machine main unit on bed base ,connect pedal
Topedalswitch ,connecting rods which have been supplied as accessories .
►CAUTION :Adjust the positions of the pedals so that connecting road and control
do not come in contact with each other.
6

(2)电源线的连接/Connecting the power cord
注意:在电压规格不同的状态下绝对不能使用。
►CAUTION :Never use under the wrong voltage and phase.
(3)缝纫机主体的安装/ Installing the sewing machine main unit .
►注意:搬运缝纫机时,请一定 2人以上进行。
单相 220V 的连接/Connecting single phase 220V
►CAUTION :To prevent possible accidents
caused by the tail of the sewing machine,
perform the work by two personal or more when
the machine is moved.
CAUTION :Place hinge plates and shaft
bearings in two places on the head base and
fix the hinge plates to the machine head with
setscrew in two places.
►注意:不要把橡胶铰链和金属铰链安装
反了,否则放倒缝纫机时会有危险。
7

►注意:
1. 放倒缝纫机之前,请先确认台板上是否
装有机头支撑杆 。
2. 为防止缝纫机突然倒下,请一定把缝纫
机放到水平的地方,再放倒缝纫机。
(4) 缝纫机的放倒方法/ Tilting the sewing machine head
★危险:放倒或抬起缝纫机时,请注意不要被缝纫机夹住手指。
为了防止突然的起动造成的事故,请关掉电源之后再进行操作。
放倒缝纫机时,请轻轻地放倒,让缝纫机被机头支撑杆 支撑住。
★WARNING : When tilting /raising the sewing machine head, perform the work so as not to allow
your fingers to be caught in the machine, to avoid possible accidents caused by abrupt start of the
machine, turn OFF the power to the machine before starting the work.
When tilting the sewing machine head, tilt quietly the sewing machine until head supper bar comes in.
►CAUTION:
1.Make sure that sewing machine head support bar
is placed on the table before tilting the sewing machine
2.To protect-fall-down, be sure to tilt the sewing
machine in a level place.
8

(5)安全开关的连接/Connecting the safety switch connector
(6)挡油板的安装/Installing the hook oil shield plate
Install hook oil shield plate onto bed base with setscrew .
注意:放倒缝纫机或抬起缝
纫机时,请注意不要碰到挡油
板。
用固定螺钉 把挡油板 安装到底座 上。
打开机头后罩,把安全开关的
插口 连接到机头后端电路板
JP7 上,再重新罩上后罩。
After open the machine cover,
connecting safety switch connector
with connect located on the
PCB which is on the back of the
machine.
►CAUTION :Fixes the sewing
machine so that it does not come in
contact with kook oil shield plate
when raising/tilting the sewing
machine.
9

(7)操作板的安装/ Installing the operation panel
(8)电缆的处理/ Managing the cord
请一边慢慢地放倒缝纫机,一边确认电缆没有被勾住。
►注意:放倒缝纫机时,请确认机头支撑杆安装在台板上。
Slowly tilting the sewing machine, check that the cords are not forcibly pulled.
►CAUTION :When you tilt the sewing machine, make sure that the sewing machine
head support bar is placed on the table.
用木螺钉 把操作板座 固
定到台板上,再把电缆穿过
台板孔 。
Install hook oil shield plate
onto bed base with setscrew
.
10

(9)眼睛防护罩的安装/Installing the eye protection cover
★危险:为了保护断针飞起弄伤眼睛,请一定安装起来。
请一定安装眼睛防护罩 后使用缝纫机。
★WARNING :Be sure to attach this cover to protect the eyes from the disperse
of needle breakage
Be sure to install and use eye protection cover and use the sewing machine.
(10)急停开关的固定/Fixing the temporary stop switch
出货时,暂停开关为 A的状态,请拧松固定螺钉,更为 B状态,然后用附件的固定
螺钉 和固定螺钉 固定好。
The temporary stop switch has been in the state as shown in figure A at the time of delivery.
Loosen setscrew and set the switch in the state as shown in figure B, and fix it with
setscrew together with setscrew supplied with the machine.
11

(11)过线柱/Thread guide rod
(12)线架装置的安装/ Installing the thread stand
请把过线柱按 2个横孔朝向正面
的方向安装好。
Securely fit the thread guide rod so
that two side holes in the thread
guide rod face the thread guide.
1)安装线架装置,把它安装到
台板右上的孔里。
2)拧紧固定螺母 ,不让线架
装置松动。
3)如果顶部可以配线时,请把
电源线从线架杆 中穿过去。
1) Assemble the thread stand,
and set it in the hole in the top
right corner of the machine
table.
2) Tighten locknut to fix the
thread stand.
3) When ceiling wiring is
possible, pass the power cord
through spool rest rod .
12

IV、缝纫机开机前的准备/ PREPARATION BEFORE OPERATION
(1)加油/ Lubrication
★注意:为了防止突然启动造成人身事故,请关掉电源,确认马达停止转动后再进行。
WARNING :To protect against possible personal injury due to abrupt start of the machine, be
sure to start the following work after tuning the power off and ascertaining that the
motoris atrest.
1)向油盒里加油
○把机油加满到 MAX 记号的位置 。
2)旋梭油量的调整
○拧松油量调节固定螺母 ,然后用油量调节螺钉 进行调节。
○调节旋梭的油量时,拧进油量调节螺钉 则油量减少。
○油量调节后,请用固定螺母 进行固定。
○新装缝纫机或较长时间没有用过的缝纫机,使用之前请取下梭壳,在旋梭边槽加 2~3 滴
机油。另外,向下轴前套 的加油孔 加几滴油,把油浸润到里面的毛毡里。
1) Lubrication oil to oiling tank.
○Fill the oiling tank with Oil up to the level indicated by “MAX . ”.
2) Adjusting the lubrication for the sewing hook
○Adjust the amount of oil supplied to the sewing hook by loosening lock nut and turning of
amount adjustingscrew .
○Amount of supplied oil is reduced when turning the screw clockwise
○Fix the screw with lock nut after adjusting the lubrication for the sewing hook .
○When you first operate your sewing machine after set-up or after an extended period of
disuse ,remove the bobbin case and apply a few drops of oil to the hook race .In addition,
apply a few drops oil from oiling hook in hook driving shaft front metal to soak the
insidefeltinoil.
13

(2)机针的安装方法/Inserting the needle
★危险:为了防止突然启动造成人身事故,请关掉电源,确认马达停止转动再进行。
★WARNING :To protect against possible personal injury due to abrupt start of the machine, be
sure to start the following work after tuning the power off and ascertaining that the motor is at rest.
1) Hold needle with its recessed part facing toward the operator side A.
2) Insert the needle fully into the needle champing hole ,and tighten needle setscrew .
3) Use a DPx 5(#11J ~#14J ).
►CAUTION :When attaching the needle, turn OFF the power to the motor.
1) 从缝纫机的正面看,把机针凹部横向转到
前侧 A。
2) 然后把机针插进针杆孔的最深处,拧紧机
针固定螺钉 。
3) 机针使用 DPx5-(#11J~#14J)。
注意:安装机针时,请一定关掉电源
14

(3)上线的穿线方法/Threading the needle-thread
1) 上线如图 ~的顺序行穿线。
2) 把线穿针时,使用附件的穿线器时操作会更加方便。
3) 使用机线不同,导线器的穿线方法也不同。
1) Pass the needle thread in the order to as shown in the figures.
2) The threading can be done easily by using the needle threader supplied with the machine.
3) Change the thread guide threading method according to the thread to be used.
(4)梭壳的穿线方法/Threading the bobbin case
梭心转动方向和穿线方法
1) 头所示方向把梭心插进去。
2) 请把缝线穿过穿线口 ,然后再从张力弹簧 的下面穿过去,再次穿过穿线口,
从把线拉出来。
3) 请注意进行直锁眼缝和锯齿缝时, 的穿线方法不同。
Rotating direction of bobbin and threading
1) Fit the bobbin so that it rotates in the direction of the arrow.
2) Pass the thread through thread slit , then through under the tension spring , again
through thread slit ,and pull the thread from .
3) Threading at for purl stitching is different from that for whip stitching .So, be careful.
15

►注意:调整了底线张力之后,请确认存储器开关的上线张力设定。
(5)底线张力的调整/Adjusting the bobbin thread tension
在梭壳穿线口 在上方的位置,把底线向上拉出之后,请按照下列的方法调整底线张力。
直锁眼缝 0.05~0.15N 手拿从梭壳出来的线头,轻轻地上下摆动时,梭壳就稍稍下
降
锯齿边缝 0.15~0.3N 手拿从梭壳出来的线头,用稍稍强的力量摆动时,梭壳才下
降
1) 把线张力螺钉 向右转动,底线张力变强,向左转动,底线张力变弱。
2) 使用化纤缝纫机线时,请把张力稍稍减弱,棉纱线时请稍稍加强。因为本机装有防止
空转弹簧,所以装上旋梭之后的线张力请再调强 0.05N 左右。
Adjust the bobbin thread tension as given below when the bobbin thread is pulled up at the position
where thread slit of bobbin case comes up .
Purl stitch
0.05~0.15N To such an extent that bobbin case quietly comes down when holding
thread end coming from bobbin case and shaking it quietly up and down.
Whip stitch 0.15~0.3N To such an extent that bobbin case barely comes down when holding thread
end coming from bobbin case and shaking it somewhat strongly.
Turning tension adjust screw clockwise will increase bobbin thread tension and turning it
counterclockwise will decrease the tension.
Adjust the bobbin thread tension to lower for synthetic filament thread, and to higher for
spun thread .The thread tension is higher by approximately 0.05N when the bobbin case
is set to the hook since idle-prevention spring is provided.
►CAUTION :When bobbin thread tension is adjusted, check the needle thread tension
settingofthememoryswitch.
16

(6)梭壳的安装方法/Installation of bobbin case.
★注意:为了防止突然启动造成人身事故,请关掉电源,确认马达停止转动后再进行。
★ WARNING: To protect against possible personal injury due to abrupt start of the
machine, be sure to start the following work after
1) Lift up and hold bobbin case latch lever between two fingers.
2) Push the bobbin case into the hook so that it is supported by the hook shaft and
then snap in the latch lever. Press the bobbin case until the predetermined position is
reached, and it will click.
1)扳起梭壳抓手。
2)插入旋梭轴 ,关闭抓
手。梭壳被按到一定位
置会听到喀喳的声音。
►CAUTION:If the bobbin case is out of the predetermined position, it can jump out
from the hook to cause the needle thread to tangle on the hook shaft.
Check to be sure that the bobbin case is properly installed in the correct
position.
►注意:如果梭壳没有在规定的位置,缝纫后梭心会飞出来,上线绕到旋梭轴上。
17

(7)切布刀的安装方法/Installing the knife
★注意:为了防止突然启动造成人身事故,请关掉电源,确认马达停止转动后再进行。
★ WARNING :To protect against possible personal injury due to abrupt start of the
machine, be sure to start the following work after turning the power of and
ascertaining that the motor is at rest.
When replacing the knife with a new one, perform as follows.
1)Knife can be easily removed together with the washer when removing
kniferetainingscrew .
2) Adjust so that the knife, when lowered the knife bar by hand, is spaced
to 2 mm away from the top surface of the throat plate as illustrated
in the sketch. Then, be sure to place the washerand tighten the knife retaining screw.
inch→mm 换算表/Inch→mm CONVERSION TABLE mm CONVERSION TABLE
切布刀尺寸/inch
Knife size /inch
mm 表示
Indication of mm
切布刀尺寸/inch
Knife size /inch
mm 表示
Indication of mm
1/4 6.40 13/16 20.60
3/8 9.50 7/8 22.20
7/16 11.10 1 25.40
1/2 12.70 1 1/8 28.60
9/16 14.30 1 1/4 31.80
5/8 15.90 1 3/8 34.90
11/16 17.50 1 1/2 38.10
3/4 19.10
请按如下的步骤更换新的切布刀。
1)卸下切布刀固定螺钉 之后,把
切布刀 和垫片一起简单地卸下
来。
2)用手按下切布刀之后,把切布
刀和针板上面的距离调整到 0~
1mm,然后套上垫片,并拧紧固定。
18

V.维修
1. 机针和旋梭的同步时间调整
★ 危险:为了防止突然启动造成人身事故,请关掉电源,确认马达停止转
动后再进行。
机针和旋梭的同步调节,请在机针落到
针板孔的中央时调整。
(1)针杆高度
1)把针杆降到最下点;
2)把高度尺[1]的部分如图所示插入
针板和针杆下端之间,使针杆碰到
高度尺;
3)拧紧针杆套管固定螺钉 ,决定针
杆高度。
(2)机针和旋梭的同步
1)按逆时针的转动主向转手轮,让机
针从最下点开始上升;
2)把高度尺[2]的部分插入针板和针
杆下端之间,让针杆顶到高度尺;
3)拧松轴套固定螺钉,把旋梭尖调整
到机针的中心;
4)此时,机针与旋梭尖之间的间隙为
约0.05mm,距离过大会导致跳针,
过小会磨损旋梭尖;
(3)内旋梭的固定和调整
用固定螺钉 把内旋梭固定器 的
前端和内旋梭 的端面的咬合调整
为0~0.2mm
19
This manual suits for next models
2
Table of contents
Other ZOJE Sewing Machine manuals