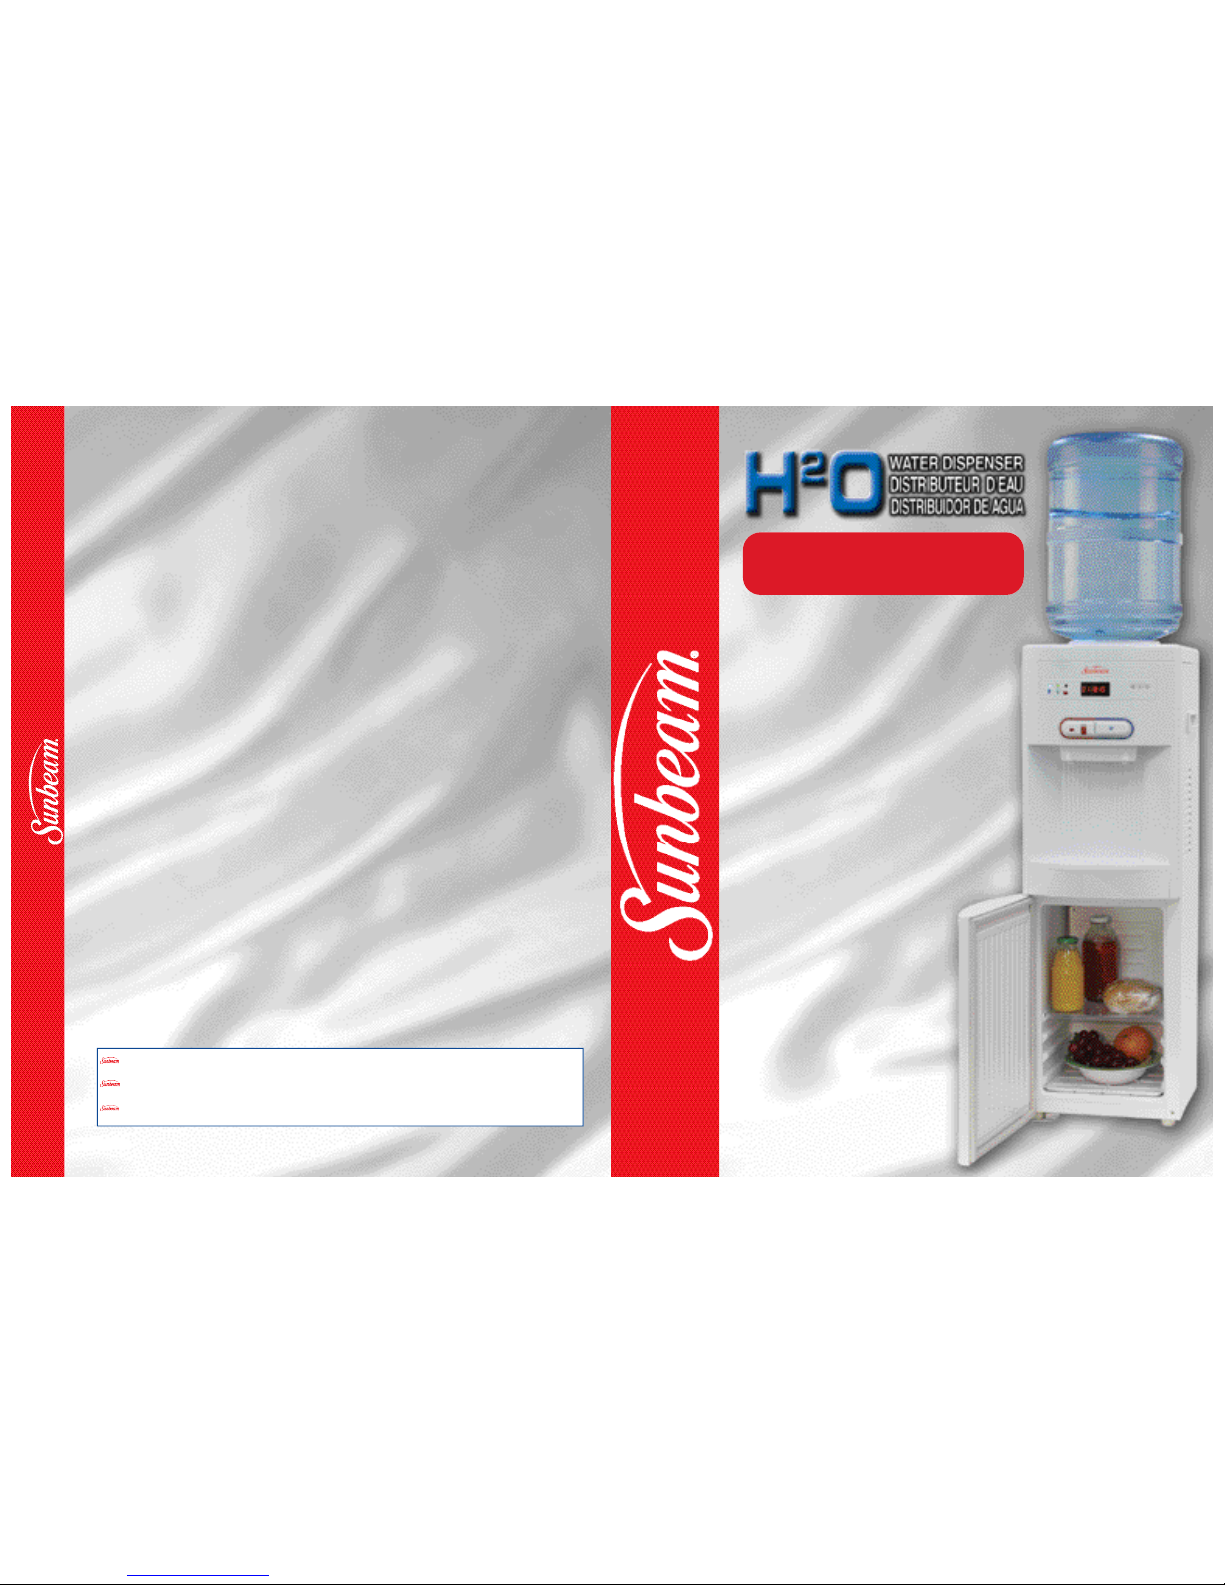
Sunbeam 168 User manual

USER MANUAL
MANUEL D’UTILISATION
MODO DE EMPLEO
555 Chabanel St. West, Suite 700,
M o n t r eal, Quebec,
Canada. H 2N 2J2,
Toll Free Tel / Tél. sans frais / Tel sin cargo: 1-877 -383-63 99
E-mail / Correo elec: serv i c e @ l i m a g e h o m e p r o d u c t s . c o m
©2003 Sunbeam Products, Inc. All rights reserved.
is a registered trademark of Sunbeam Products, Inc. used under license.
Manufactured for Prestige Home Comfort, Montreal, Canada, H2N 2J2.
©2003 Sunbeam Products, Inc. Tous droits réservés.
est une marque déposée de Sunbeam Products, Inc. utilisée en vertu d'une
autorisation. Fabriqué pour Prestige Home Comfort, Montreal, Canada, H2N 2J2.
©2003 Sunbeam Products, Inc. Todos los derechos reservados.
es una marca registrada de Sunbeam Products, Inc. uso bajo licencia.
Fabricado por Prestige Home Comfort, Montreal, Canada, H2N 2J2.
•F R Í O
Para gozar de una
bebida fría
•C A L I E N T E
Excelente para
bebidas calientes
o sopas
•F R O I D E
Savourez de l’eau froide
•C H A U D E
Parfaite pour une boisson
chaude ou une soupe
•C O L D
Enjoy a cold drink
• H O T
Great for a hot beverage
or soup

Congratulations on purchasing your new
S u n b e a m ®Water Dispenser!
Warnings & Precautions:
1. Your water dispenser should be left upright for at least ten hours, unplugged.
2. This unit should be placed with at least 4 inches between the back of the unit and the wall. Keep a
minimum distance of 2 inches on each side of your water dispenser free.
3. P ress the buttons in to let the air out, until the water starts to flow. When this happens, release the buttons.
4. Plug in your water dispenser.
NOTE: Switch on the rear of the unit must be in the “ON” position.
5. You should have hot water in approximately 10 minutes and cold water in less than 30 minutes.
6. For questions, comments or service information, please call 1-877-383-6399
Félicitations pour l'achat de votre nouveau
distributeur d'eau Sunbeam®!
Avertissements et précautions à prendre:
1. Le distributeur d'eau devrait être laissé débranché et en position verticale pendant au moins dix heures.
2. Laisser un espace d'au moins 10 cm entre l'appareil et le mur. Laisser un espace dégagé d'au moins 5 cm de chaque
côté de l'appareil.
3. Enfoncez les boutons jusqu’à ce que l’eau commence à couler. Relâchez alors les boutons.
4. Brancher le distributeur d'eau.
REMARQUE : L’interrupteur situé au dos de l'appareil doit être en position « ON ».
5. L'eau chaude devrait être prête en environ 10 minutes, et l'eau froide, en moins de 30 minutes.
6. Pour poser des questions ou obtenir de l'information concernant le service, composer le 1-877 383-6399.
Felicidades por la compra de su nuevo
distribuidor de agua Sunbeam®!
Advertencias y precauciones a tener en cuenta:
1. El distribuidor de agua debe permanecer desenchufado y en posición vertical al menos diez (10) horas.
2. Deje un espacio de 10 cm como mínimo entre el aparato y la pared. Deje un espacio libre de al menos 5 cm a cada
lado del aparato.
3. Apriete los botones hasta que comience a fluir el agua. Cuando esto ocurra, suelte los botones.
4. Enchufe el distribuidor de agua.
NOTA : El interruptor en la parte tresara del aparato deben estar en posición «ON».
5. El agua caliente estará disponible en unos 10 minutos y la fría en menos de 30.
6. Para cualquier cuestión, observación o información respecto al servicio marque el 1 877 383-6399.
~
~
Tips Sheet-0168/0169 8/31/05 5:28 PM Page 1

- 24 -
NOTES / NOTER / NOTAS

ÍNDICE
TABLE DES MATIÈRES
TABLE OF CONTENTS
ENGLISH
Wa r ranty • Garantie • Garantía ................................................................................................................23
Notes • Noter • Notas ............................................................................................................................................24
ESPANOL
~
0168 / 0169
May 20/2003 - 0168/0169 - Manual
1. Electrical Safety ....................................2
2. Unpacking your water dispenser ............3
3. Preparing your water dispenser for use ... ...3
4. Getting to know your water dispenser....4
5. Digital display........................................5
6. Water dispenser maintenance ................6
7. Trouble-shooting guide ..........................7
8. Specifications ........................................8
9. Electrical diagram ..................................8
1. Électricité et sécurité..............................9
2. Déballage de votre distributeur d’eau ..10
3. Préparation de votre distributeur d’eau
à des fins d’utilisation..........................10
4. Caractéristiques de votre distributeur d’eau....11
5.Affichage numérique ........................................12
6. Entretien du distributeur d’eau ............13
7. Directives en cas de problèmes ............14
8. Spécifications ............................................15
5. Schéma électrique ..............................15
1. Electricidad y seguridad ......................16
2. Desembalar su distribuidor de agua ....17
3. Prepare su distribuidor de agua
antes de usarlo....................................17
4. Caracterîsticas de su distribuidor de agua ......18
5. Indicador digital ..................................19
6. Mantenimiento del distribuidor de agua........20
7. Qué hacer si tiene problemas ..............21
8. Características técnicas ........................22
9. Diagrama eléctrico ..............................22
FRANÇAIS

- 2 -
ELECTRICAL SAFETY
When using electrical appliances, basic safety precautions should be followed to reduce the risk of
fire, electric shock, and injury to persons or pro p e rt y. Read all instructions before using any appliance.
Do not let hot water touch bare skin. Keep combustible materials such as furniture, bedding,
pillows, clothes, and/or papers away from the back of the unit.
Do not operate this, or any other appliance with a damaged cord. No other appliance should be
plugged into the same outlet. Be sure that the plug is fully inserted into the receptacle.
Do not run cord over carpeting or other heat insulators. Do not cover the cord. Keep cord away
from traffic areas, and do not submerge in water.
We do not recommend the use of an extension cord as it may overheat and cause a risk of fire. If
you must use an extension cord, use No. 14 AWG minimum size and rated not less than 1875
watts.
Unplug the water dispenser before cleaning or making repairs.
Do not plug your water dispenser into the power outlet or turn the power switches on, when the
water dispenser is empty.
Exercise caution and use reasonable supervision when the appliance is used by or near children.
Do not use your water dispenser outdoors. Place the water dispenser away from direct sunlight
and make sure that there is at least 4 inches of space between the back of your unit and the wall.
Keep a minimum distance of 2 inches on each side of your unit free.
Do not use this product to dispense anything other than water.
•
•
•
•
•
•
•
•
•

- 23 -
WARRANTY
Refrigeration system
and heating system: parts
and labor; two years warranty
from the date of original
purchase at retail (see enclosed
detailed warranty form).
If you are unable to locate the problem, please
call our toll free number 1-877-383-6399 for
assistance. For warranty repair,t ro u b l e - s h o o t i n g
and maintenance tips p lease obtain the
authorization for return and the address of the
nearest service center, by calling the same toll
free number.
S'il vous est impossible de localiser le pro b l è m e ,
veuillez composer sans frais le 1-87 7- 3 83 -6 3 99
pour obtenir de l'assistance. Pour les réparations
s o u s g a r a n t i e s , pour de plus amples
i n f o rmations concernant les problèmes et
l'entretien veuillez vous procurer l ' a u t o r i s a t i o n
pour le retour du produit ainsi que s'adresse du
c e n t r e de service le plus près en téléphonant au
même numéro sans frais.
Si no puede localizar el problema, llame sin
cargo al 1-877-383-6399 para obtener asistencia.
Para las reparaciones cubiertas por la garantía,
para más información relativa a los pro b l e m a s
de funcionamiento y al mantenimientosírv a s e
solicitar la autorización y la dirección del Centro
de Servicio más cercano, para devolver el
aparato, llamando al mismo n ú m e ro.
GARANTÍA
Para el sistema de refrigeración y de
calentamiento: mano de obra y
piezas, dos años de garantía a part i r
de la fecha de compra original en
una tienda (ver el formulario de
garantía detallado que se adjunta).
GARANTIE
Système de refrigeration et
systeme de réchauffement: deux ans
de garantie sur pièces et main
d’ oeu vre à partir de la date initiale
d’achat en magasin (voir la formu le
de garantie detaillée ci-incluse).

No. 0168/0169
- 22 -
CARACTERÍSTICAS TÉCNICAS
DIAGRAMA ELÉCTRICO
1. Diodo protector del indicador luminoso (LED)
2. Indicador luminoso (LED) de enfriamien to en marcha
3. Diodo del indicador luminoso (LED)
4. Resistencia del indicador luminoso (LED)
5. Termostato de refrigeración de agua fría
6. Arranque PTC del compresor
7. Compresor de refrigeración
8. Termostato de refrigeración del refrigerador
9. Protector térmico del compresor de refrigeración
10. Diodo protector del indicador luminoso (LED)
11 . Indicador luminoso (LED) de calentamiento en marcha
12. Diodo del indicador luminoso (LED)
13. Resistencia del indicador luminoso (LED)
14. Interruptor digital del sistema de calentamiento
15. Termostato para el agua caliente (85 grados centígrados)
16. Sistema de calentamiento
1 7 . Termostato automático para el agua caliente (95 grados
c e n t í g r a d o s )
18. Diodo protector del indicador luminoso (LED)
1 9 . Indicador luminoso de aparato encendido (LED)
20. Diodo del indicador luminoso (LED)
21. Resistencia del indicador luminoso (LED)
C.A. 115V / 60 Hz / 7A
4.5 A
2.5 A
R-134a
65 (+/- 1g) / 2.3 oz.
2L / 67,6 fl.oz./ hora (a la temperatura ambiente por debajo de 30°C/86°F enfría a 10°C/50°F)
5L / 169,1fl.oz. / hora (a la temperatura ambiante por encima de 20°C/68°F calienta a 90°C/194°F)
0°C - 10°C / 32°F - 50°F
0,60 pies cúbicos / 17 litros
51 lbs / 23.13 Kg
13” x 16” x 37.5” (33.02 x 40.64 x 95.25 cm)
Tensión
Consumo de energía del sistema de
calentamiento de agua
Consumo de energía del compresor de
refrigeración
Clase de fluído frigorígeno
Cantidad de fluído frigorígeno
Capacidad de enfriamiento del agua
Capacidad de calentamiento del agua
Tempe ra tura de enfriamiento del compartimento frío
Volumen de almacenamiento del compartimiento frío
Peso neto
Dimensiones
NO. 0168
N OTA : El número de modelo UL indicado en la parte tra s e ra del aparato hace re f e r encia al distribuidor de agua
y compartimento frío Sunbeam.

- 3 -
No. 0168/0169
UNPACKING YOUR WATER DISPENSER
4 in.
min
1) Remove the water dispenser from the cardboard box
without turning it upside down, or laying it on its side.
a. Remove the strapping.
b. Open the box.
c. Remove the styrofoam packing inserts from the box.
d. Pull the water dispenser straight up from the box.
e. Remove the plastic bag.
The refrigeration compressor has very sensitive
mounts inside of its welded shell in order to
provide quiet running. Improper handling may
damage the compressor.
2) Wipe it clean if necessary.
3) Find a location for your water dispenser that is
protected from direct sunlight and other sources
of heat. Place the water dispenser on a level
surface. Make sure that there is at least 4 inches
of space between the back of your water
dispenser and the wall. Keep a minimum
distance of 2 inches on each side of your water
dispenser free.
4) Do not plug your water dispenser into the power
outlet yet! Read the instructions first.
ongratulations, you have acquired a high quality SUNBEAM® Water Dispenser for bottled water. This unit is packed with
many extra features,that you will find convenient to use. Multi-temperature capability allows you to enjoy a cool or hot
dr i nk. It will provide you with many years of trouble free use, by following the simple i n s t r u c t i o n s
contained in this manual. Please take the time to read it carefully.
C
This water dispenser is for indoor use only.
Room temperature should not exceed 97°F / 36°C.
PLACE
BOTTLE
VERTICALLY
STRAIGHT
DOWN
P R E P ARING YOUR WATER DISPENSER FOR USE
1) Make sure that the water dispenser is not plugged into the electrical outlet.
2) Hold the water bottle vertically and upside down and place the water bottle into the no-spill
bottle receptacle. Apply slight pressure in order to pierce the bottle cap with the spigot. It is
not advisable to make any adjustments to the thermostat settings before the water dispenser and bottled water
are warmed up to normal room temperature. This unit accepts two,three or five gallon water bottles with with
piercable sealed caps.
3) Press the buttons in to let the air out, until the water starts to flow. When this happens, release the buttons.
4) Plug the water dispenser into a grounded power outlet and turn the power switch on.
5) If the water dispenser is brought in from outside in the winter time,give it a few hours to warm up to room
temperature before plugging it in. The thermostat setting may be affected by the coldness of the
water dispenser itself or the bottled water.
•The refrigeration thermostat is factory set between 7ºC and 8ºC (44.6ºF and 46.4ºF).
•The hot water thermostat is factory set between 88ºC and 89ºC (190.4ºF and 192.2ºF).
•The hot and cold indicator lights will be on while the system is working. Once the desired
temperatures have been reached, the lights will go off.
•If you choose to set the cold water thermostat to the lowest setting, it may take over one hour to cool
the water down to the coldest setting.
•Before the water dispenser leaves the factory,the thermostat is set properly. It is not advisable to
adjust the thermostat when using the water dispenser for the first time.
N O T E : When your water dispenser is in operation there is a small amount of water in the water passage
between the water tanks and the taps. This water is not controlled by the cold, hot or room
te mp er a t u re settings.We recommend that in order to fully enjoy the desired water setting, you
should eliminate this small amount, 200ml - 400ml (6.76 fl.oz - 13.52 fl.oz) using a small glass container.

- 4 -
No. 0168/0169
GETTING TO KNOW YOUR WATER DISPENSER
For the cold water, there is a 304 stainless steel water cooling tank.
All water ways are made from 304 stainless steel.
Refrigeration compressor is quiet and durable.
For the hot water there is a 304 stainless steel heavy duty hot water
tank with an external heater.It is suitable for mineral water.
With a convenient built-in cooling compartment.
The power cord has a grounded plug. Please make sure that your
outlet is properly grounded.
Integrated No-Spill System for added hygiene and convenience.
One power switch on the rear of the water dispenser: on/off
function.
State-of-the-art digital display
The front panel has three indicator lights,to see if the power, heating
and refrigeration are on.
Two stylish high-flow hot & cold push buttons.
The hot water push button has a child resistant device. To operate it,
lift hot water device while pressing in.
Easy to clean deep drip tray.
Easy to clean drain tray in the bottom of the cooling compartment.

- 21 -
No. 0168/0169
QUÉ HACER SI TIENE PROBLEMAS
1) El interruptor está
ac c i o n a d o,pero el
co m p resor no se pone
en march a .
1a) El cable de la corriente está bien enchufado.
1b) Al mover el distribuidor de un ambiente frío a un ambiente cálido (en invierno, por ejemplo),debe dejarlo unas horas
a la tempera tura ambiente antes de enchufarlo. La temperat u ra fría del distribuidor de agua o del agua embotellada
pueden afectar el ajuste del termostato. Si la tempera t ura ambiente es inferior a la del termostato o si el distribuidor
de agua está frío, el compresor no se pondrá en marcha. No se recomienda ajustar el termostato mientras que el
distribuidor y la botella de agua no hayan alcanzado la temperatura ambiente.
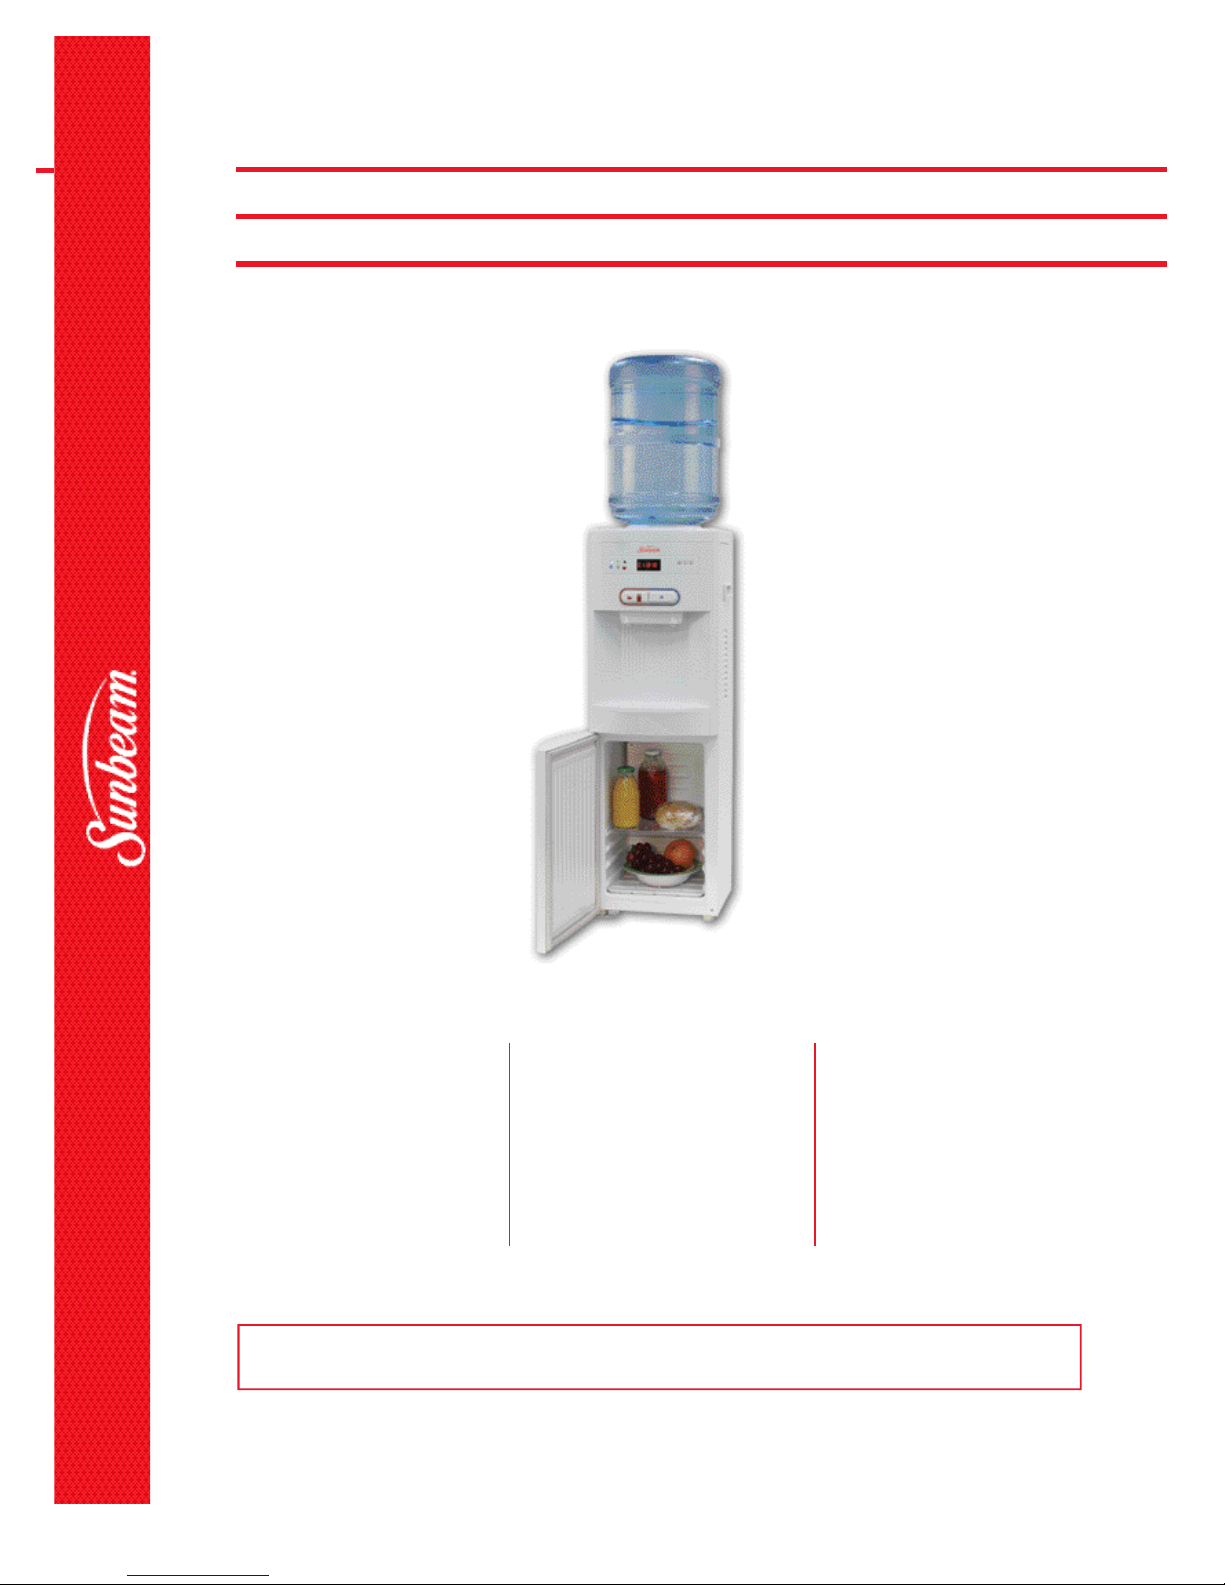
2) Verifique si el distribuidor de agua está colocado sobre una superficie nivelada y no se bambolea. Si al conectarlo por
primera vez el distribuidor de aguar hace mucho ruido, párelo unas 1/2 horas y vuelva a conectarlo.
3) Si no está satisfecho con el desempeño del distribuidor de agua, asegúrese de que haya suficiente espacio alrededor del
distribuidor de agua para que tenga una ventilación adecuada. Cuando el compresor está funcionando, es normal que el
radiador esté caliente.
4a) Compruebe el ajuste de temperatura del compartimento frío.
4b) Compruebe que la puerta del compartimento frío está bien cerrada.
5a) Verifique si la puerta del compartimento frío está herméticamente cerrada.
5b) Ajuste los dos termostatos a la alza (temperatura mayor). Una vez que el compresor haya dejado de funcionar,
vuelva a ajustar gradualmente la temperatura del agua fría y luego la del compartimento frío.Evite poner en marcha
y parar el compresor frecuentemente.
6a) La llave de la temperatura del agua fría puede congelarse bajo condiciones extremas. Cuando el compartimento frío
está cargado y el compresor está funcionando contínuamente, mientras la botella de agua no ha sido aún consumida,
puede producirse un congelamiento en el depósito de agua fría.
6b) Para descongelar el depósito de agua fría, ajuste los dos termostatos de enfriamiento a su nivel más bajo (máxima
temperatura).
Para descongelar más rápido, corte el funcionamiento del distribuidor de agua, desenchúfelo y quite la botella de agua.
Deje caer el agua y vuelva a meterla en el recipiente para el agua.Una vez que el depósito se haya descongelado, enchufe
el distribuidor de agua, accione el interruptor y vuelva a ajustar todos los termostatos.
6c) Si continúa utilizando el enfriador de agua, trate de mantener la puerta cerrada y reducir la carga para enfriar den
tro del enfriador de agua. Puede girar el interruptor del agua fría y compartimento frío, una vez que se deshiele el
depósto del agua fría.
7a) La temperatura del compartimento frío está controlada por lo que dicho compartimento no puede helarse.Sin
embargo, si el compartimento está demasiado lleno,el agua puede helarse.Si ajusta el termostato de refrigeración
a la temperatura máxima, habrá menos posibilidades que el agua hiele.
7b) El compartimento frío está demasiado lleno o su contenido demasiado caliente.No se recomienda colocar artículos
cuya temperatura sobrepase los 40 °C en el compartimento frío.
7c) La puerta del compartimento frío no está cerrada.
8) El termostato del agua fría está ajustado a una temperatura muy elevada. Ajuste el termostato a una temperatura más baja.
9) El grifo ha acumulado un depósito de calcio.Lave el interior del distribuidor
10a) La botella pierde ligeramente.
10b) El tapón de drenaje no está bien ajustado. Fíjese que el tapón de drenaje tenga una junta
de caucho en el interior.
10c) La bandeja de drenaje al fondo del distribuidor de agua está llena de agua, tire hacia afuera la bandeja de drenaje
para sacarle el agua y después colóquela nuevamente dentro del distribuidor de agua.
2) El distribuidor de agua
hace mucho ruido.
3) El radiador en la parte
posterior del distribuidor
de agua se calienta mucho.
4) El contenido del
compartimento
frío no está
suficientemente frío.
5) El compres o r
funciona sin parar.
6) La llave de agua fría
no funciona. El depósito
de agua fría está con-
ge l a d o.
7) El depósito de agua fría
está helado.
8) El agua fría sale
ca l i e n t e.
Pro b l em a Causa/medida:
9) Los grifos gotean.
10 ) El agua gotea del
distribuidor de agua
al suelo.

- 20 -
No. 0168/0169
MANTENIMIENTO DEL DISTRIBUIDOR DE AGUA
A
B
C
Punta de
p e r f o ra c i ó n
INSTRUCCIONES PARA LA LIMPIEZA DEL
DEPÓSITO DE AGUA
1. No encienda y apague rápidamente el interruptor de tensión, las sobrecargas
que ello conlleva podrían dañar el distribuidor.
2. Apague el distribuidor cuando no quede agua en la botella y antes de cambiar
la botella de agua. Una vez sustituida la botella por una llena, vacíe el aire de
todos los grifos y vuelva a prender el distribuidor.
3. Antes de limpiar el aparato, desenchufe el cable de tensión. Limpie el exterior del
distribuidor con un paño húmedo con jabón líquido para la vajilla. Use un
dentífrico para quitar las manchas de la base del distribuidor.
4. Gire el receptor de botellas del sistema antiderrame en el sentido contrario a
las agujas de un reloj y tire de él hacia arriba (véase A). El receptor se ajusta al
depósito de agua con un cierre hermético,por eso hay que tirar con fuerza para
sacarlo.
5. Desmonte el sistema antiderrame desatornillando la base (punta de perforación)
(véase B). Segui dam en te, lave las piezas con detergente para la vaji lla , en juá gue la s
y vuelva a colocarlas en el distribuidor.
6. Vaciar los dos tankes (calient es frio) sacando elganchoy el junta de goma al
rededordel tapon del desague situado en el lado de la unidad.
7. Limpie el interior del distribuidor periódicamente con la solución CLR (elimina el
calcio, óxido de calcio y óxido), de venta en la mayoría de las ferreterías.También
puede usar vinagre o una solución de ácido cítrico al 2%. De esta forma,
eliminará las incrustaciones causadas por los minerales presentes en el agua.
Enjuague bien. Use eldrenaje situado en la parte trasera para vaciar el agua. Después
de enjuagar, vu elva a colocar el tapón de vaciado. Vuelva a colocar todas las piezas
y ajuste sólidamente el tapón de vaciado (véase C). ES IMPORTANTE QUE DEJE
SECAR EL DISTRIBUIDOR DURANTE DOS HORAS ANTES DE VO LVER A
ENC HUFARLO.C ub ra el receptor de botellas para evitar riesgos de contaminación.
8. La frecuencia de limpieza del interior del aparato dependerá de la dureza del
agua que use.Según los minerales que contenga el agua y la frecuencia con la
que cambie la botella, le recomendamos limpiar su aparato a intervalos de entre
uno y tres meses.D re n e
L e v a n t e
G i r e
INSTRUCCIONES DE LIMPIEZA DEL
C O M PA RTIMENTO FRÍO
1) Antes de limpiar el aparato, desenchufe el cable de la corriente.
2) Deje que el hielo acumulado se derrita normalmente.
3) El agua resultante caerá en la bandeja de la parte inferior del compartimento.
Atención: no use un cuchillo ni ningún otro objeto punzante para quitar el hielo
acumulado. Tampoco debe usar agua hirviendo.
4) Retire la bandeja del compartimento y bote el agua que contenga.
5) Limpie el compartimento y la bandeja con un paño suave y un poco de jabón
líquido para la vajilla.

No. 0168/0169
DIGITAL DISPLAY
The LED display is designed to show by default the time. From the left, the first two digits display the HOUR, the next two digits display the
MINUTES and the last two digits display the SECONDS.
• PressTIME button to enterTime Setting Program Mode.On the LED display the first two digits on the left side, indicating the Hour, will start flashing.
• Pressing the Adjust button the number on the flashing digits will increase. Keep the Adjust button pressed until the correct hour is displayed.
• Press theTIME button again to set up theMinutes. On the LED display the third and fourth digits from the left side, indicating the minutes, will start flashing.
• Pressing the ADJUST button the number on the flashing digits will increase. Keep the ADJUST button pressed until the right minute is displayed.
• Press theTIME button again to set up the Seconds.On the LED display the sixth and seventh digits from the left side, indicating the seconds, will start flashing.
• Pressing the ADJUST button the number on the flashing digits will increase. Keep the ADJUST button pressed until the right second is displayed.
• Press TIME button to set the new time and exit Time Setting Program.
• To return to the clock display, press the clock button.
•Press Temperature button once to enter Temperature Display Mode. The LED display will show the temperature of the COLD WATER and
HOT WATER in degrees Fahrenheit (default).
• To switch back and forth from degrees Fahrenheit to Celsius temperature display,while being in Temperature Display Mode or
Temperature Setting Mode,press ADJUST button and TEMPERATURE Mode simultaneously for 5 seconds.
• Press Temperature button one time to enter Temperature Display Mode and a second time to enter Temperature Setting Program Mode. On the LED
display the actual temperature settings will be displayed and, the first two digits on the left side, indicating the COLD WATER, will start flashing.
• Pressing the ADJUST button the number on the flashing digits will increase. Keep the ADJUST button pressed until the desired temperature is
displayed. The range is approximately between 41°F (5°C) to 50°F (10°C).
• Press the temperature button again to setup the COOLING COMPARTME NT temp erature. On the LED display the third and fourth digit from the left
side (indicating the cooling compartment temperature) will be flashing.
• Pressing the ADJUST button, the number on the flashing digits will increase. Keep the ADJUST button pressed until the desired temperature is
displayed. The range is approximately between 32°F (0°C) to 50°F (10°C).
• Press the Temperature button again to set up the HOT WATER. On the LED display in fahrenheit, the fifth,sixth and seventh digits from the left side,
indicating the hot water temperature, will start flashing.
• Pressing the ADJUST button the number on the flashing digits will increase. Keep the ADJUST button pressed until the desired temperature is
displayed. The range is approximately between 158°F (70°C) to 194°F (90°C). Once you reach 194°F (90°C) you now have the option of turning
the hot water to “OFF”. You must press the button again in order to start theprocess again.* Wa r ning: Once ‘off’ option has been selected,
any hot water left in the hot water tank will remain hot for 2 to 3 hours.
• Press T EMPER ATURE button to set and exit Temperature Setting Program. Now the temperatures of the COLD WATER, COOLING COMPARTMENT
and HOT WATER are set.
• To return to the clock display, press the clock button.
Note: There may be a small temperature diff e r ence between the digital display and the actual temperature of the water.
TIME DISPLAY MODE
HOW TO SET PRESENT TIME
T E M P E R ATURE DISPLAY MODE
HOW TO SET THE TEMPERAT U R E S
- 5 -
TIME ADJUST TEMP
LED DISPLAY
Time:
Temp:
HM S
COLD
WATER
COOLING
COMPARTMENT
HOT
WATER

- 6 -
No. 0168/0169
WATER DISPENSER MAINTENANCE
COOLING COMPA RTMENT
CLEANING INSTRUCTIONS
WATER TANK CLEANING INSTRUCTIONS A
B
C
L i f t
Tw i s t
D ra i n
P i e rc i n g
Pin
1) Do not flick the power switch quickly on and off. The resulting power surges may
damage your water dispenser.
2) Always turn your water dispenser off when there is no water left in the bottle or
when you are changing bottles. Turn it back on after the new bottle has been
placed and the air is purged from the dispensing buttons.
3) To clean the unit, first unplug the power cord. Wipe the outside of the water
dispenser with a soft cloth dampened with liquid dish washing soap. Use
toothpaste to remove spots on the cabinet.
4) Twist the bottle receptacle of the No-Spill system counterclockwise and pull it up (A).
5) Take apart the No-spill system by unscrewing the base (piercing pin) (B). Th en
proceed to wash it with a dish was hi ng fluid, rinse it and reassemble.
6) Empty both tanks (hot and cold) by removing the cap and rubber gasket around
drain plug located on the side of the unit.
7) Clean the inside of the water dispenser periodically with CLR solution (Calcium,
Lime, Rust removal) available at most hardware stores. If not avail able, you can use
v i n egar or a 2% citric acid solution. This removes mineral scaling caused by the
water. Rinse it well. Use the drain on the back in order to get the water out.
Replace the drain plug after you have completed the rinsing. Put all of the parts
back, securely fasten the drain plug (C). IT IS IMPORTANT TO LET THE WATER
DISPENSER DRY FOR TWO HOURS BEFORE PLUGGING IT BACK IN.Cover the
bottle receptacle to prevent it from contamination.
8) The harder the water you use,the more often you should clean the interior of
the unit. Recommended intervals are between one and three months depending
on the mineral content of the water and the frequency of bottle changes.
1) To clean the unit, first unplug the power cord.
2) Allow the ice build-up to melt naturally.
NOTE: Do not use sharp objects or knives to remove ice buildup.Do not use
boiling water to remove ice.
3) The water will accumulate in the tray at the bottom of the compartment.
4) Remove the tray from the compartment and empty the water.
5) Wipe the compartment and the tray with a soft cloth dampened with liquid dish
washing soap.

No. 0168/0169
INDICADOR DIGITAL
El diodo fotoemisor indicará la hora por defecto.A partir de la izquierda, las dos primeras cifras indican LA HORA; las dos siguientes LOS
MINUTOS y las dos últimas,LOS SEGUNDOS.
• Apriete el botón del RELOJ para ponerse en modo de sincronización de la hora. Las dos primeras cifras del indicador de diodos fotoemisores a la
izquierda, que indican la hora, se pondrán a parpadear.
• Mantenga pulsado el botón de sincronización y las cifras parpadeantes del indicador aumentarán hasta que obtenga la hora deseada.
• Vuelva a apretar el botón del RELOJ para sincronizar los minutos y la tercera y la cuarta cifras del indicador de diodos fotoemisores a partir de la
izquierda, que indican los minutos, se pondrán a parpadear.
• Mantenga pulsado el botón de sincronización y las cifras parpadeantes del indicador aumentarán hasta que obtenga los minutos deseados.
• Vuelva a apretar el botón del RELOJ para sincronizar los segundos y la sexta y séptima cifras del indicador de diodos fotoemisores a partir de la
izquierda, que indican los segundos, se pondrán a parpadear.
• Mantenga pulsado el botón de sincronización y las cifras parpadeantes del indicador aumentarán hasta que obtenga los segundos deseados.
• Apriete el botón del reloj para introducir la nueva hora y salir del programa de sincronización de hora.
• Para ver la hora ajustada, apriete el botón del R E LO J.
•Apriete una vez el botón de TEMPERATURA para pasar al modo de visualización de la temperatura. El indicador de diodos fotoemisores
indicará la temperatura del AGUA FRÍA y del AGUA CALIENTE en grados Fahrenheit (por defecto).
• Si desea cambiar la indicación de temperatura de grados Fahrenheit a Celsius o viceversa, póngase en modo de visualización de la temperatura o
en modo de ajuste de la temperat ura y mantenga pulsados durante 5 segundos los botones de A J U S T E y de T EMPE R ATURA al mismo tiempo.
• Apriete una vez el botón de TEMPERATURA para pasar al modo de visualización de la temperatura y vuelva a pulsarlo para pasar al modo de ajuste
de la temperatura. El indicador de diodos fotoemisores indicará la temperatura real y las dos primeras cifras a la izquierda,que indican la temperatura
del AG UA FRÍA, se pondrán a parpadear.
• Mantenga pulsado el botón de AJ UST E y las cifras parpadeantes aumentarán hasta que aparezca la temperatura deseada. Las temperaturas oscilan
de 41°F (5 °C) a 50 °F (10 °C) aproximad ament e.
• Vuelva a apretar el botón de TEMPERATU RA para ajustar la temperatura del COMPARTIMENTO FRÍO.La tercera y cuarta cifras a partir de laizquierda
del indicador de diodos fotoemisores, que indican la temperatura del COMPARTIMENTO FRÍO, se pondrán a parpadear.
• Mantenga pulsado el botón de AJ UST E y las cifras parpadeantes aumentarán hasta que aparezca la temperatura deseada. Las temperaturas oscilan
de 32°F (0 °C) a 50°F (10 °C) aproximad amente.
• Vuelva a apretar el botón de TEMPERATURA para ajustar la temperatura delAGUA CALIENTE.La quinta,sextay séptima cifras a partir dela izquierda
del indicador de diodos fotoemisores, que indican la temperatura del AGUA CALIENTE en Fahrenh eit, se pondrán a parpadear.
• Mantenga pulsado el botón de AJUSTE y las cifras parpadeantes aumentarán hasta que aparezca la temperatura deseada. Las temperaturas oscilan
de 158 °F (70 °C) a 194°F (90 °C) aproxima damen te. Una vez alcanzada la temperatura de 194 °F (90 °C) puede parar el control de agua caliente
poniéndolo en posición « OFF ». Para volver a empezar la operac ión, tendrá que volver a accionar dicho botón. * Atenci ón: tras poner el aparato en
« Off », el AGUA CALIENTE del depósito seguirá caliente de 2 a 3 horas.
• Pulse el botón de TE M P E R ATU RA para memorizar el ajuste de temperatura y salir del programa de ajuste de la misma. Las temperatu ras del AGUA
FRÍA, del COMPARTIMENTO FRÍO y del AG UA CALIENTE ya están ajustadas.
• Para volver a visualizar la hora, pulse el botón del RE L O J.
Nota: La temperatura del indicador digital puede ser ligeramente diferente a la temperatura real del agua.
CÓMO VISUALIZAR LA HORA
CÓMO SINCRONIZAR LA HORA
CÓMO VISUALIZAR LA TEMPERAT U R A
CÓMO AJUSTAR LAS TEMPERATURAS
- 19 -
EL DIODO FOTOEMISOR
Relog:
Te m peratura:
HM S
AGUA
FRIA
COMPARTIMENTO
FRÍO
AGUA
CALIENTE RELOG
AJUSTE
TEMPÉRATURA

- 18 -
No. 0168/0169
CARACTERÍSTICAS DE SU
DISTRIBUIDOR DE AGUA
Para el agua fría hay un depósito de enfriamiento de acero inoxidable.
Todos los tubos de agua son de acero inoxidable.
El compresor de refrigeración es silencioso y durable.
Para el agua caliente hay un depósito de acero inoxidable muy
resistente, con un calefactor externo.Es apropiado para el agua
mineral.
Práctico compartimiento de frîo rápida.
El cable de alimentación viene con un enchufe con conexión a tierra.
Asegúrese de que el tomacorriente también tiene este tipo de
conexión.
Sistema integrado práctico sin goteo para mayor higiene y
conveniencia.
Un interruptor en la parte trasera del aparato: función « On/Off »
Indicador digital de la última tecnología
El panel delantero tiene tres indicadores luminosos que indican el
funcionamiento del distribuidor de agua, del sistema de
calentamiento y de refrigeración.
Dos elegantes botones pulsadores,caliente y frío,de alto caudal.
El botón pulsador de agua caliente tiene un surtidor con seguro para
niñ os. Para operarlo,levante el surtidor de agua caliente mientras lo
mantiene apretado.
Colector de gotas profundo y fácil de limpiar.
La bandeja de drenaje al fondo del compartimento frío

- 7 -
No. 0168/0169
TROUBLE SHOOTING GUIDE
1) The power switch is
on , but the
co m p ressor is not
starting up.
1a) The power cord is plugged in properly.
1b) If the water dispenser is brought in from outside in the winter time, give it a few hours to warm up to room
temperature before plugging it in. The thermostat setting may be affected by the coldness of the water
dispenser itself or the bottled water. If the ambient (room) temperature is lower than the thermostat setting,
or the water dispenser itself is cold, then the compressor will not start up. It is not advisable to make any
adjustments to the thermostat setting before the water dispenser and bottled water is warmed up to normal
room temperature.
2) Check if the water dispenser sits on a level surface without rocking. If the water dispenser is noisy after its
first use,unplug the water dispenser for a 1/2hour, then start it up again.
3) If you are not satisfied with the water dispenser performance check if there is enough room around the
water dispenser to provide ample ventilation.When the compressor is working, it is normal to have a hot rad iator.
4a) Check the temperature setting of the cooling compartment.
4b) Check that the cooling compartment door is closed tightly.
5a) Check if the cooling compartment door is closed tightly.
5b) Set both thermostats to a higher setting (warmer). Once the compressor has stopped, gradually readjust
the cold water setting and then the cooling compartment. Do not cause the compressor to start and stop frequently.
6a) The Cold water temperature tap may freeze up under extreme conditions. When the cooling compartment is
loaded and the compressor is running continuously while the bottled water is not consumed, there can be
an overcooling of the cold water tank.
6b) To unfreeze the cold water tank, set both cooling thermostats to their highest settings (warm).
If you need to unfreeze it in a hurry,then turn off and unplug the unit and remove the water bottle. Keep
draining hot water and pouring it back into the water receptacle.Once the tank is unfrozen, plug the unit
back in, turn on the switch and reset all the thermostat settings.
6c) If you will be continuing to use the cooling compartment, keep the door closed and reduce the cooling load
inside of the cooling compartment. You may turn the cold water & cooling compartment switch on, once
the cold water tank is thawed.
7a) The cooling compartment temperature is controlled, therefore the cooling compartment can't freeze.If the
cooling load is large,the water may freeze. Turning the refrigeration thermostat counterclockwise to its
warmest setting may help.
7b) The cooling load is too high, or warm; it’s not advisable to place contents with a temperature exceeding
40°C in the refrigerator.
7c) The door of the cooling compartment is not closed.
8) The cold water thermostat is set too high. Set the cold water to a lower temperature.
9) A calcium deposit has formed in the tap.If so, wash the inside of the water dispenser with CLR.
10a) The bottle may have small pinholes.
10b) The drain plug in the rear is not fastened properly.Check that the soft rubber seal is not torn or damaged.
10c) The drain tray at the bottom of the cooling compartment is full of water. Take out the drain tray to remove
water and then place it back into the cooling compartment.
2) The water dispenser
op e r ation is noisy.
3) The radiator at the
back of the water
dispenser is very hot.
4) The contents of the
cooling compartment
a re not cold enough.
5) The compressor works
no n - s t o p.
6) The cold water tap is
not working. The cold
water tank is froze n .
7) The cold water tank
is frozen.
Pro b l em Check if:
8) The cold water is
wa r m .
9) Water is leaking from
the dispenser
10) Water is dripping out
of the water
dispenser and
onto the floor.

- 8 -
No. 0168/0169
SPECIFICATIONS
ELECTRICAL DIAGRAM
1. Protection diode for the LED indicator light
2. Cooling on LED indicator light
3. Diode for the LED indicator light
4. Resistor for the LED indicator light
5. Refrigeration thermostat for the cold water
6. PTC starter for the compressor
7. Refrigeration Compressor
8. Refrigeration thermostat for the fridge
9. Thermal protector for the refrigeration compressor
10. Protection diode for the LED indicator light
11. Heater on LED indicator light
12. Diode for the LED indicator light
13. Resistor for the L E D indicator light
14. Heating power - digitally controlled switch
15. Thermostat for the hot water (85 degrees Celsius)
16. Heater
17. Auto-reset thermostat for the hot water (95 degrees Celsius)
18. Protection diode for the LED indicator light
19. Power on LED indicator light
20. Diode for the L E D indicator light
21. Resistor for the L E D indicator light
AC 115V / 60 Hz / 7A
4.5 Amperes
2.5 Amperes
R-134a
65 + / - 1 Gram / 2.3 oz.
2L / 67.6 fl.oz. / hour (at room temp. below 30°C/86°F cools down to 10°C/50°F)
5L / 169.1fl.oz. / hour (at room temp. above 20°C/68°F heats up to 90°C/194°F)
0°C - 10°C / 32°F - 50°F
0.60 cu.ft. / 17 L
51 lbs / 23.13 Kg
13” x 16” x 37.5” (33.02 x 40.64 x 95.25 cm)
Power supply:
Hot water heater power consumption:
Refrigeration compressor power consumption:
Refrigerant type:
Refrigerant quantity:
Cold water cooling capability:
Hot water heater capability:
Cooling compatment cooling temperature:
Volume of cooling compartment:
Net weight:
Dimensions:
NO. 0168
N OT E : UL model number on the back of the unit re f e rs to Sunbeam Water Dispenser with Cooling Compartment

- 17 -
No. 0168/0169
DESEMBALAR SU DISTRIBUIDOR DE AGUA
10 cm
mín.
1. Debe sacar el aparato de la caja de cartón sin
ponerlo al revés ni de lado.
a) Quite los precintos.
b) Abra la caja.
c) Retire los trozos de espuma-plast de la caja.
d) Saque el distribuidor de la caja tirando hacia arriba.
e) Retire la bolsa de plástico.
Los soportes del compresor de refrigeración que se
encuentran en el cajetín soldado y que hacen de
silenciadores son muy frágiles.Manipule el aparato
con cuidado para no dañar el compresor.
2. Limpie el aparato si es necesario.
3. Coloque el distribuidor fuera del alcance de los
rayos de soldirectos y de cualquier otra fuente de
calor, y en una superficie llana. Deje un espacio
mínimo de 10 cm entre el distribuidor y la pared
trasera y de 5 cm a cada lado.
4. No enchufe inmediatamente el distribuidor.Primero
debe leer las instrucciones.
elicidades! Acaba de comprar un distribuidor de agua embotellada SUNBEAM® de gran calidad. Sus numerosas
características adicionales son de lo más prácticas,como la función de temperatura múltiple que le permite obtener agua
fría o caliente.Basta con observar las sencillas instrucciones del presente manual para disfrutar sin problemas su distribuidor de
agua durante muchos años.Léalas atentamente.
F
El distribuidor debe usarse únicamente en el interior.
La temperatura ambiente no debe sobrepasar los 97°F / 36 º C.
COLOQUE
LA BOTELLA
BOCA
ABAJO Y
VE RT I CA L MEN T E
PREPARE SU DISTRIBUIDOR DE AGUA
ANTES DE USARLO
1. Asegúrese que el distribuidor de agua no está enchufado a ninguna toma de corriente.
2. Sujete la botella de agua verticalmente y boca abajo y colóquela en el receptor de botellas antiderrame. Presione
ligeramente para perforar el tapón de la botella con la parte saliente.No es recomendable ajustar el termostato
mientras el distribuidor y el agua embotellada no hayan alcanzado la temperatura ambiente normal. Su distribuidor
es compatible con botellas de dos,tres y cinco galones con sello hermético perforable.
3. Abra los grifos para dejar salir el aire.Cuando empiece a salir agua, ciérrelos.
4. Enchufe el distribuidor a un enchufe con toma de tierra. Encienda el interruptor de corriente.
5. Si es invierno y el distribuidor llega de fuera, espere antes de enchufarlo algunas horas,hasta que alcance la
temperatura ambiente.Si la temperatura del aparato o del agua embotellada es baja, los parámetros del termostato
pueden verse alterados.
•El termostato del sistema de refrigeración sale regulado de la fábrica a unos 7-8º C (44.6°F-46.4°F).
•El termostato del sistema de calentamiento sale regulado de la fábrica a unos 88-89º C (190.4°F-192.2°F).
•Los indicacores luminosos de agua caliente y agua fría se encenderán al prender el aparato y se apagarán una vez
alcanzadas las temperaturas seleccionadas.
•Si el termostato del sistema de refrigeración está regulado al mínimo,calcule hasta una hora de espera para que el
agua alcance dicha temperatura.
•El termostato del aparato sale de fábrica regulado correctamente.No se recomienda ajustar el
termostato la primera vez que use el aparato.
N O TA : al funcionar,su distribuidor acumula una pequeña cantidad de agua en el conducto que va de
los depósitos de agua a los grifos.Su temperatura queda fuera del control de los depósitos de
agua caliente,fría y de temperatura ambiente. Para obtener agua a cualquiera de las
temperaturas seleccionadas,elimine esta pequeña cantidad de agua entre 200 y 400 ml
(6.76 - 13.52 fl.oz) usando un recipiente pequeño.

ELECTRICIDAD Y SEGURIDAD
El uso de aparatos eléctricos requiere ciertas precauciones básicas para minimizar el riesgo de
incendio, choque eléctrico, heridas o daños a la propiedad.
No toque el agua caliente que sale del aparato. La parte trasera del aparato no debe estar en contacto con
materiales combustibles tales como muebles, ropa de cama, almohadas, ropa o papel.
No use este aparato (ni ningún otro) si el cable de alimentación está dañado.Enchufe el aparato únicamente
en una toma de corriente polarizada. No enchufe ningún aparato más a la misma toma de corriente. Asegúrese
de meter completamente el enchufe en la toma de corriente.
No pase el cable de alimentación sobre alfombras ni ninguna otra superficie calorífuga y evite cubrirlo o
colocarlo donde pudiera tropezarse con él o meterlo en el agua.
Se desaconseja el uso de una extensión, podría recalentarse con el consiguiente riesgo de incendio.Si no tiene
otra alternativa, use una extensión de un grosor mínimo de 14 AWG y calibrada para 1875 vatios como
mínimo.
Desenchufe el distribuidor de agua antes de limpiarlo o repararlo.
No enchufe el aparato ni ponga los interruptores de alimentación en posición «ON» si el distribuidor de agua
está vacío.
Muéstrese prudente y vigile el aparato cuando lo usen los niños o cuando éstos estén cerca.
No use el distribuidor de agua al aire libre. Colóquelo fuera del alcance directo de los rayos solares y
asegúrese que haya un espacio de al menos 10 cm entre la parte trasera del aparato y la pared. Deje un
espacio libre de al menos 5 cm a cada lado del aparato.
No use otro líquido que no sea agua en el distribuidor.
•
•
•
•
•
•
•
•
•
- 16 -

ÉLECTRICITÉ ET SÉCURITÉ
L'utilisation d'appareils électriques nécessite le respect de certaines précautions élémentaires, afin
de réduire le risque d'incendie, de choc électrique, de blessures ou de dommages à la propriété.
Lire toutes instructions avant l'utilisation de n'importe quel appareil.
Éviter de toucher l'eau chaude qui sort de l'appareil. Éviter de mettre en contact des matériaux combustibles
tels du mobilier,de la literie,des oreillers, des vêtements ou du papier avec l'arrière de l'appareil.
Éviter d'utiliser l'appareil (ou tout autre appareil) si son cordon d'alimentation est endommagé. Aucun autre
appareil ne devrait être branché dans la même prise de courant. S'assurer d'insérer complètement la fiche
dans la prise de courant.
Éviter de faire passer le cordon d'alimentation sur des tapis ou sur d'autres surfaces calorifuges.Éviter de
recouvrir le cordon d'alimentation. Éviter de placer le cordon là où l'on pourrait trébucher dessus ou de le
mettre dans l'eau.
L'utilisation d'une rallonge n'est pas recommandée,puisque celle-ci pourrait surchauffer et présenter un
risque d'incendie.S'il est nécessaire d'utiliser une rallonge, cette dernière doit être d'une grosseur minimum
de 14 AWG et calibrée pour pas moins de 1 875 watts.
Débrancher le distributeur d'eau avant de le nettoyer ou d'effectuer des réparations.
Éviter de brancher le distributeur d'eau ou de mettre les interrupteurs d'alimentation en position « ON » lors que
l ' a p p a reil est vide.
Faire preuve de prudence et exercer une surveillance lorsque l'appareil est utilisé par ou près des enfants.
Éviter d'utiliser le distributeur d'eau en plein air.Placer l'appareil à l'écart du rayonnement solaire direct et
s'assurer de laisser un espace d'au moins 10 cm entre l'arrière de l'appareil et le mur.Laisser un espace
dégagé d'au moins 5 cm de chaque côté de l'appareil.
Éviter d'utiliser tout autre liquide que de l'eau dans le distributeur.
•
•
•
•
•
•
•
•
•
- 9 -
This manual suits for next models
1
Table of contents
Languages:
Other Sunbeam Water Dispenser manuals
Popular Water Dispenser manuals by other brands

IBC Water
IBC Water AS0922TC-CL Installation & operating instructions

Hydrotech
Hydrotech 785UF Quick setup manual

Grohe
Grohe Blue Chilled & Sparkling manual

North Star
North Star NSC4218 Installation and operation manual

Quality Water Treatment
Quality Water Treatment SOFTPRO ELITE Quick Start Install Guide

Huawei
Huawei NetCol8000-C070 quick guide