Sunforce 80033 User manual

SOLAR STRING LIGHTS WITH REMOTE CONTROL
ITM. / ART. 1600334 MODEL / MODÈLE / MODELO : 80033
1 x ground stake
1 x mounting base
1 x mounting
bracket
1 x remote control
2 x big screws
2 x wall plugs
2 x rechargeable lithium-ion batteries
(pre-installed)
1 x solar panel
1 x small screw
Questions, problems, missing parts?
For assistance with assembly or instruction,
parts and customer service, call:
U.S.A & Canada only: 1-888-478-6435
(English/French/Spanish language services).
8:30 am - 5 pm Monday-Friday, Eastern Standard
www.sunforceproducts.com
Sunforce Products lnc.
9015 Avon #2017, Montreal, Quebec,
H4X 2G8, Canada
15 LED Bulbs
IMPORTANT, RETAIN FOR FUTURE REFERENCE: READ CAREFULLY
Sunforce Products lnc.
9015 Avon #2017, Montreal, Quebec, H4X 2G8, Canada

WARNING:
Prior to hanging the bulbs, make sure they do not rest upon any hot surface or
where they could become damaged. If you are charging the batteries without
attaching the bulbs, keep the bulbs in the retail box or safely store them indoors to
prevent any potential damage.
CAUTIONS: SAFETY INFORMATION
Your solar string lights are not a toy. Keep them out of reach of small children.
Your solar string lights and solar panel are both fully weather-resistant.
The solar panel must be mounted outdoors to maximize sun exposure.
Prior to installation, lay out all components and check against the parts list section of this manual.
Never look directly into the solar string lights.
Do not hang any other objects on the solar string lights.
Do not cut the wire or make any wiring changes to the solar string lights.
CAUTIONS: BATTERY INSTRUCTIONS
1) The solar string lights are shipped with the batteries pre-installed. Before starting any installation, test
the bulbs for illumination.
a) Connect the solar panel to the connector on the string lights.
b) Turn the solar panel over so the glass solar collector is facing down on a
flat surface. It is best to use a cloth for this to prevent scratching the solar
glass. No light should be detected on the solar glass.
c) Select ON on the back of the solar panel.
d) The bulbs should now illuminate.
Once the bulbs are all illuminated, turn the switch to OFF and continue
with the installation.
2) Ensure your solar panel is placed so that its exposure to sunlight is optimized. Be aware of objects such as
trees or property overhangs that may impede the panel’s ability to generate a charge.
3) Prior to using your solar string lights, the solar panel needs sunlight for a period of three days. This initial
charge should be done without the string lights connected or with the solar panel in the OFF position. After
the third day, your included batteries will be fully charged.
Note:The solar panel should be mounted in a place where the ON/OFF switch is easily accessible.
MOUNTING THE SOLAR PANEL: THE SOLAR PANEL HAS TWO MOUNTING OPTIONS
MOUNTING BRACKET
(1) If required use the two wall plugs (H)
along with the two large screws (G).
Install the screws utilizing the two outer
holes of the mounting bracket to secure
the bracket to the chosen surface.
(2) Insert the mounting base (D) onto the
back of the solar panel (B). Use the
included small screw (F) to tighten the
connection.
(3) Slide the solar panel down
onto the mounting bracket (E)
until you feel and hear the
connection click into
place.
For recycling and disposal of batteries to protect the environment, please check the internet or your local
phone directory for local recycling centers and/or follow local government regulations.
For more information on battery housing and location, refer to Step 7 on page 4.
Use rechargeable batteries only.
Always purchase the correct size and grade of battery most suitable for the intended use: for this
product use two rechargeable 18650 3.7V lithium-ion batteries.
Always replace the whole set of batteries at one time, taking care not to mix old and new ones, or
batteries of different types.
Clean the battery contacts and also those of the device prior to the battery installation.
Ensure the batteries are installed correctly with regard to polarity (+ and -).
Remove batteries from equipment which are not to be used for an extended period of time.
Remove any defective or ‘dead’batteries immediately and replace.
(4) Adjust the solar panel to the
desired angle to optimize
sun exposure.
(5) The angle of the solar
panel can be adjusted to
maximize sun exposure
by loosening, adjusting
and then re-tightening
the side screw located
on the solar panel’s
protruding arm.
PRODUCT FEATURES
• Vintage looking Edison LED light
•Solar battery charging
• 10.67 m / 35 ft total cable length
bulbs (E26 base)
• Integrated mounting loops
• Remote control included
• 3V, 0.3W LED replaceable bulbs
PRE-INSTALLATION

Note: To disconnect the solar panel
from the mounting bracket, press
down on the release tab on the
bottom of the mounting bracket.
With the tab firmly pressed, slide
the solar panel upwards and free of
the bracket. Some force may be
required to remove the panel from
the bracket.
GROUND STAKE
To utilize the ground stake (C), connect the two parts of the stake together.
The grooved section then fits into the protruding arm of the solar panel.
The stake can then be used to mount the panel into the ground.
INSTALLATION OF THE SOLAR STRING LIGHTS
The solar string lights have a variety of
possible ways to be mounted. The following
are examples of the most common ways:
(1) Temporary mounting: Using standard S
hooks (not included) or screw hooks
(not included) the solar string lights can
be mounted utilizing the integrated
mounting loops.
(2) Permanent mounting: Using cable tie
wraps or ‘zip ties’(not included) or
using nails or screws into a surface, the
solar string lights can be mounted more
permanently.
(3) Guide wire installation: Using S hooks
(not included) attach the string lights to a
pre-installed guide wire (not included).
(4) Structural installation: To create a
draping effect for the solar string lights
attach the first bulb to a structure, then
only mount every 3-4th bulb to create
the desired effect. Complete the effect
Pull out the included plastic tab to activate the remote control’s (J)
battery.
NOTE: Using the solar string light during daylight hours will have a negative effect on the length
of time the lights will illuminate in the evening. When not required always use the remote control
to turn the bulbs off to help conserve the battery charge.
(4) Structural installation: To create a draping effect for the solar string lights attach the first bulb to
a structure, then only mount every 3-4th bulb to create the desired effect. Complete the effect by
mounting the last bulb to a structure.
(5) The final step of installation is to connect the solar panel to the string lights. Simply insert the
plug located after the final bulb into the wire coming from the solar panel. Tighten the plug by
screwing the seal over the connection point.
Note: The solar string lights will illuminate for 4-5 hours depending on the charge level of the
batteries.
OPERATION:
After an initial 3 day charge in the OFF position the solar string lights are ready to use.
When the solar panel is in the ON position the bulbs should illuminate. Simply press the button on
the remote control to turn the bulbs off. Likewise when the bulbs are off press the button on the
remote control to illuminate the bulbs. It is advisable to leave the solar panel in the ON position for
regular usage. Turning the solar panel to the OFF position disengages the remote control and can
be used when storing or for long periods of intended inactivity.

BATTERY REPLACEMENT
HOW TO REPLACE THE BULB?
Input: 3V, 0.3W | Edison LED Bulb with E26 base
Step 1: Step 2 : Step 3 : Step 4:
Only use 3V, 0.3W LED bulbs. For more information on replacement bulbs, contact Sunforce Products Inc. at [email protected] or call 1-888-478-6435.
The solar string light's batteries (I) are
installed on the rear of the solar panel.
Always open the battery compartment with
the ON/OFF switch in the OFF position.
Unscrew the back of the battery compartment
and remove the backing piece. Inside you will
see the batteries.
When replacing the batteries, observe the
correct polarity and match the battery
specifications with the batteries you have
removed.
Use rechargeable batteries only.
Replace the back of the battery compartment
and continue to use the solar string lights as
required.
3V, CR2025 lithium button battery included.
Should you need to replace the included battery in the remote control, locate the battery
compartment on the edge of the remote control.
Push the tab to the right(1) and slide out the battery compartment (2).
Replace the battery ensuring the right polarity is observed and ensure the replacement battery has
the same characteristics as the one that has been removed.
AWARNING: This product contains a button battery. If swallowed, it could cause severe injury or
death in just 2 hours. Seek medical attention immediately.
Carefully unscrew the light bulb. Completely remove the light bulb. Carefully screw in the replacement bulb. Once the bulb is securely screwed into
place you are ready to use as required.

Operation is subject to the following two conditions:
(1) This device may not cause harmful interference, and (2) this device must accept any interference received, including interference that may cause undesired operation.
NOTE: This equipment has been tested and found to comply with the limits for Class B digital device, pursuant to part 15 of the FCC Rules. These limits are designed to provide reasonable protection against
harmful interference in a residential installation. This equipment generates, uses and can radiate radio frequency energy and, if not installed and used in accordance with the instructions, may cause harmful
interference to radio or television reception, which can be determined by turning the equipment off and on, the user is encouraged to try to correct the interference by one or more of the following measures:
Reorient or relocate the receiving antenna.
Increase the separation between the equipment and the receiver.
Connect the equipment into an outlet on a circuit different from that to which the receiver is connected.
Caution: Any changes or modifications to this device not explicitly approved by manufacturer could void your authority to operate this equipment.
ISED Statement
English: This device complies with Industry Canada license‐exempt RSS standard(s). Operation is subject to the following two conditions: (1) This device may not cause interference, and
(2) This device must accept any interference, including interference that may cause undesired operation of the device. The digital apparatus complies with Canadian CAN ICES‐3 (B)/NMB‐3(B).
French: Le présentappareilestconforme aux CNR d'Industrie Canada applicables aux appareils radio exempts de licence. L'exploitationestautorisée aux deux conditions suivantes: (1) l'appareil ne doit pas
produire de brouillage, et (2) l'utilisateur de l'appareildoit accepter tout brouillageradioélec triquesubi, mêmesi le brouillageest susceptible d'encompromettre le fonctionnement.
This radio transmitter (ISED certification number: 26663-101015) has been approved by Industry Canada to operate with the antenna types listed with the maximum permissible gain indicated. Antenna types
not included in this list, having a gain greater than the maximum gain indicated for that type, are strictly prohibited for use with this device.
Le présent émetteur radio (ISED certification number: 26663-101015) a étéapprouvépar Industrie Canada pour fonctionner avec les types d'antenne énumérés ci-dessous et ayant un gain admissible maximal.
Les types d'antenne non inclus dans cette liste, et dont le gain est supérieur au gain maximal indiqué, sont strictement interdits pour l'exploitation de l'émetteur.
CARE & MAINTENANCE
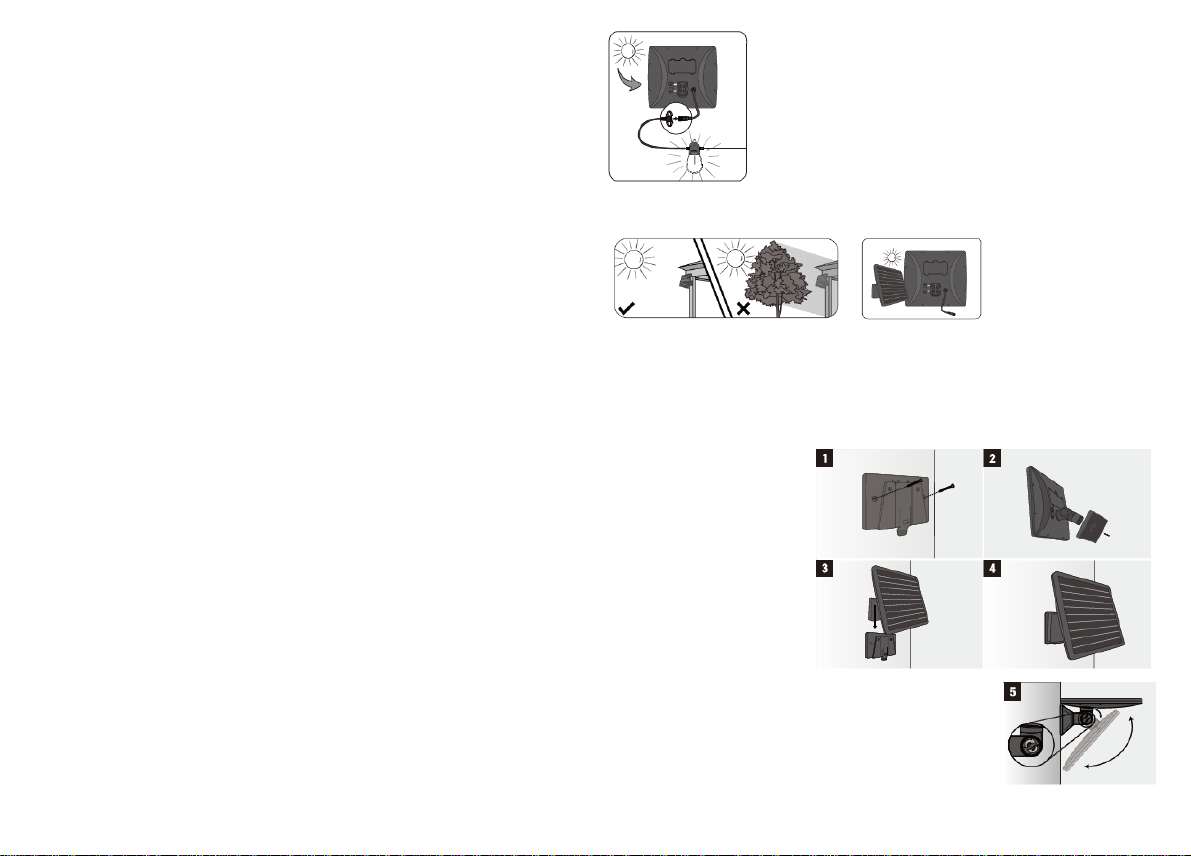
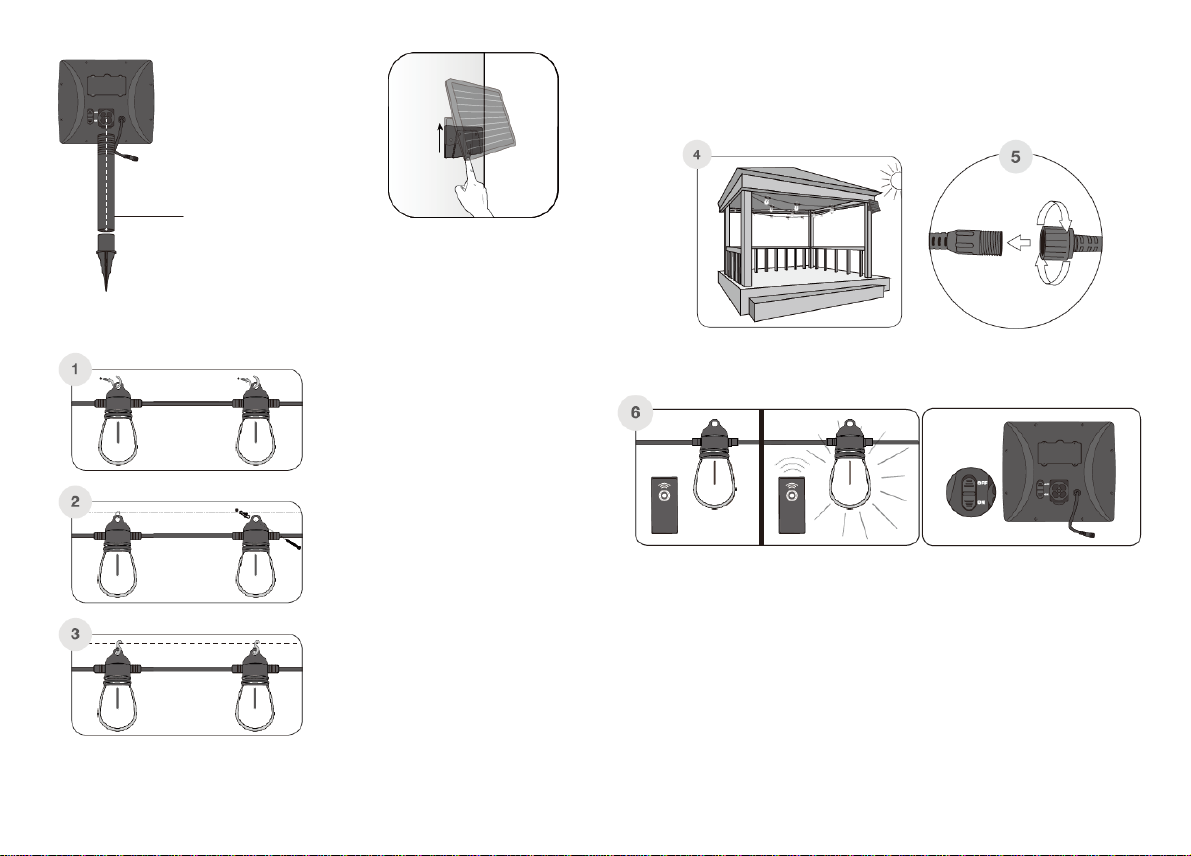
•Ensure the solar panel remains in a position that optimizes exposure to the sun, especially during the winter months.
•The solar panel should be cleaned with a damp cotton cloth on a regular basis. This will ensure optimal performance and battery charging.
•Utilize the same technique to clean the light bulbs of the solar airing lights.
•Never let any abrasive material come into contact with the solar panel or bulbs.
THIS DEVICE COMPLIES WITH PART 15 OF THE FCC
RULES.

FREQUENTLY ASKED QUESTIONS
1. Can the wire be extended?
2. Do the solar string lights require direct sun to operate?
3. Are the bulbs replaceable?
4. Why do the solar string lights appear to strobe or flash?
5. Can the solar string lights be used during the daytime?
6. What type of battery do my solar airing lights require to operate?
7. What type of battery does my remote control require to operate?
8. How long do the lights illuminate for?
1. No, the solar string light's wiring cannot be extended.
2. The solar string lights will charge in direct and indirect sunlight For optimal performance try to ensure the solar panel is orientated to maximize sun exposure.
3. Yes, the 0.3W I ED bulbs are replaceable. Please contact our customer service team and refer to page 10 for additional bulb replacement information.
4. A flashing light is generally caused by an undercharged battery. Turn the solar string lights to the "OFF" position and charge for two full days in strong sun. After these two days of charging, switch to the “ON"
position and use as normal.
5. Yes, the bulbs can work during the daytime.
6. Each set of solar string lights requires the use of two rechargeable 3. 7V Li Ion batteries.
7. This remote control requires the use of a 3V lithium (CR2025) button cell battery.
8. Dependent on the charge and health of the installed batteries the light should illuminate for between 4-5 hours.
This manual suits for next models
1
Table of contents
Other Sunforce Lantern manuals
Popular Lantern manuals by other brands

Portfolio
Portfolio SLS10BK instructions

Life
Life Tribal user manual

Kovea
Kovea KL-2905 instruction manual

Urban Electric
Urban Electric MALPLAQUET FLUSHMOUNT Assembly and mounting instructions

Vaughan
Vaughan Denmead WA0346 installation guide

olympia electronics
olympia electronics GR-939/30L/LT quick start guide

SIGNIFY
SIGNIFY LUMEC ULM100 instructions

Lighting Technologies
Lighting Technologies HB LED G2 Series manual

Clas Ohlson
Clas Ohlson TN-8041 instruction manual

S:FLEX
S:FLEX FLAT DIRECT Assembly instructions

Kichler Lighting
Kichler Lighting 39518 manual

eaglelighting
eaglelighting EL-HYP-124 installation guide