SUNKET-ESS SKT4KTL3H User manual

SKT4KTL3H
SKT8KTL3H
SKT5KTL3H
SKT10KTL3H
SKT6KTL3H
SKT12KTL3H
User Manual
: sunketess.com / sunketpower.com
: +86-510-68005868
- Installation
- Operation
- Maintenance

Contents
3.2.4 ESS Working Modes Setting Instruction
3.2.3 Monitoring and Setting
3.2.2 WiFi Configuration
3.2.1 Software acquisition
2.4.3 PV Connection
2.4.2 Overview Of The Electrical Connecting Part
2.4.1 System Wiring Diagram
2.3.2 Mounting The Inverter
2.3.1 Requirements For Mounting
1.3.4 Peak shaving and valley filling mode
1.3.3 Micro-grid mode
1.3.2 Battery backup mode
1.3.1 General mode(Default)
1.1.2 SAFETY WARNING
1.1.1 Symbols Explanation
1.1 Safety Symbois & Warnings
3.2 Monitoring System
2.8 Smart meter connection
2.7 Declaration for ESP Loads
2.6 Grid & ESP Connection
2.5 Battery Connection
3.1 LED and LCD Display
2.4 Electrical Connection
2.3 Mounting
2.2 Unacceptable Installations
2.1 Unpacking and Checking
1.3 Operation Modes Introduction
1.2 System Diagram
3 Operating of the Inverter
2 lnstallation
1 lnstallation
Contents
19
18
17
17
17
15
4 Trouble Shooting 24
15
6
1
5 Technical Data 27
6 Appendix:
Smart Meter Connection Instruction
29
14
13
13
11
10
10
9
9
8
7
7
6
6
4
4
4
3
3
3
2
1
1

Introduction Introduction
SKT

43
Instruction Instruction
SKT
3

Introduction Installation
65
1.3.4.1) In the valley level, the grid and PV charge the batteries.(Fig:1.3.4.1)
Fig:1.3.4.1
1.3.4.2) In the flat stage,if the PV is sufficient,the battery can be charged(Fig:1.3.4.2A); if
the PV is insufficient, Priority is for loads(Fig:1.3.4.2B).
Fig:1.3.4.2A Fig:1.3.4.2B
1.3.4.3) In the peak level.
Fig:1.3.4.3(A)(PV is sufficient) Fig:1.3.4.3(B)(PV is insufficient)
2 Installation
2.1 Unpackingand Checking
On receiving the inverter, please check before installation to make sure all the
components as below are not missing or damaged.
2.2 Unacceptable Installations
Please avoid thefollowing installations, which will damage the system or the inverter.
Inverter×1 Smart Meter×1
with 3 CT
Positive PV
connector×2
AC Connector×2
Positive PV
connector×2
Positive Bat
connector×1
Positive Bat
connector×1
Installation Screw
packet User manual×1
RJ45 Connector×2

2.3 Mounting
2.3.1 Requirements For Mounting
The installation of the inverter should be protected under shelter from direct sunshine or
any bad weather conditions as shown below:
Fig.2.1
The inverter should be installed in a cool & dry place with temperature from -25 to
60 (High ambient temperature will cause the inverter’s power derating).
The inverter LCD should be leveled with eyes and with enough space in the front for
inspection.
The inverter should be installed on a vertical wall or within 15°at most if backwards to the
wall
Fig.2.2
To avoid burning and electric shock, the inverter should be installed beyond reach of
children.
Make sure the installation position does not shake.
No Direct Sunlight No Exposure to Rain and Snow Direct Sunlight ×Exposure to Rain and Snow ×
Leave enough space around the inverter as shown below:
Fig.2.3
2.3.2 Mounting The Inverter
Step 1: Use the positioning the cardboard as template to drill 4 holes on walls.
Fig.2.4
Step2:
Fig.2.5
Position Min.Size(CM)
Front 40CM
Lateral
Top
Bottom
40CM
40CM
50CM
87
Installation Installation
Fix the borad to the wall using the tapping screws tightly.

Installation
9
Installation
10
Fig.2.6
2.4 Electrical Connection
2.4.1 System Wiring Diagram
General wiring diagram of SKT series hybrid inverter.
Fig.2.7
2.4.2 Overview Of The Electrical Connecting Part
Fig.2.8
2.4.3 PV Connection
Before connecting PV panels/strings to inverter, please make sure:
1) Use the right PV connectors in the accessory box.
2) The voltage, current and power ratings of the PV strings are within theallowable range
of the inverter. Please refer to the Technical Data Sheet for voltage and current limits.
3) Make sure the PV switch of the inverter is in the “OFF” position during wiring.
4) PV strings could not connect to EARTH conductor.
STEP1:
Assemble the PV connectors from the accessory box.(PV cable must be firmly crimped
into connectors)
Fig.2.9
STEP2:
Connect the PV connectors to the inverter. There
will be a click sound if connectors are inserted correctly
into PV plugs.
Fig.2.10
Step 3:Screw on the back of the box to ensure that the inverter is parallel to the wall,
and attach inverter to the wall bracket slightly to the top of its final position
Battery
Solar
KW·h
1024 Grid
N
Uc
Ub
Ua
Loads
AC Breaker
AC Breaker
AC Breaker
Billing Meter
3-phase Loads
CT Direction
CTa
CTb
CTc
A
B
C
N
Smart Meter Box
BMS
5 6 7 8 910 21 22 23
1 2 3 4 13 12
FNSet
ON
OFF PV1
+
-
Meter
Power
AC OUT
+
-
PV2
+
-
Battery
BMS
ON
OFF PV1
+
-
Meter
Power
AC OUT
+
-
PV2
+
-
Battery

Installation
11 12
Installation
2.5 Battery Connection
Battery connection diagram
Fig.2.11
1) Use the right BAT connectors in the accessory box.
2) Choose 4 to 6 mm²(AWG 10) tin-plated cable to connect the battery and the inverter.
3) Make sure battery switch is off and battery nominal voltage meets SKT series
inverter’s specification before connecting battery to inverter.
STEP1:
Assemble the battery connectors from the accessory box.(battery cable must be firmly
crimped into connectors)
Fig.2.12
STEP2:
Connect the battery connectors to the inverter.
There will be a click sound if connectors
are inserted correctly into battery plugs.
Fig.2.13
STEP3:
Connect the BMS cable between battery and inverter, insert the RJ45 connector with
water-proof cap intothe port marked “BMS” on inverter and fasten the cap. Then insert the
other end of the cable intothe battery port.
Position Color
1Orange&white
Orange
Green&white
Blue
485_A2
NC
Blue&white
Green
Brown&white
Brown
2
3
4
5
6
7
8
485_B2
CAN_H
CAN_L
NC
NC
NC
Fig.2.14
+-
CAN
Batery Power
BMS
BMS
ON
OFF PV1
+
-
Meter
Power
AC OUT
+
-
PV2
+
-
Battery

Installation
14
Installation
13
Fig.2.16
STEP2:
Connect the grid connector and the EPS connector
to the inverter. Just follow the markings on the
inverter to connect them correctly.
2.7 Power key and Declara n for EPS Loads
Fig.2.17
The power button on the rear panel is only used for EPS function.
When mains power does not exist and EPS function is enabled, press and hold for 3
seconds, the inverter will enter backup mode;
When inverter operates in backup mode, press and hold for 3 seconds, inverter will exit
backup mode;
When inverter gives an alarm and shutdown in backup mode, press and hold for 3
seconds, inverter will clear alarm.
Inductive load: a non-frequency conversion air conditioner within 1.5P can be connected
to EPS side. Two or more may cause EPS output unstable.
Do not connect 3-phase inductive load(like motor) without Neutral line to EPS side.
Capacitive load: Total power <=0.6*nominal power of model.
2.8 Smart meter connection
Please Refer to the connection instructions in the meter
box for connection
2.6 Grid & EPS Connection
Use the AC connectors from accessory box for grid and EPS connection. An external AC
breaker(32A) is needed for on-grid connection to isolate from grid
when necessary .
STEP1:
Assemble the grid connector. Follow the markings on the
connectors, make sure 3L/N/PE lines are connected correctly.
Fig.2.15
w

Operating of the Inverter
15 16
Operating of the Inverter
3 Operating of the Inverter
3.1 LED and LCD Display
The LED indicators are shown as blow:
LED Status Explanation
SYSTEM ON System is powered up
OFF System is not powered up
GRID
ON Grid is normal
OFF Grid loss
FLASH Grid is abnormal
EPS ON Inverter in offline mode, EPS is
active
OFF Inverter is not in offline mode
COM ON WIFI module connected
OFF WIFI module not connected
METER ON Smart meter communication OK
OFF Smart meter communication fail
FAULT
ON Alarm occurred and inverter stop
work
OFF No Alarm
FLASH Alarm occurred but inverter still work
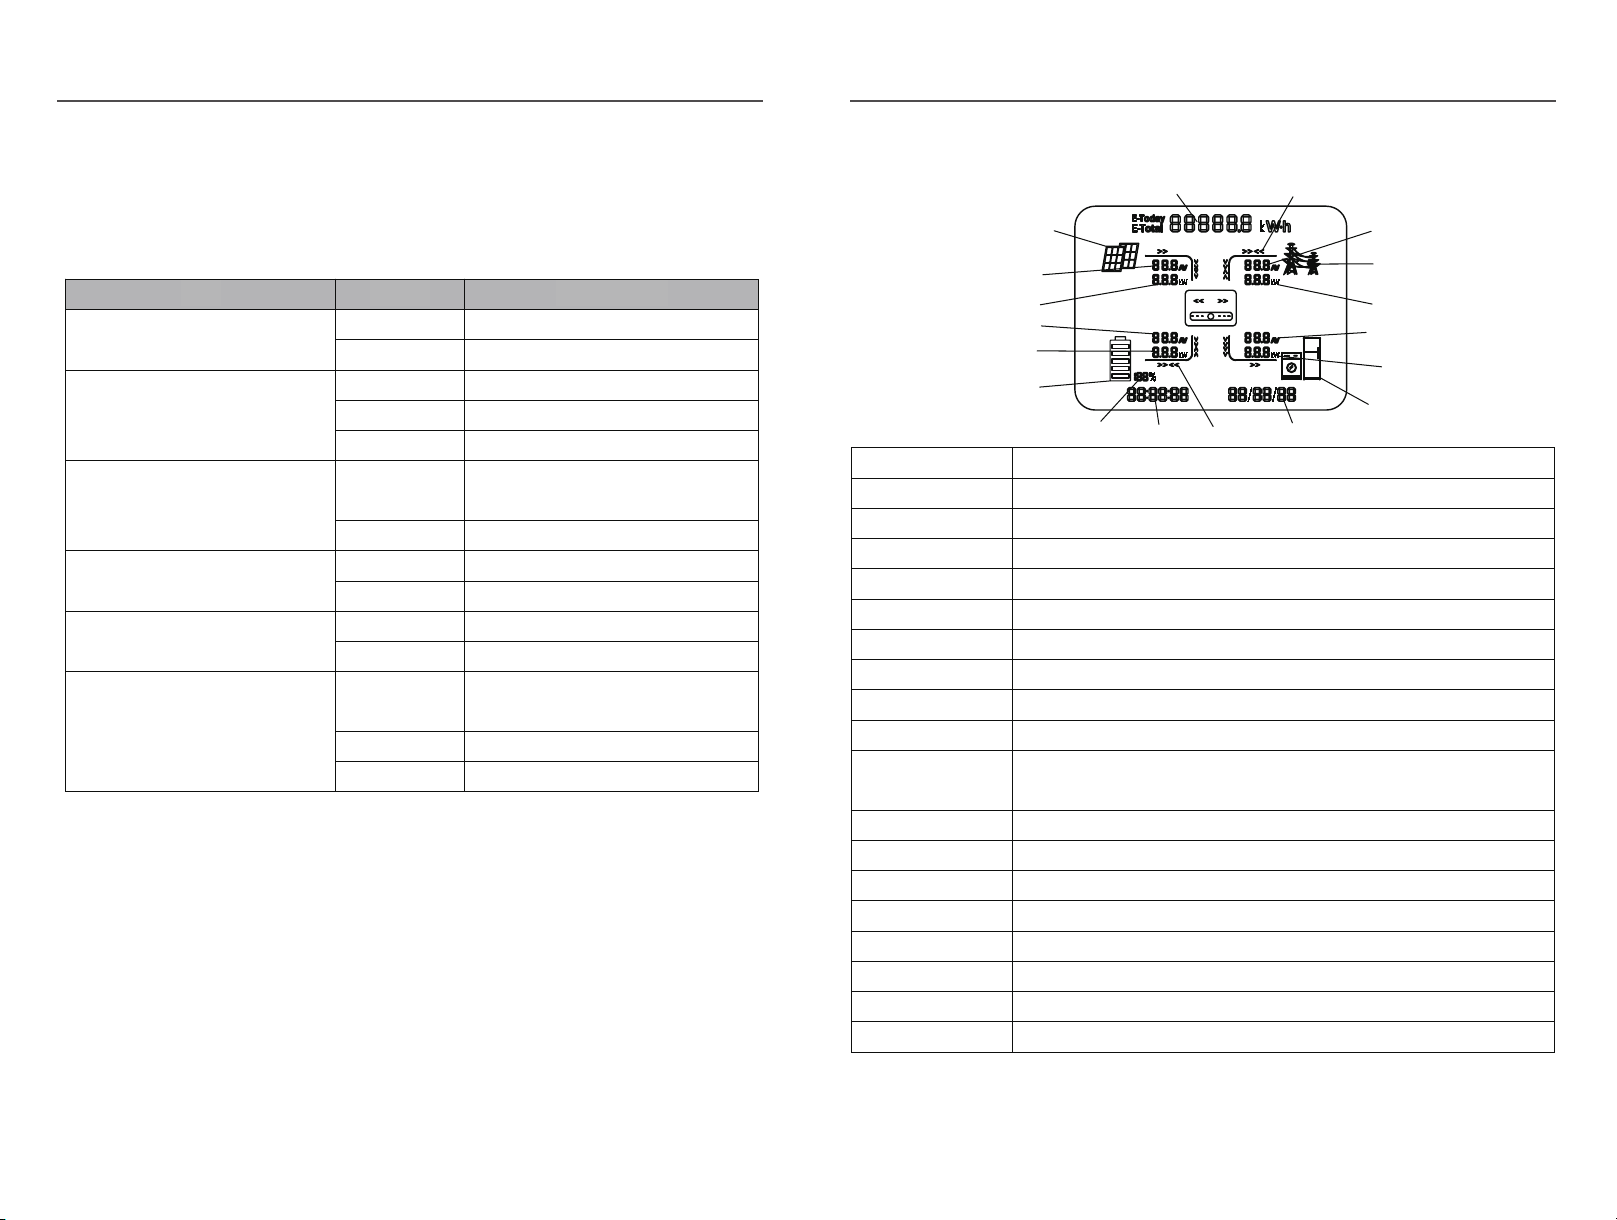
The LCD display shows the detailed information of the inverter
PV12
A
C
A
B
C
B
A
B
C
D
E
F
G
HIJK
L
M
N
O
P
Q
R
Position Description
AIt indicates the power output amount of total and today alternately. Unit: kWh or MWh
BPV panels indicator
CPV1,PV2 panels parameters. Voltage and current are displayed alternately.
DTotal PV power
EBattery parameters. Voltage and current are displayed alternately.
FBattery power
GBattery indicator
HSOC of battery
ICurrent time
J
Power flow array of battery. When it towards battery, it means charging; when it towards inverter,it
means discharging.
KDefault as current date. When an error occurs, fault code will be displayed alternately.
L Loads indicator
MLoads power consumption of each phase
NLoad parameters. Voltage and current of each phase are displayed alternately.
OPower export or import of each phase
PGrid indicator
QGrid parameters. Voltage and current of each phase are displayed alternately.
RPower flow array of load

Operating of the Inverter
17 18
Operating of the Inverter

Operating of the Inverter
19 20
Trouble Shooting
Working mode selection
Automatic mode: the automatic mode can maximize the self use rate of photovoltaic power
generation, and achieve the goal of not consuming grid power as much as possible within
the regulation range of the energy storage system. The load at any time is the first priority,
and charging is the second priority. When the battery is full, selling power to the grid is the
third priority. When the photovoltaic power is less than the load power, the battery will
automatically discharge to avoid consuming the power of the grid. The automatic mode can
meet the application needs of most families. It is generally recommended that users keep
the automatic mode setting.
Peak shaving and valley filling mode: when the battery capacity of the energy storage
system is small, the user's power consumption is relatively large, and there is a big peak
valley electricity price difference in the user's region, the user can choose whether to adopt
the peak shaving and valley filling mode according to his own power consumption. It should
be noted that after setting the peak shaving and valley filling mode, the user must correctly
set the peak valley period at the bottom of the page, and the period outside the peak valley
period is the flat period. Compared with the automatic mode, the self utilization rate of
photovoltaic power generation in the energy storage system will be reduced. During the
peak period, the priority of load & charging & selling power is the same as that in the
automatic mode; During the valley period, if the photovoltaic power is less than the load
power, the battery will not discharge. At this time, the load consumes the power of the grid,
and the user can set whether to charge the battery from the grid during this period; In the
flat section, the system only charges the battery with excess power when the photovoltaic
power is greater than the load power, and the battery will not discharge or get charged from
the grid.
Battery backup mode: in areas with unstable power grid, this mode can try to meet the
power demand of users during power loss. At the bottom of the setting page, you can set
whether to charge the battery from the grid in the battery backup mode.
Microgrid mode: applicable in areas without power grid.
The energy storage inverter provides four working modes to meet the needs of users in
different applications, namely
Automatic mode (default), peak shaving and valley filling mode, battery backup mode and
Microgrid mode.

Operating of the Inverter
21 22
Trouble Shooting
Power limit setting
Three phase unbalance setting
Users can choose whether to turn on the on-grid power limit function after the battery is
fully charged according to whether the local power grid company allows the photovoltaic
power being exported to the power grid. This function is turned off by default. When the
photovoltaic power is greater than the load power, the system will charge the battery. If the
battery is full at this time, if the on-grid power limit function is turned off, the excess
photovoltaic power will be sent to the power grid; If the on-grid power limit function is
enabled, the system will adjust the amount of power sent to the grid according to the power
limit percentage set by the user. For example, if the system is 10kW and the on-grid power
limit is 0%, the power export is completely prohibited; If it is 50%, after the system is fully
charged, the excess photovoltaic energy is allowed to send 5kW to the grid at most.
In some countries or regions, such as the Czech Republic, three-phase billing meters
charge independently on each phase. Users can choose whether to turn on the
three-phase unbalanced output function. It should be noted that in most countries,
three-phase billing meters are charged uniformly after three-phase summary, so it is not
necessary to turn on this function, because the conversion efficiency of the inverter will be
slightly reduced after turning on this function.
Valley time charging
Valley period & peak period
This function is only effective when the user selects the peak shaving and valley filling
mode, and it is generally not recommended to start it.
Peak and valley periods are only effective when the user selects the peak cutting and
valley filling mode. The system can set three Valley periods and three peak periods, and
the periods cannot overlap.

Operating of the Inverter
23 24
Trouble Shooting
4 Trouble Shooting
This part introduces the common fault and solving steps, provides troubleshooting
methods and skills to the user, and helps the user identify and solve some common faults of
the inverter.
Protection
code Description Recommended solution
P001 PV over voltage protection Check the configuration of the PV
panels
P002 Battery over voltage protection Check if battery volt larger than 600V
P003 Insulation resistance low Check the insulation of PV panels
P004 Leakage current high This error will reset itself.
P005 Over temperature protection The inverter will recover automatically
when the temperature gets lower.
P006 Bus voltage unbalance
The inverter will recover automatically.P007 Bus voltage high
P008 Bus voltage low
P009 Grid and EPS are reversed
Check the connection of AC side. Make
sure the grid and EPS load are
connected to the ports on the inverter
correctly.
P010 Grid relay open-circuit
Shut down and restart .If it still can't be
auto-recover, please contact the
service.
P011 Grid relay stick
P012 On-grid mode bus soft start fault
P013 MCU communication fault
P019 Battery SOC low in on-grid
mode
Battery discharged to low level, it will
recover after charged automatically
P020 Battery SOC low in EPS mode
P021 Battery voltage low
The peak time discharge setting is only effective when the user selects the peak shaving
and valley filling mode. During the peak time, the default setting is that the system automat-
ically adjusts the discharge power according to the household power detected by the smart
meter; If the smart meter is not installed, the user can select a fixed discharge power
according to the approximate power consumption.
The battery backup mode charging setting is only effective when the user selects the
battery backup working mode. You can set whether to turn on the mains power to charge
the battery, and the charging power and battery charging cut-off SOC.

25 26
Trouble Shooting Trouble Shooting

27 28
Technical Data Technical Data
5 Technical Data
Model SKT5KTL3H SKT6KTL3H SKT8KTL3H SKT10KTL3H SKT12KTL3H
Input(PV)
Max PV Power 5500W 6500W 7500W 9500W 11500W 13200W
Max PV Voltage 1000Vd.c
MPPT voltage range 200~850Vd.c
Max input current/per string 13A/13A
Number of MPP trackers
Number of input string
2
1
Battery Input
Battery Type Li-Lon
Battery voltage range 130~700V
Max charge/discharge current 25A/25A
Charge strategy for Li-lon Battery Self-adaption to BMS
AC Output (On-Grid)
AC nominal power 4000VA 5000VA 6000VA 8000VA 10000VA 12000VA
Max AC apparent power 5000VA 5500VA 7000VA 8800VA 11000VA 13200VA
Max output current 8 10 12 15 17 20
Nominal AC output 50/60Hz;400/350
AC output range 45/55Hz;280~490Vac(Adj)
Power factor 0.8leading~0.8laging
Harmonics <3%
Grid type 3W/N/PE
Three-phase unbalance output 0~100% 0~80%
AC Output Back-up
Max AC apparent power 4000VA 5000VA 6000VA 8000VA 10000VA 10000VA
Norminal Output Voltage 400/380
Norminal Output Frequency 50/60
Output THDV (@Linear Load) <3%
Efficiency
Max conversion efficiency 98.0% 98.0% 98.2% 98.2% 98.2% 98.2%
European efficiency 97.3% 97.3% 97.5% 97.5% 97.5% 97.5%
MPPT efficiency 99.9% 99.9% 99.9% 99.9% 99.9% 99.9%
Safety and protection
DC reverse-polarity protection yes
DC breaker yes
DC/AC SPD yes
Leakage current protection yes
Insulation Impedance Detection yes
Residual Current protection yes
Output short circuit protection yes
Bat reverse connection protection yes
General Parameters
Dimensions (W/H/D) 555*446*205mm
Weight 28kg
Operating temperature range -25 ~+60
Degree of protection IP65
Cooling concept Natural convection
Topology Transformerless
Display LCD
Humidity 0~95%,No condensation
Communication GPRS/WiFi
BMS communication CAN/RS485
Meter communication RS485
SKT4KTL3H

29 30
Technical Data Technical Data
Grid
N
Billing Meter
CT Direction
CTa
Smart Meter
1 4 7 10
3 6 9 10
13 14 16 17 19 21 24 25
SET ESC
Uc
Ub
Ua
CT Direction
CTb
Smart Meter
1 4 7 10
3 6 9 10
13 14 16 17 19 21 24 25
SET ESC
CT Direction
CTc
Smart Meter
1 4 7 10
3 6 9 10
13 14 16 17 19 21 24 25
SET ESC
Step 1
Connect the yellow live core of
volt sample cable
to power
grid phase A,and let grid phase A pass through CT-A in
the direction indicated by the arrow "GridɒLoad"
Step 2
Connect the green live core of
volt sample cable
to power grid phase
B,and let grid phase B pass through CT-B in the direction
indicated by the arrow "GridɒLoad"
Step 3
Connect the red live core of
volt sample cable
to power
grid phase C,and let grid phase C pass through CT-C in
the direction indicated by the arrow "GridɒLoad",and
the blue neutral core to power grid neutral
Step 4
Connect the smart meter to the Inverter using a network cable.
SmartMeter C onnection Instruction
1. Packin g list
2. In stallation instructions
2.1Dia gram
2.2 In s ta l lationSteps
Smart meter module CT module Manual
1 1 3 1
Smart Meter Connection Instruction
1. Packing list
2. Installation instructions
2.1 Diagram
2.2 Installation Steps
Note: Pay attention to the line sequence during AC wiring of hybrid
inverter, pin 1(or pin L1) connect to grid phase A, pin 2(or pin L2) to
phase B and pin L(or pin L3) to phase C. Otherwise, it may cause the
inverter abnormal operation when the three-phase unbalanced
output mode is enabled.
Volt sample cable
1 4 7 10
3 6 9 10
13 14 16 17 19 21 24 25
SET ESC
Grid
N
Uc
Ub
Ua
KW·h
1 0 2 4
Billing Meter
Main Breaker Main Breaker
Main Breaker
Grid
N
Billing Meter
Uc
Ub
Ua
KW·h
1 0 2 4
KW·h
1 0 2 4
36
9
10
Back-up On-Grid
AC Breaker
KW·h
1 0 2 4
Grid
N
Uc
Ub
Ua
Loads
AC Breaker
Billing Meter
CT Direction
CTa
CTb
CTc
Smart Meter
1 4 7 10
3 6 9 10
13 14 16 17 19 21 24 25
SET ESC
485
ON
OFF
PV1
+
-
PV2 Battery
36910
Main Breaker
BMS
Power
Meter
WIFI
Back-up On-Grid
ON
OFF
PV1
+
-
PV2 Battery BMS
Power
Meter
WIFI
1 4 7 10
3 6 9 10
13 14 16 17 19 21 24 25
SET ESC
2.3 System with multi-inverters
We support multi inverters with one smart to form a large capacity energy storage system,
connection diagram is as follows:
With APP, in the setting page, choose “Basic Settings”,
Set the 1st inverter as “Master” and set internal comm address 1
Set the 2nd inverter as “Slave” and set internal comm address 2, etc.
We design support up to 20 inverters in one system.
Note: Please keep the slave backup terminal unconnected, otherwise
it may cause damage to the inverter.
ON
OFF PV1
+
-
PV2 Battery BMS
WIFI
Power
Back-up On-Grid
Battery
PV1:10pcs
5 6 7 8 9 10 21 22 23
1 2 3 4 13 12
FN Set
KW·h
10 2 4
Grid
N
Uc
Ub
Ua
Loads
AC Breaker
AC Breaker
Smart Meter
Billing Meter
Back-up Loads
CTa
CTb
CTc
PV2:10pcs
Hybrid Inverter(1)(master)
Hybrid Inverter(2)(Slave)
Meter
Meter
AC Breaker
PV2:10pcs
ON
OFF PV1
+
-
PV2 Battery BMS
WIFI
Power
Back-up On-Grid
Battery
PV1:10pcs
This manual suits for next models
5
Table of contents
Other SUNKET-ESS Inverter manuals