manuals.online logo
Brands
  1. Home
  2. •
  3. Brands
  4. •
  5. Sunlight Supply
  6. •
  7. Inverter
  8. •
  9. Sunlight Supply Titan Controls Selene 1 User manual

Sunlight Supply Titan Controls Selene 1 User manual

Selene 1TM
LP CO2 Generator
Instruction Manual
VANCOUVER, WASHINGTON U.S.A.
www.titancontrols.net
Notes:
_________________________________________________
_________________________________________________
_________________________________________________
_________________________________________________
_________________________________________________
_________________________________________________
________________________________________________
1 Square = 1 Foot
®
Selene 1
• Warnings & Cautions
• Selene 1 - Instructions for Operation
• Troubleshooting Tips
• Safety Notes
• Controller Specifications
• Installation Example
• Warranty Information
Service and Repair Program
Warnings & Cautions
• Read all instructions before operating CO2 generator.
• Do not put your CO2 generator in an area where it can get wet or sprayed.
• Mount your CO2 generator SECURELY to the ceiling using hardware provided.
• LP gas can be dangerous – check all connections with soapy water before firing.
• If you smell gas, unplug CO2 generator and do NOT re-light until connections are tightened.
• When using “bug bombs” in area, cover CO2 generator completely to avoid corrosion.
• There are no serviceable parts in CO2 generator. Do not attempt to repair the unit.
• Breaking “warranty” seal will void your warranty.
• When CO2 generator is NOT in use, place in sealed bag (i.e. garbage bag, etc).
• Do not put paperclips, tools, etc. into unit. Possible electrocution may occur.
• Make sure to verify your power source prior to plugging CO2 generator into outlet.
• Check that all equipment that will activate this CO2 generator is the proper voltage.
• Avoid touching or handling CO2 generator chassis while operating. You may get burned.
• Use caution when operating CO2 generator in extremely humid environments.
• Operate CO2 generator in well ventilated area.
• Do NOT use Teflon tape on gas connections. All gas fittings are self sealing.
• Do not use CO2 generator for purposes other than the unit was designed to function.
• Use CO2 generator within defined environmental specifications.
• Ask your Dealer for tips and techniques regarding the use of this CO2 generator.
• Be conscientious when disposing of any products.
• Enjoy your Titan Controls LP CO2 generator for years to come!
WARRANTY SERVICE
If after reviewing the troubleshooting tips the unit will still not work, you should return it to the
Dealer where you purchased it. They will be able to further evaluate the unit and test its various
components and quite possibly will be able to identify and/or fix any problems. If the Dealer is
unable to fix the unit, they will return it to us for factory repair.
If there are no Dealers in your area, you may contact us directly for technical support. If we
cannot help you resolve the problem over the phone, we will issue you a RMA number (Return
Merchandise Authorization) authorizing you to return the unit to us for factory reconditioning (if the
unit is under warranty). Contact the number below for a RMA and shipping address. Complete the
form below and include it with your unit. Also please write the RMA # on the outside of the box.
Please package the unit in its original packaging. If it is damaged in shipment we cannot be
responsible.
Once we receive the unit back, we will repair it within 48 hours (business) and return it to you
freight prepaid via FedEx or UPS ground shipment.
Include the following if returning directly to Titan Controls
• Proof of purchase • This completed form • RMA # on the outside of the box
Return Merchandise Authorization Number (Required
Company Name: ____________________________________________________________________________________
Contact Name: _____________________________________________________________________________________
Address: __________________________________________________________________________________________
____________________________________________________________________________________________________
Phone #: ___________________________________________________________________________________________
Email address: _______________________________________________________________________________
What is the nature of the problem?
______________________________________
___________________________________________________________
___________________________________________________________
___________________________________________________________
___________________________________________________________
_______________________________________________________
Send to your nearest location – shipping address will be given when the RMA # is issued:
www.titancontrols.net
For technical assistance call us at 1-888-80-Titan or 1-888-808-4826.
®
Selene 1 – LP gas CO2 Generator
The Selene 1 is used to create and maintain the CO2 in your growing environment. CO2 has
been proven to considerably increase the growth of plants. The normal level of CO2 in the
environment is between 300 parts per million (ppm) to 600 ppm. The recommended level of
CO2 in the grow area should be between 1000 ppm and 1500 ppm. Concentrations of 2500
ppm and higher can be dangerous to your health. If you feel dizzy or light headed leave the
grow area immediately and go to an area with fresh air. Your plants uptake CO2 only during
daylight hours, so by utilizing a CO2 controller (Atlas 1 – CO2 Monitor/ Controller) or short cycle
timer (Apollo 1 – Repeat Cycle Timer with photocell) or a multi-functional controller (Kronus
Series) will allow you to effectively monitor and dose CO2 in a safe and efficient method. The
Selene 1 has a number of safety features such as: Electronic Spark Ignition (ESI) with safety
cut-off switch, a tip over switch that defeats the fuel source if the Selene 1 tilts past a 30° angle,
and a LP regulator with POL fitting for a safe and secure attachment to the propane source.
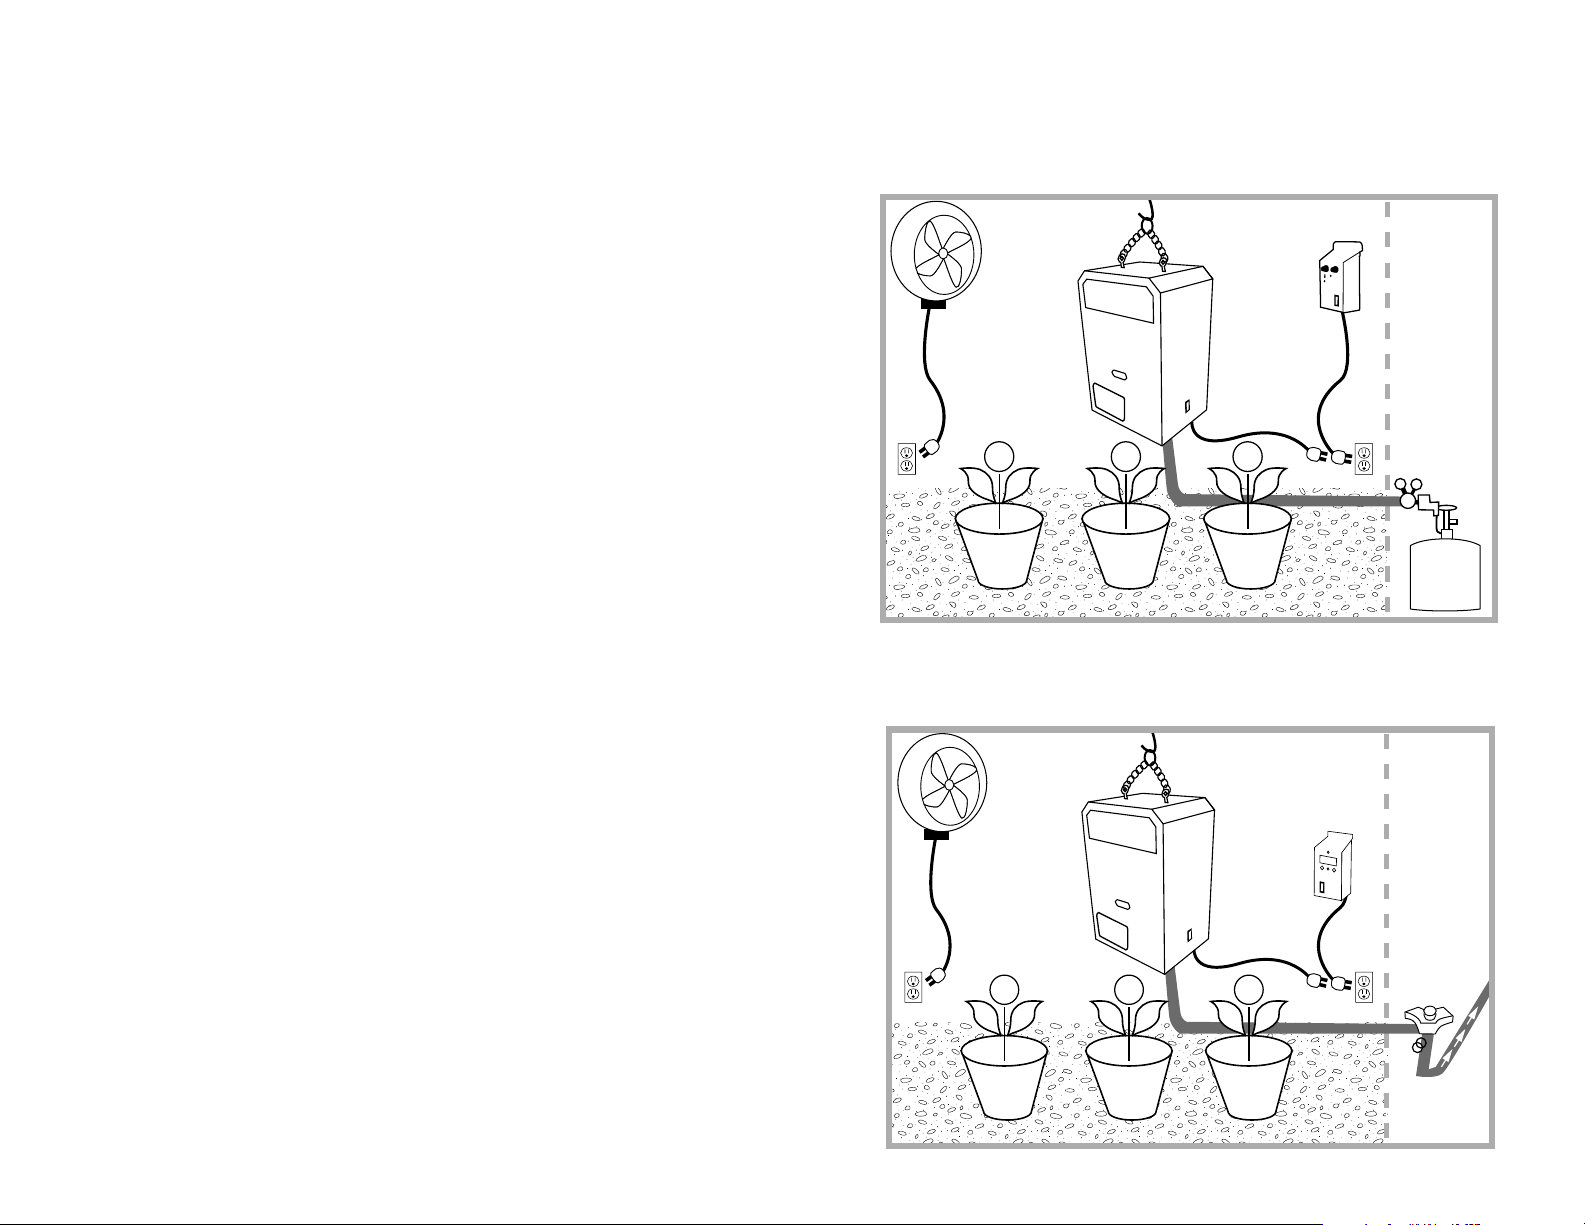
The Selene 1 is easy to set up and operate (See Installation Examples). Products created
for our industry, by our industry. The Selene 1 is built with the highest quality components to
provide the user with years of trouble free service.
Instructions for Operation
• Hang Selene 1(using the #4 hook and chain included) a minimum of 20” away from ceiling and
away from potentially flammable materials. Verify that the #4 hook is secure in ceiling joist or
rafter prior to hanging Selene 1.
• Attach LP hose to Selene 1 using two (2) wrenches to avoid damage to the gas input valve.
DO NOT over tighten fittings. DO NOT use Teflon tape.
• Connect POL gas fitting securely to LP source and turn tank or LP service ‘ON’.
• Inspect all gas connections using a sprayer filled 1/3 with dish soap and 2/3 water. If bubbles
are noted, tighten fittings and recheck with soapy water solution.
• Check to see that the Selene 1 is level . This is so your generator burns clean and evenly.
• Plug in power adaptor to power input jack located on the right side of the Selene 1.
• Plug other end of the power adaptor into your CO2 Controller (Atlas 1) or a short cycle timer
(Apollo 1) into the “CO2 Output” outlet or multifunctional controller ( Kronus Series).
• Turn ‘ON’ green on/off switch on the right side of the Selene 1.
• The Selene 1 will now activate and deactivate based on your controller or timer settings.
Note: Position circulation fan to disperse CO2 evenly throughout your enclosure.
Troubleshooting Tips
If the Selene 1 is not performing as expected, try the following:
a. Verify that your LP source is ‘ON’ and providing fuel to the system.
b. Make sure that the power switch is lit and in the ‘ON’ position.
c. If ring Selene 1 for the rst time, allow 2 – 3 cycling’s to allow the air to purge from the LP
supply line. Turn Selene 1 ‘OFF’ then ‘ON’ to start new cycle.
d. Should the burners fail to ignite, check the burner orice and burner cap to verify that
they are not obstructed. Use canned air to blow out any obstructions.
Warranty Information
• Titan Controls warrants the original purchase of this product against defects in material and
workmanship under normal use for three (3) years from the date of purchase.
• During the warranty period, Titan Controls will, at our option, and without charge, repair or
replace this product if the controller or any of its components fail or malfunction.
• All returns or repairs must be accompanied by a Return Merchandise Authorization (RMA)
number prior to any service of the product.
• This warranty is expressly in lieu of all other warranties, expressed or implied, including the
warranties of merchantability and fitness for use and of all other obligations or liabilities on the
part of the seller.
• This warranty shall not apply to this product or any part thereof which had been damaged by
accident, abuse, misuse, modification, negligence, alteration or misapplication.
• Controllers with serial numbers or date tags that have been removed, altered or obliterated;
broken seals or that show evidence of tampering; mismatched board serial numbers or
nonconforming parts, are excluded from coverage.
• Titan Controls makes no warranty whatsoever in respect to accessories or parts not
supplied by Titan Controls.
• Monetary refunds of the warranty will not be given.
• The Buyer assumes all responsibility regarding the use & installation of this controller.
• All warranty service is provided through the factory or an authorized service representative.
• This warranty shall apply only to the United States, including Alaska, Hawaii and territories of the
United States.
• Defective controllers need to be returned with the “proof of purchase/receipt”.
• For additional warranty information, contact a Titan Controls Technical Service Representative or
your Dealer.
• NOTE: Titan Controls is a manufacturer of environmental controls. All sales offerings to the
public are done through a nationwide group of Dealers. No sales offerings will be made directly
to the general public.
Service and Repair Program
• For all service and repairs please contact one of our Technical Service Representatives for a
Return Merchandise Authorization (RMA) number.
• All factory service & repairs will be completed within 48 hours of receipt of controller and after
authorization by customer for repairs.
• Titan Controls will, at its discretion, repair or replace the controller.
• Factory calibration services are available for all Titan Controls. Returning Units: Please contact
your retail store for returns.
e. If the Selene 1 res the burner but then turns off, check the slotted caps to see that the
slots are pointing directly towards the Electronic Spark Ignition (ESI), then adjust the ESI
mounting bracket to position the ame sensor in the center of the ame
f. If low level yellow ames are noted, check your propane source and verify that LP source
has enough pressure to provide LP to the Selene 1.
g. If you’re still having problems with your Selene 1, please contact our Technical Service
Representative to assist you further.
Safety Notes
1. If you smell gas, unplug unit immediately and x any gas leaks before ring again.
2. DO NOT use Teon tape on any ttings, it may clog gas orices.
3. The Selene 1 is not for use in residential setting.
4. DO NOT operate this unit with the front panel removed, injury may occur.
5. A carbon monoxide alarm is recommended for grow areas with limited ventilation.
6. DO NOT operate the Selene 1 without a 11” water column (WC) LP regulator.
7. CO2 in excess of 2000 ppm can be detrimental to your health.
8. DO NOT use with any fuel source other than LP.
9. Use LP regulator included with Selene 1 unless LP source is already regulated to
11” water column (WC) pressure.
Controller Specifications:
• Size = 16.5”H x 11”W x 9”D
• Weight = 17 lbs. (Selene 1, LP hose and accessories)
• Input Voltage = 120 Volts/AC
• Output Voltage = 12 Volts/AC
• Maximum Amperage = 2 Amps
• Operating Hertz = 60 Hz
• LP Regulator = 11” WC
• Burner Output: 2 = ~ 6 cubic feet per hour
3 = ~ 9 cubic feet per hour
4 = ~12 cubic feet per hour
• Cord set = 8 feet – UL Wall Transformer
• Storage Temperature = 32° to 135°F (0 to 58°C)
• Operating Temperature = 45° to 145°F (7 to 63°C)
Installation Examples
Fan
CO2
Generator
LP
Tank
Atlas 1 or
Apollo 1
CO²Generator using LP Tank
CO²Generator using LP Supply Line
To outdoor
propane tank
Fan
CO2
Generator
Atlas 1 or
Apollo 1

Popular Inverter manuals by other brands

Goodwe HT Series user manual

Goodwe

Goodwe HT Series user manual

CE+T Power TSI MEDIA user manual

CE+T Power

CE+T Power TSI MEDIA user manual

ABB PVS800-57B Maintenance manual

ABB

ABB PVS800-57B Maintenance manual

ABB PVS-175-TL Series Quick installation guide

ABB

ABB PVS-175-TL Series Quick installation guide

SMA Sunny Central SC 100 installation manual

SMA

SMA Sunny Central SC 100 installation manual

Heiko JS050-C2 Service manual

Heiko

Heiko JS050-C2 Service manual

SMA SUNNY BOY 3800 installation guide

SMA

SMA SUNNY BOY 3800 installation guide

Home Zone Security ELJ9533V installation instructions

Home Zone Security

Home Zone Security ELJ9533V installation instructions

Kuhne electronic MKU 57 G4 manual

Kuhne electronic

Kuhne electronic MKU 57 G4 manual

Boston gear 700 Series Installation and operation

Boston gear

Boston gear 700 Series Installation and operation

Hitachi sj300CE series Quick reference guide

Hitachi

Hitachi sj300CE series Quick reference guide

Victron energy PIN121800300 manual

Victron energy

Victron energy PIN121800300 manual

Sungrow SG50KTL-M-20 user manual

Sungrow

Sungrow SG50KTL-M-20 user manual

Xantrex GT2.8-AU-QC-230 owner's manual

Xantrex

Xantrex GT2.8-AU-QC-230 owner's manual

Olimpia splendid DC 18 HP Instructions for installation, use and maintenance

Olimpia splendid

Olimpia splendid DC 18 HP Instructions for installation, use and maintenance

HIHAP HE-143 owner's manual

HIHAP

HIHAP HE-143 owner's manual

Energy zeroCO2 large RHI-3P5K-HVES-5G Operation manual

Energy

Energy zeroCO2 large RHI-3P5K-HVES-5G Operation manual

Westerbeke WPDS SERIES Information sheet

Westerbeke

Westerbeke WPDS SERIES Information sheet

manuals.online logo
manuals.online logoBrands
  • About & Mission
  • Contact us
  • Privacy Policy
  • Terms and Conditions

Copyright 2025 Manuals.Online. All Rights Reserved.