Sunnydaze Decor AMP-P009BR User manual

SOLAR PUMP & PANEL KIT
AMP-P009BR
Read this manual carefully before using this product, and save this manual for future reference.
OVERVIEW
►This solar pump kit is designed for outdoor use in a fountain, birdbath or freshwater pond. NOTE: the pump is not
designed for use in a natural pond as it can quickly become clogged by debris such as algae, plant matter, pond sludge, etc.
►The solar panel must be placed in direct sunlight for the pump to operate.
►This solar panel is equipped with battery pack and operates by remote control only.
►The optional LED light ring will automatically illuminate at night when no sun or ambient light is hitting the solar panel.
Carefully unpack all components. Save the box for storing the unit during winter.
Connect extension tubes, LED light ring, and fountain spray head as required for your intended use; adjust components
as needed.
Unwind the pump and light power cables.
Place the pump under water, it is important to ensure the pump body remains fully submerged under water during
operation. If the spray head is too far below the water surface, use at stones or bricks to elevate the pump to the proper
height. For use with a water fountain, attach the pump directly to the fountain tubing.
Connect the pump and light cables to the solar panel; ensure each cable is in the correct port and they are rmly inserted.
Assemble the solar panel stake as shown in the diagram above. Wait to ax the solar panel to the stake until after the
stake has been installed into the ground.
Thank you for choosing Sunnydaze Decor. We stand behind our brand and the quality of the items we sell.
Replacement parts or products will be sent at our discretion within the 1-year warranty period. Proof of purchase, with
the date of purchase as well as photos of the merchandise defect, must be provided. Photos are used to determine
the cause of defects and for future quality control. Register your warranty at https://tiny.cc/SunnydazeWarranty
If you have any questions, comments or concerns, feel free to contact us by phone at 833-982-1977, by email:
customerservice@sunnydazedecor.com, or via our contact us page at https://tiny.cc/SunnydazeContact
Purchase Date: / / Order/Customer Reference Number:
Page 1 / 505/2022P0009BR
Remote Control
A Timer
B LED
C Hi
D On/Off
Battery Status:
Green: fully charged
Orange: half charged
Red: needs charge
Charger Pump Light
Bracket
Tube
Spike
ASSEMBLY & USE
CAUTION:
• Operate in freshwater only
• Do not strike the solar panel
• Never lift the pump by the power cable

Remote Control:
A TIMER: Press this button to turn on the pump for 1-4 hours running.
One press for one hour, two presses for two hours, three presses for three hours, and four presses for
four hours. The indicator light will give you a feedback blink number your preset, eg: you preset 2 hours,
the indicator light will blink twice. Press D button to turn the pump o.
B LIGHT: Press this button to turn the LED light ring on/o.
NOTE: The light will automatically turn on at night, when the panel sensors no longer receive sunlight
or ambient light.
C WATER LIFT: Press this button to control the water lift height, there are ve lift levels.
D ON/OFF: Press this button to turn on the pump without timer; the pump will run until the stored
battery power has been depleted. Press this button again to turn the pump o.
OPERATING INSTRUCTIONS
NOTE: This unit is operated by remote control. The LED light ring (oponal) is designed to only work at night.
Page 2 / 505/2022P0009BR
A Timer
B LED
C Hi/Mo
D On/Off
A
DC
B
PANEL PLACEMENT
First time use, fully charge the battery for at least 8-10 hours in full, direct sunlight.
Select an area where the solar panel will receives full, direct sunlight all day long.
Insert the spike into the ground. Position
the solar panel to face South (in the
Northern hemisphere) to make the most
of daylight hours. It is important to angle
the solar panel towards the sun when
the sun is at its highest point. Ensure
trees, shrubs or buildings do not shade
the solar panel at any point throughout
the day.
INCORRECT
CORRECT
Max. Lift
Max. Lift is the maximum height
the pump will lift water.
Solar Panel:
Charging the Battery:
Ensure the pump is turned 'OFF'. Place the solar panel in direct sunlight until the
battery pack is fully charged.
Battery Status:
When pump is ON: The indicator light color on the back of the solar panel
indicates the battery status as noted below:
When pump is OFF: Press C on the remote, the indicator light will illuminate for
5 seconds to indicate the battery status as noted below:
Green: Battery fully charged. Pump will run approximately 4-5 hours.
Orange: Battery half charged. Pump will run approximately 1-3 hours.
Red: Battery requires charging. Pump will run less than 1 hour.
NOTE: Operating time may be reduced when using the LED light and when the water lift is set to
a higher level.

Page 3 / 5P0009BR 05/2022
CLEANING AND MAINTENANCE
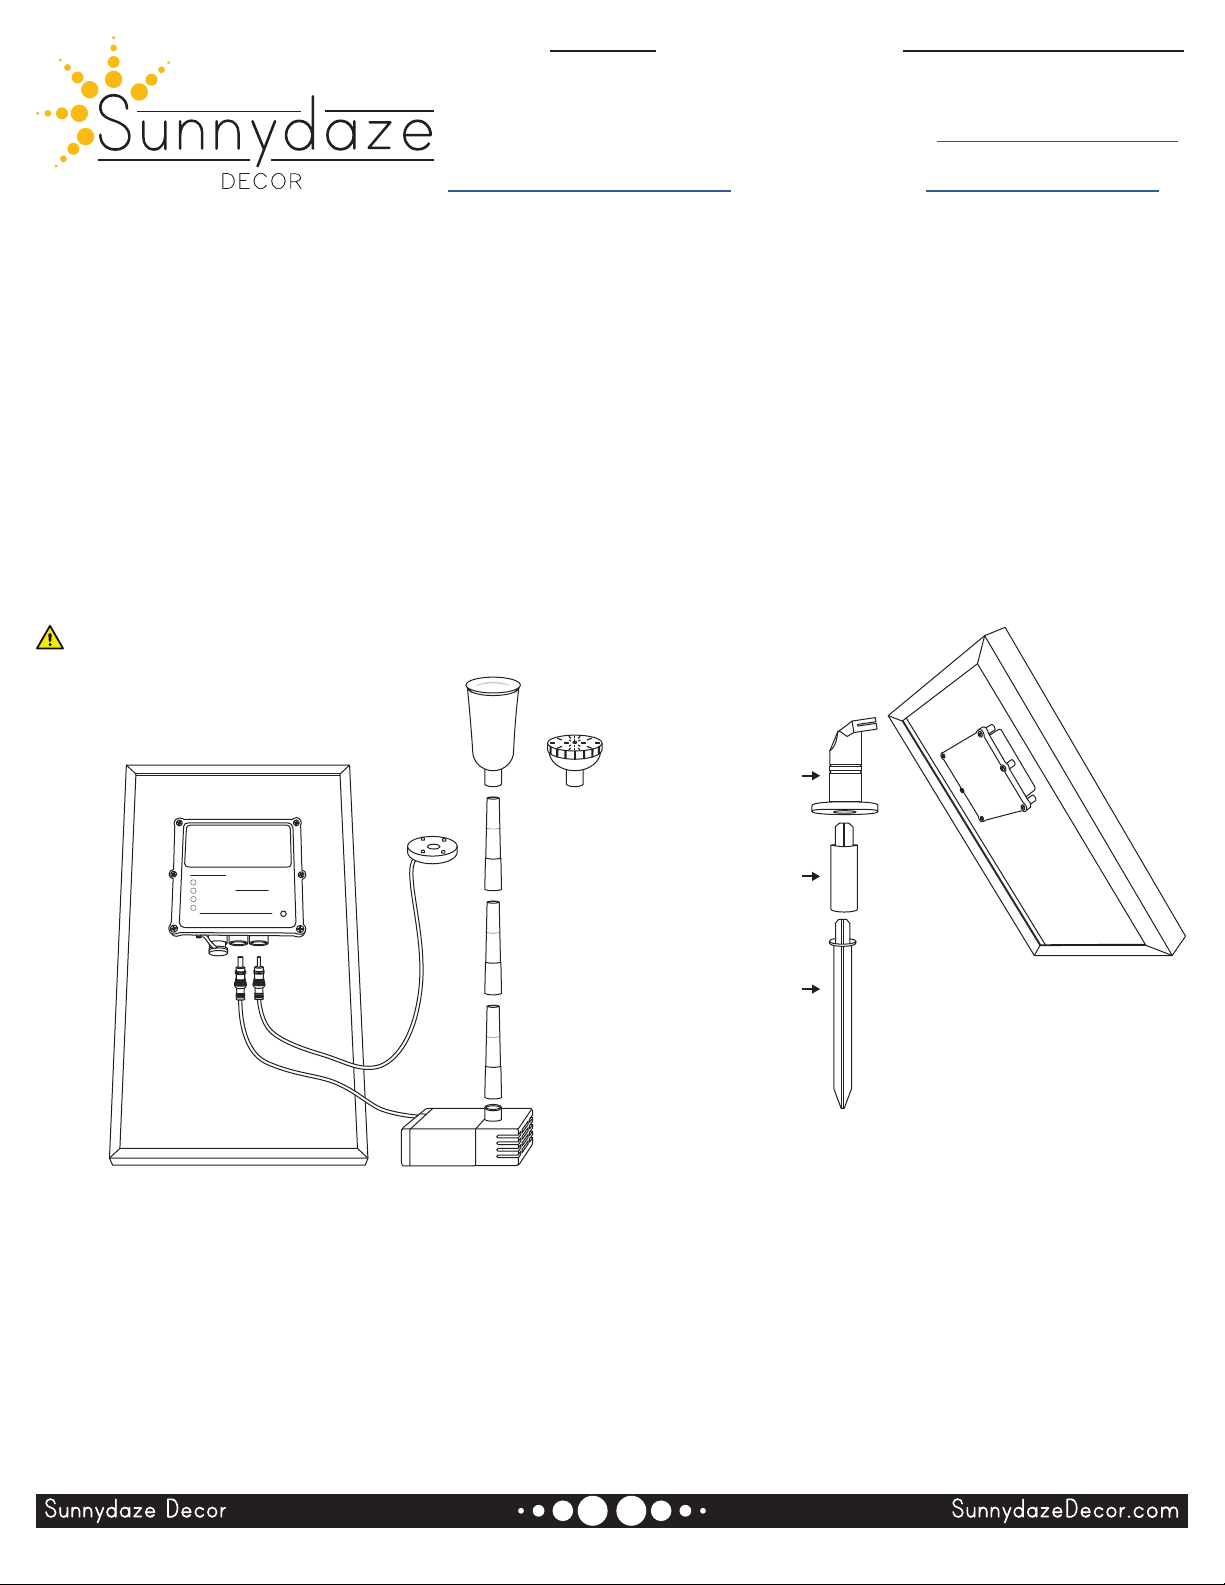
Solar Panel:
Clean the face of the solar panel often to ensure optimal conversion of the sun's energy into direct current. Solar panels
can become extremely hot in the sunshine. It is recommended that cleaning be performed early in the morning, late in
the evening, or during a cool, cloudy day.
Only use a soft tissue, soft cloth or soft sponge and a propriety glass cleaning solution to clean the front of the solar
panel. Take care not to scratch the glass while cleaning.
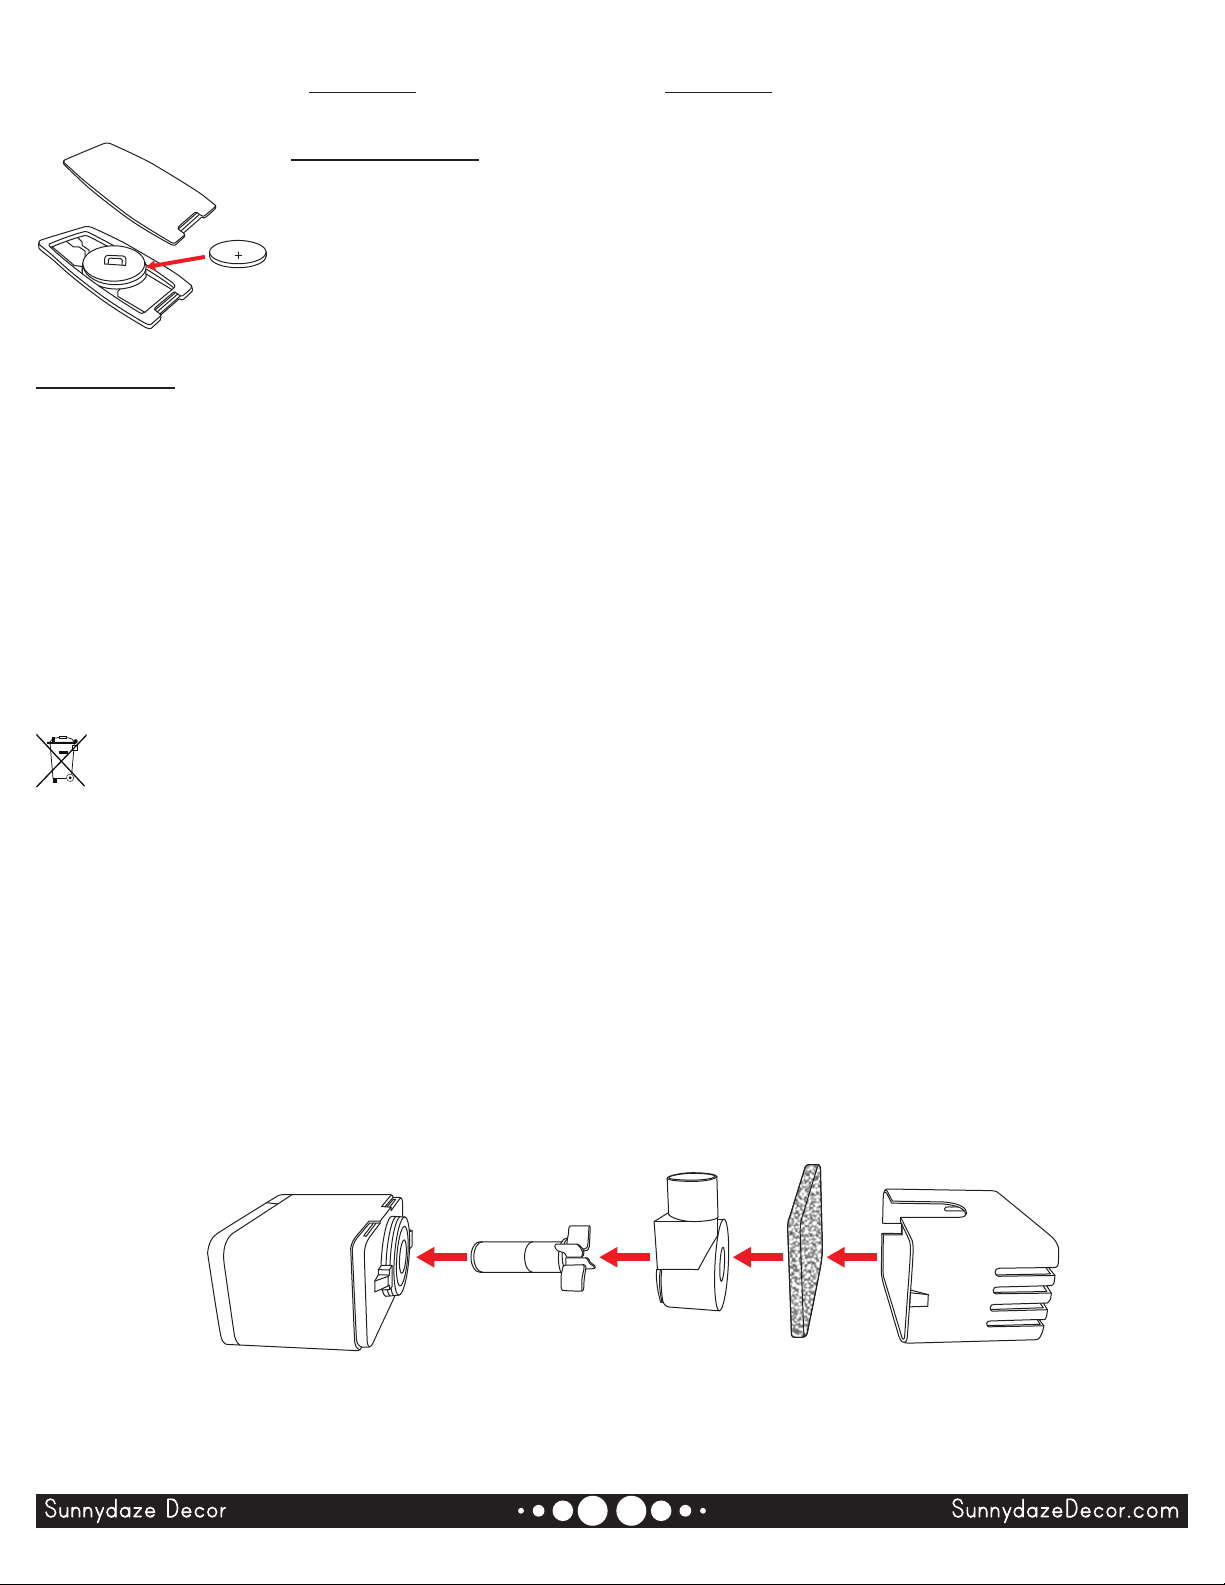
Pump (6V DC):
If the pump starts losing power or stops working, check for buildup of sediment or scale in the lter and/or in the pump
housing. Use clean, fresh water to clean components.
Press down on the top of the front cover and pulling it o by the sides.
Remove the impeller cover by turning it clockwise. Then, remove the lter and impeller. Wash all components using
clean water. Use a soft cloth or brush, such as a toothbrush or a nylon pipe brush, to clean the pump components.
When re-assembling the pump, ensure the impeller cover is replaced correctly.
Impeller
Impeller Cover
Filter Front Cover
Pump Body
Remote Control:
Carefully separate the front and back covers. Carefully remove the motherboard and place on
a soft, clean surface. Observe the direction of the button cell battery. Use a thin tool such as
a at screwdriver to very carefully remove the expelled battery; take care not to damage the
motherboard or the welds between the motherboard and the conducting plate. Insert a new
CR2032 battery (not included), ensuring the polarity and contact are good. Ensuring A,B,C,D
correctly align with the front of the remote, place the motherboard back into the remote and
gently snap the front and back cover together.
Solar Panel:
Rechargeable batteries become less ecient with repeated charge and discharge cycles. If you nd the battery pack
becoming less ecient or does not run as long, try a boost charge. To do this, disconnect the pump and light cables
from the solar panel for 2 to 3 sunny days to allow for a maximum charge to the batteries. After a boost charge, if the
batteries are still not performing to expectations, the battery pack lifespan may have been exceeded and should be
replaced. To ensure the correct battery pack is used, contact us via one of the methods mentioned at the top of page 1;
to expedite your request, please have the item number and order information available to help expedite your request.
To change the battery pack, use a Phillips screwdriver to remove the four screws holding the battery compartment
cover on the back of the solar panel. Remove the cover. Taking great care, gently disconnect the plug from the socket;
be sure not to disconnect the socket from the motherboard. Remove the battery pack; the end of the battery pack may
be secured to the panel with an adhesive, slight force may be required to remove the battery pack. Insert the plug of
the new battery pack (not included) into the socket and place the battery pack into the designated space. Replace the
battery cover and secure using the previously removed screws.
C
R
2
0
3
2
IMPORTANT! Only use a compatible battery in the remote and compatible battery pack in the solar panel; alternatives
may damage the unit and will automatically void the product warranty.
BATTERY INFORMATION
This product uses a rechargeable battery pack and a button battery. When the batteries can no longer be used, they should be removed from the unit and
recycled in accordance with local laws and regulations. The batteries must not be incinerated or composted.

Page 4 / 5P0009BR 05/2022
STORAGE
Ensure the solar panel battery is fully charged before storing, doing so will prolong the life of the battery pack.
Before storing, unplug the pump and LED light ring from the solar panel. Place the solar panel in full, direct sunlight
until the battery is fully charged. Ensure the battery status is Green (see Operating Instructions) before storing the solar
panel.
Do not allow components to freeze. Store all components in a warm, dry indoor location.
TROUBLESHOOTING
Pump is not running even though the solar panel is in full sunlight.
► Pump is submersed – ensure the pump is fully submerged under water. The pump is equipped with dry-run
protection which prevents the motor from running unless the internal mechanisms of the pump are wet. You may
need to gently tap the side of the pump to release trapped air bubbles.
► Cable connection secure – ensure the pump cable is fully inserted into the 'Pump' port on the solar panel.
► Solar panel is turned on – press the "ON" button on the remote.
► Impeller may be blocked – disassemble the pump as shown in Cleaning & Maintenance, page 3. Use a small brush
or stream of water to remove any debris.
Pump is running but little or no water is owing.
► Clear debris – check to ensure debris is not blocking the front of the pump.
► Buildup of sediment or scale – check the pump, lter, tubes and spray heads for blockages. Clear loose blockages
by hand and thoroughly clean pump components. Fountain cleaning products are recommended for cleaning
fountain components; do not use bleach!
► Check connections – make sure the extension tube(s), adapter, and spray head are rmly connected; loose
connections can reduce water ow.
I turned the panel ON using the remote, but water is not owing.
► Distance and obstacles – the distance between the remote and solar panel is greater than 10 meters. Make sure
there are no major obstacles, such as trees, shrubs, lawn decor between the remote and the solar panel.
► Battery depleted – Press any button on the remote, if indicator light on the front of remote does not illuminate, the
battery may need replacing.
► Boost Charge – unplug the pump and light cable from the solar panel. Place the solar panel in full, direct sunlight
for 2 to 3 sunny days. Avoid testing the panel during boost charging as this will diminish the battery power.
► Replace the battery – if a boost charge does not revive the battery pack, replace the battery pack. Only replace
with a compatible pack, contact our customer service team directly for a suitable replacement (see top of page 1).
► Solar panel battery charger – the battery pack can be charged using a compatible solar panel battery charger
(sold separately), contact our customer service team directly to purchase a compatible charger (see top of page 1).
The LED light ring is not turning on.
► Time of day – the light is designed to only turn on at night.
► Cable connection secure – ensure the light cable is fully inserted into the 'Light' port on the solar panel.
► Turned on – make sure the light function is turned on by pressing button B on the remote.
If you are still experiencing issues, please contact our customer service team through one of the methods mentioned at
the top of page 1. Please have the item number and order information available to help expedite response time.

Page 5 / 5P0009BR 05/2022
SAFETY STATEMENTS & WARNINGS
Any modication to the product or failure to follow recommended care will void the product warranty.
• Operate the pump in freshwater only.
• Do not use bleach or corrosive chemicals to clean any components of the unit.
• Do not charge the solar panel using AC voltage power; it is intended ONLY for DC voltage power.
• Do not use this product to pump flammable liquids.
• Do not use pump with water above 50°C (122°F) and never at or below 0°C (32°F).
• Do not allow any components to freeze. During freezing weather, dry every component and store in a warm, dry indoor location.
• Do not strike the solar panel.
• Do not lift the pump by the power cable.
• Altering of this product or changing components is prohibited.
WARNING!
Manufacturer and seller expressly disclaim any and all liability from personal injury, property damage
or loss, whether direct or indirect, or incidental, resulting from the incorrect attachment, improper use,
inadequate maintenance, or neglect of this product.
Solar Panel 3W
Operation Voltage 9V DC
Max. Water Flow 600 LPH
Max. Water Lift 1.4M
Water Projection Height 0.8M Max.
LED Light (optional) 4 LED White
Cable Length 5M
Battery Lithium
7.4V-4000mAh
SPECIFICATIONS
Remote Control RC
Parameters 3V/180mAh
Working Temperature 32°F - 140°F
Working Humidity 0% - 95%
Battery CR2032
This device complies with part 15 of the FCC Rules. Operation is subject to the following two conditions:
(1) this device may not cause harmful interference, and (2) this device must accept any interference received, including
interference that may cause undesired operation.
Any changes or modications not expressly approved by the party responsible for compliance could void the user's
authority to operate the equipment.
NOTE: This equipment has been tested and found to comply with the limits for a Class B digital device, pursuant to
Part 15 of the FCC Rules. These limits are designed to provide reasonable protection against harmful interference in a
residential installation. This equipment generates, uses and can radiate radio frequency energy and, if not installed and
used in accordance with the instructions, may cause harmful interference to radio communications. However, there is
no guarantee that interference will not occur in a particular installation.
If this equipment does cause harmful interference to radio or television reception, which can be determined by turning the
equipment o and on, the user is encouraged to try to correct the interference by one or more of the following measures:
-- Reorient or relocate the receiving antenna.
-- Increase the separation between the equipment and receiver.
-- Connect the equipment into an outlet on a circuit dierent from that to which the receiver is connected.
-- Consult the dealer or an experienced radio/TV technician for help.
The device has been evaluated to meet general RF exposure requirement. The device can be used in portable exposure
condition without restriction.
Table of contents
Other Sunnydaze Decor Inverter manuals
Popular Inverter manuals by other brands

Fuji Electric
Fuji Electric FRENIC-Mini (C2) Quick reference guide

Goodwe
Goodwe GW8000-MS Quick installation guide

Haier
Haier 1U25BEEFRA Service manual

m-Dimension
m-Dimension 12Z8NV owner's manual

Baumer
Baumer GTR 9 Installation and operating instructions

Mitsubishi Electric
Mitsubishi Electric FR-E5NP instruction manual