manuals.online logo
Brands
  1. Home
  2. •
  3. Brands
  4. •
  5. Sunricher
  6. •
  7. Media Converter
  8. •
  9. Sunricher DALI+0/1-10V User manual

Sunricher DALI+0/1-10V User manual

Zigbee to DALI+0/1-10V 2 in 1 Converter
09.2421ZGTY.04791
Function introduction
Important: Read All Instructions Prior to Installation
Product Data
• DO NOT set the DIP switches with power applied to the device.
• DO NOT install with power applied to device.
• DO NOT expose the device to moisture.
Safety & Warnings
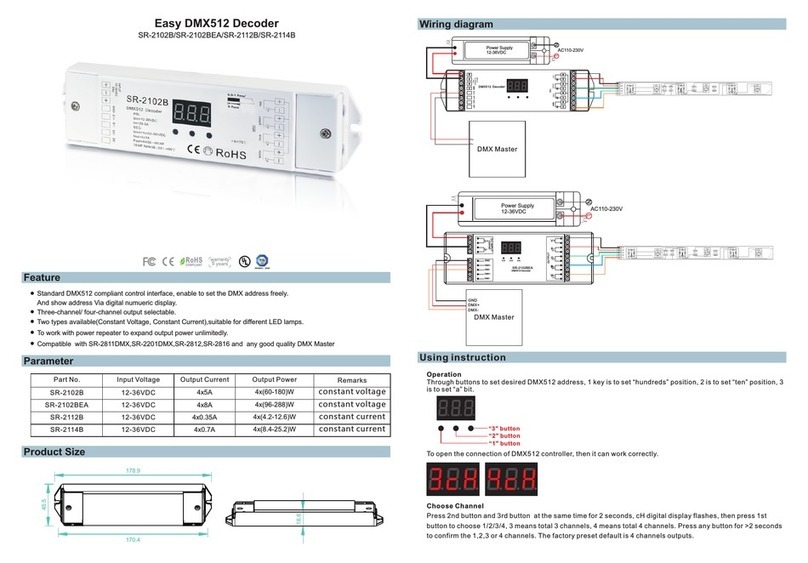
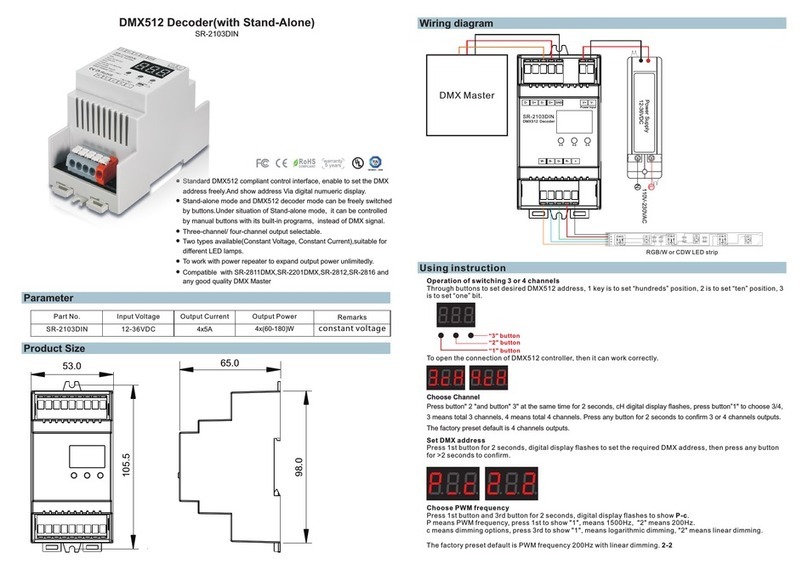
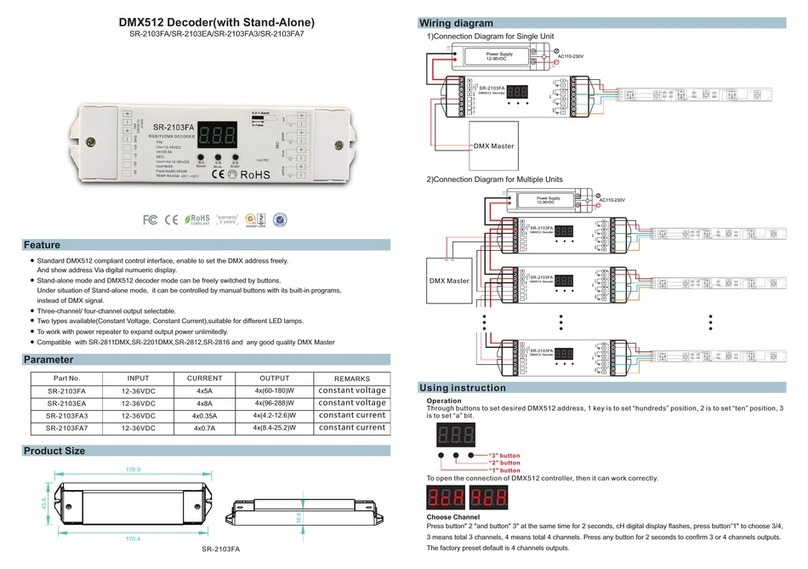
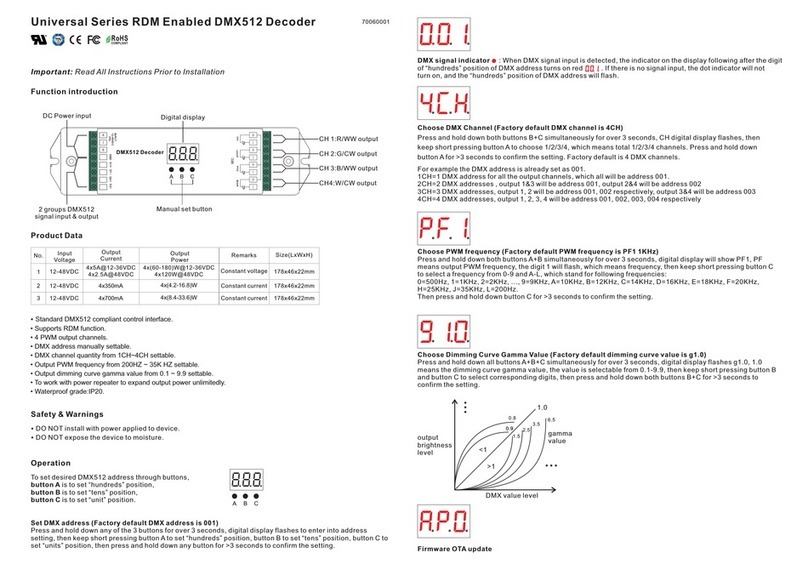
• Zigbee to DALI+0/1-10V 2 in 1 converter based on zigbee 3.0
• With max. 5A relay output and metering function
• Zigbee signal input, DALI signal output to DALI line or 0/1-10V signal output, 110-240VAC power input
• Compatible with Tuya Zigbee gateway and controlled through Tuya Smart App
• DALI signal or 1-10V signal output selectable by DIP switch
• With max. 50mA DALI bus power current output
• Built-in DALI bus power supply, no extra DALI bus PS required
• To supply control current to up to 25 DALI control gears
• DALI DT6 or DT8 device type selectable by DIP switch under DALI mode
• Color control according to DALI specifications of Device Type 8,
• Color type: Tc, XY coordinates, RGBW selectable by DIP switches
• DALI address control mode or group control mode selectable by DIP switch
• Enables to select the DALI address (00-63) to be controlled by DIP switches
• Enables to select the DALI group (0-15) to be controlled by DIP switches
• Enable to control 1 DALI Group of devices or 1 DALI Address on DALI line
• Enable to control all devices on DALI line via broadcast
• Waterproof grade: IP20
Operation
110-240V
power input
DIM
DT8 Tc
1 2 345678
2) Select DALI Device Type (DT6/DT8 Color Type) to be Controlled Using Dial Switches 8-9
DT8 XY Coordinates
DT8 RGBW
1 2 345678
910
Address Mode
1 2 345678
3) Select DALI Address or Group Control Mode Using Dial Switch 7
Group Mode
1 2 34567899 10
DALI
1 2 345678
1) Select DALI or 0/1-10V Output Using Dial Switch 10
0/1-10V
1 2 345678910
910
1 2 3 4 5 6 7 8 9 10
Dial up
Dial down
Note: please first select output signal by the dial switch.
Note: once DALI output is selected, please then select the DALI device type you would like to control by
the dial switches.
Note: once DALI device type is selected, please then select address control mode or group control mode
by dial switch.
0
1
2
3
4
5
6
1 2 345678
4) Select the DALI Group to be Controlled Using Dial Switches 2-6
Note: here device type is selected as DIM as an example, please select your correct DALI device type.
9
10
11
12
13
14
15
1 2 34567
7
910
Controlled group Controlled group
Note: 1) once DALI device type and group control mode are selected, please then select the DALI group
(0-15 selectable) to be controlled on DALI line by dial switches.
2) The control gears that are assigned to the selected DALI group on DALI line will be controlled.
3) The control gears shall be first grouped by a DALI master controller, please refer to the user manual of
corresponding master controller.
8
8
910
10
910
1 2 3 4 5 6 7 8 9 10
Dial up
Dial down
1 2 3 4 5 6 7 8 9 10
Dial up
Dial down
1 2 3 4 5 6 7 8 9 10
Dial up
Dial down
Input Output, relay
110-240VAC Max. 4mA Max. 20mA
Current
Max. 5A
Power Current Operating
temperature
-20℃-+50℃
Signal
Zigbee
2.4GHz
Output, DALI Output,
0/1-10V
DALI PS
current
Max. 50mA
DALI current
consumption
Switching
voltage
110-240VAC
Relative
humidity
8% to 80%
Environment
Dimensions
95x37x20mm
Others
Broadcast
Relay output,
max. 5A
DALI (DA, DA)
or
0/1-10V output (+, -)
LED indicator
Program key, for network pairing, touchlink and factory reset of the device
Dip switches to select DALI or 0/1-10V output, DALI DT6 or DT8 color type, DALI address
or group control mode, DALI address to be controlled, DALI group to be controlled
DALI Add.
1 53 7 92 64 8 10
L
L1
N
N
DA/-
DA/+
Prog.
DALI
0/1-10V
Input Voltage: 110-240V AC
Output Current: 1x5A max
ZigBee to DALI+0/1-10V
2 in 1 Converter with Relay
ta:-20℃-+50℃
5) Select the DALI Address to be Controlled Using Dial Switches 1-6
Note: here device type is selected as DIM as an example, please select your correct DALI device type.
1 2 3456781 2 345678910
910
Controlled address Controlled address
00
01
02
03
04
05
06
07
08
09
10
11
12
13
14
15
16
17
18
19
20
21
22
23
24
25
26
27
28
29
30
31
32
33
34
35
36
37
38
39
40
41
42
43
44
45
46
47
48
49
50
51
52
53
54
55
56
57
58
59
60
61
62
63
Note: 1) once DALI device type and address control mode are selected, please then select the DALI address
(00-63 selectable) to be controlled on DALI line by dial switches.
2) The control gear with the selected DALI address on DALI line will be controlled.
1 2 3 4 5 6 7 8 9 10
Dial up
Dial down
Input Clusters
6. ZigBee Clusters the device supports are as follows:
• 0x0000: Basic • 0x0003: Identify • 0x0004: Groups • 0x0005: Scenes • 0x0006: On/off
• 0x0019: OTA
• 0x0008: Level Control • 0x0300: Color Control • 0x0b05: Diagnostics
Output Clusters
7. Do wiring according to connection diagram correctly.
8. This ZigBee device is a wireless receiver that communicates with a variety of ZigBee compatible
systems. This receiver receives and is controlled by wireless radio signals from the compatible ZigBee
system.
9. Zigbee Network Pairing through Coordinator or Hub (Added to a Zigbee Network)
Step 1: Remove the device from previous zigbee network if it has already been added to, otherwise pairing will
fail. Please refer to the part "Factory Reset Manually".
Step 3: From your Tuya ZigBee gateway interface, choose to add lighting device and enter Pairing mode as
instructed by the gateway. Please refer to the user manual of Tuya zigbee gateway.
Step 4: LED indicator will blink 5 times
and then stay solid on, then the device
will appear in your controller's menu
and can be controlled through
controller or hub interface.
Step 4: Short press “Prog.” key for 5 times continuously to set it into network pairing mode, network pairing
mode lasts 180S, once timeout, repeat this step.
L N
10. Removed from a Zigbee Network through Coordinator or Hub Interface
From your Tuya ZigBee gateway interface, choose to delete or reset the lighting device as instructed. Please
refer to the user manual of Tuya zigbee gateway. The LED indicator blinks 3 times to indicate successful reset.
11. Factory Reset Manually
Note: 1) If the device is already at factory default setting, there is no indication when factory reset again .
2) All configuration parameters will be reset after the device is reset or removed from the network.
Step 1: Short press “Prog.” key for 5 times continuously.
Step 2: LED indicator flashes 3
times for successful reset.
L N
Step 2: Connect your Tuya Zigbee gateway correctly and download Tuya Smart App on your smart phone.
DALI Add.
1 53 7 92 64 8 10
L
L1
N
N
DA/-
DA/+
Prog.
DALI
0/1-10V
Input Voltage: 110-24 0V AC
Output C urren t: 1x5A ma x
ZigBee t o DALI+ 0/1-1 0V
2 in 1 Converter wi th Rela y
ta:-20℃-+50℃
DALI Add.
1 53 7 92 64 8 10
L
L1
N
N
DA/-
DA/+
Prog.
DALI
0/1-10V
Input Voltage: 110-240V AC
Output C urrent: 1x5A ma x
ZigBee to DALI+0/1-10V
2 in 1 Conve rter wi th Rela y
ta:-20℃- +50℃
0/1-10V Dimmable
Driver
ACL
ACN
DIM+
DIM-
LED+
Wiring Diagram
When 0/1-10V Output Selected
L N
Max. 5A Relay
LED+ V+
LED light
LED-
LED- V-
When DALI Output Selected
L N
Max. 5A Relay
DALI Bus
DA
DA
DALI DT6/DT8 Control Gear
L
N
DA
DA
DALI DT6/DT8 Control Gear
L
N
LED+
LED-
LED+
LED-
LED+ V+
LED- V-
LED+ V+
LED- V-
LED light
LED light
Note: 1) Max. 50mA DALI bus PS output to supply control current to up to 25 control gears.
2) The max. load of the relay is 5A, and the number of control gear can be switched by the
relay depends on the load of each control gear.
DALI Add.
1 53 7 92 64 8 10
L
L1
N
N
DA/-
DA/+
Prog.
DALI
0/1-10V
Input Voltage: 110-240V AC
Output Cu rrent: 1 x5A max
ZigBee to D ALI+0/ 1-10V
2 in 1 Converter with R elay
ta:-20℃-+ 50℃
DALI Add.
1 53 7 92 64 8 10
L
L1
N
N
DA/-
DA/+
Prog.
DALI
0/1-10V
Input Voltage: 110-240V AC
Output Current: 1x5A max
ZigBee to DALI+0/1-10V
2 in 1 Converter with Relay
ta:-20℃-+50℃

Other Sunricher Media Converter manuals

Sunricher SR-2103FA User manual

Sunricher

Sunricher SR-2103FA User manual

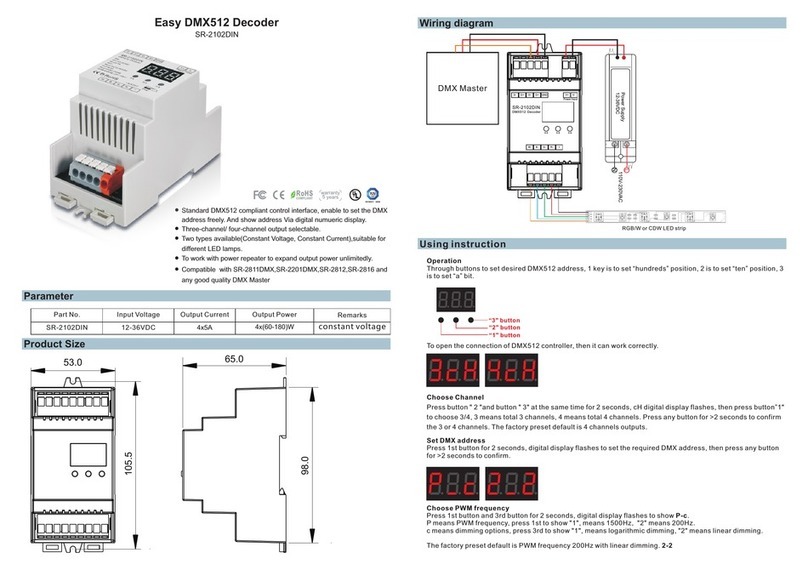
Sunricher SR-2102DIN User manual

Sunricher

Sunricher SR-2102DIN User manual

Sunricher Universal Series User manual

Sunricher

Sunricher Universal Series User manual

Sunricher SR-2102B User manual

Sunricher

Sunricher SR-2102B User manual

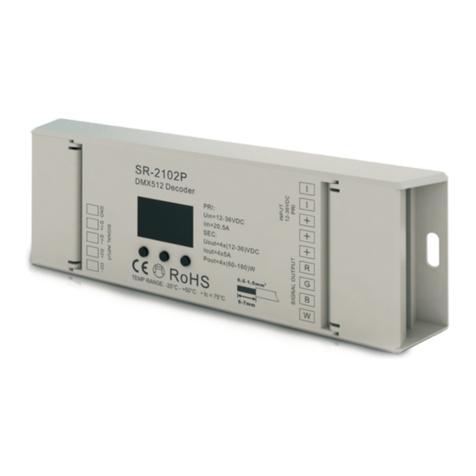
Sunricher SR-2102P User manual

Sunricher

Sunricher SR-2102P User manual

Sunricher SR-2102RJ45-DIN User manual

Sunricher

Sunricher SR-2102RJ45-DIN User manual

Sunricher SR-2102B User manual

Sunricher

Sunricher SR-2102B User manual

Sunricher Easy DMX512 Datasheet

Sunricher

Sunricher Easy DMX512 Datasheet

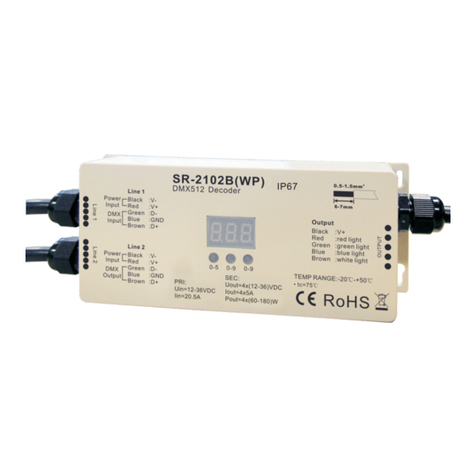
Sunricher SR-2102B(WP) User manual

Sunricher

Sunricher SR-2102B(WP) User manual

Sunricher SR-2102DIN User manual

Sunricher

Sunricher SR-2102DIN User manual

Sunricher SR-2103DIN User manual

Sunricher

Sunricher SR-2103DIN User manual

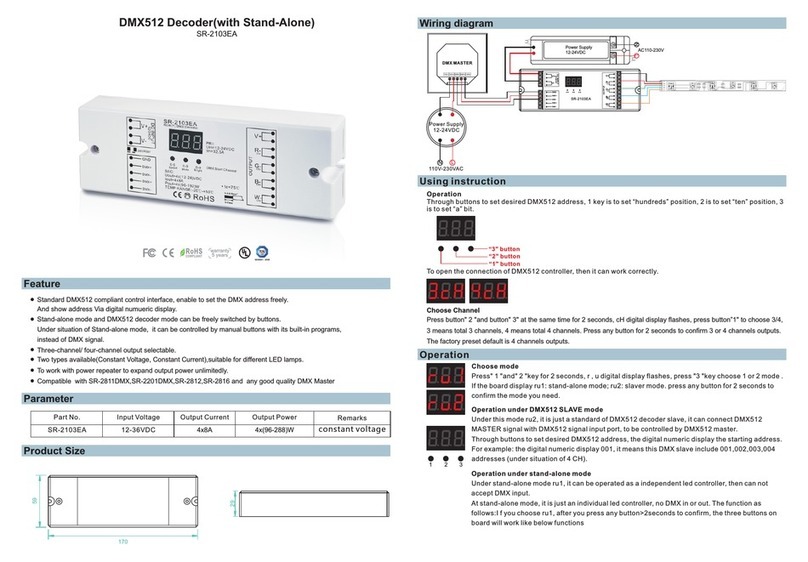
Sunricher SR-2103EA User manual

Sunricher

Sunricher SR-2103EA User manual

Sunricher SR-2421-SB User manual

Sunricher

Sunricher SR-2421-SB User manual

Popular Media Converter manuals by other brands

Atlona AT-SDI220 Operation manual

Atlona

Atlona AT-SDI220 Operation manual

HDanywhere XTND4K14140TPC Product guide

HDanywhere

HDanywhere XTND4K14140TPC Product guide

Eizo CB-01 user manual

Eizo

Eizo CB-01 user manual

VXI Technology VM3618 user manual

VXI Technology

VXI Technology VM3618 user manual

Intelix SKYPLAY-DFS quick start guide

Intelix

Intelix SKYPLAY-DFS quick start guide

ORPHEUS Heritage D/A CONVERTER III user manual

ORPHEUS

ORPHEUS Heritage D/A CONVERTER III user manual

Kramer VW-9 quick start guide

Kramer

Kramer VW-9 quick start guide

Schumacher Electric XI41B owner's manual

Schumacher Electric

Schumacher Electric XI41B owner's manual

Zoom tac-8 Operation manual

Zoom

Zoom tac-8 Operation manual

Apogee Mini-Me datasheet

Apogee

Apogee Mini-Me datasheet

Chiayo GMC-10+ Operation manual

Chiayo

Chiayo GMC-10+ Operation manual

Lika ROTAPULS I28 Series quick guide

Lika

Lika ROTAPULS I28 Series quick guide

Transmedia CS 30 AL quick start guide

Transmedia

Transmedia CS 30 AL quick start guide

Bitstream ERIS-100 Quick start manual

Bitstream

Bitstream ERIS-100 Quick start manual

Pace DC80Xu HD Connection guide

Pace

Pace DC80Xu HD Connection guide

NorthStar HSD44 Series installation manual

NorthStar

NorthStar HSD44 Series installation manual

TAMS FD-M manual

TAMS

TAMS FD-M manual

Precision Digital Corporation PROVU PDA1232 instruction manual

Precision Digital Corporation

Precision Digital Corporation PROVU PDA1232 instruction manual

manuals.online logo
manuals.online logoBrands
  • About & Mission
  • Contact us
  • Privacy Policy
  • Terms and Conditions

Copyright 2025 Manuals.Online. All Rights Reserved.