manuals.online logo
Brands
  1. Home
  2. •
  3. Brands
  4. •
  5. Sunricher
  6. •
  7. Media Converter
  8. •
  9. Sunricher SR-2102DIN User manual

Sunricher SR-2102DIN User manual

Other Sunricher Media Converter manuals

Sunricher SR-2102DIN User manual

Sunricher

Sunricher SR-2102DIN User manual

Sunricher SR-2103DIN User manual

Sunricher

Sunricher SR-2103DIN User manual

Sunricher SR-2103EA User manual

Sunricher

Sunricher SR-2103EA User manual

Sunricher Universal Series User manual

Sunricher

Sunricher Universal Series User manual

Sunricher DALI+0/1-10V User manual

Sunricher

Sunricher DALI+0/1-10V User manual

Sunricher SR-2102RJ45-DIN User manual

Sunricher

Sunricher SR-2102RJ45-DIN User manual

Sunricher SR-2421-SB User manual

Sunricher

Sunricher SR-2421-SB User manual

Sunricher SR-2102B User manual

Sunricher

Sunricher SR-2102B User manual

Sunricher Easy DMX512 Datasheet

Sunricher

Sunricher Easy DMX512 Datasheet

Sunricher SR-2102P User manual

Sunricher

Sunricher SR-2102P User manual

Sunricher SR-2103FA User manual

Sunricher

Sunricher SR-2103FA User manual

Sunricher SR-2102B(WP) User manual

Sunricher

Sunricher SR-2102B(WP) User manual

Sunricher SR-2102B User manual

Sunricher

Sunricher SR-2102B User manual

Popular Media Converter manuals by other brands

SoundTraxx Blunami BLU-2200 user guide

SoundTraxx

SoundTraxx Blunami BLU-2200 user guide

SPROLINK VA1 user manual

SPROLINK

SPROLINK VA1 user manual

Acclaim Lighting DDC-1-AC user guide

Acclaim Lighting

Acclaim Lighting DDC-1-AC user guide

Nikon AF-S TC-20E III user manual

Nikon

Nikon AF-S TC-20E III user manual

Axis AXIS Q7406 user manual

Axis

Axis AXIS Q7406 user manual

Omega TAC80B-J instruction sheet

Omega

Omega TAC80B-J instruction sheet

Zoom Thunderbolt TAC-2R Operation manual

Zoom

Zoom Thunderbolt TAC-2R Operation manual

OST iConverter 10/100M quick start guide

OST

OST iConverter 10/100M quick start guide

Vertiv Netsure user manual

Vertiv

Vertiv Netsure user manual

birddog MINI user guide

birddog

birddog MINI user guide

Roland GI-10 owner's manual

Roland

Roland GI-10 owner's manual

Wallenstein WX310 Operator's manual

Wallenstein

Wallenstein WX310 Operator's manual

Pace MSS 200-1 Service manual

Pace

Pace MSS 200-1 Service manual

Solar Converters EQ 12/24-50 manual

Solar Converters

Solar Converters EQ 12/24-50 manual

CYP EL-7400V Operation manual

CYP

CYP EL-7400V Operation manual

TIE MIDI 1i1o user manual

TIE

TIE MIDI 1i1o user manual

DCS Vivaldi Upsampler user manual

DCS

DCS Vivaldi Upsampler user manual

Westermo MCW-211 SERIES user guide

Westermo

Westermo MCW-211 SERIES user guide

manuals.online logo
manuals.online logoBrands
  • About & Mission
  • Contact us
  • Privacy Policy
  • Terms and Conditions

Copyright 2025 Manuals.Online. All Rights Reserved.

Easy DMX512 Decoder
Standard DMX512 compliant control interface, enable to set the DMX
address freely. And show address Via digital numueric display.
SR-2102DIN
Three-channel/ four-channel output selectable.
Parameter
SR-2102DIN 12-36VDC 4x5A 4x(60-180)W
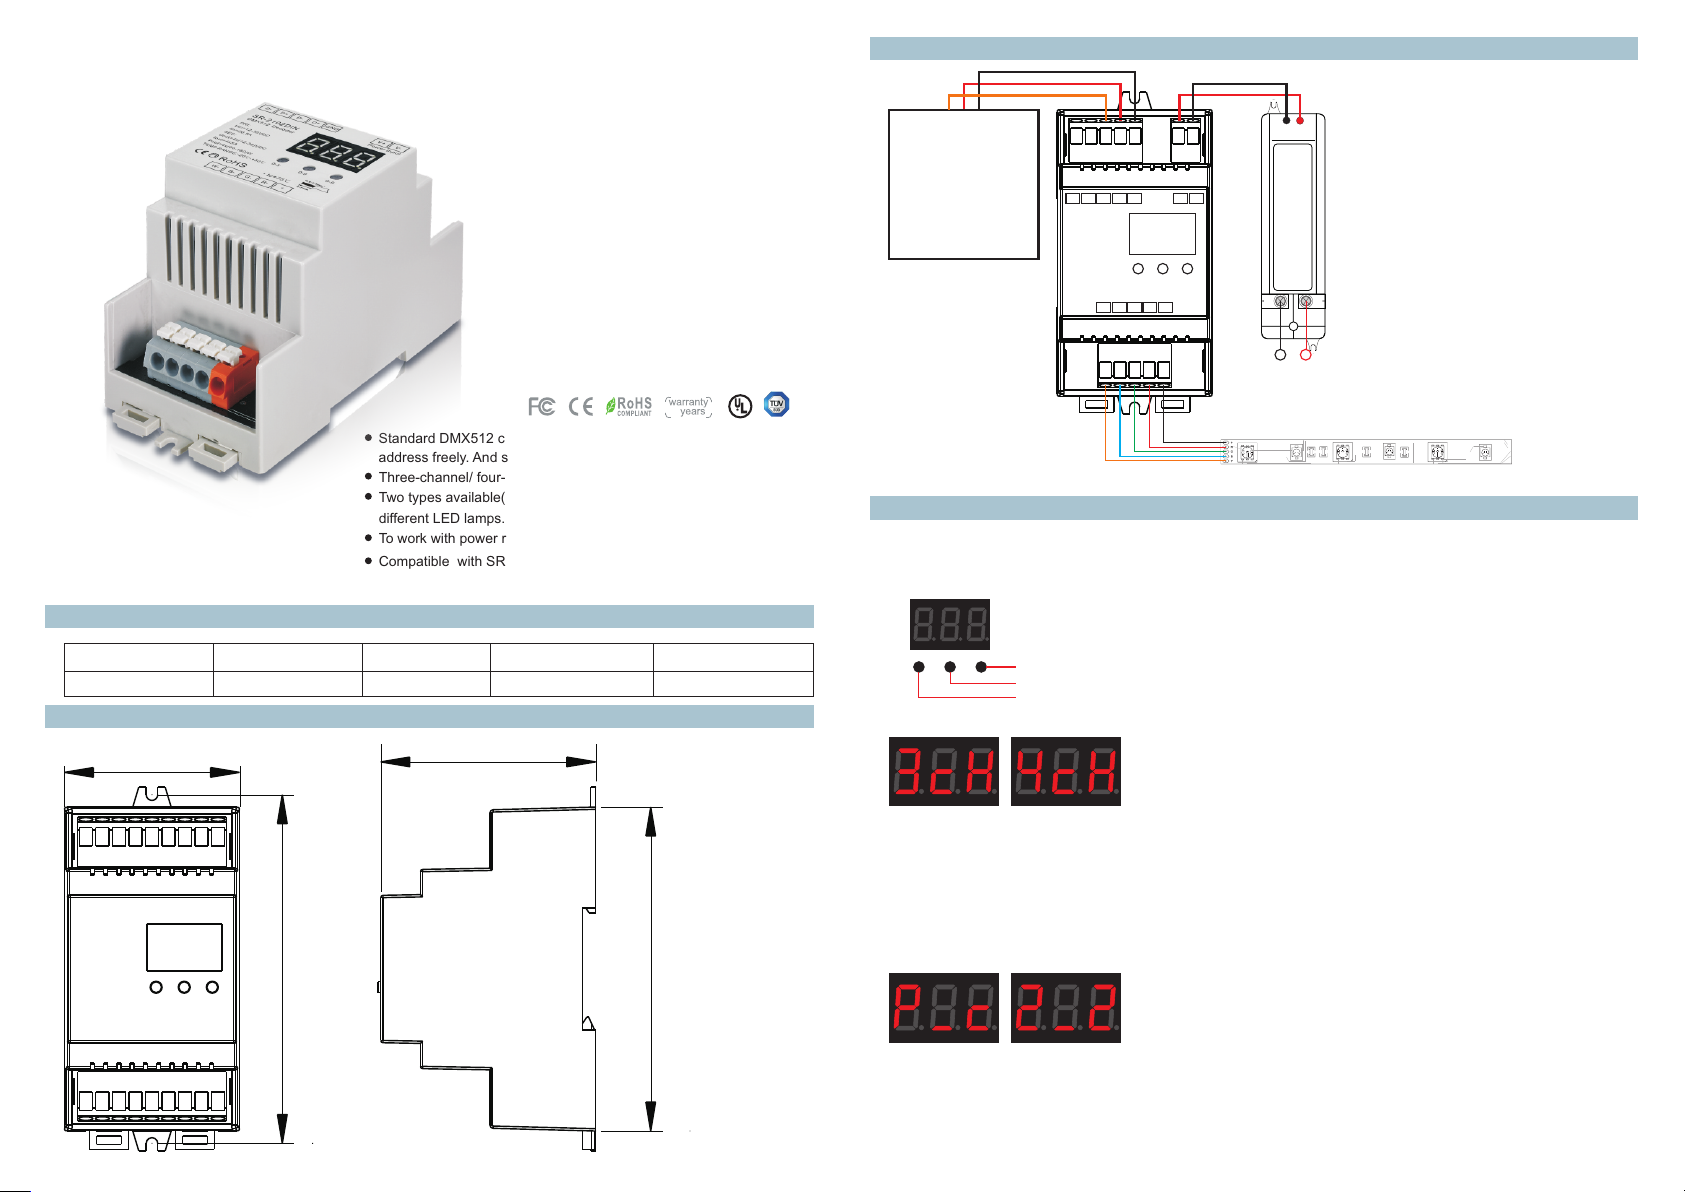
Wiring diagram
Product Size
Two types available(Constant Voltage, Constant Current),suitable for
different LED lamps.
To work with power repeater to expand output power unlimitedly. Operation
Through buttons to set desired DMX512 address, 1 key is to set “hundreds” position, 2 is to set “ten” position, 3
is to set “a” bit.
“1" button
“2" button
“3" button
To open the connection of DMX512 controller, then it can work correctly.
Using instruction
Compatible with SR-2811DMX,SR-2201DMX,SR-2812,SR-2816 and
any good quality DMX Master
constant voltage
98.0
65.0
105.5
53.0
Power Supply
12-36VDC
L
N
110V-230VAC
SR-2102DIN
D- GND
D+ D- D+
0-90-5 0-9
DMX512 Decoder
V-V+
+
R-G-B-W-
Power i npu t
DMX Master
RGB/W or CDW LED strip
Choose Channel
Press button " 2 "and button " 3" at the same time for 2 seconds, cH digital display flashes, then press button”1"
to choose 3/4, 3 means total 3 channels, 4 means total 4 channels. Press any button for >2 seconds to confirm
the 3 or 4 channels. The factory preset default is 4 channels outputs.
Set DMX address
Press 1st button for 2 seconds, digital display flashes to set the required DMX address, then press any button
for >2 seconds to confirm.
Choose PWM frequency
Press 1st button and 3rd button for 2 seconds, digital display flashes to show P-c.
P means PWM frequency, press 1st to show "1", means 1500Hz, "2" means 200Hz.
c means dimming options, press 3rd to show "1", means logarithmic dimming, "2" means linear dimming.
The factory preset default is PWM frequency 200Hz with linear dimming. 2-2
Part No. Input Voltage Output PowerOutput Current Remarks
ISO 900 1:2008
5
Warranty Agreement
1) We provide lifelong technical assistance with this product:
5-year warranty. We print date on every products, for example :1125 means year 2011,week 25.The
warranty is for free repair or replacement and covers manufacturing faults only.
For faults beyond the 3-year warranty we reserve the right to charge for time and parts.
2) Limited Warrenty
Any defects caused by wrong operation.
Any damages caused by unauthorized removal, maintenance, modifying, incorrect connection and
replacement of chips.
Any damages due to transportation, vibration etc. after purchase.
Any damages caused by earthquake, fire, lightning, pollution and abnormal voltage.
Any damages caused by negligence, inappropriate storing at high temperatures and humidity or near
harmful chemicals.
Product has been updated
3) Repair or replacement as provided under this warranty is the exclusive remedy to the customer.
Safety & Warnings
1) The product shall be installed and serviced by a qualified person.
2) IP20.Please avoid the sun and rain. When installed outdoors, please ensure it is mounted in a water proof
enclosure.
3) Always be sure to mount this unit in an area with proper ventilation to avoid overheating.
4) Please check if the output voltage of any LED power supplies used comply with the working voltage of the
product.
5) Never connect any cables while power is on and always assure correct connections to avoid short circuits
before switching on.
6)
7) For update information please consult your supplier.
Please ensure that the cable is secured tightly in the connector