Super Sealer REI-85 User manual

Updated: 15 November, 2011 Page 1 REF: REI-85-0045
SUPER SEALER
OPERATION
MANUAL
Model: REI-85
Rotary Tray Sealing Machine
This is a generic operational manual for Model REI-85 Super Sealer Rotary machines and includes some of
the other features that may not be applicable for your specific machine.
CAUTION: BURN HAZARD
• Cleaning and maintenance should be performed by your trained personnel only
• Allow unit to cool at least 90 minutes before normal cleaning
• If hot machine must be opened, keep hands away from upper moulds and the printer
Routine maintenance or prompt cleaning after a spill will help to maintain the proper performance of the REI-85 tray sealer. Any
troubleshooting or repairs other than cleaning must be referred to Super Sealer service center.

Updated: 15 November, 2011 Page 2 REF: REI-85-0045
1. PRECAUTIONS____________________________________________________________________________ 3
1.1 INSTALLATION ______________________________________________________________________ 3
1.2 SAFETY MATTERS ___________________________________________________________________ 3
1.3 DO’s & DON’Ts_______________________________________________________________________ 3
2. INTRODUCTION __________________________________________________________________________ 4
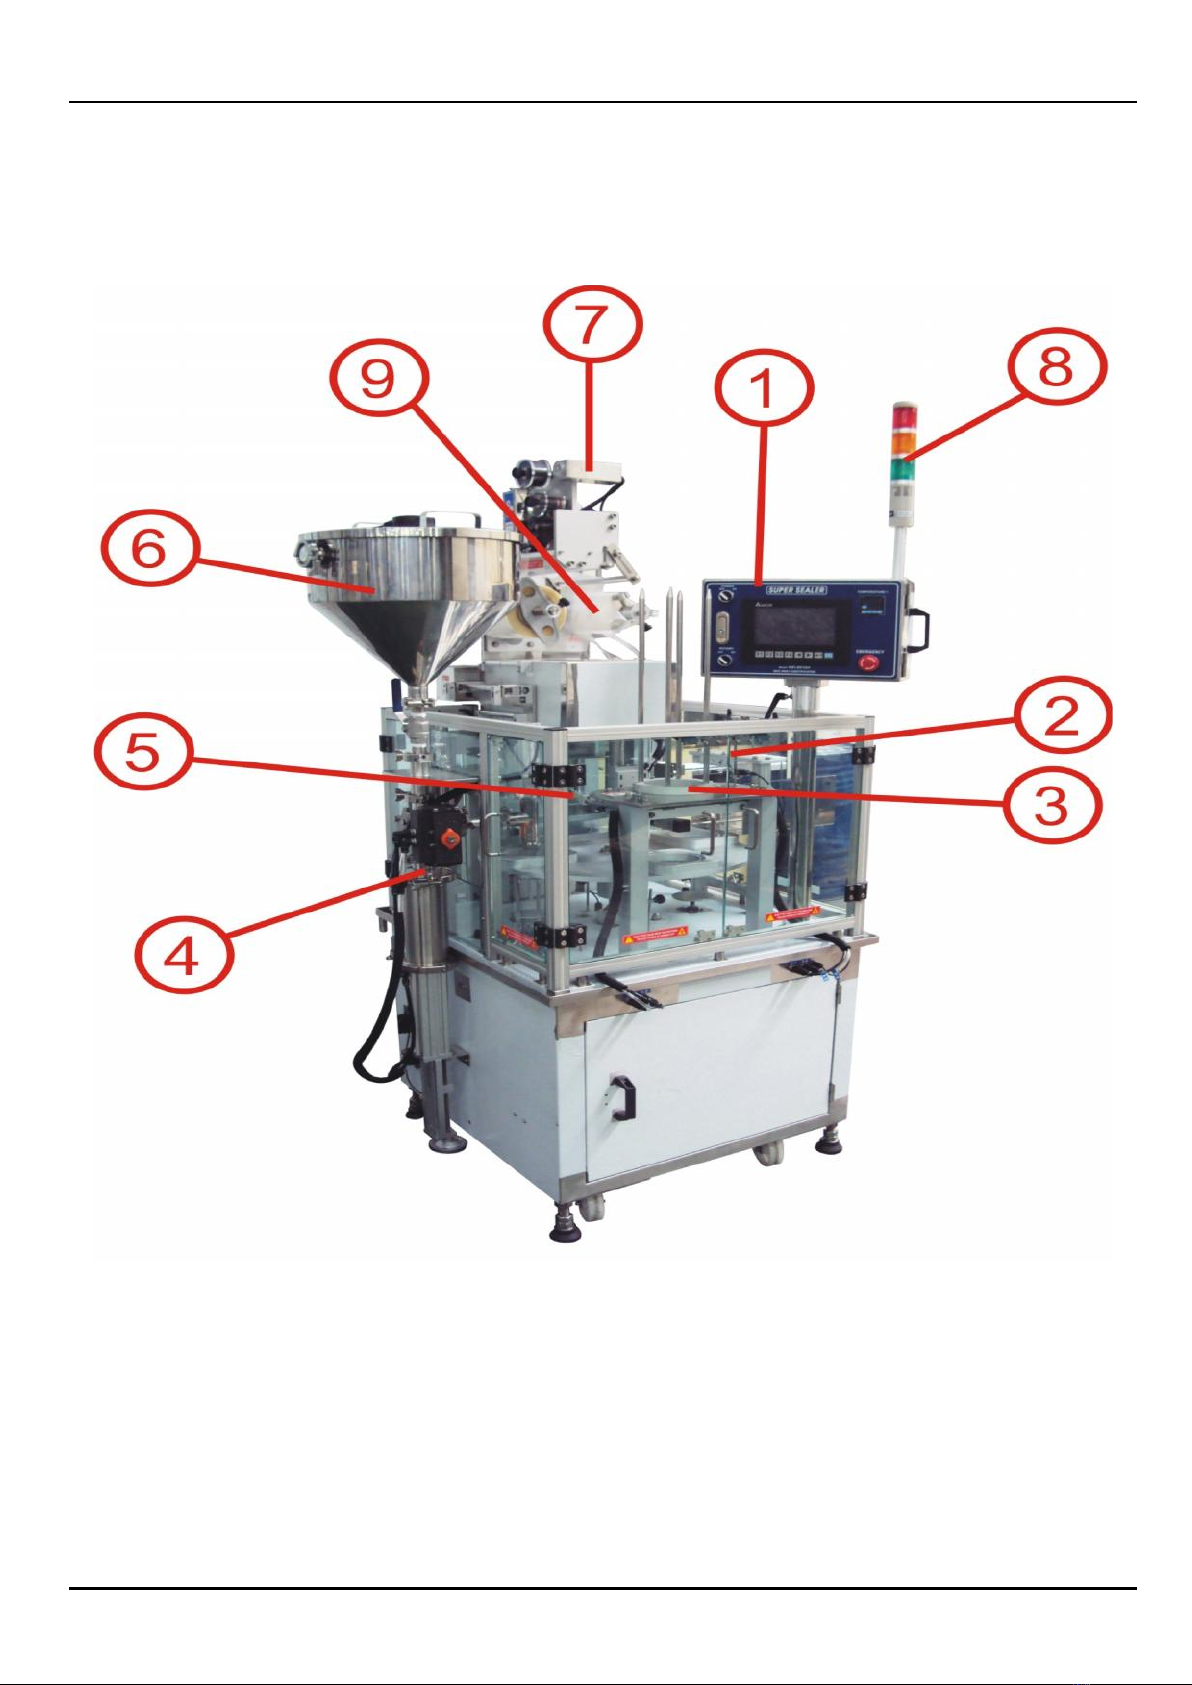
3. MAIN PARTS______________________________________________________________________________ 5
3.1 SPECIFICATIONS ________________________________________________________________________ 6
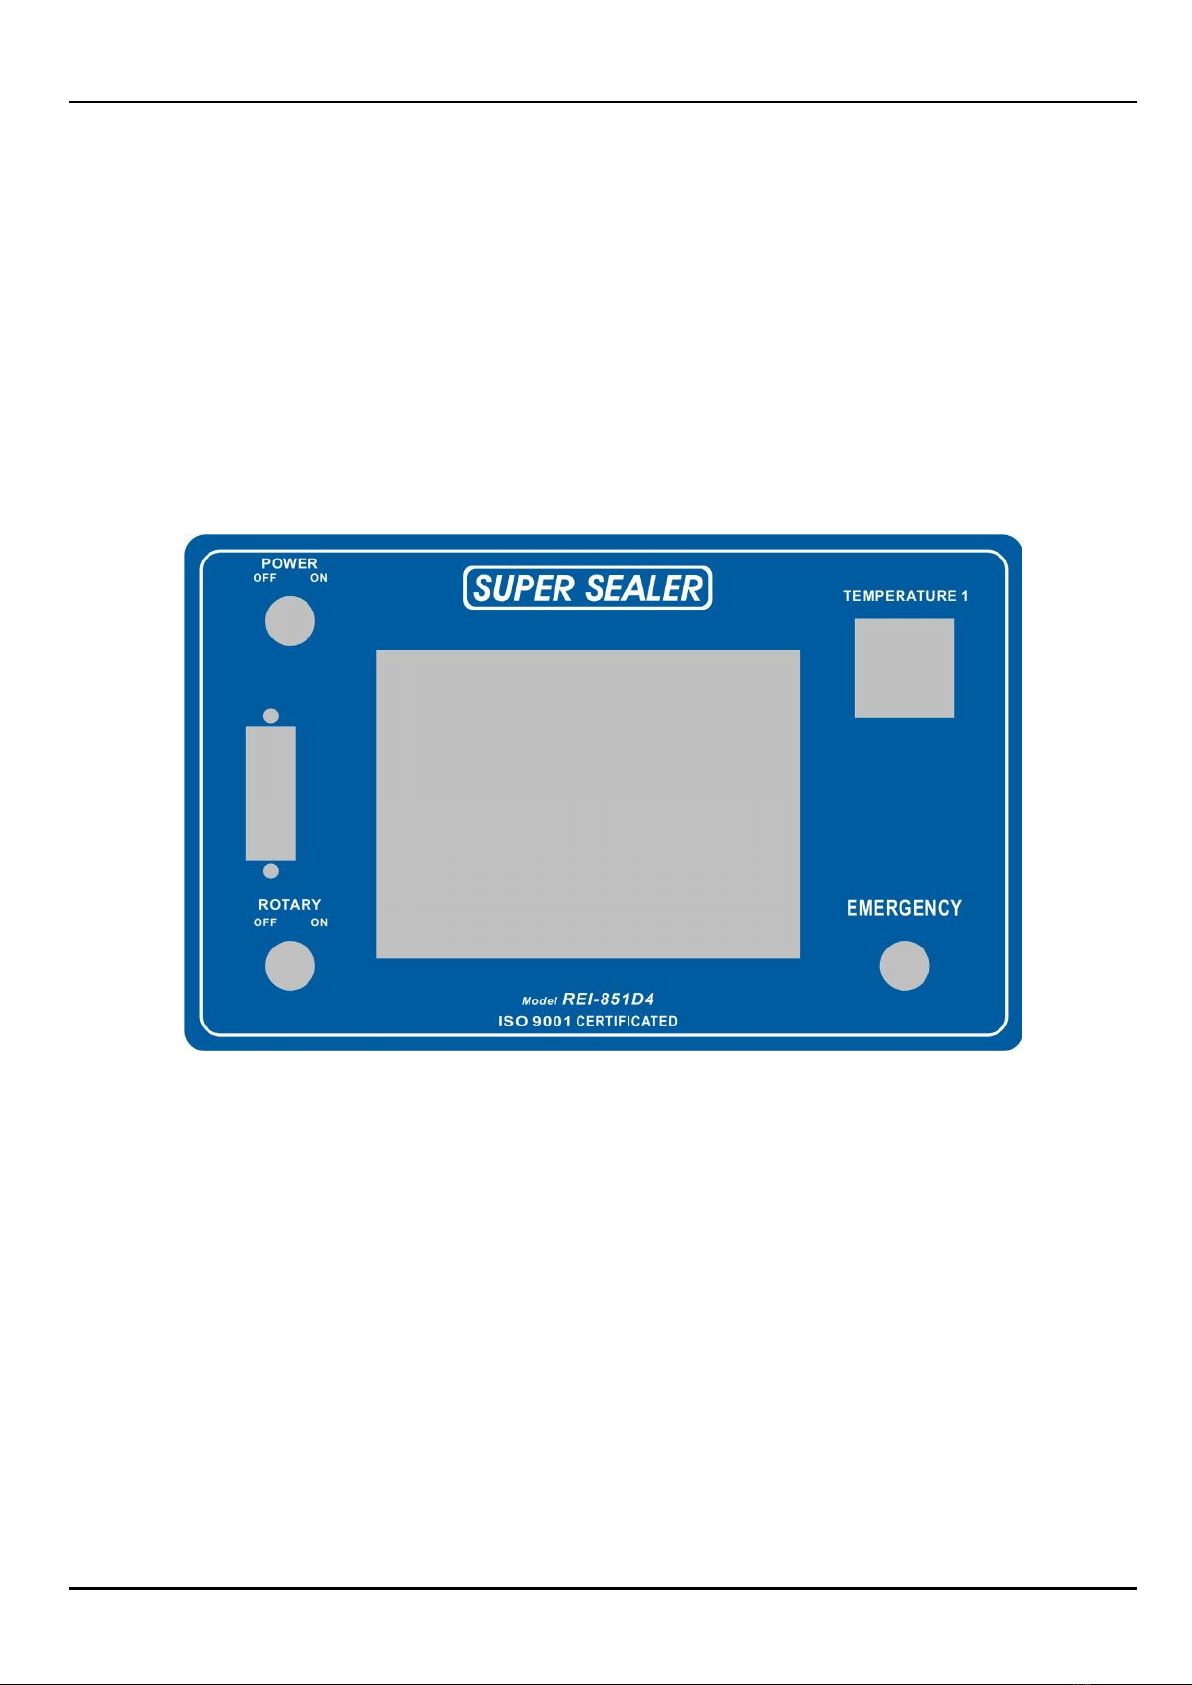
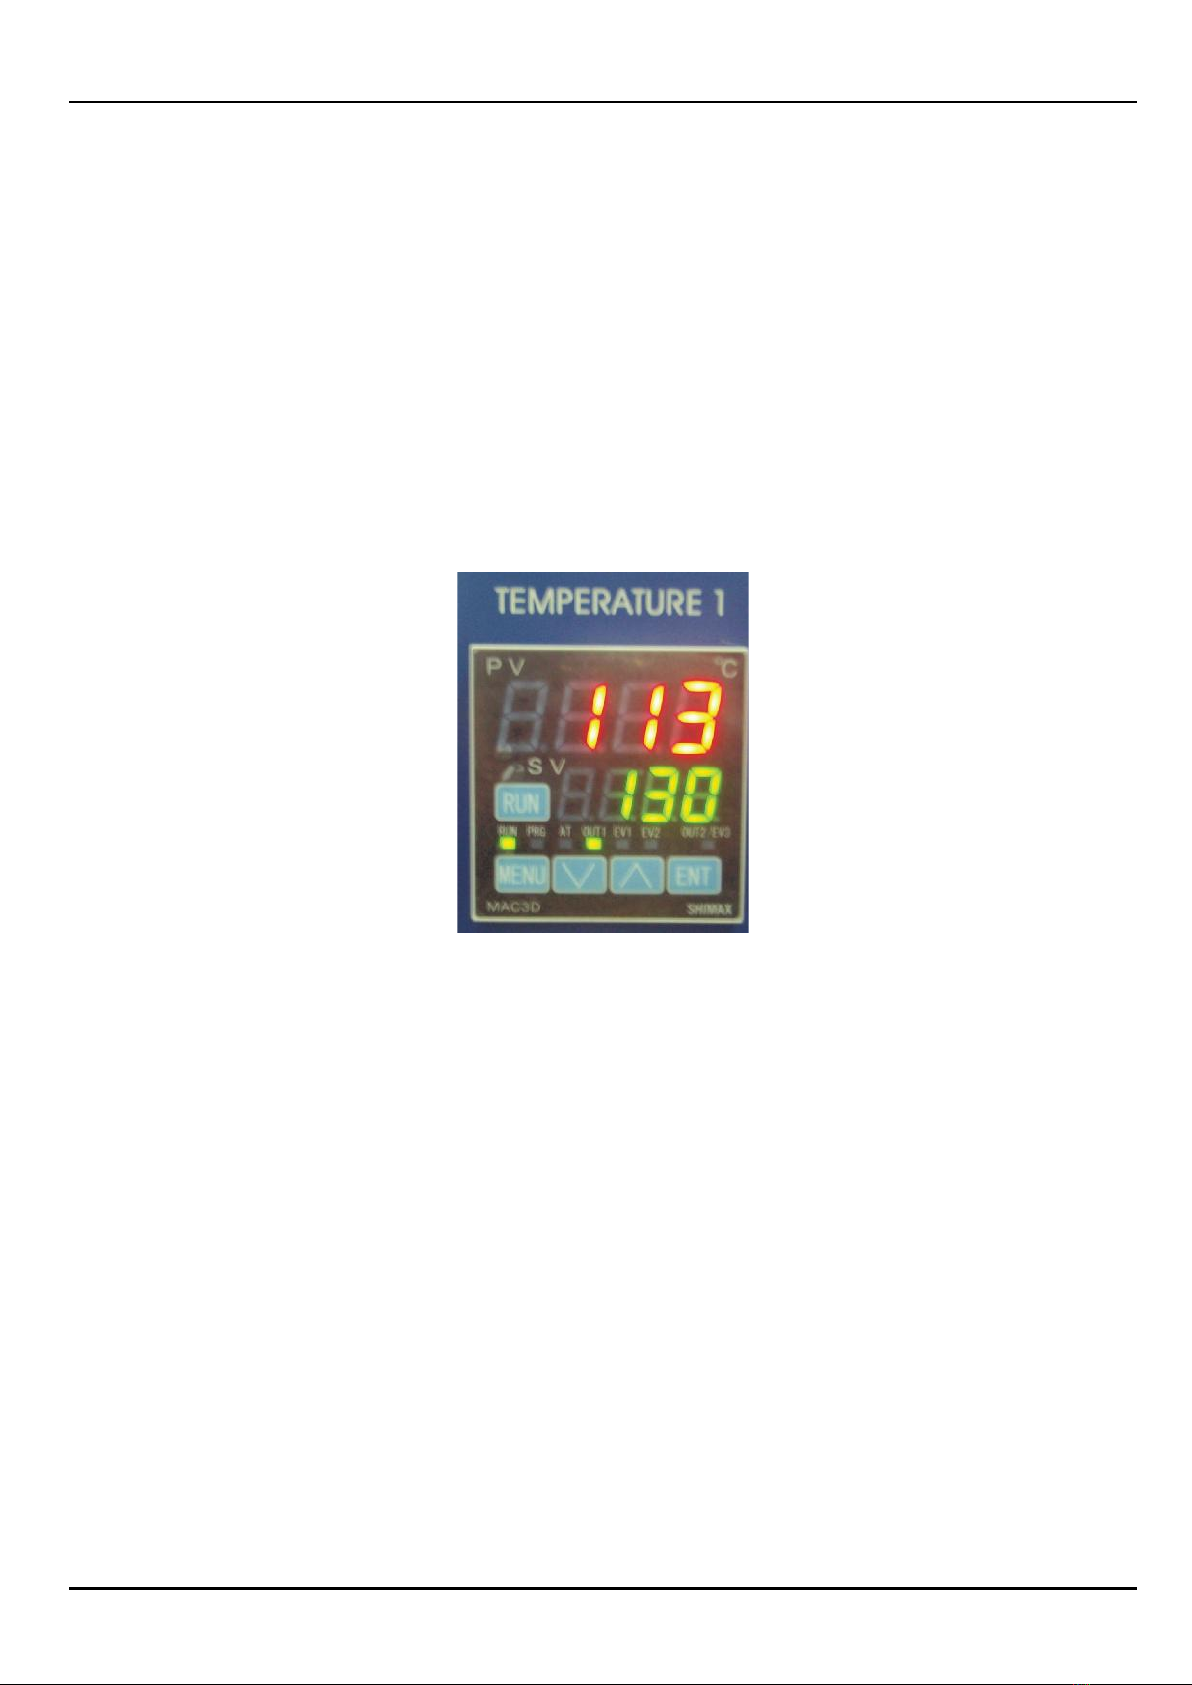
4. CONTROL PANEL _________________________________________________________________________ 6
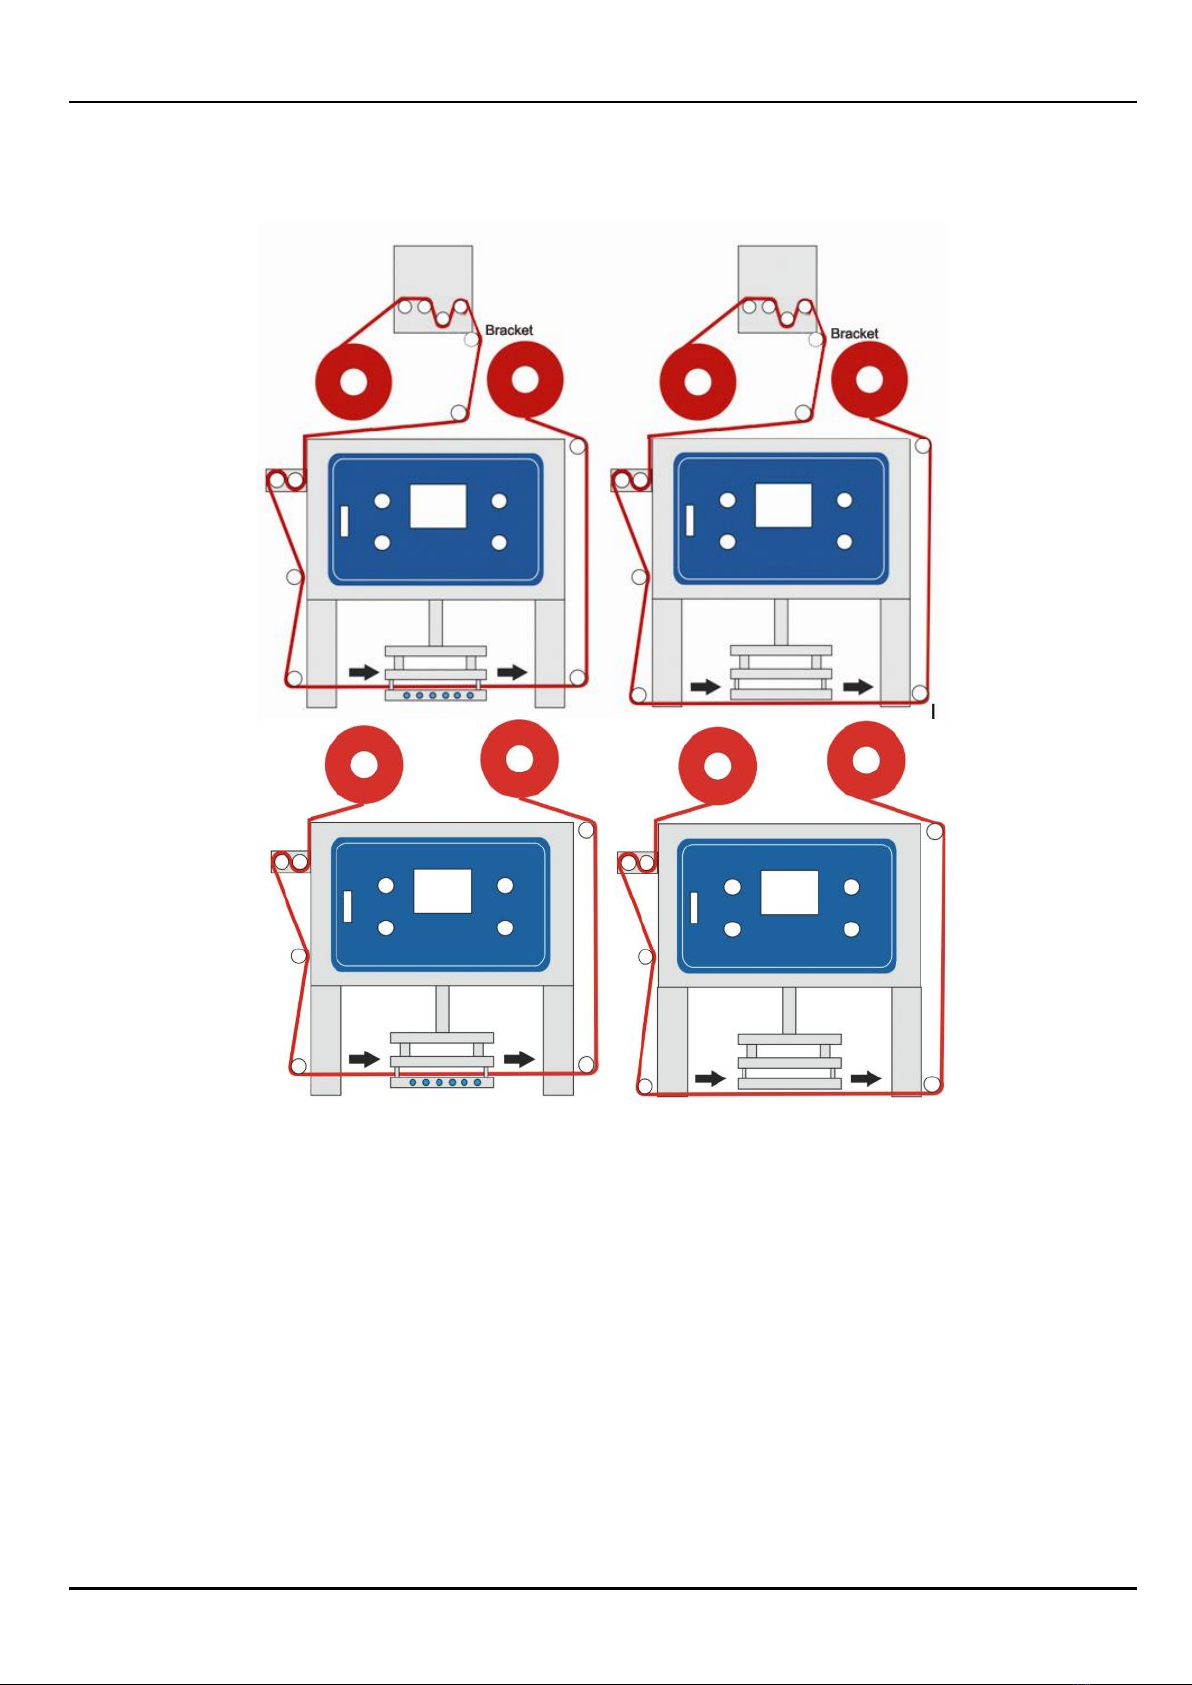
5. ROLL FILM SET-UP _______________________________________________________________________ 7
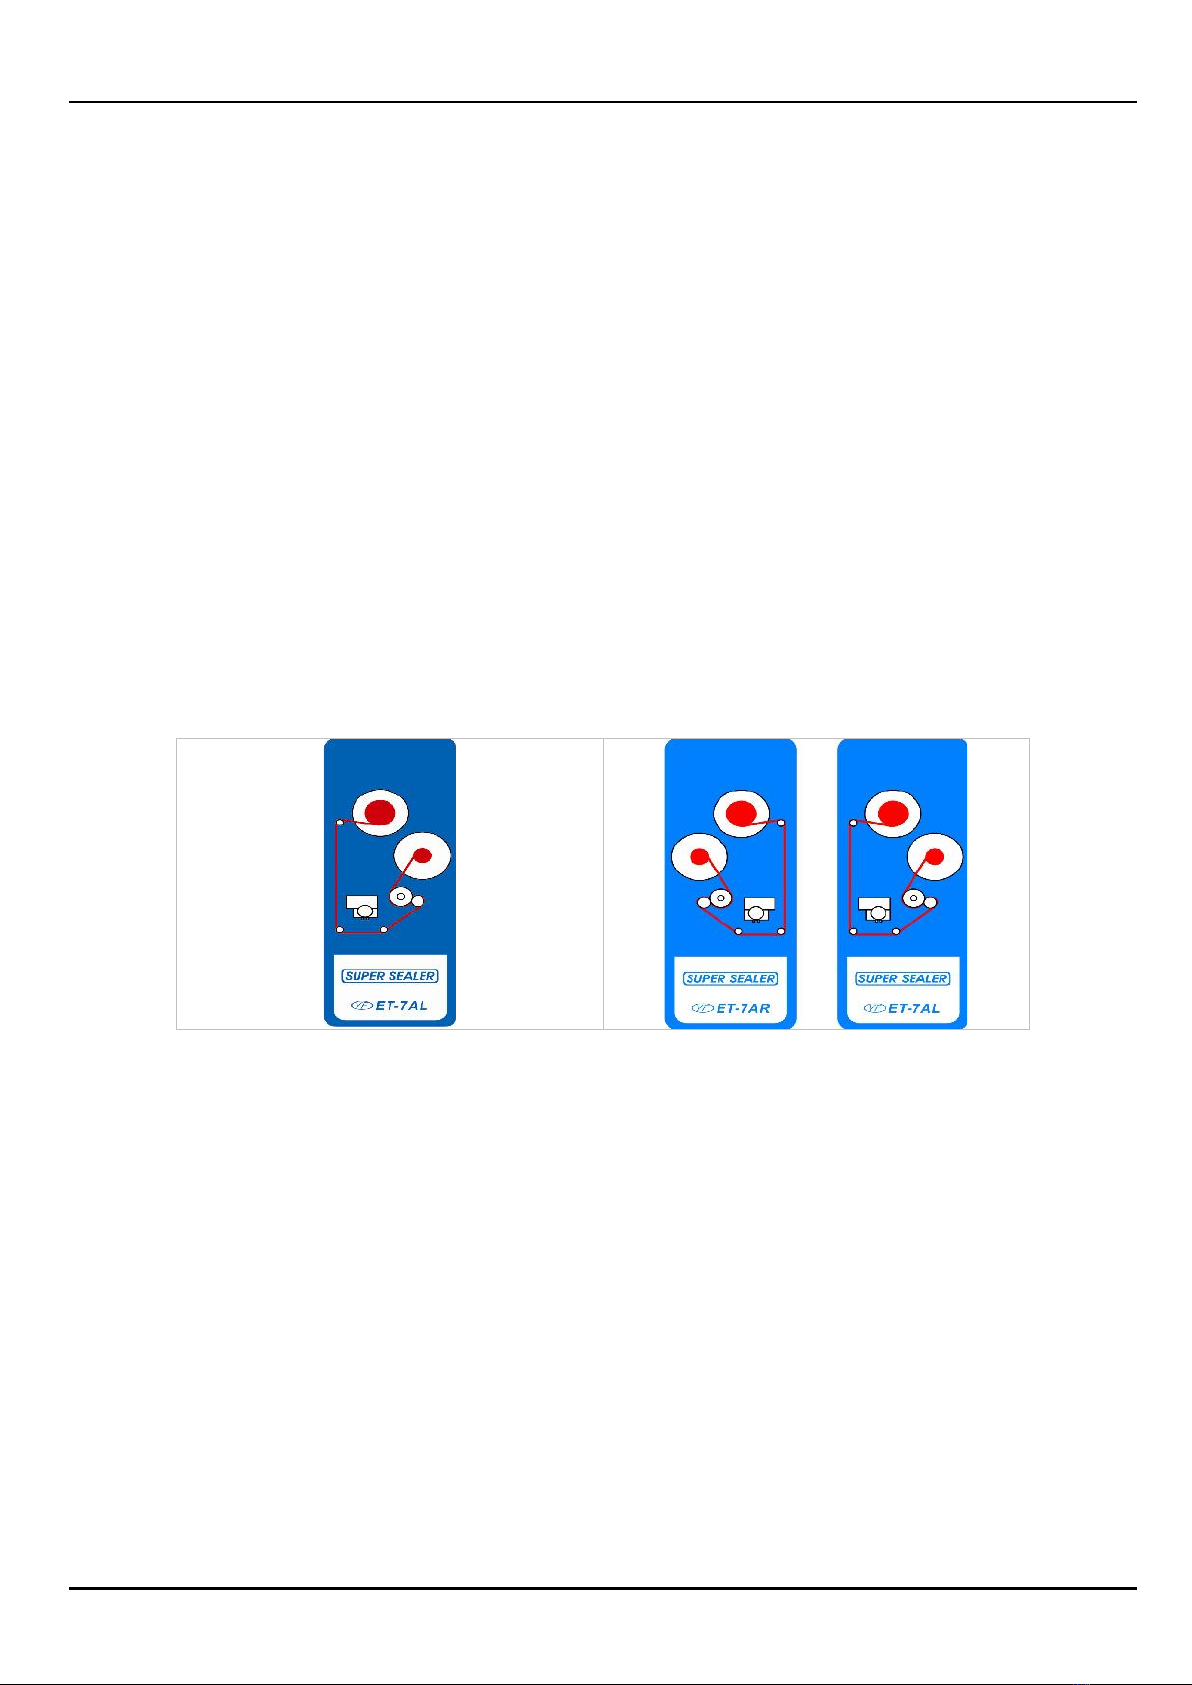
5.1 FILM SCHEMATICS______________________________________________________________________ 8
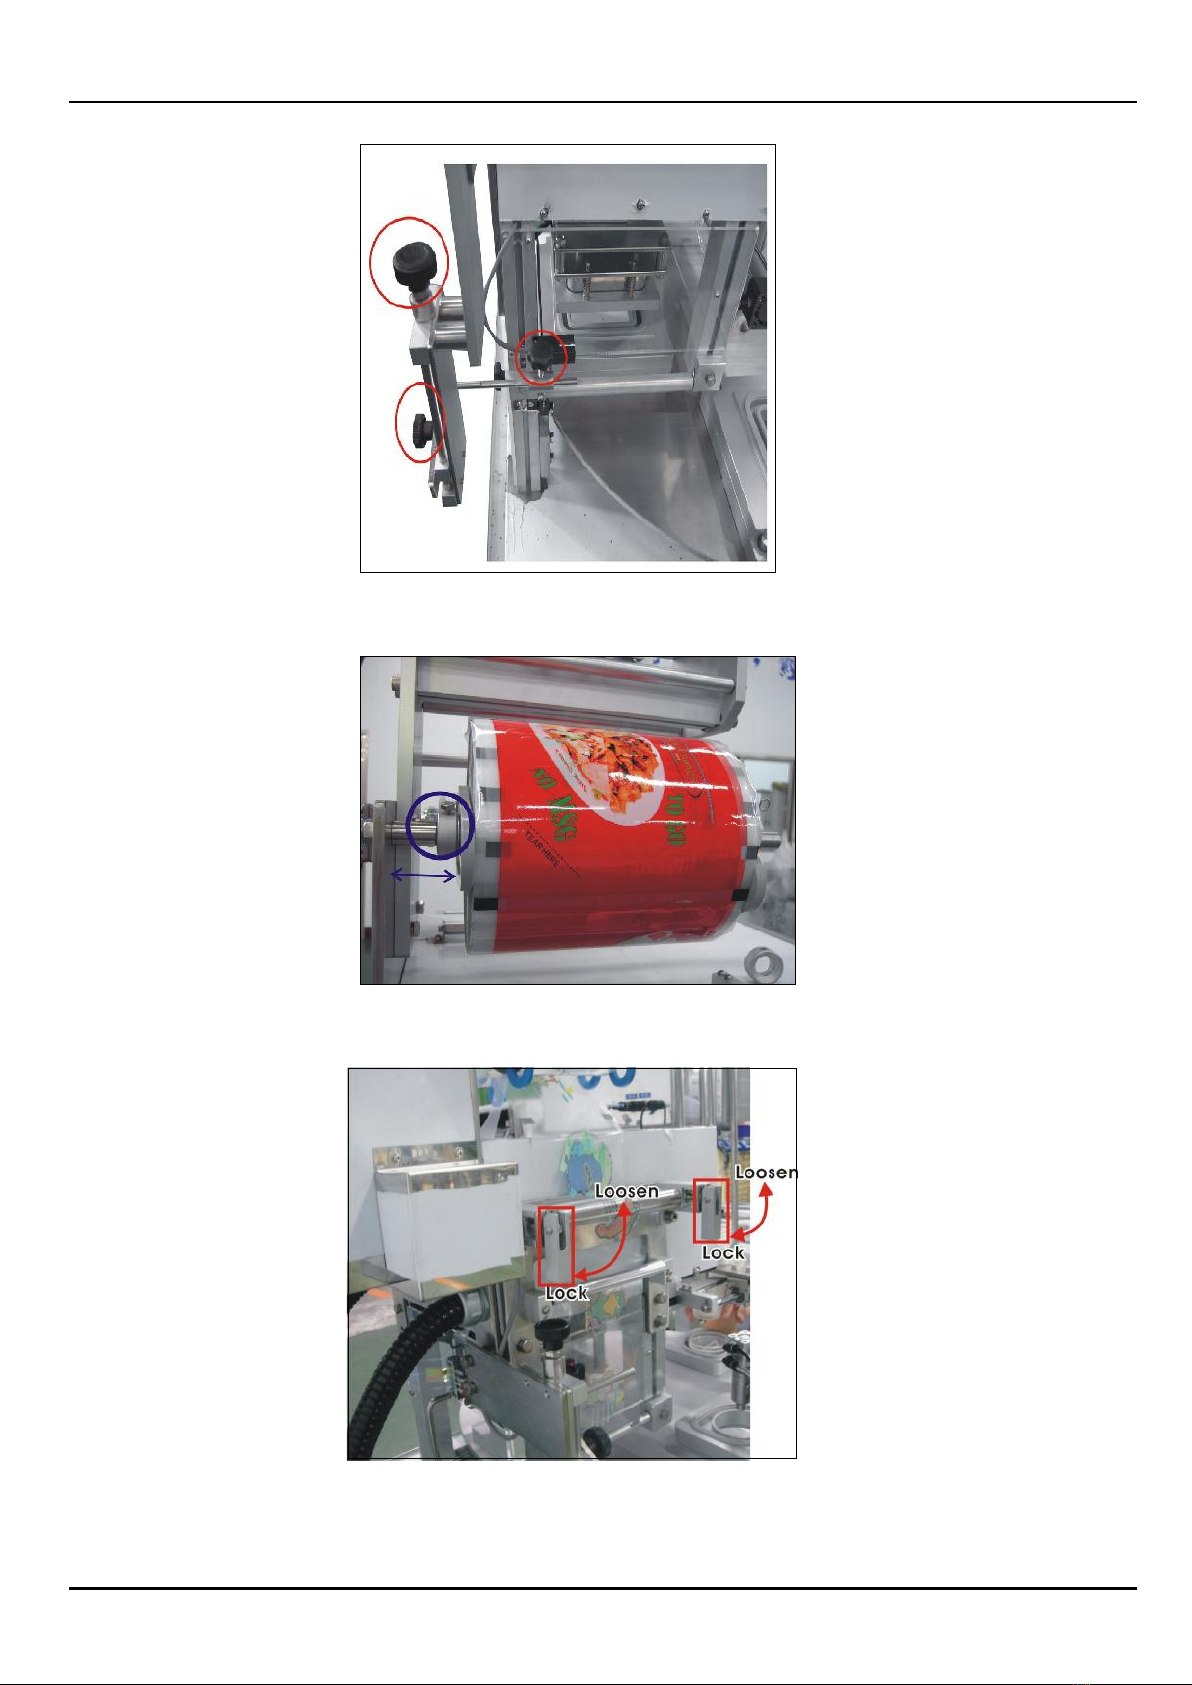
5.2 PRINTED FILM ADJUSTMENT ____________________________________________________________ 8
6. DATE PRINTER __________________________________________________________________________ 10
6.1 PRINTER RIBBON SETTING _____________________________________________________________ 10
7. MOULD REMOVAL & REPLACEMENT______________________________________________________ 10
7.1 LOWER MOULD ________________________________________________________________________ 11
7.2 UPPER MOULD _________________________________________________________________________ 11
8. FILLER _________________________________________________________________________________ 12
8.1 HOPPER LEVEL ________________________________________________________________________ 13
8.2 VOLUME ADJUSTMENTS________________________________________________________________ 13
9. OPERATION _____________________________________________________________________________ 13
9.1 FUNCTION SELECTION _________________________________________________________________ 13
9.2 MANUAL OR AUTOMATIC OPERATION__________________________________________________ 14
9.3 FILM SETTING (ENCODER OR SENSOR OR TIMER) ______________________________________ 14
9.4 SEALING TIME _________________________________________________________________________ 15
9.5 FILLER ________________________________________________________________________________ 16
9.5.1 FILLER RINSING _____________________________________________________________________ 16
10. MAINTENACE _________________________________________________________________________ 17
10.1 DAILY MAINTENANCE ______________________________________________________________ 17
10.2 WEEKLY MAINTENANCE _________________________________________________________ 17
10.3 MONTHLY MAINTENANCE ___________________________________________________________ 17
11. ERROR CODES AND TROUBLE SHOOTING _______________________________________________ 17
12. ELECTRICAL DIAGRAMS _______________________________________________________________ 21
13. LADDER DIAGRAM ____________________________________________________________________ 23
14. STATEMENT___________________________________________________________________________ 24
15. WARRANTY____________________________________________________________________________ 24
16. LIABILITY_____________________________________________________________________________ 24

Updated: 15 November, 2011 Page 3 REF: REI-85-0045
1. PRECAUTIONS
1.1 INSTALLATION
Always check whether the voltage (V) and power(W) required by the machine are compatible to the local
power supply. Always ensure that all the electrical installation be done by trained personnel only.
1.2SAFETY MATTERS
The system is designed and built in such a way that it can be run with the presence of only trained
individual. The trained individual is able to run the whole packaging system with ease if he/she reads
through and understands the contents of this instruction manual.
REI-85 has been designed and constructed in accordance with the directives and regulations based on today’s
technology. The machine can however be hazardous if:
The machine is not operated according to the operation instructions.
The machine is operated by untrained personnel.
The machine is modified by unqualified personnel.
The safety instructions are not observed.
Therefore each individual who operates the machine is obliged to read and follow the safety instructions
stated in this manual.
1.3DO’s & DON’Ts
DOs
Ensure maintenance work is carried
out regularly.
Before working (cleaning or
maintaining) on machine parts,
always disconnect the machine from
the power supply.
When in doubt, always contact your
dealer for further assistance.
Electrical installation should
always be done by qualified
personnel only.
Ensure the machine is operated by
trained personnel only.
DON’Ts
When the machine is switched on, do
not touch the sealing heads or any
other electrical components.
Any adjustment or alteration to he
machine cannot be carried out without
acknowledgement from the dealer.

Updated: 15 November, 2011 Page 4 REF: REI-85-0045
2. INTRODUCTION
Super Sealer REI-85 rotary sealing machine models are suitable for films from reel or pre-cut lids for different
small to medium batch operations.
The machine offers superior quality machine suitable for small and medium food processing factories.
Suitable for any sealable cups and trays such as PP, PE, PET, PVC, Card Board or Foil Trays.
By utilizing some of the options below, a Super Sealer Rotary Sealing machine can also offer complete and
fully automated solution for different food processing applications including dips, humus, pate, yoghurt,
cheese, fruit paste, antipasto, cup water, milk, etc.
MAIN FEATURES
Up to about 15 cycles per minute.
Stainless steel frame construction and components are standard.
PLC Controlled and Touched Screen Panel design.
Requires pneumatic compressed air supply (600KPa, 400~600L/Min).
Sealing moulds can be exchangeable for different tray for about 15 minutes only.
Safety Features – gearless construction and emergency button.
Container Photo Sensor or Automatic option.
Film Sensor or Encoder option.
OPTIONALS
Options are not a simple “plug and play” type. The machine’s physical construction and the control system
are predefined as per customer requirements and specifications.
Date Printer/Coder (hot ink manual)
Interchangeable Mould
Cup Denester/ Drop
Auto-Fill (Liquid, Heavy Liquid, Powder, Solid products)
Auto-Capping
Auto-Container Discharge (Infeed)
Discharger (Product Outfeed)
Load Cell/Scale

Updated: 15 November, 2011 Page 5 REF: REI-85-0045
3. MAIN PARTS
1. Control Panel
2. Discharge System
3. Denester/ Cup Drop
4. Piston Filler
5. Safeguard Fence
6. Hopper (Liquid)
7. Date Printer/ Coder
8. Visual Alarm
9. Film Rewind System

Updated: 15 November, 2011 Page 6 REF: REI-85-0045
3.1 SPECIFICATIONS
REI-85
Output Capability
Air Requirement
Machine Dimension
Machine Weight
Power Requirement
Up to 15 cycles per minute
3HP (600KPa, 200~300L/M)
~ 800Lmmx1000Wmmx2000Hmm
~ 280 kg
1Phase, 220-240Vac @ 20Amps
4. CONTROL PANEL
REI-85 Control Panel
The control panel is where some of the functions of the machine could be adjusted and/or modified based on
your specific machine requirements. Please note that the machine is delivered with predefined feature
parameters and you may not need to change any of the defined settings.
TOUCH SCREEN: Please check from page (13) for operation detail & function setting.
ROTARY: The switch on/off to start/stop turntable.
EMERGENCY: Safety Button provided to STOP the machine
POWER ON/ OFF:
The power on/off switch to start/stop the operation of the machine

Updated: 15 November, 2011 Page 7 REF: REI-85-0045
BUZZER : Warning sounds when machine function encounter error.
Note: To turn off sound, press “F1” key on HMI.
TEMPERATURE : This is how to manage the temperature setting in degrees centigrade (oC).
SETTING FOR TEMPERATURE:
The Orange number means the actual temperature of the heater and the Green means the desired
setting.
Press the “︿”、”﹀”、”〈“ for adjust the Green temperature.
And press the “ENT” to save when finish the adjusting.
Then Press “Run” to Start or Stop heat, and it ‘s start to Heat if shows the 2 Green light, and Stop to
Heat if not.
Polypropylene, PVC or PET films could have the default settings of 135 to 250 oC. This will vary
based on the type of containers and sealing films used.
5. ROLL FILM SET-UP
Setting Up the film roll is a simple step of following the direction as per the images below – with printer or
without the printer. The printer will stamp product information on the film such as the expiry date,
manufacturing date / time.
1. Follow the film dressing process below. Keep the film in right direction as shown below.
2. When the power is on, the printer heater will start heating up automatically.
3. It takes 5~7 minutes to reach the set temperature set. (Manually adjusted)
4. The indicative lamp will be “off” automatically when the set temperature reached. Then the machine is
ready for the container to make sealing function.
5. Choose the correct film material:(It is important for good sealing)

Updated: 15 November, 2011 Page 8 REF: REI-85-0045
5.1 FILM SCHEMATICS
Gas Flushing design
5.2 PRINTED FILM ADJUSTMENT
The printed film will have to be adjusted properly to ensure that the design is always centre during
sealing/ cutting.
The machine is equipped with a “bracket” to assist on positioning (manually).
Please ensure that the EYEMARK is positioned in between the photo sensor. The position of the photo
sensor can be adjusted as per below picture.

Updated: 15 November, 2011 Page 9 REF: REI-85-0045
Use a spanner to adjust the position of the film on the film holder.
Always ensure that the encoder is lock as shown below.

Updated: 15 November, 2011 Page 10 REF: REI-85-0045
6. DATE PRINTER
Specification
Type Manual Hot Ink Stamp
Maximum Number of Lines Maximum 3 (Required before making)
Font / Font Size Times Roman 10 font
Ribbon / Ribbon Color 100 meters/ Black (standard) or White
Maximum Number of Alphanumeric per line 9 (e.g. 20060918, EXP060918)
Temperature Setting (adjustable) 50- 180 C (Default 120)
Printer Position The position can be adjusted manually
The information (e.g. date/time) is manually loaded on the date printer “alphanumeric holder”. Simply
slide in the information on a “MIRROR” direction.
WARNING! The printer uses HIGH temperature to function. Please ensure that you allow the printer to
COOL DOWN for at least 90 minutes before changing the information.
6.1 PRINTER RIBBON SETTING
(With 1 Date Coder) (With 2 Date Coders)
7. MOULD REMOVAL & REPLACEMENT
ELECTRICAL HAZARD
Always REMOVE the machine from the power outlet before performing any maintenance or cleaning
works.
BURN HAZARD
• Cleaning and maintenance should be performed by your trained personnel only
• Allow unit to cool at least 90 minutes before normal cleaning
• If hot machine must be opened, keep hands away from upper moulds and the printer

Updated: 15 November, 2011 Page 11 REF: REI-85-0045
7.1 LOWER MOULD
Lower Mould Function
The main function of the lower mould is to hold the containers on right position for the sealing and the
cutting function.
Exchanging
The lower mould is made to lock in position for ease the removal and replacement.
1. On the control panel, turn off “Rotary Switch” and ALL the devices on the Function Selection.
The movement of the turntable can be activated by “Rotary Jog” button (On Touch Screen).
2. Loosen the BLACK screws under the lower mould, and then take lower mould away.
7.2 UPPER MOULD
Sealing and Cutting Function
Standard Upper mould performs the sealing with/without the cutting function at the same time.
Removing and Exchanging
Mould can be removed for cleaning or exchange by (see images below):
Removing the thermocouple and wiring connection (Socket).
Removing the black screw.

Updated: 15 November, 2011 Page 12 REF: REI-85-0045
1 2
3 4
Holding the bottom part of the upper mould, slowly pull/ slide out.
5 6
8. FILLER
Clamps hold each of the sections of the filling system for ease on dismantling without tools.

Updated: 15 November, 2011 Page 13 REF: REI-85-0045
8.1 HOPPER LEVEL
The system controls the level of product (water or juices) in the hopper by using a level sensor.
Ensure that the LEVEL switch on the control panel is TURNED ON.
8.2 VOLUME ADJUSTMENTS
ALWAYS release the air pressure before adjusting quantity.
To adjust the volume of the piston filler, loosen nuts & rotate handle (screws).
Lock the nuts once the setting is completed.
9. OPERATION
The machine is operated MAINLY using the TOUCH SCREEN system.
9.1 FUNCTION SELECTION

Updated: 15 November, 2011 Page 14 REF: REI-85-0045
CUP DROP--- to turn ON or OFF the denester
SEALING SWITCH – to turn ON or OFF the sealing function
DISCHARGER SWITCH – to turn ON or OFF the discharge section
FILM CODER SWITCH – to turn ON or OFF the date printer
LEVEL SWITCH – to turn ON or OFF the level switch.
9.2 MANUAL OR AUTOMATIC OPERATION
The machine can be operated using MANUAL or AUTO mode. During AUTO mode, the sensors (e.g.
cup sensors) is activated. Once the sensors are activated, the machine will not operate unless there is
container present. During MANUAL operation, the sensors are not activated. Therefore once the
FUNCTION is selected to be ON, the machine will operate regardless there is container or not.
For example, on the FUNCTION SELECTION, if the SEALING is turned ON, during MANUAL
operation, the sealing process will operate on every cycle.
9.3 FILM SETTING (ENCODER OR SENSOR OR TIMER)

Updated: 15 November, 2011 Page 15 REF: REI-85-0045
ENCODER --- for clear (no print) film
SENSOR ---- for printed film (with eyemark)
There is another function (TIMERMODE/ FILM REWIND) on the system which is being if the sensor
or encoder cannot be used (e.g. malfunctioning). This will need to be always OFF if SENSOR or
ENCODER is selected. Once the FILM REWIND (Timer) button is ON, timer for this can be set from
the Time Setting.
ENCODER TIMER MODE
FILM LENGTH SETTING FILM LENGTH SETTING
9.4 SEALING TIME
Press Time Setting from the main screen to bring out the screen below where the sealing time
can be set.
The value 10 equates to 1 sec, 15 to 1.5 secs, etc…

Updated: 15 November, 2011 Page 16 REF: REI-85-0045
9.5 FILLER
Press Filler Selection from the main screen to bring out the screen below.
Turn ON or OFF the “Filler Switch” button to operate the piston filler.
The machine is also equipped with double filling. Select 1 for single filling and 2 for double filling.
9.5.1 FILLER RINSING
This function allows you to assist on cleaning the machine. You could set the amount of time you want the
piston filler to continuously run.
The Filling Nozzle Setting is for speed the nozzle opens and close.

Updated: 15 November, 2011 Page 17 REF: REI-85-0045
10. MAINTENACE
ELECTRICAL HAZARD
Always REMOVE the machine from the power outlet before performing any maintenance or cleaning
works.
BURN HAZARD
• Cleaning and maintenance should be performed by your trained personnel only
• Allow unit to cool at least 90 minutes before normal cleaning
• If hot machine must be opened, keep hands away from upper moulds and the printer
10.1 DAILY MAINTENANCE
Wipe with wet cloth the upper and lower moulds with dirt. Always remove residual films
(plastic roll films).
Clean the groove of the lower sealing mould
Clean the sensor if necessary
10.2 WEEKLY MAINTENANCE
Clean the panel box. Ensure it is free of dust, insects and etc.. If necessary, insect repellent can
be placed in the panel box.
10.3 MONTHLY MAINTENANCE
Regularly check the air pressure controller (once every month). Check lubricant oil every
month. If less than 50%, refill the lubricant oil (Specification: Number 68)
Check if all sealing springs are in good condition
Lubricate moving parts.
11. ERROR CODES AND TROUBLE SHOOTING
This error is related to the magnetic sensor
situated on the sealing cylinder.
The sensor could be faulty or has been moved
out of position. Move the magnetic sensor into
position or replace.
The error can also be caused by unstable air
pressure. Please check compressed air supply.

Updated: 15 November, 2011 Page 18 REF: REI-85-0045
This error is related to the sensor at the noozle
area. Possible causes:
The cylinder bar could be out of position due
to some food particles.
The sensor is faulty or out of position.
The machine will not work once the air pressure
is low.
This is just an alarm which would give this
alarm and a visual alarm.
The machine will still operate but the visual
alarm cannot be removed from the touch screen.
Please add some more containers to remove the
alarm.
Once of the doors are opened the machine will
stop operating and will make visual and audio
alarm.

Updated: 15 November, 2011 Page 19 REF: REI-85-0045
The magnetic sensor will need to be positioned
or replaced.
Please check if the correct setting is made on the
machine (SENSOR or ENCODER).
Please check if the EYEMARK is positioned
properly in between the photosensor.
This error will appear if the turntable is made
out of position.
Please the “Rotary Positioning” button until the
error disappeared.
TROUBLE
POSSIBLE REASON
SOLUTION
NO RESPONSE
AFTER TURNING
THE POWER ON
1. Pressure is low.
2. No electricity.
3. Security door of sealing
area is unlocked.
4. Cylinder of sealing no any
response.
1. Check air compressor and pressure switch.
2. Check power plug.
3. Check micro switch and shot the security
door in properly.
4. Check cylinder sensor if it is out of right
position.

Updated: 15 November, 2011 Page 20 REF: REI-85-0045
MACHINE STOPS
SUDDENLY WHILE
OPERATING
1. Container falls down inaccurately
into lower mould.
2. Pressure is low.
3. No electricity.
4. Security door of Sealing area
unlocked.
5. Cylinder of sealing no any
response.
1. Check and wipe the sensor surface which
located at cup drop area, also adjust sensor
ray.
2. Check air compressor and pressure switch.
3. Check power plug.
4. Check micro switch and shot the security
door in property.
5. Check cylinder sensor if it is out of right
position.
FILM PATTERN
OUT OF RIGHT
POSITION WHILE
SEALING.
1. Film sensor dirty.
2. Film sensor no response.
3. Film sensor broken.
1. Wipe the film sensor surface。
2. Adjust the ray of film sensor 。
3. Replace film sensor.
OTHERS
1. Sealing plate does not always not
enough hot when heating time over 7
minutes.
2.Always show high temperature as
soon as turning on the power of
temperature controller.
3.Unable to reach the presetting
temperature.
1. Check temperature controller, thermocouple,
and heater if they have
been turned on, broken, or burnt.
2. Thermocouple may damage, replace new one.
3. Some of heaters may be burnt.
Table of contents
Other Super Sealer Food Saver manuals