SuperATV WN-12000 User manual

WN-12000 Winch guide
Stopper
© 2020 SuperATV.com®. All Rights Reserved. Rev WN-Winch-Guide-12000 10/15/2020
Fairlead
(kit contents continue on following page)
Clevis Pin and Hook
Hand Strap
Winch
Battery Wire Harness
Winch Mounting Hardware (4 each)
Stopper Hardware (4 each)
Fairlead Hardware (2 each)
SuperATV strongly recommends a dual Battery setup

WN-Winch-Guide-12000 2
remove (3) screws on back of Wireless Remote
and install Batteries
“+”, on Batteries, to face installer
CR2032 Batteries
Wireless Remote
Solenoid
(kit contents continued)
Wired Remote

WN-Winch-Guide-12000 3
INTRODUCTION:
Congratulations on your purchase of a high quality Winch designed and built to strict
specications. Proper use and maintenance will ensure years of reliable, satisfying
service.
A winch can develop tremendous pulling forces. If winch is used improperly, or in an
unsafe manner, personal injury, death, and/or property damage can occur. Throughout
this operating manual CAUTION, WARNING, and DANGER symbols are present. Pay
particular attention to notes preceded by these symbols as they are written for your safety.
User is responsible for safe operation of this device.
WARNING: Read, study, and follow all instructions before operating winch.
Failure to heed these instructions may result in personal injury, death, and/or
property damage.
Indicates a potentially hazardous situation, which if not avoided,
may result in minor or moderate injury. This symbol is also used
to alert user against unsafe practices.
CAUTION
Indicates a potentially hazardous situation, which if not avoided,
may result in death or serious injury.
WARNING
RECOMMENDED WINCH ACCESSORIES (not included):
Gloves: Protect hands when handling Synthetic Rope.
Blanket: Place on Synthetic Rope to absorb energy in event of a failure.
Pulley/Snatch Block: Doubles pulling power of Winch or changes pulling direction without
damaging Synthetic Rope. When pulling over 70% of rated line pull, it is recommended to
use double line and snatch block.

WN-Winch-Guide-12000 4
Synthetic Rope (Diameter x Length): Ø25/64” x 46’
Model WN-12000 (all dimensions shown are in inches)
18.56
7.39
6.18
6.52
4.49 Mounting Bolt Pattern
PERFORMANCE DATA: 12V DC Motor, 6hp output
Line Pull
(lbs - kgs)
Line Speed
(Ft/min, M/min)
Motor
(amps)
Pull by Layer
(layer/lbs - kgs)
034.78 (10.6) 75 1/7000 (3175)
3000 (1361) 11.48 (3.5) 180 2/5562 (2535)
6000 (2722) 8.2 (2.5) 255 3/4614 (2093)
9000 (4082) 5.96 (1.8) 320 4/3853 (1748)
12000 (5443) 4.59 (1.4) 420
Line Pull
(lbs - kgs)
Line Speed
(Ft/min, M/min)
Motor
(amps)
Pull by Layer
(layer/lbs - kgs)
063.98 (19.5) 75 1/7000 (3175)
1625 (737) 22.64 (6.9) 185 2/5562 (2535)
3250 (1474) 14.76 (4.5) 265 3/4614 (2093)
4870 (2209) 10.50 (3.2) 330 4/3853 (1748)
6500 (2948) 5.91 (1.8) 430
Normal Speed
High Speed
12V DC Motor, 6hp output

WN-Winch-Guide-12000 5
SOLENOID TO WINCH MOUNTING:
- Solenoid is designed to install directly to Tie Bars on Winch; SuperATV prefered mounting method.
- Place Solenoid onto Tie Bars and tighten screws in Clamps.
- User may install to an optional location.
Winch
Tie Bar
Tie Bar
Solenoid
Clamp
Clamp
BATTERY WIRE HARNESS WIRING:
Battery Wire Harness
RED............. to Battery POS “+”
BLACK........ to Battery NEG “-”
connect to plug on Solenoid

WN-Winch-Guide-12000 6
SOLENOID TO WINCH WIRING:
- Connect wires from Solenoid to Terminal Posts on Winch.
- Match colors and secure.
Black Battery NEG “-” wire and Black Solenoid Ground wire will share same Terminal Post.
**
Red Solenoid Power wire must be connected to a switched 12V source i.e Igntion Key.
*
Solenoid
connect to Battery Wire Harness
BLUE........... Winch NEG “-”
YELLOW...... Winch POS “+”
RED............. Battery POS “+”
BLACK........ Battery NEG “-”
***
- use (2) wrenches, one on each Nut, when
tightening Terminal Posts; use hand tools
only and do not overtighten
- torque all wiring connections to a maximum
35 in/lbs

WN-Winch-Guide-12000 7
Wired Remote
WIRED REMOTE CONNECTING:
- Open Protective Boot on Solenoid and connect Wired Remote.
- Close Protective Boot when Wired Remote is not connected.
Solenoid
Protective Boot
CLUTCH SETTINGS: NORMAL SPEED: Use for full 12,000 lbs. pull rating.
DISENGAGED: Use to manually disengage (“CLUTCH OUT”)
Winch Drum from Mechanical Gear System; free spool.
HIGH SPEED: Use for light pulling or faster winching in of
Synthetic Rope.

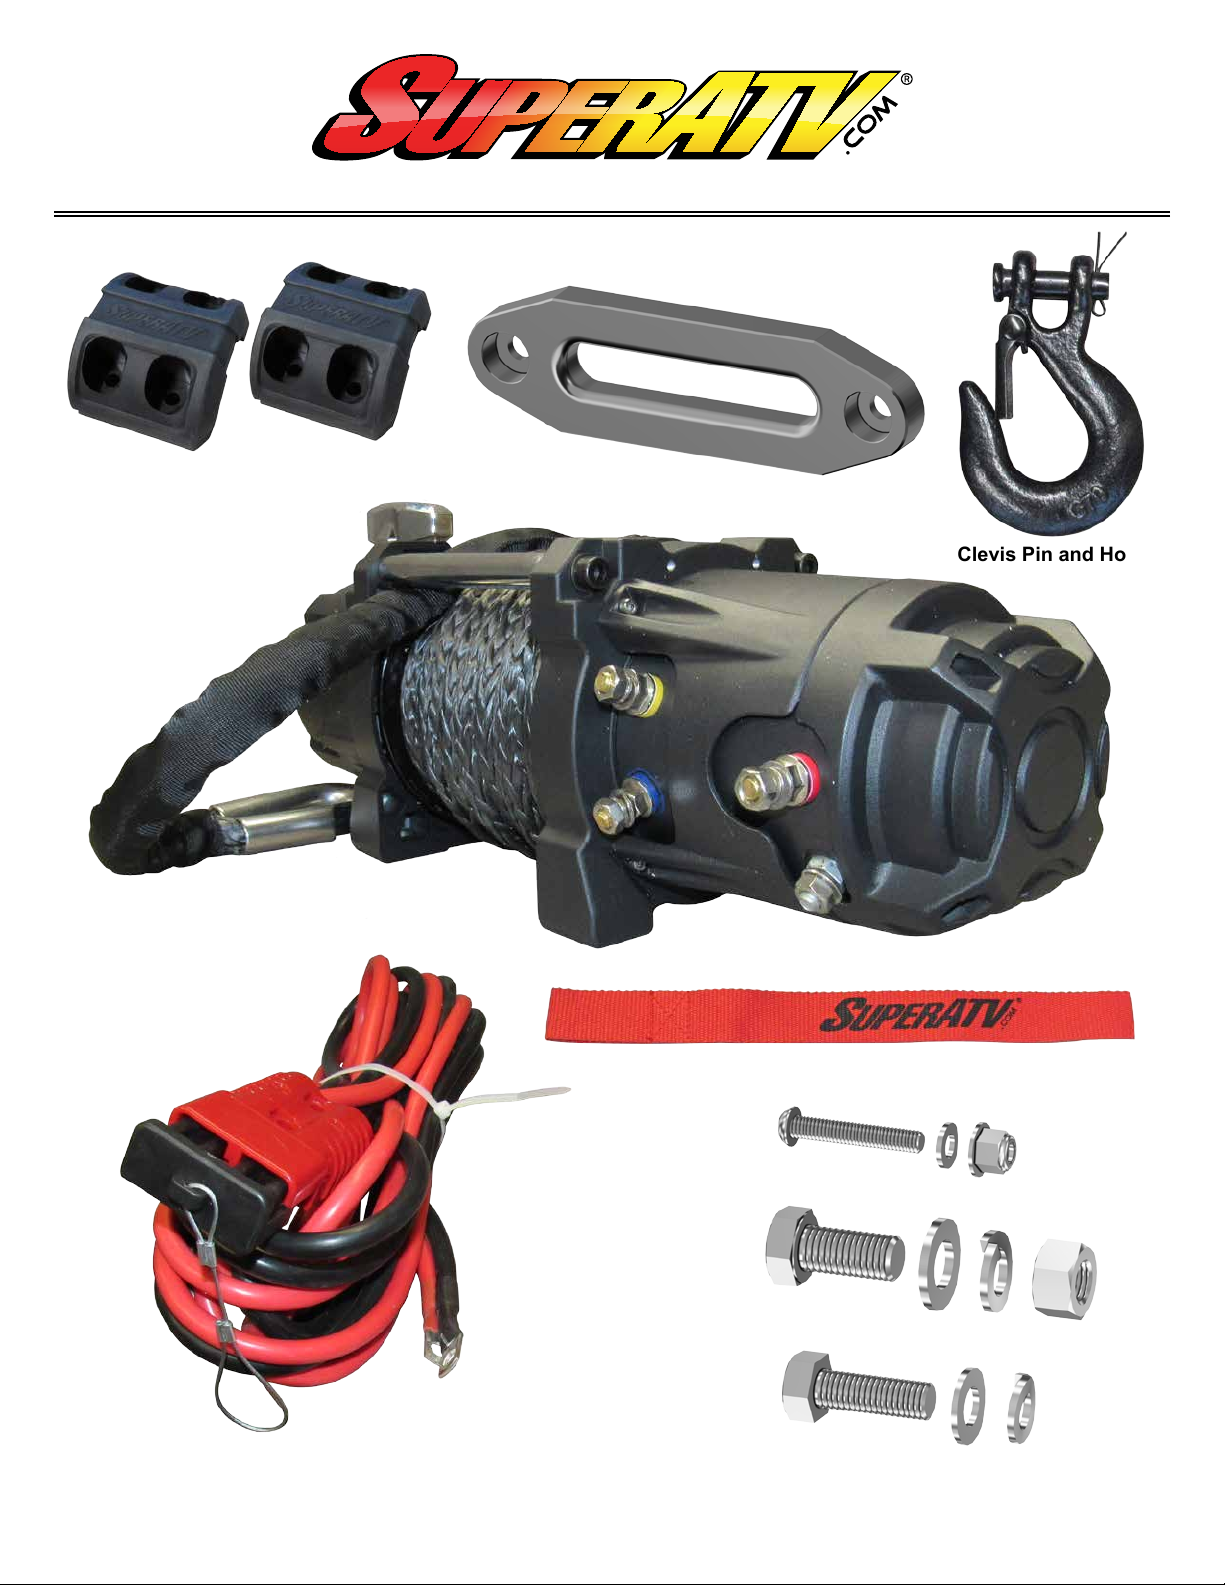
WN-Winch-Guide-12000 8
GETTING TO KNOW YOUR WINCH:
A winch is a powerful piece of machinery. For safe and condent operation, it is important
to understand basic winch operations and specications. See below for details on winch
components and usage. Practice using winch before an actual situation occurs.
Winch has been engineered with several patented technologies.
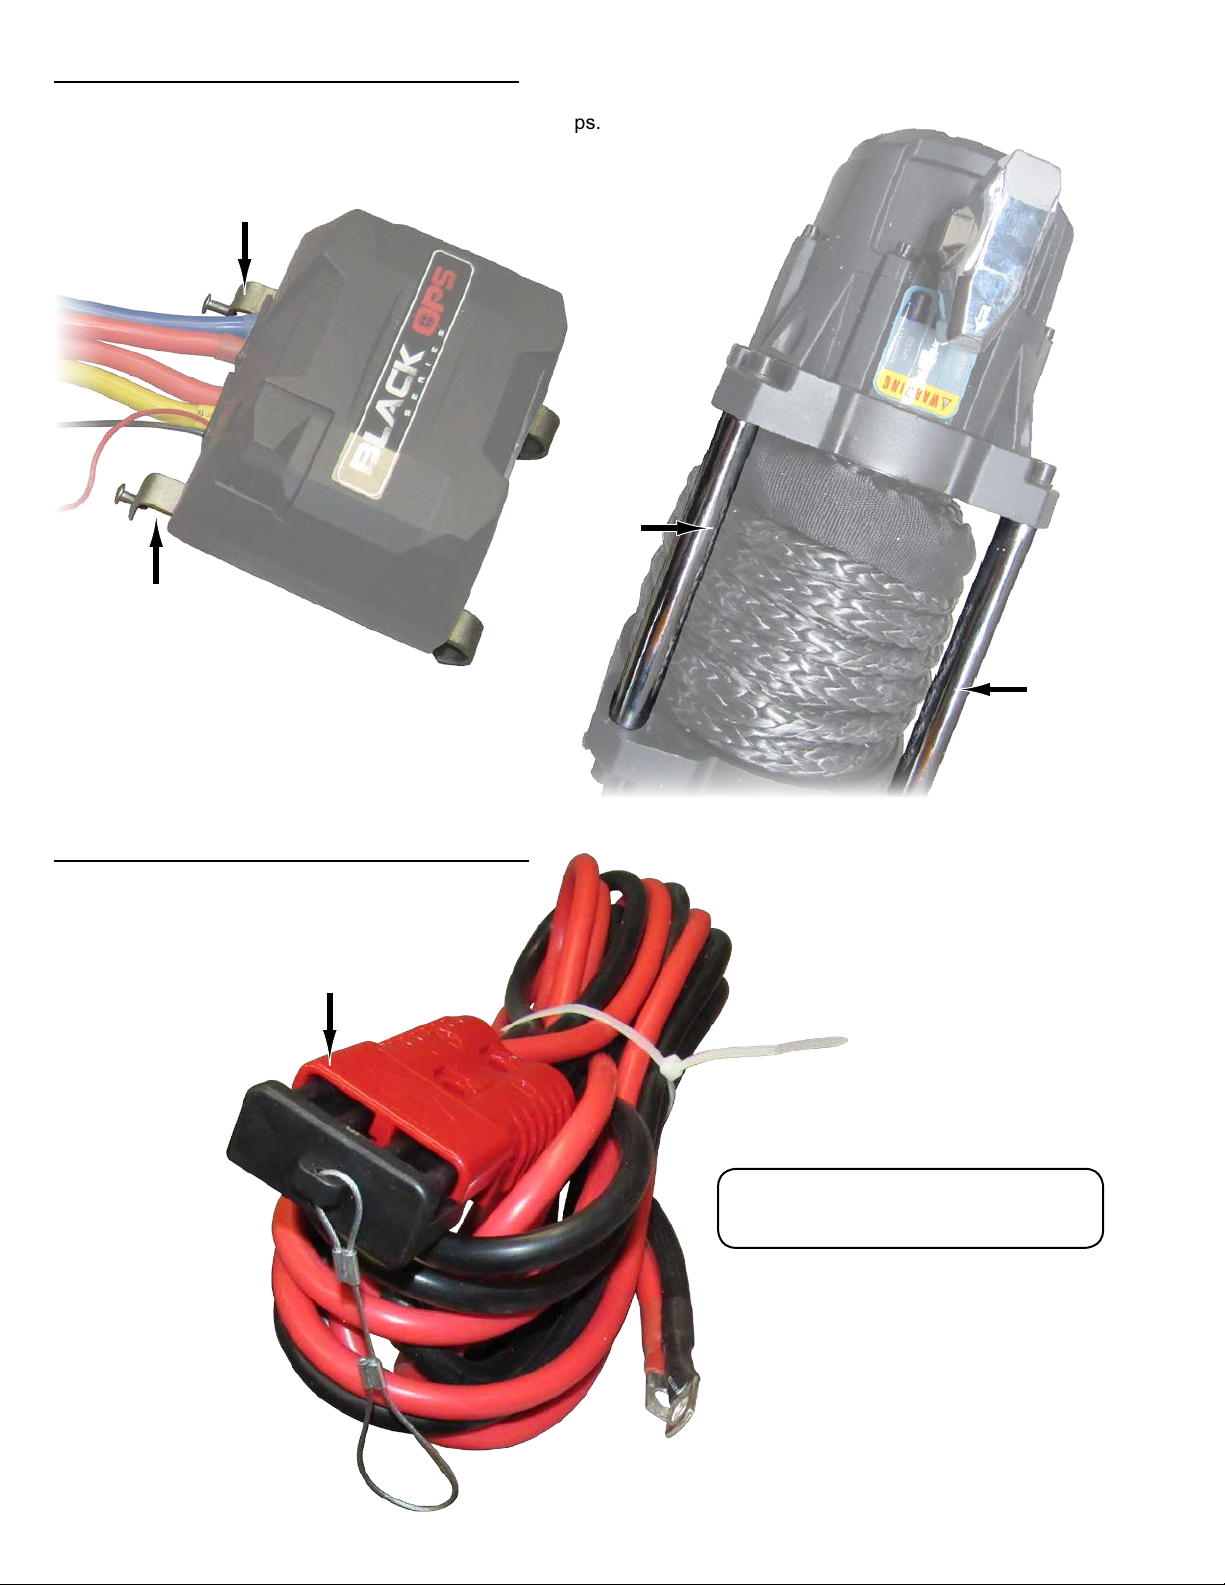
Motor: Motor is powered by a 12 volt battery. Motor provides power to Mechanical Gear
Mechanism which turns Winch Drum and winds Synthetic Rope.
Winch Drum: Cylinder on which Synthetic Rope is stored. Winch Drum feeds or winds
Synthetic Rope depending on Winch switch direction.
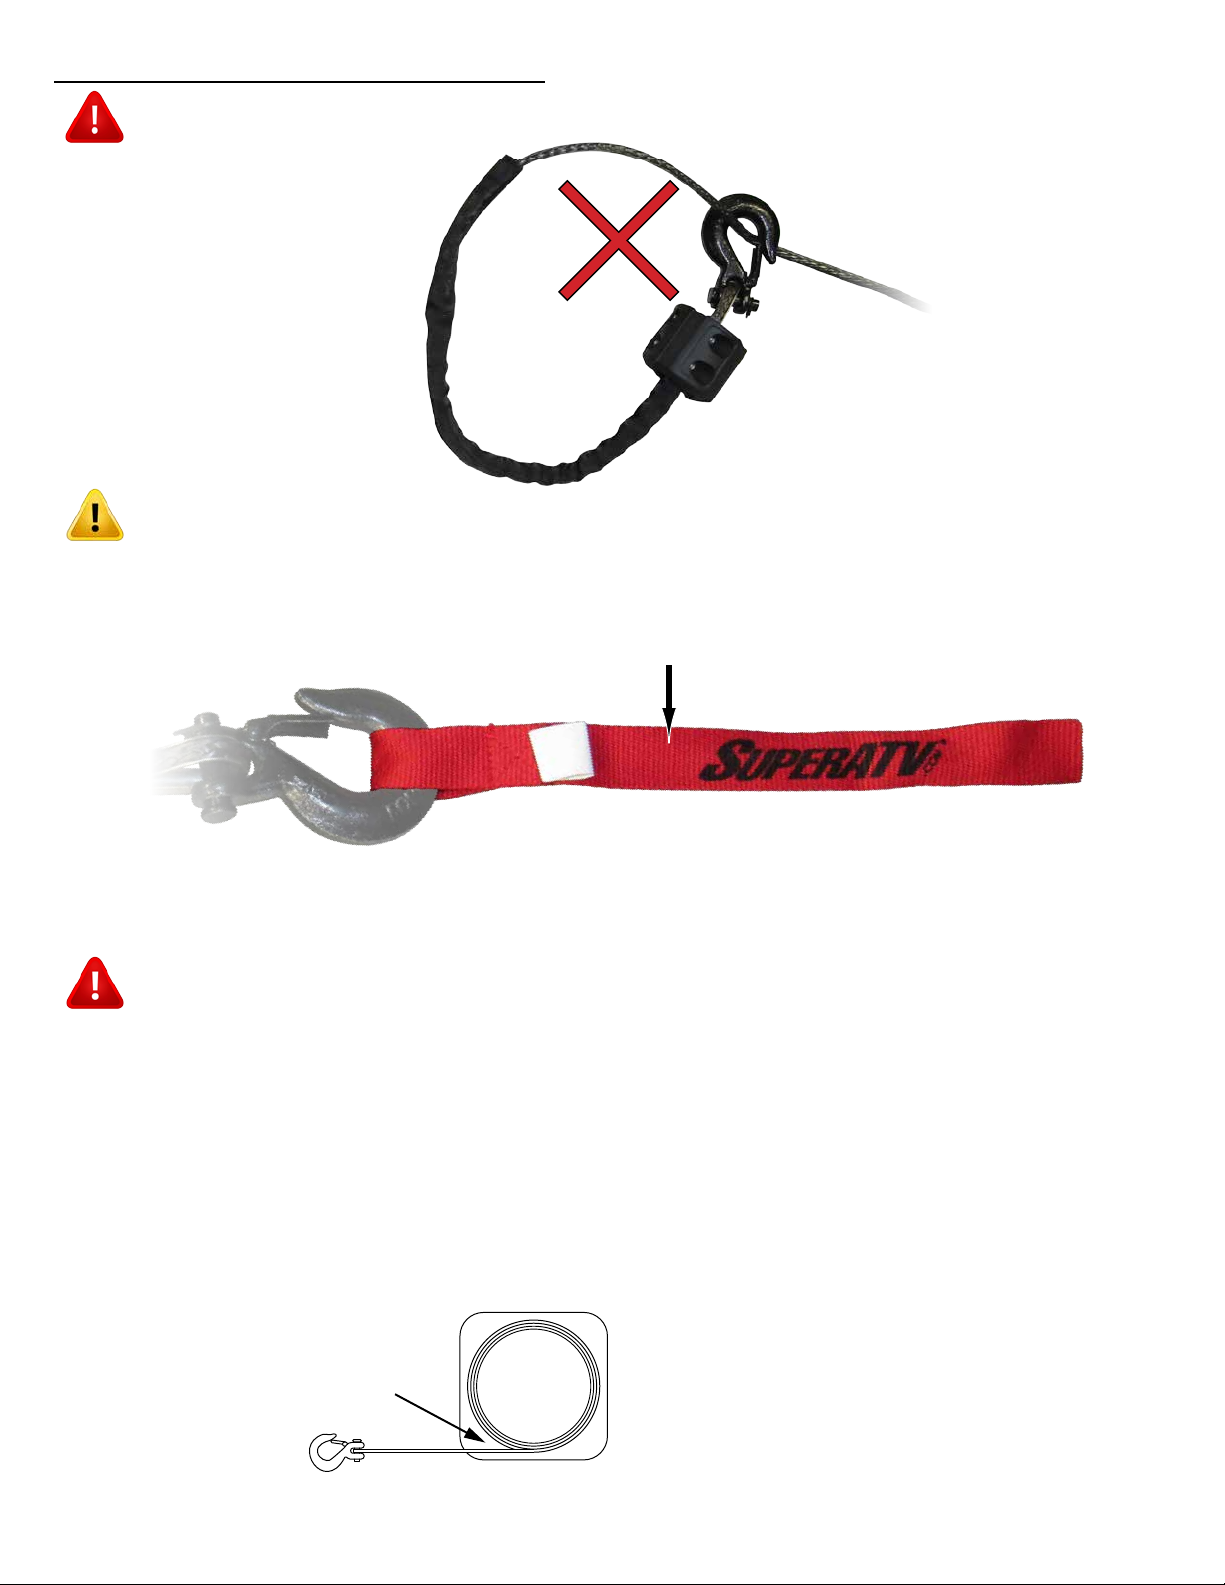
Synthetic Rope: Designed specically for Winches load capacity and is looped at end to
accept clevis hook pin. Synthetic Rope feeds onto Winch Drum, through Fairlead, when in
“under wind” position.
Fairlead: When operating Winch at an angle, Fairlead guides Synthetic Rope onto Winch
Drum and minimizes damage/abrasion from winch mount or bumper.
Mechanical Gear System: Converts Motor power into extreme pulling forces.
Braking System: Braking action is automatically applied to Winch Drum when Motor is
stopped and there is load on Synthetic Rope. A separate mechanical brake applies braking
action.
Control System: Winch can be controlled by using Power Cord/Switch Assembly or through
Remote Control.
Free Spooling Clutch: Allows user to manually disengage (“DISENGAGED”) Winch Drum
from Mechanical Gear System; free spool. Engaging clutch (“HIGH SPEED” or “NORMAL
SPEED”) locks Winch into Mechanical Gear System. See “Clutch Settings” on page 7 for
further information.
Solenoid: Power from vehicle battery ows through a weather-sealed switch before being
directed to Motor.
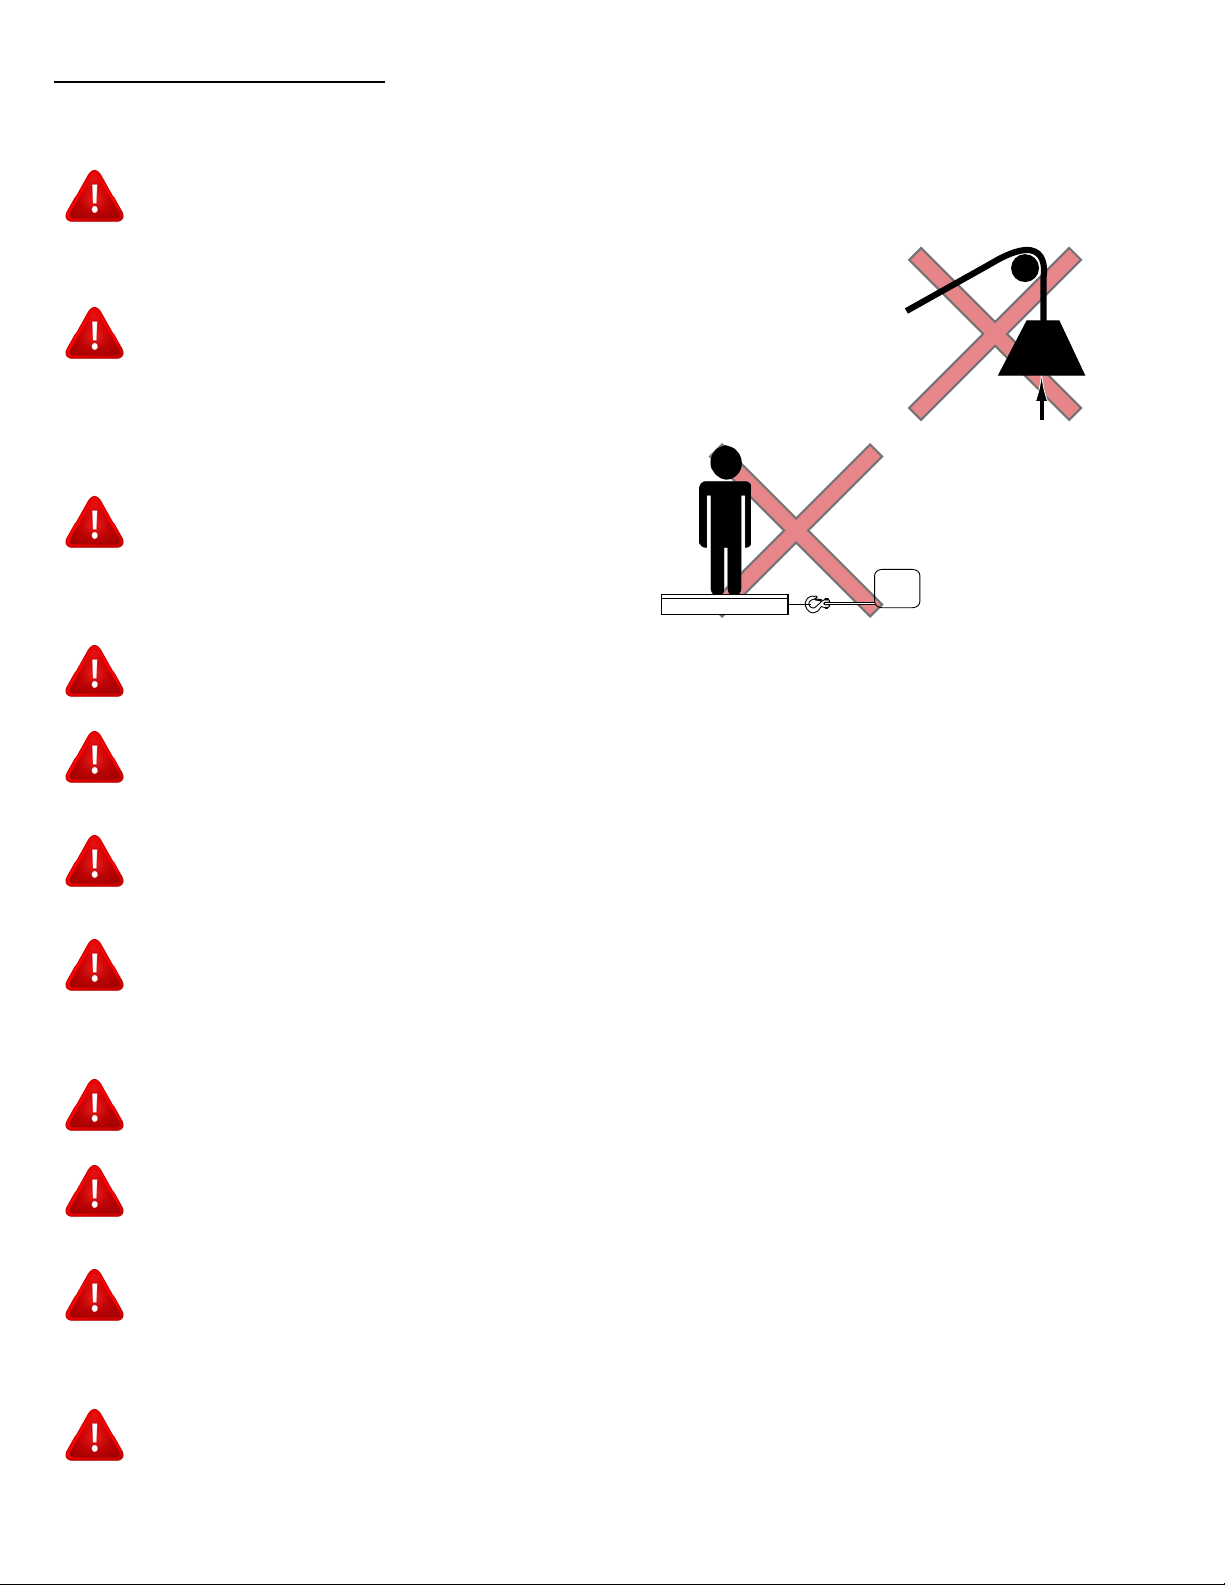
Wired Remote: Allows user to stand clear of Synthetic Rope when Winch is under load.
Wireless Remote Control: Allows user to operate Winch from 50’ away. To turn on, push
both buttons at once until LED lights up. To turn o, push both buttons at once until LED light
goes out.
To turn ON:
- press and hold (2) buttons simultaneously
until LED indicator turns on
To turn OFF:
- press and hold (2) buttons simultaneously
until LED indicator shuts o
- remote will power o automatically after 2
minutes of inactivity

WN-Winch-Guide-12000 9
WARNING - Do not exceed rated capacity. See “Performance Data”, page 4.
WARNING - Never cut, weld, or modify any part of Winch or Synthetic Rope.
WARNING - When under load, never step over or go near Synthetic Rope.
WARNING - A minimum of (5) wraps of Synthetic Rope around Winch Drum is
necessary for pulling and holding rated load.
WARNING - Keep yourself and others a safe distance and to a side when
Synthetic Rope is under tension.
WARNING - Synthetic Rope may break before Motor stalls. For heavy loads at or
near rated capacity, use a pulley block/snatch block to reduce load
on Synthetic Rope.
WARNING - Don’t move vehicle to pull a load (towing) on Synthetic Rope. This
can result in Synthetic Rope breakage.
WARNING - Avoid “shock loads” by using control switch intermittently to take up
slack in Synthetic Rope. “Shock loads” can exceed rated capacity for
Synthetic Rope and Winch Drum.
SAFETY PRECAUTIONS:
Failure to heed these warnings and cautions may result in personal injury and/or property
damage.
load
WARNING - Do not use Winch to lift vertically or as a hoist.
Winch
WARNING - Do not use Winch to pull or
move people in any way.
(Safety Precautions continue on following page)
WARNING- Apply blocks to wheels of vehicle when on an incline.

WN-Winch-Guide-12000 10
SAFETY PRECAUTIONS (continued):
WARNING- When re-spooling, ensure that Synthetic Rope spools in “under wind”
position with Synthetic Rope entering Winch Drum from bottom, not
top. To spool correctly, keep a slight load on Synthetic Rope while
pushing remote button to draw in Synthetic Rope. Walk toward Winch
while not allowing Synthetic Rope to slide through hands. Do not
let hands get within 12″ of Winch while re-spooling. Turn o Winch
and repeat procedure until only a few feet of Synthetic Rope remain.
Disconnect Remote Control and nish spooling by hand; rotate Winch
Drum by hand with Clutch disengaged. Keep hands clear of Fairlead
and Winch Drum while Winch is under power.
WARNING- Never connect Synthetic Rope back onto itself.
Side cutaway view of Winch
Side Cutaway View Of Winch
Rope Exiting
From Under
Drum
- Use Hand Strap when handling Clevis Hook. Use gloves to protect
hands when handling Synthetic Rope. Never let Synthetic Rope slide
through bare hands.
CAUTION
Hand Strap

WN-Winch-Guide-12000 11
Pulley/Snatch Block Winch
Anchor point
on vehicle
Synthetic Rope
to sling/tree stap
and anchor point
GENERAL TIPS FOR SAFE OPERATION:
• Winch is at rated capacity when spooling rst Synthetic Rope layer onto Winch Drum.
Overloading can damage components. For loads over 70% of rated line pull, it is
recommend to use a pulley block/snatch block to double rope line. When doubling line,
number of layers on Winch Drum is reduced and load on Synthetic Rope is reduced by
as much as 50%. Attach to frame or other load bearing component when doubling line
back to vehicle.
• To minimize battery drain and maximize power and speed of Winch, keep vehicle
engine running during winching. Battery may be drained if winch is used for a
considerable amount of time with engine o.
• Know all features before actual use. Become familiar with rigging techniques, sounds
made under various loads, way Synthetic Rope spools onto Winch Drum, etc. by
performing several test runs.
• Inspect all components, hardware, and electrical connections before each use. If
Synthetic Rope is frayed or damaged, replace immediately. Use only manufacturers
replacement rope. Replace or remove any component that appears to be damaged,
worn, or operating abnormally.
• Never connect Synthetic Rope back onto itself. Always use a snatch block, sling, or
chain of suitable strength.
• Pull only on parts of vehicle as specied by vehicle manufacturer.
• Use only attachments and/or adapters supplied by manufacturer.
• Test run Winch in (2) directions before winching.
- Never disengage Free Spooling Clutch when a load is on Winch.
CAUTION
- If Motor stalls, stop winching immediately. Electric winches
are designed for intermittent use. Do not use in constant duty
applications. Keep duration of winching pulls as short as possible: Do
not use for more than (1) minute when at or near rated load. If Motor
becomes hot to touch, stop winching immediately. Allow Motor to cool
before resuming.
CAUTION

WN-Winch-Guide-12000 12
WINCH ASSEMBLY AND MOUNTING:
Winch is designed with a standard bolt pattern for its class.
When installing, ensure that Winch installs to a at surface so Motor, Winch Drum, and
Gear Housing are properly aligned. Proper alignment allows for even distribution of full
rated loads.
1. Install Fairlead with supplied hardware.
2. Secure Winch with supplied hardware:
- Set Free Spooling Clutch to “DISENGAGED” and pull out a few inches of Synthetic
Rope.
- Feed Synthetic Rope through opening in Fairlead.
3. Make electrical and component connections per See SuperATV instructions.
4. Assemble Clevis Hook to Synthetic Rope.
- Remove Pin from Clevis Hook and connect Clevis Hook to Synthetic Rope.
- Reinstall Pin to Clevis Hook.
5. Install Stopper to Synthetic Rope with supplied hardware.
6. Install Hand Strap to Clevis Hook.
7. Check Winch Drum for proper rotation:
- Set Free Spooling Clutch to “DISENGAGED” and pull out some Synthetic Rope.
- Set Free Spooling Clutch to “HIGH SPEED” and press “OUT” button on remote. If
properly installed, Winch Drum should be turning and releasing Synthetic Rope. If
Winch Drum is turning and collecting more Synthetic Rope, check and reverse leads
on Motor. Repeat steps and check rotation.
- Remove all jewelry and wear eye protection when making battery
connections. Batteries contain ammable and explosive gases.
Avoid leaning over battery.
CAUTION
Clevis Hook
Pin
Stopper half
Synthetic Rope
Stopper half
M6 x 35mm
M6 Washer
M6 Nut
(4) each
Hand Strap

WN-Winch-Guide-12000 13
RIGGING TECHNIQUES:
To absorb energy in event of Synthetic Rope
failure, place a blanket or jacket over Synthetic
Rope approximately 5ft - 6ft from Clevis Hook
before pulling a heavy load. Open vehicle hood
for more protection.
Do not winch from an acute angle. Synthetic Rope will pile up on one side of Winch Drum
causing damage to Synthetic Rope and Winch.
Short pulls from an angle can be used to straighten vehicle. Long pulls must be done with
Synthetic Rope at a 90° angle to winch/vehicle.
Winch
incorrect angle
Winch
correct angle
sling/tree strap
Locate a suitable anchor such as a strong tree
trunk or boulder. Always use a sling/tree strap
as an anchor point.

WN-Winch-Guide-12000 14
OPERATING WINCH:
1. Take time to assess situation and thoroughly plan pull.
2. Set Free Spooling Clutch to “DISENGAGED” position.
3. Pull Synthetic Rope and attach to vehicle to be winched. Wear gloves and use Hand
Strap.
4. Secure Clevis Hook to anchor point: Sling, chain or snatch block. Do not attach Clevis
Hook back onto Synthetic Rope.
5. Set Free Spooling Clutch to “HIGH SPEED” or “NORMAL SPEED” position.
6. Start vehicle engine so that battery is being charged while winching.
7. Slowly winch in Synthetic Rope just enough to take up slack.
8. Inspect Synthetic Rope. Make sure there are minimum 5 wraps of Synthetic Rope
around Winch Drum.
9. To absorb energy in event of Synthetic Rope failure, place a blanket or jacket over
Synthetic Rope approximately 5ft - 6ft from Clevis Hook. Open vehicle hood for more
protection.
10. Clear area. Make sure all spectators are away and that no one is directly in front,
behind vehicle, or anchor point.
11. Vehicle to be winched should be placed in neutral and emergency brake released.
Only release brake pedal when Synthetic Rope is under full tension.
12. While standing aside and clear of tow path, use remote to control winching. If required,
wait until Motor stops before reversing direction.
- Be sure Synthetic Rope is winding evenly and tightly around Winch Drum.
- Vehicle being winched can be slowly driven to add assistance to winching.
- Avoid shock loads; keep Synthetic Rope under tension. This can damage components
and vehicles.
13. Winch is meant for intermittent use. Under full load with a single line rig do not power
“in” for more than (1) minute without letting Motor cool down for a few minutes before
resuming winching.
14. Once vehicle is on stable ground, set brakes and place vehicle in park. Winching
operation is complete.
15. Set Free Spooling Clutch to “DISENGAGED” to release tension on Synthetic Rope.
Winch is not meant to hold loads for long periods of time.
16. Disconnect Synthetic Rope from vehicle or anchor.
18. Set Free Spooling Clutch to “HIGH SPEED” position and rewind Synthetic Rope.
Keep hands clear of Winch Drum and components. Any material already on Winch
Drum should be spooled tightly and neatly. Draw out and re-spool if necessary.
19. Secure Hook Strap and Clevis Hook. Disconnect Wired Remote if applicable.
- Always leave minimum of (5) turns of Synthetic Rope on Winch
Drum. Review “Safety Warnings” section of manual before continuing.
CAUTION

WN-Winch-Guide-12000 15
TROUBLE SHOOTING:
SYMPTOM POSSIBLE CAUSE SUGGESTED ACTION
Motor does not
turn on
Rocker Switch not connected
properly.
Insert Rocker Switch completely into Controls
Splitter Connector.
Connect ignition power source.
Loose battery cable
connections. Tighten nuts on all cable connections.
Defective Rocker Switch. Replace.
Defective Motor.
Check for voltage at armature port with Rocker
Switch pressed. If voltage is present, replace
Motor.
Water has entered Motor.
Allow water to drain and Winch to dry. Without a
load, operate Winch in short cycles until completely
dry.
Solenoid sticking. Tap on Solenoid with handle end of screwdriver.
Motor runs but
Winch Drum does
not turn.
Free Spooling Clutch not
engaged.
Set Free Spooling Clutch to “HIGH SPEED” or
“NORMAL SPEED” position. If problem persist,
contact SuperATV.
Motor runs slowly
or without normal
power.
Insucient current or
voltage.
Battery(s) is weak and may need charging. Always
operate Winch with vehicle running.
Corroded and/or loose battery cables should be
cleaned and tightened.
Motor overheating. Winch run time too long. Periodically allow Winch to cool while operating.
Motor runs in one
direction only.
Defective Rocker Switch/
Remote Control. Repair or replace Rocker Switch/Remote Control.
Loose battery cable
connections.
Corroded and/or loose battery or Motor cable
connections should be cleaned and tightened.
Motor runs
continuously on its
own.
Defective Solenoid, Wireless
Receiver, or Remote Control.
Unplug ignition power.
Remove negative battery cable from Solenoid.

WN-Winch-Guide-12000 16
SYNTHETIC ROPE REPLACEMENT:
If Synthetic Rope has become worn or is beginning to show signs of breaking, replace
immediately.
WARNING - Only replace with identical part number from manufacturer.
When installing replacement, refer to SuperATV Synthetic Rope instructions.
WINCH MAINTENANCE:
- Check tightness of all mounting hardware and electrical connections periodically.
- Keep Winch clean. Remove all dirt and corrosion as required.
- Do not disassemble Mechanical Gear System. High temperature lithium grease has
been applied at the factory. No user maintenance is required.
SYNTHETIC ROPE MAINTENANCE:
- Minimize abrasion: Use movable Abrasion Sleeve whenever contact with rocks or
other objects occurs. Slide Abrasion Sleeve up and down Synthetic Rope as required.
Abrasion will reduce Synthetic Rope Life.
- Keep clean: Allowing dirt and debris to enter Synthetic Rope will lead to abrasion.
- Avoid sharp bends: A sharp bend will decrease Synthetic Ropes strength
substantially under load and may cause damage or failure.
Table of contents
Other SuperATV Winch manuals
Popular Winch manuals by other brands

Harken
Harken B 1140 Series manual

Pullmaster
Pullmaster M50 Instructions and parts manual

Andersen
Andersen 18ST FS product manual

Raider
Raider RD-CB01 user manual

TRAC
TRAC Seaside 40AD T10220-G3 Installation and operating instructions

Portable Winch
Portable Winch PORTABLE CAPSTAN WINCH PCW5000 quick start guide