Supertrax Maybach Style Kids Ride on Car User manual

Maybach Style Kids Ride on Car
Installation and Operation Instructions
Please read this instruction manual carefully. It is
important to read and follow all of the steps during
assembly to ensure proper operation and safety of the
child. Please keep this manual for future reference.
SPECIFICATIONS:
Scan this QR
Code to view our
assembly video

Car Type:
Maybach Style
Battery Type:
12V7AH
Electric Motor:
12V30W(Drive)
Age Range:
2 –5 Years
Max. Weight:
65 lbs
Product Size:
54”L x 29”W x 29”H
Avg. Speed:
2 –3 MPH
Charging time:
8-12 hrs
Avg. Use Time:
1-2 Hrs (depending on use)
Remote Battery:
2 - AA (not included)
IMPORTANT!
•Assembly of car and charging of
battery is only to be done by an
adult.
•WARNING!! NOT TO BE USED ON
STREETS or IN TRAFFIC.
•Never modify the electric circuit
system or tamper with electric
system. Can cause permanent
damage.
•Please check the product regularly
for any loose parts or wires to
ensure proper operation.
•Adult supervision is recommended
during operation by child to avoid
injury. Safety equipment is
recommended.
•Please make sure that the child uses
caution to avoid falls and collisions
causing injury to the child or third
party.
•Do not pick up vehicle by steering
wheel.
•Do not pick up battery by wires or
charger.
•Keep all plastic bags out of the reach
of young children.
•Not recommended for children
under the age of 2 yrs. due to small
parts that could cause a choking
hazard.
•Battery must be charged for a
minimum of 8-12 hours prior to first
use of the car to avoid damage to
the battery. Car power switch must
be in off position when charging.
•Battery charger should be examined
for damage prior to each use. It is
important to inspect the cord and
both ends for damage. In the event,
there is damage found, DO NOT USE
THE CHARGER! Contact us for
replacement charger.
•Please retain instruction manual for
future reference.
•Please retain packaging in the event
it is necessary to return for repair.
If the charger is plugged into the charging port, the car will not power up
regardless if the charger is plugged into the wall outlet or not.

All assembly videos can be found on
YouTube under SPORTrax


ASSEMBLY INSTRUCTIONS:
1. Remove car from box and plastic. Lay out all parts to be
assembled. Unplug and remove both motor/gearboxes from the
battery area. Turn car upside down so that the bottom of the car is
facing up.
2. Install rear wheels & motor/gearbox on rear axle: Right side -
Slide motor/gearbox onto the rear axle while feeding the
electrical connection through the hole in the body into the
battery area and reconnect the electrical connection to the
white connector with right side wires. Slide a previously
assembled wheel onto the axle. Slide washer on and secure the
assembly with nut that is provided. Install wheel covers onto
the wheels by lining up the 5 tabs on the covers with the holes
on the tires. Snap them in gently until cover is securely on tire.
Repeat steps for left side. Electrical connection will be made to
the white connector with left side wires. See Fig. 3.

3. Install the Front Wheels: Slide a washer and then a black
bushing onto the front axle. Slide the wheel onto the front axle.
Slide another washer and then the nut onto the axle and secure
assembly. Use the wheel nut wrenches to tighten down both
sides. Do not overtighten tires because this could cause
premature motor failure. Install wheel covers onto the wheels
by lining up the 5 small tabs in the wheel covers with the
corresponding holes in the wheels and gently snap into place.
Repeat steps for other side. See Fig. 5.
4. Install exterior mirrors: Place mirrors into place on the body
press firmly until a clicking sound is heard. (Letting you know
they have snapped into place.) See Fig. 6

5. Install Steering Wheel: Connect electrical connection between
the steering wheel and the wires from the car. Slide steering
wheel onto the steering shaft. Align the screw hole in the
steering shaft and the steering wheel and slide the bolt through
the hole. Apply the nut to the end of the bolt and tighten until
snug. See Fig. 7
6. Connecting the Battery: Slide red wire with spade terminal
onto the red or positive side of the battery. Slide the black wire
with spade terminal onto the black or negative side of the
battery. DO NOT INSERT THE RED WIRE ONTO THE BLACK OR
NEGATIVE SIDE OF THE BATTERY! See Fig. 9

7. Install the Seat: Slip tabs on back of seat into the slots in the
body of the car. Attach seat to body through the two holes
located in the front corners of the seat with 2 screws.
See Fig. 10
Charging the battery: The charging port is located just under the front
portion of the seat. Plug the charger into the charging port first, then
plug the charger into wall outlet.
Please Note: As a safety precaution and to avoid damage to the
charger, the car will not power up while charger port is plugged into
the car. BATTERY MUST BE CHARGED FOR A MINIMUM OF 12 HOURS
BEFORE INITIAL USE TO AVOID DAMAGE TO THE BATTERY.
CHARGING and BATTERY MAINTENANCE:
•IMPORTANT! Battery must be charged for a minimum of 12 hours prior to first
use of the car to avoid damage to the battery.
•When connecting the charger, please install the plug into the car prior to
plugging charger into the wall socket.
•Charging time for battery is 8-12 hours
•DO NOT EXCEED 20 hours when charging.
•Only use the battery supplied with this car to avoid damage to the car.
•Adult supervision is advised for connecting charger.
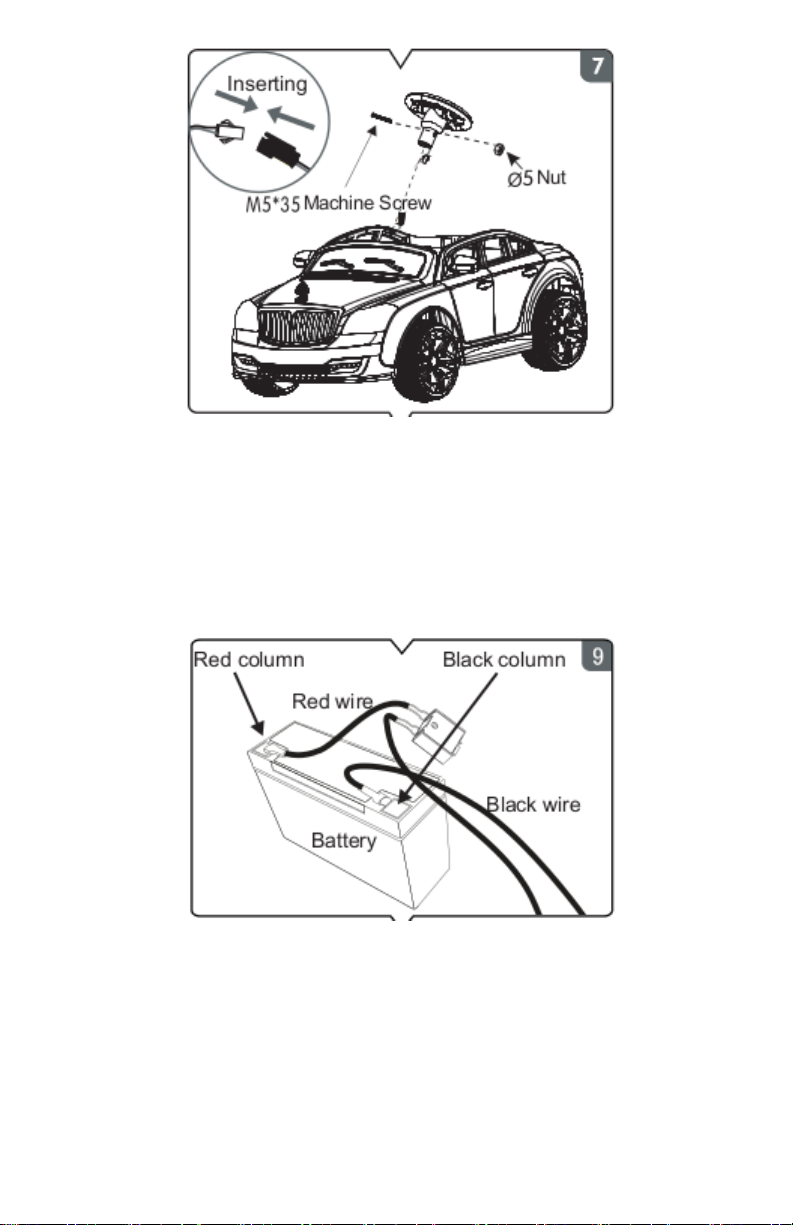
•Never reverse polarity of the battery + to red and –to black.
•Never short circuit battery! Do not touch red wires to black wires.
•For remote control: it is not recommended to use rechargeable batteries.

REMOTE CONTROL BATTERY INSTALLATION: Open battery cover on
the back of the remote control. Install 2 AA Batteries as indicated
inside the cover. Replace battery cover and secure with screw.
Once battery is fully charged, disconnect from charger. Depress power
button to turn on the car. Once power is on, all lights light up,
accompanied by the sound of the engine. (If no sound is heard, turn up
the volume) To allow the child to operate the car, remote
control/manual switch must be set to the manual position. To move
the car forward, forward/reverse switch must be set to the “forward”
position and to move the car backward, the switch must be set to the
“reverse”position. To operate the car using the remote control,
remote control/manual switch must be set to the “remote control”
position.
The buttons found on the steering wheel are for the horn and the on-
board music. There is a MP3 interface located on the dash area with a
volume knob to control the level of sound.
All assembly videos can be found on YouTube under SPORTrax

TROUBLE SHOOTING GUIDE:
Problem
Possible Cause
Possible Solutions
Car will not move
1. Battery voltage is low.
2. Battery connector or wires
are loose.
3. Battery is damaged or
dead.
4. Electrical box or motor is
damaged
Charge the battery
Re-connect the battery
connector to the car
Replace battery
Replace motor
The battery will not
charge.
1. Battery connector may
have come apart or have a
bad connection.
2. Battery charger plugged
into a bad wall outlet.
3. Battery charger is
damaged.
Re-connect the battery
connector to the car
electrical connector
Try another wall outlet
Replace battery charger
Shortened battery life
Battery was not charged fully
Battery is old
Charge battery fully
Change battery
Some Noise and heat
when charging battery
Chemical reaction
Normal
Low Speed
Battery is old
Battery is low on charge
Weight limit exceeded
Uneven or uphill path
Vehicle is being used in harsh
conditions
Change the battery
Charge the battery
Do not exceed max weight
limit
Use on flat surfaces
Avoid using car in harsh
conditions
Noise coming from
motor/gearbox
Gear in motor/gearbox broken
Call for replacement
motor
The car shakes when
moving
Bad Connection of the motor
wires
Possible motor failure
Reconnect wires
Call for replacement
motor
Car needs a push to go
forward
Poor contact of wires and/or
connectors
“Dead Spot” on motor
Check that the battery
connectors are firmly
plugged into each other. If
wires are loose around
the motor, contact the
distributor’s service
department
A dead spot means the
electric power is not being
delivered to the terminal
connection. Call our
service department
Self-Resetting Breaker –The vehicle is equipped with a self-resetting breaker. In
the event the power is tripped the breaker will reset itself in approximately one minute.
If you are unable to solve a problem, please feel free to contact us.
Phone: 402-477-0541 or Email: customerservice@rollinghillstrading.com

GENERAL MAINTENANCE:
It is the parent’s responsibility to check main parts of the toy before using. Regularly
examine the car for potential hazard, such as damage to the battery, charger, cable or
cord, and plug. Also, check that all screws are tightened throughout the car. In the event
of such damage, the toy must not be used until that damage is repaired or replaced.
•Make sure the plastic parts of the vehicle are not cracked or broken.
•Occasionally use a lightweight oil to lubricate moving parts such as wheels.
•Park the vehicle indoors or cover it with a tarp to protect it from wet weather.
•Keep the vehicle away from sources of heat, such as stoves and heaters. Plastic
parts may melt.
•Recharge the battery after each use. Only an adult should handle the battery.
Recharge the battery at least once a month when not being used.
•Do not wash the vehicle with a hose. Do not wash the vehicle with soap and water.
Do not drive the vehicle in rainy or snowy weather as water will damage the motor,
electric system and battery.
•Clean the vehicle with a soft, dry cloth. To restore shine to plastic parts, use a non-
wax furniture polish. Do not use car wax. Do not use abrasive cleaners.
•Do not drive the vehicle in loose dirt, sand or fine gravel which could damage
moving parts, motors or the electric system.
•For extended times when the car will not be used, the power switch needs to be in
the off position and the electrical connections should be disconnected from the
battery.
WARNING:
- Use only the rechargeable battery and charger supplied with your vehicle. NEVER
substitute the battery or charger with another brand. Using another battery or charger
may cause damage.
- NEVER modify the electric circuit system. Tampering with the electric system may cause
permanent damage to the system.
- Do not allow direct contact between battery terminals.
- Do not allow any type of liquid on the battery or its components.
- Charge the battery in a well-ventilated area ONLY.Do not charge near or around
flammable materials.
- NEVER pick up the battery by the wires or charger. Damage can occur to the battery and
may cause a fire. Pick up the battery by the case ONLY.
- Charge the battery in a dry area ONLY.
Wash hands after handling.
- Do not open the battery. Battery contains lead acid and other materials that are toxic
and corrosive.
- Do not open the charger. Exposed wiring and circuitry inside case could cause electric
shock. NEVER allow a child to handle or charge the battery. Battery is heavy and contains
lead acid (electrolyte).
- Do not drop the battery. Permanent damage to the battery could occur or cause serious
injury.
- Before charging the battery, check for wear or damage to the battery, charger, its supply
cord and the connectors. DO NOT charge the battery if any damage to parts has occurred.
- Do not allow the battery to drain completely. Recharge the battery after each use or
once per month if not used regularly.
- Do not charge the battery upside down.
-Always secure the battery with the bracket. Battery can fall out and injure a child if
vehicle tips over.
- The Power Switch must be turned in the OFF position when charging.
- When the car begins to run slowly, recharge the battery.
Table of contents
Other Supertrax Toy manuals
Popular Toy manuals by other brands

fischertechnik
fischertechnik PROFI Dynamic 4 Assembly instruction

Eduard
Eduard B-26 Marauder exterior manual

Blizzard
Blizzard IncrediBuilds HORDE Building instructions

H-KING
H-KING Seagull Building instructions

Pyramid Models
Pyramid Models RX3S Orange Rx Flight Stabilizer Setup guide

baufix
baufix Helicopter 30401 Building primer

Fisher-Price
Fisher-Price LittlePeople Motorized Big Top Train 77706 manual

LEGO
LEGO STAR WARS 75183 instructions

VQ
VQ Legend Model P-38 Lighting instruction manual

Smoby
Smoby 310707 quick start guide

Eduard
Eduard Liberator GR Mk.VI upgrade set manual

Black Horse Model
Black Horse Model Space Walker BH65 Instruction manual book