SVN Sound Neon 100 User manual

PERSONAL MUSIC AND LIGHT
HEADPHONE SYSTEM
NEON 100
USER GUIDE

Use the standard USB charging cable (included) to charge your headphones. Plug
the cable into any standard USB (5V, over 500mA) power adaptor or computer.
Avoid listening to music at high volume levels for extended periods of time.
Exposure to high volume levels for extended periods may cause hearing damage.
Avoid storing the headphones in extreme heat or cold.
Avoid exposing the headphones to water or excessive moisture. If the headphones
becomes wet, turn the power off, pat the device dry with a towel, and let it dry
completely before turning on again.
Do not attempt to disassemble, modify, or repair the headphones.
Avoid excessive impact or shock to the headphones.
Keep out of the reach of children or pets.
Do not tug on cables or touch power cables with wet hands. Avoid getting water in
charging or cable receptacles.
Do not use the headphones near microwaves or wireless LAN adapters.
Turn the device off when not in use.
PRODUCT AND SAFETY INFORMATION:
1.
2.
3.
4.
5.
6.
7.
8.
9.
10.

When storing the headphones, place them in the included protective carrying
pouch.
When cleaning the headphones, use a soft, dry cloth to wipe them clean. Do not
use solvents.
Wipe the ear pads with a damp cloth after use and before storing. Exposure to
excessive sweat, moisture, or makeup for extended periods can damage the ear
pads. If damage occurs, replacement ear pads can be purchased.
Do not use these headphones while driving, riding a bicycle, or walking in urban
environments. The headphones will block outside noise and may pose a safety
hazard. Always use caution and maintain awareness to protect yourself and others
when using your headphones.
Use these headphones only for their intended purpose.
This device cannot be used for purposes related to human safety as it may cause
radio interference during operation.
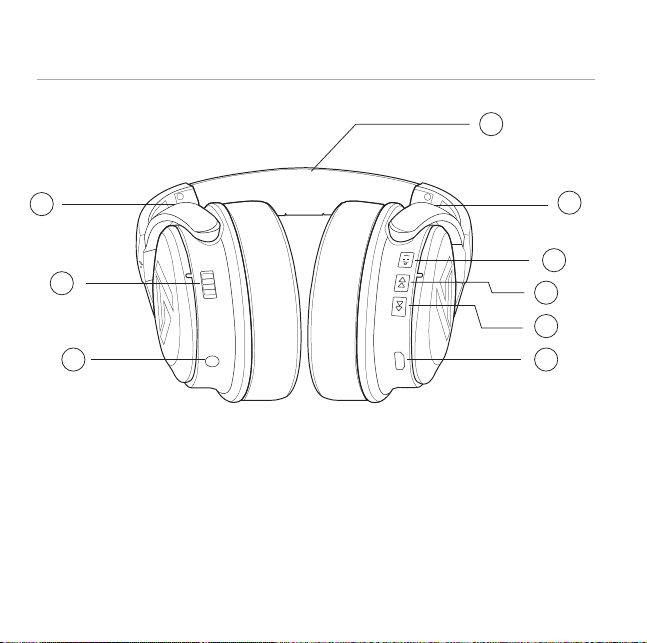
11.
12.
13.
14.
15.
16.
WARNING:
Electrical and electronic equipment, parts and batteries marked with
this symbol must not be disposed of with normal household waste. It
must be collected and disposed of separately to protect the
environment.

BUTTONS AND SWITCHES
1. Multi- function Button/Play/Pause
2. Volume Down/ Previous Track
3. Volume Up/ Next Track
4. Lighting Eects
5. Headband
6. Headband Extension
7. Headphone 3.5mm Input Jack
8. Micro USB Charging Jack
5
6
1
2
3
87
4
6

WEARING THE HEADPHONES:
The NEON 100 headphones are designed to be lightweight, adjustable, and very comfortable to
wear. The unique multi-pivot hinge mechanism and headband extension allow for easy
adjustment to fit almost any head, hairstyle, and ear size combination. Simply extend or retract
the adjustable headband to adjust the ear cups in the most comfortable position. Place the cups
over your ears and enjoy the great sound quality.

CHARGING:
The headphones are not charged upon purchase
and must be charged before first use.
1. Connect the provided USB charging cable to the headphones.
2. Connect the other end of the cable to a computer.
You may also use a standard USB power adapter (5V, over 500mA).
DO NOT USE USB FAST-CHARGE OR PD ADAPTERS WITH GREATER
THAN 5V OUTPUT OR YOU WILL DAMAGE YOUR HEADPHONES
AND VIOLATE WARRANTY.

POWER ON AND OFF YOUR HEADPHONES:
1. To power on your headphones, press the Multi-function Button (1) for 2 seconds.
Press and hold for 2 seconds.
TURNING ON
Press and hold for 3 seconds.
TURNING OFF
2. To power off your headphones, press the Multi-function Button (1) for 3 seconds.
1. Turn on your mobile device and go to the Bluetooth menu.
2. Make sure the headphones are within one meter from the mobile device.
CONNECTING TO A BLUETOOTH DEVICE:
Range within 1 meter

Press and hold for 3 seconds.
3. Press and hold the Multi-function Button (1) on your headphones for 3 seconds.
4. Select NEON 100 on the Bluetooth device menu. Ensure that the device shows
“Connected” in the status display. (IF a PIN is required, enter 0000.)
Bluetooth
Bluetooth
MY DEVICES
OTHER DEVICES
Speaker
NEON 100
Not Connected

1. If previously connected to a Bluetooth device, the NEON 100 will automatically
reconnect with the device when powered on.
2. The headphones will not automatically reconnect if the one meter distance
is exceeded.
RECONNECTING TO A DISCONNECTED DEVICE:
Range more
than 1 meter
Bluetooth
Bluetooth
MY DEVICES
OTHER DEVICES
None
NEON 100 Connected

1. If the headphones are powered on and no Bluetooth device is available for pairing,
the headphones will enter “Connection Waiting Mode”. If a Bluetooth device
becomes available, press the Multi-function Button (1) to connect automatically.
2. If no Bluetooth device becomes available, the headphones will power off automatically
after five minutes.
CONNECTION WAITING MODE:
Press and hold
for 3 seconds.
Automatically
turn off 5 minutes
when not used.
Bluetooth
Bluetooth
MY DEVICES
OTHER DEVICES
None
NEON 100 Connected

1. Press the Multi-function Button (1) one time to play music from your Bluetooth device.
2. Press the Multi-function Button (1) for 1 second when music is playing to pause
the music.
PLAYING AND CONTROLLING MUSIC:
3. Press the Multi-function Button (1) for 1 second when music is paused to begin
playing again.
PLAY MODE
One time press to play music.
PAUSE MODE
One time press to play music.
RESUME PLAY
Press 1 second to resume music
when paused.
Icon change when Multi-function Button(1) press.
NOW PLAYING

4. To go back to the previous track, press the Volume Down Button (2) for 1 second.
5. To skip to the next track, press the Volume Up Button (3) for 1 second.
6. To lower the volume, press and hold the Volume Down Button (2)
for more than 1 second.
7. To raise the volume, press and hold the Volume Up Button (3)
for more than 1 second.
PREVIOUS TRACK
NOW PLAYING
Press 1 second to play previous track.
NEXT TRACK
Press 1 second to play on next track.
Press and hold more than
1 second to minimized volume.
VOLUME DOWN
VOLUME UP
Press and hold more than
1 second to maximized volume.
volume
volume

USING YOUR HEADPHONE’S LIGHTING EFFECTS:
Express yourself!
Our goal was to create great sounding and super comfortable headphones that are also
fun to use. There are a number of lighting effects that can be configured to your
personal tastes. Set the color and brightness, make it pulse, and change colors
automatically.
Enjoy!
Left Side Right Side

USING YOUR HEADPHONE’S LIGHTING EFFECTS:
1. Setting the lighting mode.
a. A short press on the Lighting Effects Button (4) cycles the headphone lighting
between On with solid color, Pulse to Music, SVN Color Mode, and Off.
i. On is a solid neon color under the logo.
ii. Pulse is a solid lighting color pulsed to the beat of your music.
iii. SVN Color cycles through all of the colors in 5-second intervals.
iv. Off is no light behind the logo.
Press here to turn
the lights on.
On Off

2. Setting the lighting color.
a. Press the Lighting Effects Button (4) for 3 seconds to cycle through the lighting colors.
Stop on the one you want. This will be the color for the ON or PULSE mode lighting
effect. The color choices include red, blue, green, purple, yellow, and teal.
3. Setting brightness level.
a. Press the Lighting Effects Button (4) quickly (tap-tap) two times to switch the light
intensity from full to half brightness. Using the lower lighting level will increase
the battery life of the headphones.
Off Mode
Press button for 3 seconds
to cycle colors.
Featured Colors:
RedWhite Blue Green Purple Yellow Teal
Quickly tap 2x to adjust
brightness.

MAKING CALLS:
1. ACCEPTING OR ENDING A CALL (during music playback included)
a. Upon hearing the incoming call tone, press the Multi-function Button (1) once to
answer the call. This will also pause your music.
b. Press the Multi-function Button (1) again to end the call. Music will resume.
2. MAKING A CALL (during music playback included)
a. Press and hold the Multi-function Button (1) for 1 second to redial the last number
called. This feature may vary based on the mobile device.
3. REJECTING A CALL (during music playback included)
a. Upon hearing the incoming call tone, press the Multi-function Button (1) for
1 second to reject the call.
4. CALL WAITING (during music playback included)
a. For incoming calls during another call, press and hold the Multi-function Button (1)
for 1 second to place the current call on hold and connect the second call.
b. Press and hold the Multi-function Button (1) again for 1 second to switch between
the waiting call and the connected call.
c. Press the Multi-function Button (1) once to end the current call and return to the
waiting call.
Press to answer incoming call. (Press again to end call)
Press and hold 1 second to reject incoming call or
redial the last number called.
Press and hold 1 second to answer waiting calls,
end current calls and return to previous call.
Press and hold 1 second to switch between waiting and
main calls.

CONNECTING TO AN ANALOG AUDIO SOURCE:
1. Use the 3.5mm to 3.5mm analog cable (included) to connect to the 3.5mm Analog Input
Jack (9) on the headphones.
2. Connect the other end to the analog audio source.
Analog Volume Control
OUTPUT 3.5mm plug
INPUT 3.5mm plug
OUT
IN
3. Set the desired volume on the attached device. The headphone volume controls will not
operate when connected to an external wired audio source.

a. Charge the headphones. If the headphones do not turn on even after charging,
contact customer service at www.svnsound.com.
TROUBLESHOOTING:
1. The headphone power does not turn on.
a. Check whether the USB charging cable has been properly connected to the
headphones and the power source.
b. Check whether the PC power is on and that it is properly connected.
c. When using a separately purchased USB power adapter, make sure that it is
properly connected.
2. The headphones do not charge.
a. Check whether the Bluetooth device is powered on.
b. Check whether Bluetooth is enabled on the Bluetooth device.
c. Check whether the Bluetooth device is within 1 meter from the headphones.
d. Check whether the Bluetooth device is compatible with the headphones.
3. The headphones do not pair.
a. Check whether the headphones and Bluetooth device are powered on.
b. Check whether the music is playing on your Bluetooth device.
c. Check the volume level on your Bluetooth Device.
4. Music will not play through the headphones.

WARRANTY:
a. Check if there is a 2.4 GHz device near your headpones or Bluetooth device.
b. Check whether the Bluetooth device is within 10 meters (30’) of your headphones.
5. Sound lag/ distortion/ noise.
a. Check whether the headphones are connected to the Bluetooth device.
b. Check whether Bluetooth is enabled on your Bluetooth device.
c. Check the volume level on your Bluetooth device.
6. Caller cannot be heard.
To register your product and review warranty information, please go to
www.svnsound.com/warranty

REGULATORY INFORMATION:
•
•
•
Reorient or relocate the receiving antenna.
Increase the separation between the equipment and receiver.
Connect the equipment into an outlet on a circuit different from that to which the
receiver is connected.
•Consult the dealer or an experienced radio/TV technician for help.
Changes or modifications not expressly approved by SVN Sound could void the user’s
authority to operate this equipment.
NOTE:
This equipment has been tested and found to comply with the limits for a Class B digital
device, pursuant to Part 15 of the FCC Rules. These limits are designed to provide
reasonable protection against harmful interference in a residential installation. This
equipment generates, uses, and can radiate radio frequency energy and, if not installed and
used in accordance with the instructions, may cause harmful interference to radio
communications. However, there is no guarantee that interference will not occur in a
particular installation. If this equipment does cause harmful interference to radio or
television reception, which can be determined by turning the equipment off and on, the user
is encouraged to try to correct the interference by one or more of the following measures:
Hereby, the manufacturer declares this device is in compliance with the Directive
(RED) 2014/53/EU. The full text of the EU declaration of conformity is available at
the following web address: www.svnsound.com/certifications
Other manuals for Neon 100
1
Table of contents
Other SVN Sound Headphones manuals