Swiss Bionic Solutions Omnium1 2.0 CHI-System User manual

intelligent Lifestyle
Omnium1 2.0 CHI-System
Operating Manual

2
Important Notes for Getting Started
We congratulate you on your purchase of the Omnium1 2.0 CHI-System.
The Omnium1 2.0 CHI-System represents the latest development and applica-
tion standard in the eld of portable PEMF technology for home use.
The Omnium1 2.0 CHI-System complies with the following guidelines and
standards:
• IEC 60601-1 Electrical Safety
• IEC 60601-1-2 Tolerance of Electromagnetic Fields
This operating manual is a component of the scope of delivery.
It should be kept close at hand and remain with the system when sold.
Copyright
Copyright © 2018 Swiss Bionic Solutions Holding GmbH
All rights reserved.
No part of this manual, including the products and software described herein,
may be reproduced, transferred, transcribed, stored in a retrieval system or
translated into another language, without the implicit written permission of
Swiss Bionic Solutions Holding GmbH. Documentation stored by the purchaser
for backup purposes is excluded from this condition. This condition shall not
apply for software that has been licensed under the General Public License
(GPL) or other free open source licensing systems.
Omnium1, the Omnium1 logo and the Swissbionic Solutions Logo are trade-
marks of Swiss Bionic Solutions Holding GmbH. All other trademarks are the
property of their corresponding owners. The details of the content of this
manual may deviate from the product or the associated software. All informa-
tion in this document may be changed without prior notication.

3
Table of Contents
1. Intended Use...................................................................................................4
2. Possible Applications ......................................................................................4
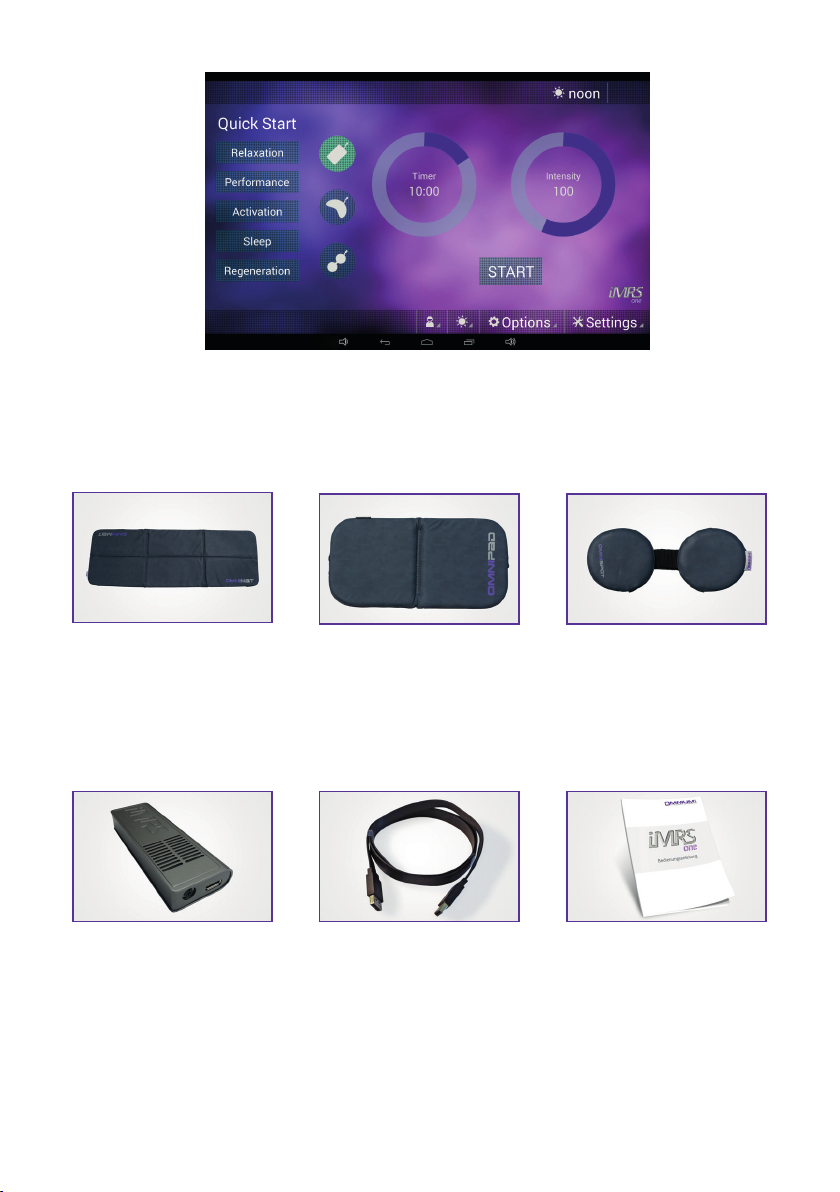
3. Scope of Delivery.............................................................................................5
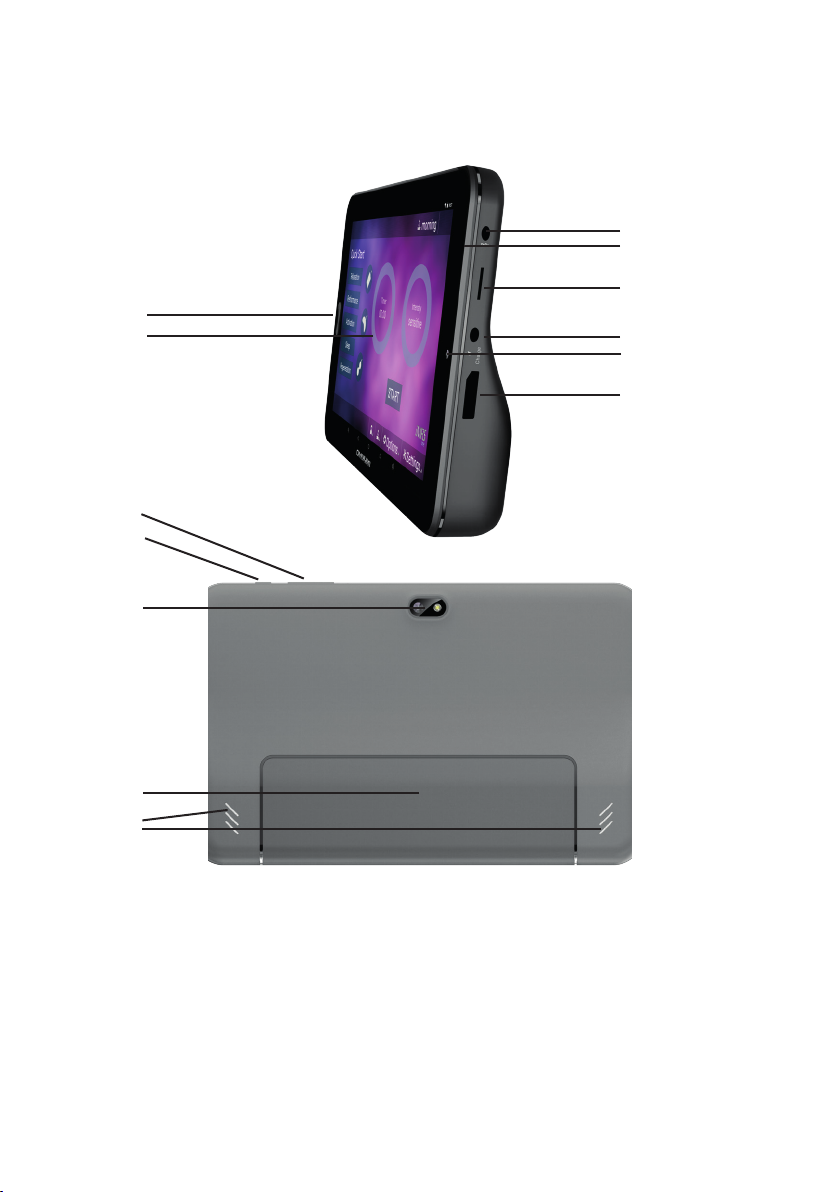
4. Housing and Buttons ......................................................................................7
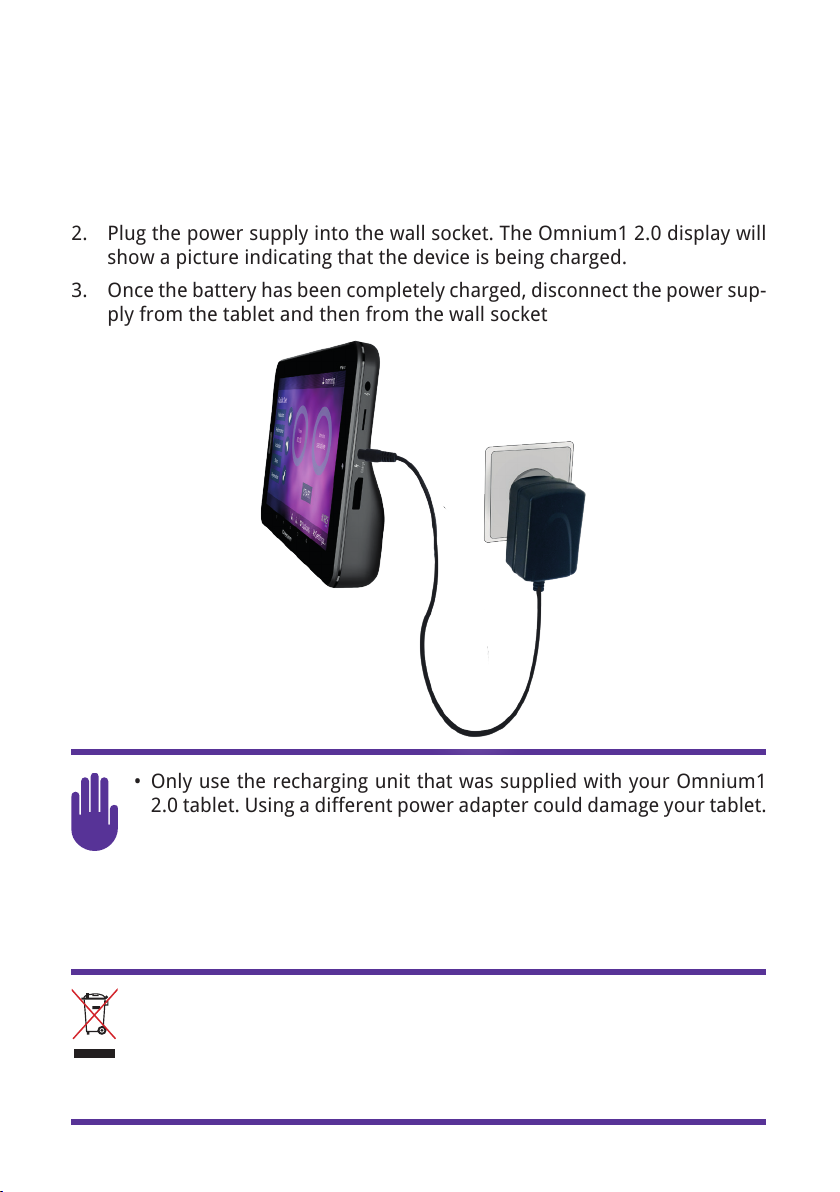
5. Charging the Battery .......................................................................................8
6. Switching On and Off ......................................................................................9
7. Inserting and Removing the Micro SD Card ................................................10
8. Working with the Screen...............................................................................11
9. Using the Operating Buttons........................................................................12
10. Viewing in Portrait and Landscape Modes ................................................13
11. Information on the Menu...........................................................................13
12. Connecting to the Internet .........................................................................14
13. Installation...................................................................................................15
13.1 Installing / removing the battery..............................................................15
14. Activation.....................................................................................................16
15. Saving and Loading Preset Parameters .....................................................17
15.1 Saving.........................................................................................................17
15.2 Loading ......................................................................................................18
16. Starting an Application ...............................................................................18
17. Quick Start Programs..................................................................................20
18. Settings ........................................................................................................20
18.1 Users..........................................................................................................21
18.2 Autotimer ..................................................................................................21
18.3 Factory Settings.........................................................................................22
18.4 App Settings...............................................................................................22
18.5 Music Settings ...........................................................................................22
18.5 About .........................................................................................................22
19. Updating ......................................................................................................23
20. Applicators...................................................................................................23
20.1 OmniMat....................................................................................................24
20.2 OmniPad....................................................................................................24
20.3 OmniSpot...................................................................................................24
21. Cleaning and Maintenance.........................................................................25
22. Maintenance & Error Message ...................................................................26
23. Identication & Technical Data ..................................................................27
23.1 Identication .............................................................................................27
23.2 Technical Data ...........................................................................................27
24. Safety Instructions: Where You should be Careful....................................30
25. Guarantee/Warranty ...................................................................................35

4
1. Intended Use
With the Omnium1 2.0 CHI-System, very low, pulsating electromagnetic vibrations are
exposed. The characteristics of these pulse packages and the intensity levels of the
applied vibrations are no stronger than the average ux density of the Earth’s own
magnetic eld.
Use other than as described in this manual may lead to damage to the device and
should therefore be avoided.
2. Possible Applications
The Omnium1 2.0 CHI-System can be used:
• for Relaxation
• for Meditation
• for overall Wellbeing
Important Note:
The Omnium1 2.0 CHI-System is NOT a licensed or certied medical device
and therefore cannot be used for therapeutic purposes and is not intended
to support, modify, replace or restore a biological function or structure for
the purpose of treating or mitigating an illness or injury or a symptom of an
illness or injury.

5
3. Scope of Delivery
Omnium1 Tablet
Charging Equipment Earphones

6
Omnium1 2.0 Android software
(Pre-installed on the Omnium1 2.0)
OMNIUM1 2.0
OmniMat
OMNIUM1 2.0
OmniPad OMNIUM1 2.0
OmniSpot
Not included with the
Omnium1 2.0 basic set
D/A Converter 2.0 20-pin Cable Operating Manual
If any of the parts is damaged or missing, please contact your partner at Swiss
Bionic Solutions.

7
4. Housing and Buttons
1. 3.5 mm headphone jack
2. Microphone
3. Micro SD/SDHC (TF) card slot
4. DC charging cable
5. Front camera
6. 20-pin adapter connection
7. Home button
8. Touchscreen
9. Volume control
10. On/off and lock button
11. Rear Camera & LED ash
12. Battery compartment
13. Speaker
4
6
7
2
10
13
3
1
9
5
8
11
12

8
5. Charging the Battery
Before you use your Omnium1 2.0 for the rst time, the battery will need to
be charged.
1. Plug the power supply into the tablet’s power connection.
2. Plug the power supply into the wall socket. The Omnium1 2.0 display will
show a picture indicating that the device is being charged.
3. Once the battery has been completely charged, disconnect the power sup-
ply from the tablet and then from the wall socket
•• Only use the recharging unit that was supplied with your Omnium1Only use the recharging unit that was supplied with your Omnium1
2.0 tablet. Using a different power adapter could damage your tablet.2.0 tablet. Using a different power adapter could damage your tablet.
•• The input voltage between the wall socket and the adapter is 100 V to The input voltage between the wall socket and the adapter is 100 V to
240 V AC. The adapter’s output voltage is 18 V DC, 1200 mA. 240 V AC. The adapter’s output voltage is 18 V DC, 1200 mA.
•• If the battery has been completely discharged, the device may not If the battery has been completely discharged, the device may not
switch on. In this case, allow several minutes before you try again. switch on. In this case, allow several minutes before you try again.
Do NOT dispose of the Omnium1 2.0 in the standard garbage. Some
of the product components can be re-cycled and re-used. The symbol
with the cross-out garbage container indicates that the product does
not belong in the standard garbage. Ask about the disposal guidelines
and laws in your region.
BILD

9
6. Switching On and Off
How to switch your Omnium1 2.0 on:
• Press the on/off button on the top for several seconds.
• As soon as the device has booted, the lock screen will appear. Use your n-
ger to drag the lock symbol to one side in order to unlock the screen. Your
Omnium1 2.0 will now display the home screen.
Once the Omnium1 2.0 has been switched on, you can use the on/off button
(10) to activate the power-saving mode or return to standard mode.
After several minutes of non-use, the Omnium1 2.0 will switch to power-sav-
ing mode (the interval can be set from Settings => Display => Sleep). You can
also exit power-saving mode by pressing the on/off button.
How to switch your Omnium1 2.0 off:
• Press the on/off button down until a conrmation message appears.
Touching the Power off symbol will switch the device off completely.
How to re-start your Omnium1 2.0:
• Press the on/off button down until the Omnium1 logo appears on the dis-
play.
SAFE TEMPERATURE RANGE: The Omnium1 2.0 may only be operated in
an environmental temperature range between 0 °C and 35 °C.
When you switch your new Omnium1 2.0 on for the rst time, we re-
commend that you rst make several important settings on your Omni-
um1. These include setting the language (Settings => System => Lan-
guages & input => Languages => Add a language) as well as setting
your time zone and the time format (Settings=> System => Date &
time).

10
7. Inserting and Removing the Micro SD Card
Insert a micro SD memory card (max. 32 GB) in the card slot as shown in the
picture of the device. Do not push hard or use any force. The card only needs
to overcome a light spring resistance. Once the memory card is properly posi-
tioned, it will lock into place instead of being ejected.
To remove the memory card, press it into the device until the spring releases
and then pull the card out.
To prevent the loss of data, the micro SD card should only be inserted
or removed after the tablet has been switched off. Optionally, you can
remove the micro SD card with the tablet switched on, once you have
rst deactivated the card. To do that, open the Settings and then click
Storage. Then, tap on Unmount SD card in the window on the right
and click OK.

11
8. Working with the Screen
Your Omnium1 2.0 has been equipped with a touch-sensitive (capacitive)
multi-touch touchscreen, so a simple touch (without any pressure) is sucient
for running your commands. There are a number of options for controlling
the tablet:
Tap Tap on an item once The tapped item
will be opened,
selected or
activated. This
works like
clicking with a
mouse
Tap and hold Tap and keep your
nger there for about
one second.
The options for
the current action
will be displayed
(similar to action of
right-clicking).
Pinching or stretching Touch screen or an
item with at least two
ngers and pinch or
stretch them.
Zooms in or out on
that area of a web
page, street map or
picture
Rotate Put at least two
ngers on an item
and then rotate your
hand
The item touched
will also be rotated
(if possible).
Drag to scroll Drag one nger
across the screen
This action will
scroll through the
items on screen
(similar to scrolling
with a mouse).

12
9. Using the Operating Buttons
App Menu Button Opens the app menu.
There, you will nd a number of pre-in-
stalled apps. In addition, all downloaded
apps will be stored there
Back Button Allows you to go back one step in all apps.
Home Button Briey tapping the button will return you to
the home screen (also possible with Home
button (7)).
Apps Button Briey tapping the button will display all
open apps. Tapping on an app icon will
open the app immediately. In order to close
open apps, touch the corresponding app
and swipe from left to right.
To optimize power use, you should close
apps that you do not need.

13
10. Viewing in Portrait and Landscape
Modes
Turning the Omnium1 2.0 from horizontal to vertical or vice versa will change
the screen orientation. Most apps will automatically adjust their screen con-
tent.
If automatic orientation is not possible, check if the function has been acti-
vated. To do this, open the Settings and tap the Accessibility icon. Check the
Auto-rotate screen option to enable this feature.
If automatic orientation is still not possible, the app may only be able to work
in one direction.
11. Information on the Menu
The menu will display a variety of icons. They will provide a range of informa-
tion. The battery charge status and the time will always be displayed. All other
information will only be displayed in the appropriate situations.
Battery charge status
New email
Active USB connection
WIFI reception strength
Time

14
12. Connecting to the Internet
To surf the Internet or send email messages with your Omnium1 2.0, you must
be able to connect to a wireless LAN network that you can access.
To do so, open the Settings and then click on Network & Internet => WI-FI.
Enable the WI-FI option by setting the switch to ON. Choose the network that
you would like to access by tapping the corresponding network name and
enter your WI-FI password.

15
13. Installation
1. Take the individual parts out of the packaging. Place the OMNIMAT on a
stable, even surface, such as on the oor, on a couch or under the mattress
(but not box-spring mattresses) of your bed (pay attention to the intensi-
ty adjustment, please). Heavily shaped and soft furniture, such as a sofa,
chair, very soft surfaces should be avoided, since the pressure load on un-
even supports may lead to damage to the built-in copper coils.
2. Aside from this, make sure that your environment is as free of electro-smog
as possible. There should not be any devices like: TVs, microwave ovens, ra-
dio-based telephones and so forth in the immediate vicinity (approx. 1-2m)
during an application.
3. Connect one of the supplied applicators to the Omnium1 2.0 control device
as follows:
• Connect the supplied D/A converter 2.0 with the 20-pin ribbon cable
• Connect the second plug attached to the 20-pin ribbon cable with the
corresponding plug on the Omnium1 2.0.
• Connect the desired applicator with the D/A Converter 2.0.
4. Make sure that battery for your Omnium1 2.0 has been suciently char-
ged. The application will not be possible if the battery charge state drops
below 5%. In that case, connect the power supply with the Omnium1 2.0.
5. Check the system time selected (upper right) and set it to the current time,
if necessary. The built-in bio-rhythm clock will adjust automatically to this
system clock during an application.
13.1 Installing / removing the battery
To install the battery, open the rear battery cover, connect the plug to the
connector on the control panel, place the battery in the compartment and
close the cover.
To remove the battery, open the rear battery cover, pull out the battery, dis-
connect the cable and close the cover.

16
14. Activation
After you have completely installed the system and checked the battery charge
state, activate the Omnium1 2.0 app by tapping the program icon (1) on the
Omnium1 2.0 desktop (2).
Afterwards, the Omnium1 2.0 initial screen will display the legally indicated
notication. As soon as it has been acknowledged (by pressing ENTER), you will
see the user interface for the Omnium1 2.0 application.
2
1

17
15. Saving and Loading Preset Parameters
The Omnium1 2.0 application provides you with the ability to save various
users in advance. You can save all bio-rhythm clocks with all time and intensity
levels for each applicator in advance and load them as needed.
15.1 Saving
In order to create a new user, tap on the “ Settings” button on the user
interface and then tap “Users”.
Tap the “Name” entry (4) and overwrite the placeholder. Then, tap on Next and
the virtual keyboard will disappear
You can now start making settings for the rst applicator with the rst bio-
rhythm clock setting. To do so, tap the circle next to Timer (3) and set the
desired application duration from 1 to 60 minutes. It can be set in steps of 1
minute.
Afterwards, tap the circle next to Intensity (5) and set the desired intensity of
the vibration (ux density). This setting has been divided into the following
relative levels: Sensitive, 10, 25, 50, 100, 150, 200 and 400.
Tap on “Next” (6) to set the next bio-rhythm clock. If you have set all four bio-
rhythm clocks (morning, afternoon, evening and night), you will automatically
be taken to the next applicator.
2
3
4
5
6
1

18
If you have set all of the applicators, tap on “Save” (6) to save your entries per-
manently on the Omnium1 2.0.
If you want to create another user, tap the “+” icon (2) above the list of users
and repeat the process (in principle, any number of users desired can be cre-
ated).
If you created all of the users desired, you can tap “Back” (1) to return to the
main screen for the Omnium1 2.0 application.
The selected user is displayed in the header of the screen surface.
15.2 Loading
Choose the user, once the system has successfully been started. To do that,
tap on the User icon (2). A list of all of the created users (1) will appear. Tap on
the desired user and start the application by tap the “Start/Stop” button (3).
The Omnium1 2.0 application will always detect automatically the connected
applicator and use the preset user parameters from internal memory.
16. Starting an Application
Connect the D/A converter 2.0 and the desired applicator (see Chapter 13,
Installation) and start the Omnium1 2.0 application (see Chapter 14, Activa-
tion). After the system has been successfully started, chose the desired appli-
cation duration. To do so, tap the circle next to Timer (1) and set the desired
application duration from 1 to 60 minutes. It can be set in steps of 1 minute.
2
1
3

19
Afterwards, tap the circle next to Intensity (4) and set the desired intensity of
the vibration (ux density). This setting has been divided into the following
relative levels: Sensitive, 10, 25, 50, 100, 150, 200 and 400.
The integrated bio-rhythm clock will automatically adjust to the time set on
your Omnium1 2.0. You can see the bio-rhythm clock setting on the display in
the upper right corner (3). However, if you want to change it manually, tap on
the bio-rhythm clock icon (2) and choose the desired bio-rhythm clock setting
(morning, afternoon, evening or night).
The application can be started by tapping the Start/Stop button (5).
After starting an application, a pause button (6) is displayed, which can be
used to pause the current application. The application can then be continued
at any time with the existing parameters by pressing the key again.
2
1
5
4
3
6

20
17. Quick Start Programs
In addition to the parameters that can be manually set, the Omnium1 2.0
application provides ve preset quick start programs (exclusive with the OMN-
IMAT applicator). Tapping one button will suce to activate the following pro-
grams:
• Relaxation: longer duration with decreasing intensity
• Performance: short duration with higher intensity
• Activation: short duration with increasingly higher intensity
• Sleep: decreasing intensity towards lowest levels
• Regeneration: longer duration with very low intensity
The application will start immediately after touching one of the ve quick start
buttons. All of the necessary parameters have already been dened.
If the OmniBrain option is also activated with a quick start program, then the
displayed color (RGB setting), the frequency patterns of the goggles as well as
the sound waves from the ear-phones adapt to the selected quick start pro-
gram in a fully automatic fashion.
18. Settings
Tapping on the “ Settings” button will open a sub-menu with various menu
items. Tap the desired button to open a sub-menu item.
Table of contents