18
19
20
17
5.3 Altimeter Mode - Calibrate the Altimeter
5.4 Altimeter Mode - Set the AltitudeAlarm
Altitude Graph Display
Altitude Graph
Display
Altitude History Graph
Temperature
in degree Celsius
Altitude in meter
Altitude history graph
the altitude
variable
(Y-axis)
the time variable
(X-axis)
Real time
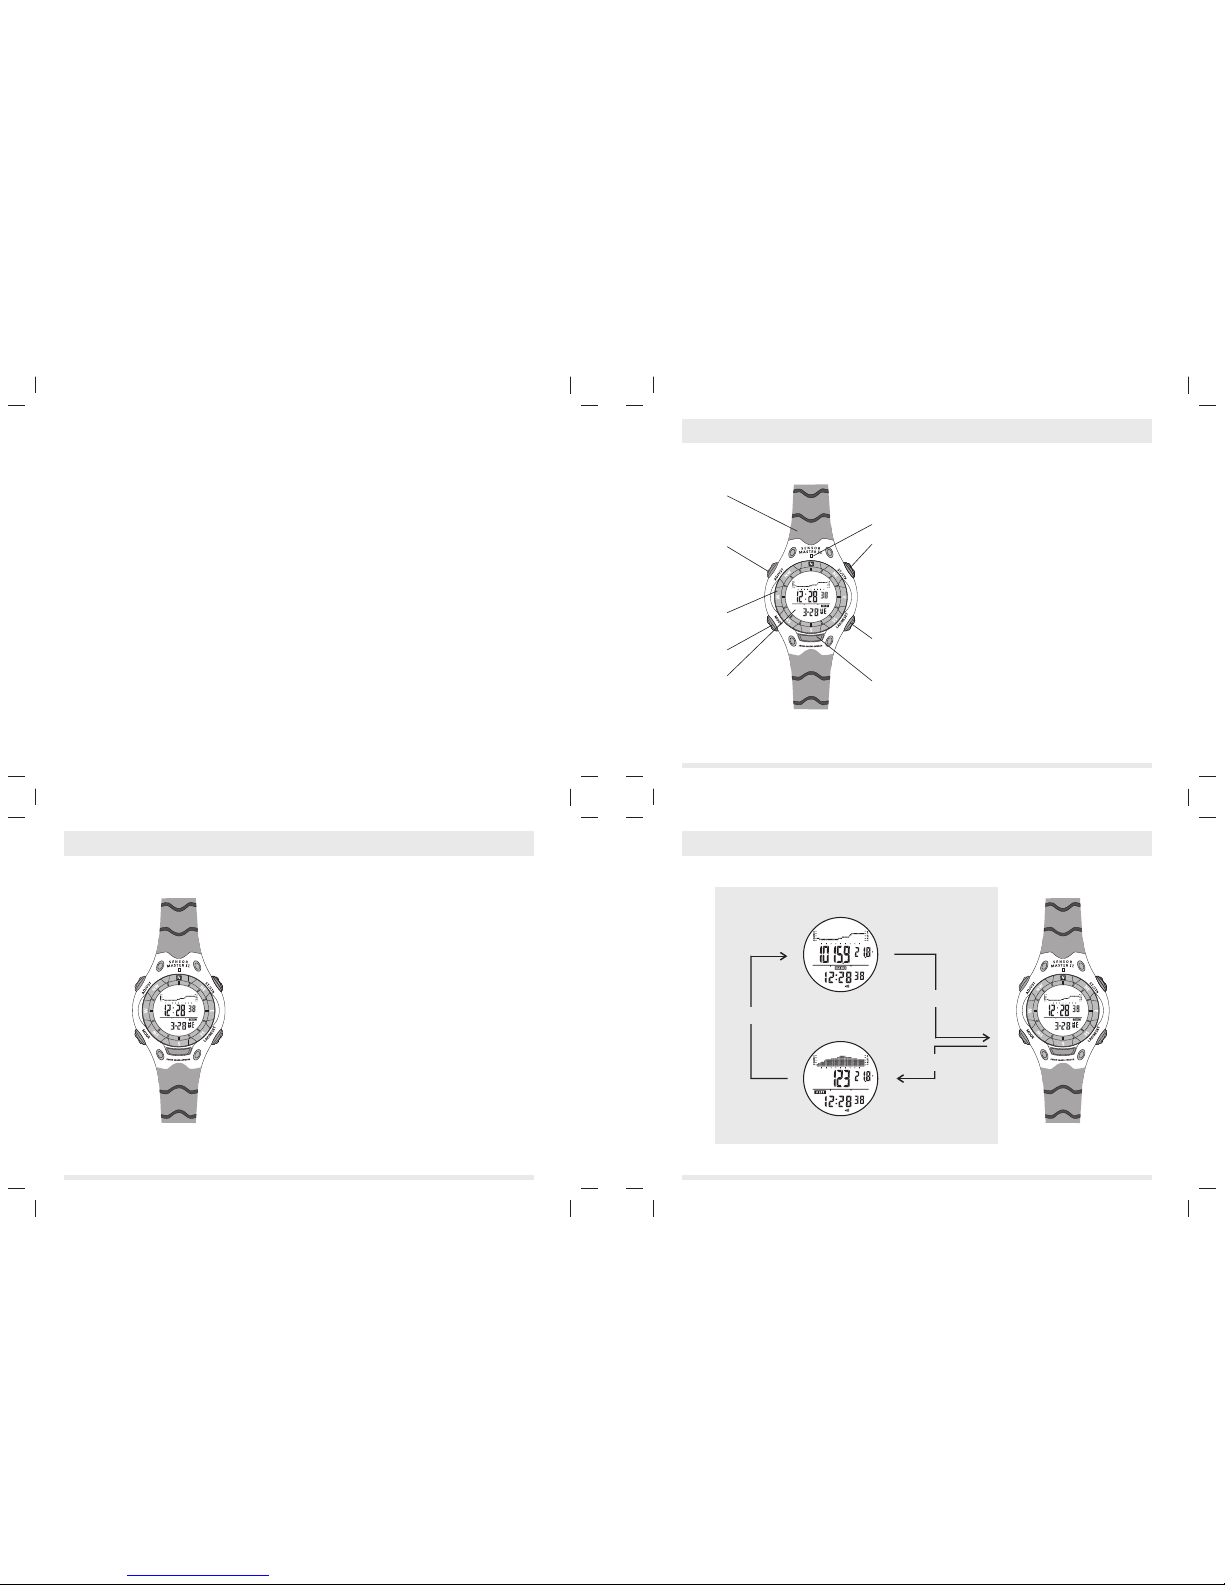
Altimeter Graph Display
- In the Altimeter Graph Display, the 1st row of the display
shows the altitude history graph of the last 24 hours.
The 2nd row of the display shows the altitude
and the current temperature.
IMPORTANT: If the user intends to get an accurate reading
of air temperature, the user must taken off the watch from
the wrist for 20 to 30 minutes before the actual
measurement. It allows no body temperature effect on the
watch.
- The 3rd row of the display shows the current time: hour
minute and second.
The Altitude History Graph
- The SensorMaster II stores the altitude values
automatically as long as the time goes by.
- The Altitude History Graph of the Altitude Graph Display
is plotted by these historical altitude values.
- The X-axis of the history graph is time variable; the Y-
axis of the history graph is altitude variable. The Altitude
History Graph makes up by 11 rows and 40 columns.
- The memory on the left hand side of the history graph
are recorded early than those on the right.
- The scale of the Y-axis of the history graph is changeable,
the scale will be changed in order to fit in the altitude
values. Check the 'Altitude History Graph Scale' section
for more detail on the scale of the history graph.
To Switch among Units
- The SensorMaster II can display altitude in meter (m) or
feet (ft); the SensorMaster II can display temperature in
Celsius ( C) or Fahrenheit ( F).
- Press and hold the [lap/reset] button to change the units
following the units select sequence.
88
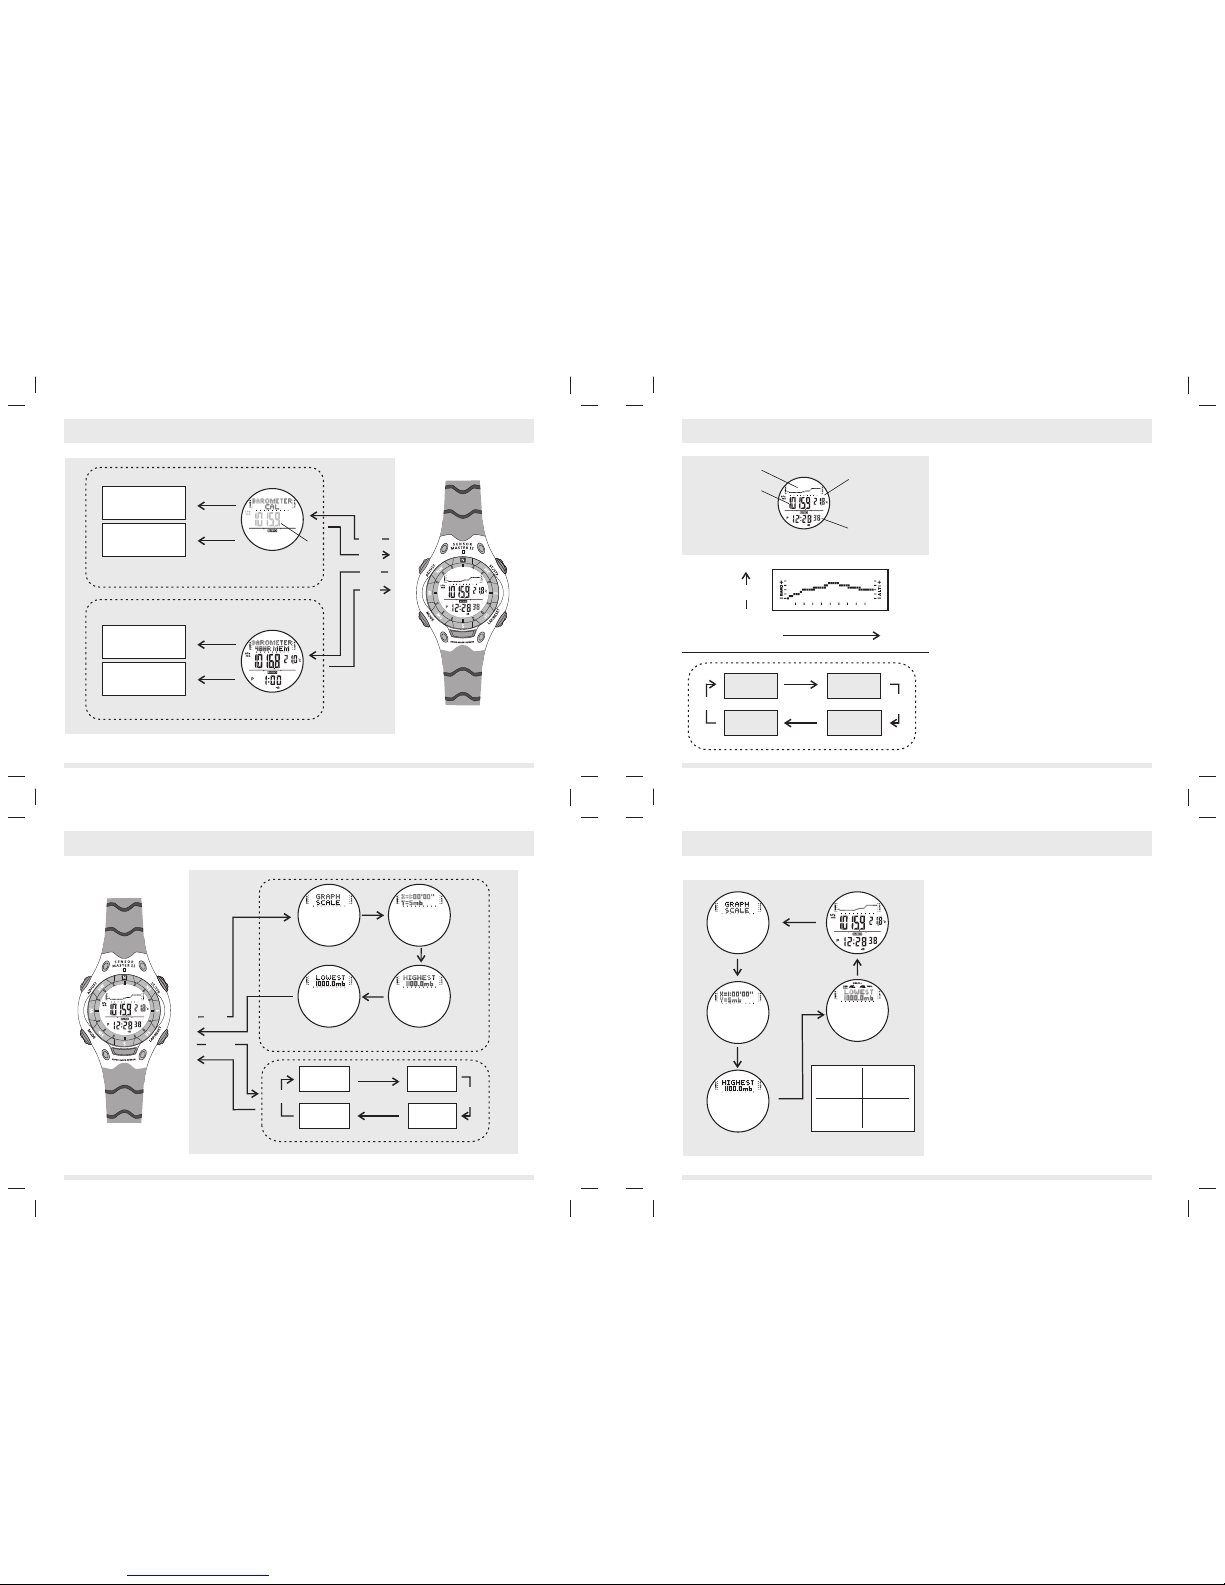
Altitude History Graph Scale
- The scale of the Y-axis of the History Graph is varied
for fitting all the altitude memory into the graph.
- Press the [lap/reset] button once to vie w th e al tit ude
scale information, in the Altitude Graph Display,
- The 'GRAPH SCALE' message will slide out and display
for 3 seconds, then the X-axis and Y-axis resolutions
will be shown.
- For example, 'X=0:15'00"' implies that the resolution of
X-axis is 15 minute per column; at the same time,
'Y=20m' implies that the resolution of Y-axis is 20
meter per row.
- The maximum and the minimum altitudes of the History
Graph will be shown on the display a while later.
- For example, 'MAX 151M' implies that the current
maximum altitude of the Altitude History Graph is 151
meter. 'MIN 0m' implies the current minimum altitude of
the Altitude History Graph is 0 meter.
NOTE:
- The resolution of X-axis of the history graph (time
variable) is fixed as 15 minutes.
- The resolution of Y-axis of the history graph (altitude
variable) is ranging from 1,2,5,10,20,50,100,200,500,1000
to 2000 meters.
5.1 Altimeter Mode - Altitude Graph Display
8C (Celsius)
m (Meter)
8C (Celsius)
ft (Feet)
8F(Fahrenheit)
ft (Feet)
8F (Fahrenheit)
m (Meter)
hold
lap/reset
hold
lap/reset hold
lap/reset
hold
lap/reset
lap/reset
button
Unit Selection Sequence
5.2 Altimeter Mode - Altitude History GraphScale
History Graph Scale Display
altitude
total display time
(15 min. X 40 column=600min or 10 hour)
total display altitude
(Y axis resolution X 11 row)
Y-axis
resolution
(altitude/meter)
1, 2, 5, 10
20, 50
100, 200, 500
1000, 2000
meter(s)
X-axis
resolution
(time/minute)
15 minutes
Altitude Alarm 1 and2
- The SensorMaster II built-in two altitude alarms: Altitude
Alarm 1 and Altitude Alarm 2. They are working
independently.
- The Alarm icon will flash and the SensorMaster II will sound
for 10 seconds when you pass through the Altitude Alarm
Limit, either below or abovethe limit.
- When the alarm sounds, pressany button to stop the alarm.
- The Altitude Alarms can be set within the range from -9164m
to 9164m.
- If two AltitudeAlarms are set at the same altitude limit value,
the AltitudeAlarm 1 will be activated only.
To Set theAltitude AlarmLimit and set theAlarm ON/OFF
- Press and hold the [adjust] button for 2 seconds to enter
Altitude Calibration Display. Press the [adjust] button once
again to select theAltitude Alarm1 Display.
- Press and hold the [adjust]button to enter the Altitude Alarm
1 Setting Display. In the setting display, the altitude digits
and the altitude unit willflash. Press the [start/stop] button to
increase the altitude number; press the [lap/reset] button to
decrease altitude number. Hold down the button, the altitude
change at a higherspeed.
- If the altitude alarm have been adjusted, the Altitude Alarm
1 turn ON automatically. After you set the altitude alarm,
press the [mode] buttonto exit the settingsequence.
- Press the [lap/reset] button to turn the alarm ON or OFF,
or press the [mode] button once again to return to the
Altitude History Graph Display. If the alarm is ON, a dotted
line will show on thedisplay to illustrate theAlarm 1's limit.
To Set theAltitude Alarm 2
- Set the Altitude Alarm 2 in the same manner as setting
Altitude Alarm 1.
hold
adjust
hold
adjust
adjust
button
Altitude Alarm 1 SettingSequence
(Set the Altitude Alarm1 as 129m)
increment
the altitude
mode
button
mode
button
Altitude Graph Display
Altitude Graph
Display
lap/resetstart/stop
digits have been
selected (flashing)
alarm
limit line
alarm 1 ON
indicator
digits
flashing
Decrement
the altitude
start/stop lap/reset
hold
adjust
hold
adjust
Calibration Sequence
( Calibrate the altitude from123 to 128m)
increment
the altitude
hold
adjust
Altitude in meter
Altitude History Graph
digits flashing
mode
button
mode
button
Altitude Graph
Display
Altitude Graph
Display
Decrement
the altitude
Before Calibrate the Altimeter
- The altimeter's calibration procedure design for use in
the normal altimeter mode.
- As the altitude is calculated from the air pressure,
the change of airpressure would affect thealtitude reading.
- To achieve a more accurate reading, the SensorMaster II
need to be calibrated from time to time as pressure may
change gradually even within hours.
- Calibrate the SensorMaster II at which with a known
altitude, such as at sea level or beside an altitude sign pole,
because that altitude value has to be input the SensorMaster
during the calibration procedure.
IMPORTANT: Input a incorrect altitude in the calibration
procedure, it results amistaken altitude reading infuture.
Altitude Calibration Procedures
- Press and hold the [adjust] button for 2 seconds to enter the
Altitude Calibration Display.
- Press the [adjust] button once again to enter the calibration
sequence, the digits of the middle row of the display and the
altitude unit will start flashing.
- Press the [start/stop] button to increase the number; press
the [lap/reset] button to decrease the number. Hold down the
button changes the numberat a higher speed.
- After you set thealtitude, press the [mode] button to exit the
setting sequence.
- Press the [mode] button once again to return to
Altitude Graph Display.