Swisstone SW 750 Pro User manual

EN
SW 750 Pro
Instructions

2
1. Overview front
14
3
2
1. Microphone.
2. Shortcut buon.
Shortcut to sports mode.
3. Turn knob/conrmaon buon.
Turn the knob to switch screen.
Press to select/conrm:
4. Power buon.
Longpress to power on/o.
Press to go back to main menu.
Press to turn on/o display.

3
2. Overview back
5
6
7
5. Heart rate sensor.
6. Charging connectors.
7. Magnec charging cable.

4
3. How to charge
While it’s possible that your SW 750 Pro will
already come with enough charge to be powered
on right out of the box, we recommend to fully
charge it before rst use.
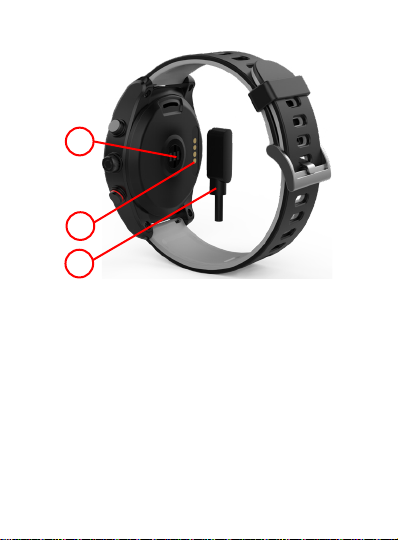
Place the magnec charging cable on the back of
the watch (as shown in the gure ). Insert the USB
charging connector into any USB port that permits
charging, 5V/500mA (or above). For example:
computer, USB adapter, PowerBank and others.
The watch displays the icon when charging.
Note! Maximum charging output for USB charger:
5V / 2A. Always disconnect the charging cable
from the USB port before disconnecng it from
the watch!
To prevent short circuits due to metals (eg
paper clips, etc.) on the charging cable, never
leave it unused on an acve USB port!
4. Wear on your wrist
Place the bracelet on your
wrist, with the display facing
up, adjust the band to t
snugly.

5
5. Install the app
Download and install the app SwissFit HR Pro
from Google Play or App Store on your
smartphone.
Compable devices
• Android version 6.0 and later
• iOS version 9.0 and later
• Bluetooth 4.0 and later compatible device
See more about the app and how to pair the
watch with the smartphone on
7. Pairing with your smartphone, page 16
6. Navigate your watch
Funcon icons:
Tap the screen
Swipe direcon

6
Clock display
Long press the clock and then swipe
LEFT
/
RIGHT
to
select the clock interface. Tap to select .
Swipe le-right from the main screen
From the main screen (clock) you can swipe
RIGHT
for the nocaon screen.
Press to view a nocaon
Longpress to clear all nocaons.

7
Note! It will only clear the nocaons on the
clock, not ton the phone
Opons from the main screen
From the main screen (clock) you can swipe
UP/
DOWN
to view the stascs for your exercise.
See the screens for single exercise, sleep monitor,
heart rate tesng, GPS posion.

8
Main menu
From the main screen (clock) you can swipe
LEFT
for the main menu. Tap to select mode .
Swipe
UP
to get to the second screen of the main
menu.
Swipe
RIGHT
to return.
Icon
Funcon
Explainaon
Phonebook
View your phone’s Phonebook.
Tap to call contact.
Dialer
Make call from the watch.
Call logs
View your phone’s call log. Make call
or send messages to the contacts in
the call log.
Siri
Open Siri and use as on the phone.
It also works with Google Voice
Assistant or Alexa on Android.

9
Icon
Funcon
Explainaon
Sengs
See more sengs in the
Sengs
menu
table.
SMS
Check the messages and make a
quick reply from watch (iPhone does
not support message synchronizaon
currently).
Heart rate
Click the heart rate interface to
detect your heart rate. LED’s on
the backside will be lit during
measurement. Result will be
displayed aer a few seconds. Slide
le to set “Auto” to connuously
detect your heart rate.
Nocaon
View your phone nocaons in the
watch (Nocaon type must be set
up in the phone). If you delete no-
caons on your smartphone, they will
also no longer be displayed on the
SW 750 pro.
Swipe up/down between the main menu screens.

10
Icon
Funcon
Explainaon
Remote
camera
Take photos by watch,photos will
be saved in your mobile.(You should
open the mobile’s camera rst for
iPhone).
Music
Control the music on your phone and
adjust the volume.
IMPORTANT:
For remote music control, the SW
750 Pro must be connected twice
in the Bluetooth sengs of the
smartphone! The second connecon
is named “750 Pro LE”
Stop watch
Click the dot to start ming. Save
the recording by clicking the small
spot on the right during ming (when
nished the record will be deleted
if you click ). See the record by
sliding the screen from right to le.
Sound
recorder
Click to start recording and the
red square to end recording. Sliding
the screen from right to le, you can
check the audio recording.

11
Icon
Funcon
Explainaon
Gesture
Turn on the display by a simple twist
of your wrist.
Set to on or o.
Sports
Select sports mode: walking, running,
trail run, run indoor, biking, hiking,
swimming.
You can see the day’s movement
(step, distance, calorie, me) by
clicking the corresponding screen.
Alarm
Set alarms (meals, medicaon,
meengs, sleep, exercise, geng up).
Single or repeated alarms.
Calculator
Make calculaons.

12
Sengs menu
This is the opons in the sengs menu.
Tap to select seng .
Most sengs can be done in the app also.
Icon
Funcon
Explainaon
Prole
Set gender, height, weight, date of
birth.
Bluetooth
Turn Bluetooth on/o.
Note: You must establish the
Bluetooth connecon if you want to
access contacts, call lists, etc. The
remote music control also requires
the connecon with the smartphone
via this Bluetooth menu.
GPS
Turn GPS on/o.
Time &
Date
Set the me and date, 12/24-hour
me format.
Units
Select between metric or Imperial
units (distance,height, weight).

13
Icon
Funcon
Explainaon
Tempera-
ture
Select between Celsius or Fahrenheit
degrees for temperature.
Sound
Set sound, volume and nocaon
type for calls and nocaons.
Display
Set the screen brightness and
backlight o me.
Informaon
Displays the device name and
soware version.
Language
Select the language synchroniz-
ing with the mobile phone or not,or
custom watch language
Baery
Displays the current baery status.
Restore to
factory
Restore the watch to factory default
state.

14
Locaon
Make sure that the GPS is enabled .
Slide down to nd the locaon page,
then wait up to 3 minutes while the
GPS searches for your posion. If the
posioning is successful, latude and
longitude will be displayed. If the
posioning fails no data will be
displayed.
Note! GPS locaon only works
outdoors and preferrably in open
spaces away from high-rise buildings or other
things that can block the GPS signals.
Sport + Locaon
Make sure that the GPS is enabled.
If GPS is disabled you will asked to
enable tracking.
The GPS will then start to get a GPS x
to posion your exact locaon. Wait up
to 3 minutes while the GPS searches
for your posion.

15
If the GPS fails to get a x within 3
minutes you will be asked to
Wait
/
Skip
.
GPS o GPS on, but
GPS x failed
GPS x
successful

16
7. Pairing with your smartphone
Connect with a Smartphone
1. Start Bluetooth on your smartphone.
IMPORTANT: On the iPhone, the 750 Pro must be
connected twice.
First, nd the watch name in the app: 750 Pro_LE
The second paring takes place via the Bluetooth
sengs of the iPhone. There is the Bluetooth
name: 750 Pro
There you can also acvate the sync for the
contacts / phonebook and the call list.
2. Open the app
SwissFit HR Pro
and tap
Device
.
3. Find your watch:
Bluetooth ID
:
Sengs
-
Watch info
When found, tap your Bluetooth ID in the app.
4. Tap
Yes
to pair your SW 750 Pro to your
smartphone.
5. Allow requested permissions for best funcon.
Android screens

17
iPhone screens
Aer a successful pairing the Bluetooth icon on
the watch turns blue and communicaon between
watch and phone is established.
8. Synchronise the device
SW 750 Pro automacally synchronises the data
with your phone aer the rst pairing. Steps,
acve calories, distance, date and me is included
in the synchronisaon.
To manually start synchronisaon, tap .
A synchronisaon will normally take around 1-2
minutes. If synchronisaon fails, disconnect the
Bluetooth and reconnect the watch.

18
9. Disconnection
If the watch is outside the Bluetooth range of the
connected smartphone, the message “Discon-
nected” appears.
When the connecon is reestablished, a note will
also appear.
10. Call and message notifications
Tap the
Device
tab, then tap
Device seng.
Tap
Message Push
to select all or individual apps/
features that should be able to
send nocaons.
For Android smartphones, you
need to allow SwissFit HR Pro to
send you nocaons.
For iOS smartphones,
you need to allow
SwissFit HR Pro to send you
nocaons. When you have
installed the app, go to phone
Sengs
to allow the noca-
ons.

19
Incoming call/messages (WhatsApp, SMS, etc.) will
be displayed on the watch and it will vibrate.
If it’s a known caller the name will be displayed,
otherwise the number.
For messages, you will see the sender and the
content of the messages.
11. Weather function
When opening the app, the phone
automacally locates the city and
gets weather data based on your GPS
locaon (weather data is updated
once per hour). Every me the app is
connected to the watch, the weather data is auto-
macally synced to the watch.
Note! The SwissFit HR Pro app
requires locaon permission
to collect weather data. Go to
phone Sengs to allow locaon
permission.

20
12. My sports data
Note! All sport acvies should
be started/paused/stopped via
the watch.
Click on the step target view to
enter the My Sport Data page.
This shows the cumulave sport
me, calories burned, acve days,
connuous sport days, today’s
sport steps and details of the last
sport for each type of sport data.
Click
Total length of exercise/detail
or any of the specic acvity
types to check daily, weekly,
monthly and total sports data.
Table of contents