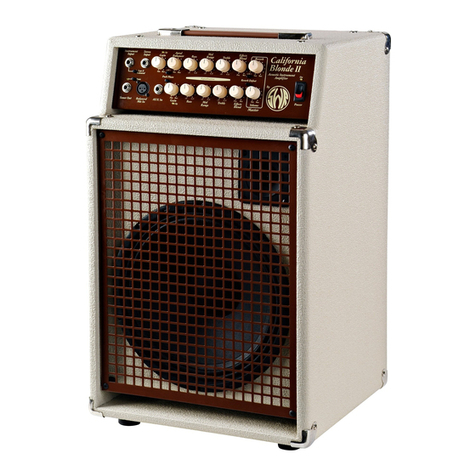
SWR California Blonde User manual

CALIFORNIA
BLONDE
OWNER’S MANUAL
SWR • CORONA, CA • USA

IMPORTANT SAFETY INSTRUCTIONS
CAUTION: TO REDUCE RISK OF ELECTRIC SHOCK, DO NOT REMOVE THE COVER OR BACK.
NO USER-SERVICEABLE PARTS INSIDE. PLEASE REFER TO A QUALIFIED SERVICE TECHNICIAN.
A. Read Inst uctions: All safety and ope ation inst uctions should be ead befo e the p oduct is ope ated.
B. Retain Inst uctions: The safety and ope ating inst uctions should be etained fo futu e efe ence.
C. Heed Wa nings: All of the wa nings on this p oduct and in the ope ating inst uctions should be adhe ed to.
D. Follow Inst uctions: All ope ating and use inst uctions should be followed.
E. Cleaning: Unplug this p oduct f om the wall outlet befo e cleaning. Do not use liquid cleane s o ae osol cleane s. Use a slightly damp cloth fo cleaning.
F. Wate and Moistu e: Do not use this p oduct nea wate ; fo example, nea a swimming pool, wet basement, and the like.
G. Accesso ies: Do not place this p oduct on an unstable ca t, stand, t ipod, b acket o table. The p oduct may fall, causing se ious inju y to a child o adult, and se ious
damage to the p oduct.
H. Ventilation: Slots and openings in the unit a e p ovided fo ventilation and to ensu e eliable ope ation of the p oduct, to p otect it f om ove heating, thus these open-
ings must not be blocked o cove ed. This p oduct should not be placed in a built-in installation such as a bookcase o ack unless p ope ventilation is p ovided o the
manufactu e 's inst uctions have been adhe ed to.
I. G ounding: This p oduct is equipped with a th ee-wi e g ounding-type plug, a plug having a thi d (g ounding) pin. This plug will only fit into a g ounding-type powe out-
let. This is a safety featu e. If you a e unable to inse t the plug into the outlet, contact you elect ician to eplace you obsolete outlet. Do not defeat the safety pu pose
of the g ounding-type plug.
J. Powe Co d P otection: Powe supply co ds should be outed so that they a e not likely to be walked on o pinched by items placed upon them, paying pa ticula
attention to co ds at plugs and the point whe e they exit the p oduct.
K. Lightning: Fo added p otection of this p oduct du ing a lightning sto m o when it is left unattended and unused fo long pe iods of time, unplug it f om the wall out-
let. This will p event damage to the p oduct due to lightning and powe -line su ges.
L. Ove loading: Do not ove load wall outlets o extension co ds as this can esult in a isk of fi e o elect ic shock.
M. Object and Liquid Ent y: Neve push objects of any kind into this p oduct th ough the openings as they may touch dange ous voltage points o sho t out pa ts that
could esult in a fi e o elect ic shock. Neve spill liquid of any kind on the p oduct.
N. Se vicing: Do not attempt to se vice this p oduct you self as opening o emoving cove s may expose you to dange ous voltage o othe haza ds. Refe all se vicing
to qualified se vice pe sonnel.
O. Damage Requi ing Se vice: Unplug this p oduct f om the wall outlet and efe se vicing to qualified se vice pe sonnel unde the following conditions:
1) When the powe supply co d has been damaged
2) If liquid has been spilled o objects have fallen into the p oduct
3) If the p oduct has been exposed to ain, wate , o othe conductive liquids
4) If the p oduct does not ope ate no mally by following the ope ating inst uctions
5) If the p oduct has been d opped o damaged in any way
6) When the p oduct exhibits a distinct change in pe fo mance.
P. Replacement Pa ts: When eplacement pa ts a e equi ed, be su e the se vice technician has used eplacement pa ts specified by the manufactu e o have the
same cha acte istics as the o iginal pa t. Unautho ized substitutions may esult in fi e, elect ic shock, o othe haza ds.
Q. Safety Check: Upon completion of any se vice o epai s to this p oduct, ask the se vice technician to pe fo m safety checks to dete mine that the p oduct is in p op-
e ope ating condition.
R. Heat: The p oduct should be situated away f om heat sou ces such as adiato s, heat egiste s, stoves o othe p oducts that p oduce heat.

CALIFORNIA BLONDE OWNER’S MANUAL • 1
INTRODUCTION
CONGRATULATIONS...
…you a e now the p oud owne of an SWR Califo nia Blonde acoustic inst ument amplifie ! Please ead this enti e manual ca efully so that
you can fully ealize the potential of the Califo nia Blonde.
MADE IN THE U.S.A.!
SWR amplification is handmade and individually tested in the United States. Eve yone at SWR since ely hopes that you a e satisfied with
you ecent pu chase, as we a e ext emely p oud of the quality and attention that goes into each and eve y SWR p oduct. We t uly hope
that you pu chase of an SWR helps b ing out the best in you playing and adds to you enjoyment of music.
Thanks fo choosing SWR!
The amplifier packaging should include the following items:
(1) Owne ’s Manual
(1) AC Powe Co d
(1) Wa anty/P oduct Regist ation Fo m
CALIFORNIA BLONDE SPECIFICATIONS
POWER OUTPUT
120 Watts @ 8 ohms (inte nal speake only)
160 Watts @ 4 ohms (using an 8 ohm extension speake )
SPEAKERS
1- 12" stamped f ame woofe , 200 watts, 8 ohm impedance
1- high f equency supe tweete , 25 watts, 16 ohms (c ossove point fixed at 4kHz)
FREQUENCY RESPONSE
30Hz to 16kHz.
CABINET
Made f om a combination of plywood and pa ticle boa d. Inte locking dado and abbet joints, glued and nailed. Cove ed in a “sandstone”
vinyl cove ing. Metal co ne s. Comes with ou “Texas Ba P oof” powde coated speake g ill. F ont slot po t located at bottom.
One top st ap handle and one sp ing loaded handle on the bottom. Fo bette monito ing, tilt the cabinet back and extend the bottom han-
dle. Then lowe the cabinet down, esting it on the ubbe handle.
DIMENSIONS: 24" H x 14.5" W x 14.5" D
WEIGHT: 50 lbs.

2• CALIFORNIA BLONDE OWNER’S MANUAL
FRONT PANEL FEATURES
• Inst ument Input Jack
• Ste eo Input Jack
• Tune Out Jack
• Balanced Mic Input Jack
• Gain Cont ols with LED Ove load Indicato and Pull Phase
• Au al Enhance Cont ol (Channel 1)
• Bass Cont ols
• Mid Range Level Cont ols
• T eble Cont ols
• Effects Blend Cont ols
• Reve b Cont ol
• Maste Volume Cont ol
• Powe On/Off Switch
REAR PANEL FEATURES
• Line Fuse: 3A slo-blo
• A/C Powe Co d Receptacle
• Ste eo Headphones Jack
• Speake On/Off Switch
• Effects Send Jacks
• Effects Retu n Jacks
• Balanced Line Out
• Line Out Jacks (Channel 1 o 2)
• Post-Reve b Retu n Jack
• Reve b Footswitch Jack
CROSSOVER PANEL FEATURES
• Tweete Attenuato Cont ol
• Extension Speake Out Jacks (Speakonand 1/4")
GETTING STARTED
Remove the AC cable f om the accesso y pack and connect it f om the amplifie to a standa d wall outlet. Make su e that the Gain and
Master Volume cont ols a e set to the minimum position (fully counte -clockwise). Locate the powe switch on the ight side of the
f ont of the unit and tu n on the amplifie . Upon powe ing up, don’t be su p ised if you hea a small pop. This is absolutely no mal.
Plug you inst ument into the desi ed input jack ( efe to “F ont Panel Featu es” fo g eate detail). Tu n you inst ument’s volume up to at
least 75% of maximum and slowly adjust the gain cont ol. Once you begin to play you inst ument and you see the yellow light ove the
gain cont ol illuminate, back off the gain a bit. Now tu n up the Master Volume and you should hea the sound of you inst ument
amplified th ough the Califo nia Blonde. Fo mo e detailed info mation, please ead the enti e manual ca efully so that you can fully ealize
the Califo nia Blonde’s potential.

CALIFORNIA BLONDE OWNER’S MANUAL • 3
FRONT PANEL FEATURES
INSTRUMENT CHANNEL (Ch.1)
INSTRUMENT INPUT
Accepts a 1/4" mono phone plug. The input “senses” eithe a magnetic o piezo pickup, the efo e sepa ate inputs o a selecto switch a e
not needed (as on othe acoustic amplifie s).
If you should hea some disto tion when using this input, make su e the LED ove load indicato is not lighting and don’t fo get to check the
batte y in you inst ument.
STEREO INPUT
Accepts a ste eo 1/4" phone plug. This unique featu e was p ovided fo inst uments having a ste eo output. Fo example, some acoustic
guita playe s have a piezo b idge pickup and a soundhole mic ophone. These combine fo a ste eo o dual output signal. As well, some
pickup manufactu e s have a dual pickup system culminating in a ste eo jack.
The tip of the ste eo input gets outed to the inst ument channel. The ing goes to the mic/aux channel. This allows the use complete
independent cont ol of the tone shaping and levels of each pickup/mic system! The two a e blended togethe at the end of the signal
chain. The Master Volume and Reverb both affect this blended signal.
The Califo nia Blonde can be un in ste eo. Please efe to “Ste eo Ope ation” located in the “Rea Panel Featu es” section of this guide.
GAIN CONTROL
P ope use of this featu e will ensu e maximum signal-to-noise atio (quiet ope ation) and unwanted clipping (disto tion) in the p eamp sec-
tion. Whethe you a e using the Inst ument channel o the Mic/Aux channel, the following p ocedu e should be followed.
1. Tu n the Master Volume to the “MIN” position. Plug you inst ument into the desi ed input jack.The volume cont ol on you inst u-
ment should be set at maximum (because we all know soone o late it will get the e!). Sta t with the Tone cont ols in the “0” flat position
and the Aural Enhancer (if applicable) in the 12 o’clock position.
2. Sta ting f om “MIN,” aise the Gain cont ol while st iking you loudest cho d o note. If setting up with a mic ophone, sing o speak
loudly into the mic as you would du ing a pe fo mance. Find the setting on the Gain cont ol that causes the LED O/L indicato to flash.
Now back off the Gain until the LED ove load indicato no longe comes on.
3. Use the Master Volume to set ove all desi ed loudness.
The Aural Enhancer and Tone cont ols can have an affect on the optimal setting of the Gain cont ol. Afte you have set these to
you liking, go back and epeat steps 1 th ough 3.
To accommodate a wide ange and va iety of inst uments and mics, the Gain cont ol’s tape o action was designed to sta t slowly. This
allows fine cont ol of the p ope gain setting fo you inst ument o mic. In othe wo ds, you may notice that the volume changes mo e
apidly afte the Gain Cont ol eaches about the 11 o’clock position. This is no mal.
The Gain cont ol also “d ives” the effects send signal and inte nal eve b ci cuit y. Effects units used in the effects loops should be able
to accept line level signals. If you effect is being ove d iven at the input, you can tu n down the Gain to alleviate this condition. Reset you
Master Volume fo desi ed ove all volume.
PULL PHASE FUNCTION
This function eve ses the input to output phase. In the “in” position, the output (speake ) is in phase with the input. In the “out” position, the
eve se is t ue. The pu pose of this featu e is to inhibit egene ative feedback. This method is supe io to a notch filte as it does not alte
the ove all tone.
If you inst ument o mic sta ts to feedback, pull the Gain knob out to eve se the phase. It should be noted howeve , that the distance
between you and the cabinet is a facto . Depending on you p oximity to the cabinet, changing the phase could actually cause an inc ease
in feedback.
Most feedback in acoustic inst uments occu s in the lowe egiste s. If ample volume is not obtained by using the phase switch o chang-
ing you position in elationship to the amp, t y using the tilt back handle featu e on the bottom of the cabinet.You may also t y putting the
Califo nia Blonde on a chai o stand off the floo .
LED OVERLOAD (O/L) INDICATOR
If the p eamp ci cuit y is ove d iven o clipped, the yellow LED will light. To co ect this condition, lowe the Gain cont ol. The O/L monito s
the Gain, Au al Enhance , tone cont ols and effects loop ci cuit y.

4• CALIFORNIA BLONDE OWNER’S MANUAL
USING THE TONE CONTROLS
To get the most out of the Tone Cont ols of you Califo nia Blonde, it would be best to fi st unde stand how the Au al Enhance
(Inst ument channel only) wo ks, and how it inte acts with the Bass, Mid Range and Treble cont ols. Think of the Au al Enhance as
a va iable tone cu ve. As you aise the cont ol f om its “0,” o fully counte clockwise position, you a e elevating the whole ange of sound
(lows, mids, and highs) at f equency points diffe ent than those selected fo the individual Tone Cont ols.
This emains t ue up to about the “2 o’clock” position, at which point selected mids sta t to d op off. The cu ves involved he e a e gentle,
as opposed to the ve y ext eme cu ves you can c eate with the Tone Cont ols. Most significantly fo basses, the Enhance will help b ing
out the fundamentals of you lowe egiste s without masking them with ove tones, such as the Bass cont ol would. At the same time, it
opens up the sibilance cha acte istics of all inst uments without being ha sh.
Most playe s p efe setting the Au al Enhance between 10 and 2 o’clock. T y playing a cho d and move the Au al Enhance f om one
ext eme to the othe . You should find a setting that is pleasing to you ea .
TONE CONTROL SECTION
The Califo nia Blonde’s Tone Cont ol section is a th ee-band set of level cont ols cente ed a ound the f equencies 80 Hz (Bass), 800 Hz
(Mid Range) and 5kHz (Treble). Each cont ol can cut o boost its band a maximum of 15dB. Each cont ol has a flat (cente click)
position that defeats its function. In this position, the tone cont ols a e inactive.
Fo each tone cont ol, otating the knob counte -clockwise f om the “cente click” position will cut o educe its designated f equency.
Rotating the knob clockwise will boost its designated band o f equency.
The Bass cont ol wo ks in a ange that will be useful unde most “no mal” conditions. Its musical use might be thought of as a “fatness”
cont ol. The ove all “punch” of you inst ument will be dete mined with this cont ol. With passive inst uments, this will be st aightfo wa d.
With active inst uments containing bass-boost/cut functions, mo e explo ation will be wo thwhile.
The Mid Range cont ol ope ates in a c ucial a ea fo most inst uments. Many basses (pa ticula ly those st ung with oundwound
st ings) and some pickups fo acoustic inst uments can have a ve y “honky” o nasal sound. D opping the Mid Range cont ol can go
a long way towa d smoothing out you tone. We suggest, though, that what sounds best when you’ e listening to you tone by you self
may not be what wo ks best in a band o when eco ding. Sometimes that objectionable quality may be just the ight “hai ” on you note
to still have an audible p esence in the t ack o on stage.
The Treble cont ol ope ates in a tonal a ea that extends th ough and beyond the usual t eble ange. It may be thought of as a “t ans-
pa ency” cont ol. Ove time, we have found this app oach to esult in a mo e musically useful t eble. Boosting the cont ol will open up the
sound of a dull inst ument, pa ticula ly in conjunction with the high end supe -tweete in the Califo nia Blonde. Howeve , this is also the ange
of st ing attle, finge slides, pickup clicks, etc. Again, we ecommend you expe iment with the cont ol alone with you inst ument while find-
ing you tone, and listen again in a band context, both nea to and away f om the Califo nia Blonde. Qualities like punch, fatness, p esence
and bite can be fai ly well sp ead out. T eble, despite the b oad dispe sion of the supe tweete , is a ve y di ectional quality. Spend some
time explo ing what you can hea in this a ea as you move a ound.
EFFECTS BLEND
The effects loop ci cuit y in the Califo nia Blonde is a “side chain” design, the same concept as used in studio mixe s and consoles. The
Effects Blend cont ol mixes the signal coming f om you inst ument with the sound coming f om you effect. With the Effects
Blend cont ol fully counte -clockwise, no signal f om you effect will be hea d. As you tu n this cont ol clockwise, mo e of the effect can
be hea d in the ove all sound. When the Blend is fully clockwise, no d y o unaffected signal is hea d othe than the output of you effects
device.
This type of cont ol and patching a angement is ve y effective in educing noise caused by effects units and in maintaining a mo e natu -
al sound. If you effects device has a simila cont ol, we suggest leaving it set to its maximum effect/minimum d y signal position and
using the Effects Blend cont ol fo this function. Please ead the “Effects Loop” section fo mo e info mation.
MIC/AUXILIARY CHANNEL (Ch. 2)
TUNER OUT
This featu e allows the use to connect thei inst ument tune to the Califo nia Blonde without having to unplug and go back and fo th f om
amp to tune to amp. The Tune Out ci cuit is isolated f om the est of the ci cuit y and no othe cont ols othe than you inst ument affect
the signal. Being on a side chain (isolated) also avoids loading down of the inst ument which can cause a loss in dynamic ange.
To use the Tune Out, plug in a shielded patch co d f om this jack to the INPUT of you tuning device. Tu n the amp on and you’ e eady to
go. If you don’t want to monito you sound while tuning, tu n down eithe the Gain o Master Volume, o position the Speaker
On/Off switch on the back panel to the “Off” position.

CALIFORNIA BLONDE OWNER’S MANUAL • 5
BALANCED MIC INPUT
This input is a t ue balanced XLR input, not a single-ended input as on some amplifie s. This input is DISCONNECTED when the Ste eo Input is
being used. Input impedance is 10k ohms, and the wi ing is Ame ican standa d:
Pin 1= g ound, Pin 2= +, Pin 3= – (minus)
The Balanced Mic input does not supply phantom powe . Phantom powe can be obtained by the use of an outboa d phantom powe sup-
ply box, available at most la ge musical inst ument etaile s.
AUXILIARY INPUT (AUX IN)
This input can be used with a second inst ument, unbalanced mic ophone, o any sou ce not needing a supe high input impedance. Input
impedance is app oximately 800k ohms. This input will not function when the Ste eo Input is being used.
GAIN, PULL PHASE, BASS, MID RANGE, TREBLE & EFFECTS BLEND
Since these featu es a e all identical to the ones found in the Inst ument channel, please efe to that section fo p ope ope ation and
info mation.
MASTER SECTION
MASTER VOLUME
The Master Volume cont ol adjusts the signal level going to the powe amplifie , ste eo headphones jack, extension speake and the
inte nal speake system. It does NOT affect the Balanced XLR Line out. Fo optimum signal-to-noise atio, it should be used in conjunction
with the Gain cont ol.
MASTER REVERB
The Master Reverb cont ol blends in the eve b with the main signal. The eve b ci cuit y is on a side chain as well, so the natu al
sound of you inst ument is always maintained. Rotating this cont ol clockwise will add mo e eve b to the ove all sound. Reve b is int o-
duced afte the Inst ument and Mic/Aux channels have been summed togethe and will affect both channels (unless you utilize the Post-
Reverb Return jack, which is explained late in the “Rea Panel Featu es” section).
REAR PANEL FEATURES
STEREO HEADPHONES JACK
By inse ting a set of ste eo headphones into this jack you will be able to monito you sound o p actice without distu bing you neighbo s.
The volume level is adjusted by the Master Volume. We suggest you begin with the Master Volume off (fully counte -clockwise),
then slowly b ing the volume up to you desi ed level. If you hea some disto tion in you headphones that is not p esent with the speake s
on, tu n down the volume—you a e p obably ove d iving you headphones and could uin them. To p actice silently, set the Speaker
On/Off switch on the back panel to the “Off” position. Any impedance ste eo headphones will wo k, howeve , optimum impedance is 75
ohms. Do NOT use mono headphones as they will sho t out a channel.
SPEAKER ON/OFF SWITCH
In the TOP position, labeled “On,” both the woofe and supe tweete in the speake system a e activated. The tweete level can be sepa-
ately cont olled and/o eliminated by using the Tweete Attenuato (desc ibed below in “C ossove Panel Featu es”).
The BOTTOM position, labeled “OFF” disconnects the signal going to the inte nal speake s and extension speake jack. Use this position
when listening th ough headphones only o fo silent tuning ( efe to "Tune Out" section). The Ste eo Headphones jack is always active
ega dless of the position of this switch.
INTERNAL CABINET JACK/PLUG
This specially-sized jack/plug assembly (in the black plastic housing) uns the signal f om the amplifie to the Califo nia Blonde’s inte nal
speake s. It should NOT be unplugged unless the chassis needs to be emoved f om the unit, which should ONLY be done by a qualified
technician.
EFFECTS LOOP
Sepa ate and independent effects loops a e p ovided fo both the Inst ument and Mic/Aux channels. They a e located POST EQ and PRE
Reve b & Maste Volume in the signal path. The level appea ing at the Send jacks is cont olled by the Gain functions on the f ont panel. If
you a e getting too hot a signal at the input of you effects unit, educe the level of the applicable Gain cont ol(s). You can then aise you
Master Volume to etain simila ove all volume levels. By using the Gain, Master Volume, and Effects Blend cont ols,
optimum pe fo mance should be easily obtainable with any effects device.

6• CALIFORNIA BLONDE OWNER’S MANUAL
Since the effects loops a e on a side chain, thei use should g eatly educe noise gene ated by effects devices (as compa ed to in-line
effects loops). Additional featu es of this type of loop can be found below unde the Receive jack section.
SEND
Run a shielded patch cable f om the Send jack to the input of you effects device. This jack may be used as an additional line level output,
in which case its level is dete mined by the setting of the Gain cont ol.
RECEIVE
Run a shielded patch cable f om the output of you effects device to the Receive jack.
One unique featu e of the Receive jack is the ability to p actice along with p e- eco ded music. Inse t a sound sou ce into the Receive jack
(make su e it’s a mono signal). Use the Effects Blend cont ol to mix the level of the eco ded music with you inst ument’s level. The
combined signal will be hea d th ough the inte nal speake s o you headphones. The Send jack is not used.
NOTE: Inse ting a plug into the Receive jack activates the Effects Blend cont ol by eceiving a “command” th ough the
g ound c eated. The efo e, only a mono (2-conducto ) phone plug should be used.
If you a e not getting any “effect” th ough the speake s, check the position of the app op iate Effects Blend cont ol on the f ont panel.
BALANCED XLR LINE OUT
Being a “line” out, the signal appea ing he e is simila to that hea d th ough the speake system. All of the cont ols on the f ont panel,
except the Master Volume, will affect the sound.
To use this featu e, un an XLR cable f om the Balanced Line out to the input of a mixing console, tape machine, etc. This output is also
suitable fo sending a signal to a house mixe in live situations.
Wi ing fo the XLR connecto is Ame ican standa d: Pin 1= g ound, Pin 2= +, Pin 3= – (minus)
STEREO OPERATION
Complete ste eo ope ation can be achieved using the following p ocedu e:
Fi st, you will need an exte nal powe amp and speake cabinet (powe ed “slave” enclosu es a e ideal fo this situation). Plug a shielded
patch cable f om the Line Out CH-1 o Line Out CH-2 jack (you choice) on the back of the Califo nia Blonde to the input of the exte nal
powe ed speake system. This disconnects you chosen Line Out channel f om the powe amp/speake system of the Califo nia Blonde.
The Maste Volume and Reve b will affect only the channel you have NOT assigned to the exte nal system. Fo example, if you have chosen
“Line Out CH-1” to send to an exte nal system, only Channel 2 will be p esent in you Califo nia Blonde speake and the efo e cont ollable
by the Maste Volume and Reve b. If you send Channel 2 to an exte nal system, the eve se is t ue. In eithe case, the volume cont ol on
the exte nal system acts as the “Maste Volume” cont ol fo that side of the ste eo system, while the Gain cont ol on the assigned channel
acts as the p eamp volume cont ol.
The independent effects loops of both channels can now be used fo full ste eo enhancement. This can be obtained by plugging in a
ste eo effect such as a cho us, echo, etc. Use the left side of the effect fo the Inst ument channel (Channel 1) and the ight fo the
Mic/Aux channel (Channel 2). Don’t fo get to set the Effects Blend cont ol p ope ly fo each side.
LINE OUT CH-1 JACK
This jack wo ks in conjunction with eithe the Inst ument o Ste eo inputs. This featu e allows you to send the Inst ument channel’s signal
to an exte nal system. Inse ting a co d into this jack DISCONNECTS the signal f om the inte nal powe amp, the efo e the Maste Volume,
Reve b and inte nal speake system a e disabled.
LINE OUT CH-2 JACK
This jack pe fo ms the exact same functions fo the Mic/Aux Channel (Channel 2) as the “Line Out CH-1” does fo the Inst ument channel.
It wo ks in conjunction with the Balanced Mic In, Aux In o Ste eo inputs. When using the Califo nia Blonde in t ue ste eo applications, you
can now decide what signal is best to send to an exte nally powe ed sou ce—Channel 1 o Channel 2.
NOTE: To achieve a “summed” Line Out of Channels 1 and 2, you have th ee options:
a) Optimal: Use the Balanced XLR Line Out jack. If you need this connection te minated into a 1/4" phone plug, then use
eithe a di ect box o a line t ansfo me (XLR female to 1/4" phone plug male).
b) Not Optimal*: Sum both Effects Send jacks into a “Y” cable and send the signal to the desi ed destination
c) Not Optimal*: Sum the “Line Out CH-1” and “Line Out CH-2” jacks into a “Y” cable and send the signal to the desi ed
destination. If you choose this option, you should know that the signals will not etu n to the Califo nia Blonde unless out-
ed back into the Effects Retu n jacks. “Y” co ds can do funny things to you signal.

CALIFORNIA BLONDE OWNER’S MANUAL • 7
POST-REVERB RETURN JACK
You may choose to use the Califo nia Blonde as an all-in-one amp/P.A. Plug you inst ument into Channel 1 and the mic into Channel 2.
Then you can choose to have eve b on eithe the vocal o the inst ument only. To defeat eve b on Channel 1, simply un a (p efe ably
sho t) inst ument cable f om the “Line Out CH-1” jack into the “Post-Reve b Retu n” jack. Reve b will now be p esent only in Channel 2.
REVERB FOOTSWITCH
Inse ting a footswitch into this jack allows the use to tu n on and off the eve b signal p esent in the mix. Fo best esults, use a quality
shielded footswitch (available th ough SWR).
A/C LINE (MAINS) FUSE
The line fuse can open (blow) due to powe su ges o high powe line t ansients. This fuse will also open in the unlikely event of an elec-
t onics failu e inside you amplifie .
Co ect size and ating of the line fuse: 3AG, 3 amp slo-blo fo 120V ope ation (in No th Ame ica), and 1.5 amp slo-blo fo 240V use. DO
NOT DEFEAT THE PURPOSE OF THIS FUSE BY USING A HIGHER AMPERAGE RATING. THIS COULD VOID YOUR WARRANTY.
A/C LINE CORD RECEPTACLE
Accepts a standa d A/C powe cable (supplied with the Califo nia Blonde in the United States), used with almost all cu ent musical, p o-
fessional and household elect onic devices. If it does become misplaced, eplacements can be found at almost any compute , elect onics,
o p o audio sto e.
Note: The ating fo this cable is 3-conducto , 18 gauge, 10 ampe es. If eplacement is necessa y, o if you wish to buy
a longe cable, look fo the co ect ating on the cable.
CROSSOVER PANEL FEATURES
TWEETER ATTENUATOR CONTROL
Use this cont ol to adjust the level of high f equency hea d th ough the tweete (located in the uppe ight co ne of the speake enclo-
su e). A no mal setting fo this cont ol is st aight up o “12 o’clock.” As you tu n the knob clockwise f om this position, the high f equency
content is inc eased and you will get mo e “spa kle.” Tu ning the knob fully counte -clockwise emoves the tweete f om the system com-
pletely. If you p efe a “da ke ” sound o a e getting a lot of f et buzz, clicks, bow, pick o finge noise, you may want to use this position.
(This cont ol will not affect the 12" loudspeake , headphones, o any extension cabinet.)
NOTE: We have found that most fiddle/violin playe s p efe the tweete out of the ci cuit (completely counte -clock-
wise). This can be t ue fo some up ight bass and cello playe s as well. Guita , dob o, bass and mandolin musicians like
the ho n activated. T y it both ways and pick the setting that sounds best to you. The T eble cont ol’s ange is ve y simi-
la to the esponse of the tweete and can be used as a “high end pad.”
EXTENSION SPEAKER OUT JACKS
We have p ovided two Extension Speake Out Jacks on you Califo nia Blonde: one Speakonjack and one 1/4" jack. They should ONLY
BE USED AS OUTPUT JACKS TO ANOTHER SPEAKER CABINET, NOT AS INPUT JACKS FROM ANOTHER AMPLIFIED SOURCE!
Fo the 1/4" jack, use an unshielded 2-conducto cable, o speake cable (NOT A SHEILDED GUITAR CORD) to connect an additional
speake cabinet. Use a high quality, heavy gauge cable of at least 18 gauge (the lowe the gauge, the heavie the cable). The impedance of
any extension speake connected to this output should be no less than 8 ohms.
In addition to the standa d 1/4" jack, a single Speakon jack is p ovided. Speakon jacks and connecto s offe the best possible speake
connection. They a e fa supe io to banana o 1/4" phone jacks in that they not only lock in place and cannot become accidentally dis-
connected, but offe a g eate and mo e stable connection su face. If using the Speakon jack, we highly ecommend a Speakon-to-
Speakon speake cable. If you extension cabinet does not have a Speakon jack, you should use the 1/4" jack and a simple 1/4"-to-1/4"
speake cable. The Speakon jack is wi ed “standa d” (+1/–1); Speakon-to-Speakon speake cables a e available th ough most musical
equipment etail outlets. Again, when using a single extension speake with this jack, the impedance should be 8 ohms o g eate .
If you wish to connect two additional cabinets (eithe by using both Speakon and 1/4" Out jacks, o by “daisy-chaining” two cabinets off of
one jack), be su e the combined total impedance is no less than 8 ohms (equivalent to two 16 ohm speake cabinets in pa allel).

CALIFORNIA BLONDE LIMITED WARRANTY
The CALIFORNIA BLONDE from SWR is warranted to the original consumer purchaser for ONE
YEAR from the date of purchase against defects in materials and workmanship, provided that it is
purchased from an Authorized SWR dealer. This warranty applies only to products purchased in
the USA or Canada.
This warranty is VOID if the unit has been damaged due to accident, improper handling, installa-
tion or operation, shipping damage, abuse or misuse, unauthorized repair or attempted repair, or if
the serial number has been defaced or removed. FMIC reserves the right to make such determi-
nation on the basis of inspection by an Authorized FMIC Service Center.
All liability for any incidental or consequential damages for breach of any expressed or implied
warranties is disclaimed and excluded herefrom.
Some states do not allow limitations on how long an implied warranty lasts, or the exclusion or
limitation of incidental or consequential damages, so that the above exclusion may not apply to
you. This warranty gives you specific legal rights and you may also have other rights which vary
from state to state.
For a complete list of Authorized FMIC
Service Centers, and the latest SWR
news, interviews, and more, check out
our website:
SWR
8860 E Chaparral Rd, Suite 100
Scottsdale, AZ 85250-2618 USA
PHONE: (480) 596-9690
FAX: (480) 367-5262
EMAIL: custserve@fenderusa.com
WEB: swrsound.com
swrsound.com
CALIFORNIA BLONDE OWNER’S MANUAL • Part # 0066567000 • 08/03
Copy ight © 2003 SWR
SHOULD YOUR SWR AMPLIFIER REQUIRE SERVICE OR REPAIR, PLEASE USE THE
FOLLOWING PROCEDURE:
Locate you o iginal eceipt showing date of pu chase, model and se ial numbe .
Dete mine the closest Autho ized FMIC Se vice Cente to you location. The fastest way to get a complete list of Autho ized FMIC Se vice
Cente s is on the web at:
http://www.m gea head.com/faq/allse vice.html
You can also get this info mation by calling FMIC Consume Relations at (480) 596-7195
To eceive wa anty se vice, etu n the complete p oduct to an Autho ized FMIC Elect onics Se vice Cente , with p oof of pu chase, du ing
the applicable wa anty pe iod. T anspo tation costs a e not included in this Limited Wa anty.
Defective p oducts that qualify fo cove age unde this wa anty will be epai ed o eplaced, at FMIC’s disc etion, with a like o compa able
p oduct, without cha ge.
1
2
3
4


Other manuals for California Blonde
3
Table of contents
Other SWR Amplifier manuals

SWR
SWR amplite User manual

SWR
SWR 350x User manual

SWR
SWR Super Redhead User manual

SWR
SWR WorkingPro WorkingPro 700 User manual

SWR
SWR PB-200 User manual

SWR
SWR Baby Baby Blue User manual

SWR
SWR WorkingPro 2x10C User manual

SWR
SWR California Blonde II User manual

SWR
SWR BASS 750 User manual

SWR
SWR SM-500 User manual

SWR
SWR WorkingPro Series User manual

SWR
SWR SM-900 User manual

SWR
SWR Baby Blue Head User manual

SWR
SWR WORKINGMAN'S 10 User manual

SWR
SWR Workingman's 8004 O User manual

SWR
SWR Marcus Miller User manual

SWR
SWR Spellbinder Blue User manual

SWR
SWR 350x User manual

SWR
SWR WORKINGMAN'S 2004 User manual

SWR
SWR SM-500 User manual