manuals.online logo
Brands
  1. Home
  2. •
  3. Brands
  4. •
  5. Syclone
  6. •
  7. Fan
  8. •
  9. Syclone NEGATIVE AIR MACHINE Installation and operation manual

Syclone NEGATIVE AIR MACHINE Installation and operation manual

NEGATIVE AIR MACHINE
OPERATING &
MAINTENANCE
MANUAL
Releases & Notes May 2023 — The purpose of this document is to provide
basic information regarding operation, maintenance procedures, and warranty
details for the Negative Air Machine.
GENERAL INFORMATION
NC Filtration (FSNC LLC “Seller”) warrants the SYCLONE Negative Air Machine
shall be free from defects in material and workmanship for a period of one year
after receipt of equipment.
REMEDIES!
Seller’s sole obligations and the buyer’s exclusive remedies with respect to
goods determined to be defective shall be limited to repair or replacement.
RETURN PROCESS!
Buyer must call or email to receive an RMA# (return merchandise authorization)
and return address information. Buyer assumes responsibility for return freight
costs and must ship equipment pre-paid. The RMA# must be clearly marked on
returned items.
phone — 704.822.4444
email — customerservice@ncfiltration.com
Returned equipment will be inspected for defects and contaminants by seller. If
equipment is deemed defective by seller, the buyer will receive a
reimbursement for return freight costs and replacement may constitute, at
seller’s option: new, refurbished, or functionally equivalent item(s).
The SYCLONE Negative Air Machine is designed
for indoor use and to provide the most efficient air
filtration with three stages of filtration. The final
stage includes a HEPA (High-Efficiency Particulate
Air) filter that can remove 99.97% of particles 0.3
micron or larger from the air stream.
Specifications
Housing - galvanized steel or aluminum
Power & Motors - 115 volts, 60 Hz, 1625 rpm
1.0 HP, 2 Speed (9 amps)
0.5 HP, 2 Speed (5 amps)
Control Panel Options
Economy Panel
hi/low rocker switch
circuit breaker/reset button
inlet flange (plug receptacle)
Gauge Panel
hi/low rocker power switch
circuit breaker/reset button
inlet flange (plug receptacle)
minihelic pressure gauge
Full Feature
hi/low rocker power switch
circuit breaker/reset button
inlet flange (plug receptacle)
minihelic pressure gauge
replacement light/alarm
LIMITED WARRANTY
REPLACMENT PART NUMBERS
NC-MOTOR1HP
1 HP motor/capacitor
NC-MOTOR-5HP
1/2 HP motor/capacitor
(16x16 models only)
Motor replacements come as a complete kit (includes band and three support arms).
NC-HANDLE
handle (4)
NC-CASTER
rigid caster (2)
NC-SWIVCASTER
swivel caster with brake (2)
NC-OUTLETRING
outlet ring for exhaust
Contact distributor for replacement filters and parts.
OPERATION
⚠ATTENTION ⚠
PERSONNEL RESPONSIBLE FOR CHANGING FILTERS,
SERVICING, OR RELOCATING THE UNIT MUST WEAR
APPROVED RESPIRATORS AND PROTECTIVE EQUIPMENT. THE
REPLACEMENT FILTERS MUST BE THE SAME SIZE/TYPE AS THE
ONE BEING REPLACED. WHEN THE HEPA FILTER IS
REPLACED,THE PRE-FILTER PAD AND RING PANEL FILTER
SHOULD ALSO BE REPLACED. THIS WILL HELP TO EXTEND THE
LIFE OF THE HEPA FILTER.
•Turn the SYCLONE unit off and make sure to
disconnect the power supply cord from the machine.
•Watch for sharp edges, lift the door up and out of the
channel. Remove the contaminated pre-filter pad,
folding in the sides, and dispose of the filter
properly.*
•Next, carefully remove the contaminated ring panel
filter. Fold in half before proper disposal.*
•To remove the HEPA filter, loosen the four nuts and
rotate the four tabs to the open position. Carefully,
pull the HEPA filter out of the cabinet and dispose. To
prevent contamination, wipe down all exposed
surfaces and clean machine thoroughly BEFORE
installing new filters.
•Inspect the gasket on the new HEPA filter housing
before installation, to make sure there are no gaps,
cracks, or defects. Any defects in the gasket will allow
leakage of contaminated air through the unit.
•Place the new HEPA filter in the unit with the gasket
end facing the fan. Check to see that the filter lies
squarely on the base bracket.
•Push the HEPA filter against the HEPA flange
bulkhead. Rotate the locking tabs to the closed
position; tighten the nuts to ensure the HEPA tabs are
secure. Install the ring panel filter and pre-filter pad.
Place the door back into the channel, slowly
dropping the door closed.
•Reconnect the power supply cord. Then turn the unit
on and check the pressure gauge at the control
panel.
*USED FILTERS ARE CONSIDERED CONTAMINATED WASTE AND MUST BE
DISPOSED IN COMPLIANCE WITH ALLAPPLICABLE REGULATIONS.
FIRST STAGE — PRE-FILTER PAD
•24” x 24” x 1” — 1-Ply Pad
•Removes large particles up to 10 microns
and larger from the air flowing through the
unit, thereby preventing premature loading
of the second stage and HEPA filters. The
pre-filter pad is recommended to be
changed as it becomes loaded and the
airflow capacity of the unit decreases—or the
pressure gauge at the control panel exceeds
2.6 inches at high speed or 1.9 inches at low
speed, of W.C.
SECOND STAGE — RING PANEL
•24” x 24” x 1” — 2-Ply Ring Panel
•Removes particles up to 1 micron and larger
from the air flowing through the unit, thereby
protecting the more expensive, HEPA filter.
The ring panel filter is recommended to be
changed as it becomes loaded and the
airflow capacity of the unit decreases—or the
pressure gauge at the control panel exceeds
2.6 inches on high speed (1.9 inches on low
speed) of W.C..
THIRD STAGE — HEPA
•24” x 24” x 11.5” (99.97%) Wood Frame
HEPA Filter
•Removes smaller contaminated particles up
to 0.3 microns from the air flowing through
the unit and has an efficiency rating of
99.97%. The HEPA filter is recommended to
be changed as it becomes loaded, the
airflow capacity of the unit decreases, and
the pressure gauge at the control panel
exceeds 2.6 inches on high speed (1.9 inches
on low speed) of W.C.
FILTRATION
FILTER REPLACEMENT
UNIT SET UP & START UP
•The unit is to be operated away from doorways or other
make-up air sources. Properly set up the exhaust and seal off
any opening. Do not exhaust into uncontaminated or
occupied areas.
•Before powering the unit on:
‣lock the two rolling casters to keep the machine in place
‣confirm the rocker switch is in the off position
‣plug in the power supply cord
•To start the machine, select the speed by
pressing the top for high and the bottom for low.
ELECTRICAL REQUIREMENTS
The SYCLONE requires a minimum of 115 V, 60 Hz, 9.5
amp, power supply for normal operation. The unit requires
an industrial grade 12/3 cord, in good condition. Do not
use a damaged cord. The cord should be properly
grounded (ground pin on the plug) and the continuous
length should not exceed 50 feet in for proper operation.
Do not expose the unit or power cord to water.
⚠CAUTION ⚠
DO NOT OPERATE THE SYCLONE WITHOUT THE HEPA FILTER INSTALLED!
OPERATING WITHOUTTHE HEPA FILTER INSTALLED OR USING
NON-APPROVED POWER CORDS MAY CAUSE DAMAGE TO THE
ELECTRICAL SYSTEM AND/OR MECHANICAL COMPONENTS.
FAILURE TO COMPLY WILL VOID THE WARRANTY.

Other Syclone Fan manuals

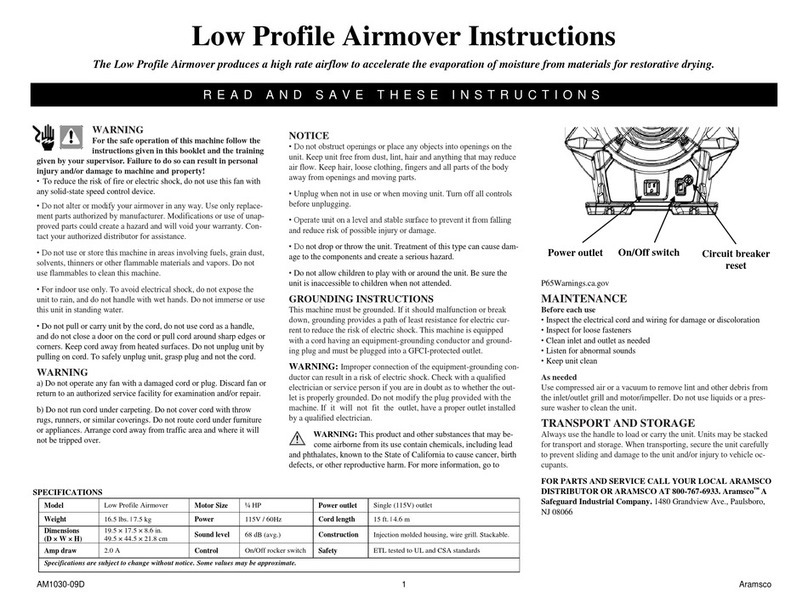
Syclone Low Profile Airmover User manual

Syclone

Syclone Low Profile Airmover User manual

Popular Fan manuals by other brands

Samsung Fresh Access AN035NSEDAV/AA installation manual

Samsung

Samsung Fresh Access AN035NSEDAV/AA installation manual

KDK K15YC Operating and installation instructions

KDK

KDK K15YC Operating and installation instructions

Space Pak WCSP-D series Installation, operation & maintenance manual

Space Pak

Space Pak WCSP-D series Installation, operation & maintenance manual

Ebmpapst A3G500-AN33-03 operating guide

Ebmpapst

Ebmpapst A3G500-AN33-03 operating guide

Pro Breeze PB-01 instruction manual

Pro Breeze

Pro Breeze PB-01 instruction manual

Ebmpapst G4E180-AB01-01 operating instructions

Ebmpapst

Ebmpapst G4E180-AB01-01 operating instructions

Water-Loo LCS-F Operating and maintenance

Water-Loo

Water-Loo LCS-F Operating and maintenance

German pool EFB-226 user manual

German pool

German pool EFB-226 user manual

LTG VFC Instructions for installation, use and maintenance

LTG

LTG VFC Instructions for installation, use and maintenance

Kambrook KFA839 Nstructions booklet

Kambrook

Kambrook KFA839 Nstructions booklet

Ebmpapst AF1250-001 operating instructions

Ebmpapst

Ebmpapst AF1250-001 operating instructions

Ebmpapst D3G160-BF60-11 operating instructions

Ebmpapst

Ebmpapst D3G160-BF60-11 operating instructions

Ebmpapst R2E225-AX52-16 operating instructions

Ebmpapst

Ebmpapst R2E225-AX52-16 operating instructions

Hitachi RPI-1.5FSRE Installation & operation manual

Hitachi

Hitachi RPI-1.5FSRE Installation & operation manual

FALMEC KACL.953 Instruction booklet

FALMEC

FALMEC KACL.953 Instruction booklet

Nicotra EC FAN FDP operating manual

Nicotra

Nicotra EC FAN FDP operating manual

Craftmade STY52CH installation guide

Craftmade

Craftmade STY52CH installation guide

Bionaire BASF1016GRC instruction manual

Bionaire

Bionaire BASF1016GRC instruction manual

manuals.online logo
manuals.online logoBrands
  • About & Mission
  • Contact us
  • Privacy Policy
  • Terms and Conditions

Copyright 2025 Manuals.Online. All Rights Reserved.