EnglishDeutsch
 logo
Brands
  1. Home
  2. •
  3. Brands
  4. •
  5. Sylvania
  6. •
  7. Speakers
  8. •
  9. Sylvania SP563-BLACK User manual

Sylvania SP563-BLACK User manual

This manual suits for next models

2

Other Sylvania Speakers manuals

Sylvania SP332 User manual

Sylvania

Sylvania SP332 User manual

Sylvania MA-960-D User manual

Sylvania

Sylvania MA-960-D User manual

Sylvania SP262-ASST User manual

Sylvania

Sylvania SP262-ASST User manual

Sylvania SP349 User manual

Sylvania

Sylvania SP349 User manual

Sylvania SP776-PDQ DG User manual

Sylvania

Sylvania SP776-PDQ DG User manual

Sylvania SB350BT User manual

Sylvania

Sylvania SB350BT User manual

Sylvania SP234 User manual

Sylvania

Sylvania SP234 User manual

Sylvania SPA021 User manual

Sylvania

Sylvania SPA021 User manual

Sylvania SP355 User manual

Sylvania

Sylvania SP355 User manual

Sylvania SB3713 User manual

Sylvania

Sylvania SB3713 User manual

Sylvania SP332-ASST3-PL User manual

Sylvania

Sylvania SP332-ASST3-PL User manual

Sylvania SB379W User manual

Sylvania

Sylvania SB379W User manual

Sylvania SP770 User manual

Sylvania

Sylvania SP770 User manual

Sylvania SP305DG User manual

Sylvania

Sylvania SP305DG User manual

Sylvania SPA081-C User manual

Sylvania

Sylvania SPA081-C User manual

Sylvania SP332-AST4 User manual

Sylvania

Sylvania SP332-AST4 User manual

Sylvania SP650 User manual

Sylvania

Sylvania SP650 User manual

Sylvania SP263G User manual

Sylvania

Sylvania SP263G User manual

Sylvania SP233 User manual

Sylvania

Sylvania SP233 User manual

Sylvania SP845 User manual

Sylvania

Sylvania SP845 User manual

Sylvania SP260 Manual

Sylvania

Sylvania SP260 Manual

Sylvania SPA124 User manual

Sylvania

Sylvania SPA124 User manual

Sylvania SP5686 User manual

Sylvania

Sylvania SP5686 User manual

Sylvania SPA081 User manual

Sylvania

Sylvania SPA081 User manual

Popular Speakers manuals by other brands

Yamaha DXR10 null

Yamaha

Yamaha DXR10 null

argon audio IE20 quick start

argon audio

argon audio IE20 quick start

Denon SC-N7 owner's manual

Denon

Denon SC-N7 owner's manual

Gemline Ace 3952 user manual

Gemline

Gemline Ace 3952 user manual

Focal ON WALL 300 User manua

Focal

Focal ON WALL 300 User manua

HEADRUSH Maximus HRSP 5024 manual

HEADRUSH

HEADRUSH Maximus HRSP 5024 manual

SoundLogic BCCS-6/6395 instruction manual

SoundLogic

SoundLogic BCCS-6/6395 instruction manual

Peavey DTH 218 Specification sheet

Peavey

Peavey DTH 218 Specification sheet

Avantree Pluto Air user guide

Avantree

Avantree Pluto Air user guide

Morel Integra Series INTEGRA OVATION 4 install guide

Morel

Morel Integra Series INTEGRA OVATION 4 install guide

Oppo SONICA quick start guide

Oppo

Oppo SONICA quick start guide

Bose SoundLink Wireless Music System owner's guide

Bose

Bose SoundLink Wireless Music System owner's guide

Rocksteady Stadium owner's manual

Rocksteady

Rocksteady Stadium owner's manual

Bowers & Wilkins 4 owner's manual

Bowers & Wilkins

Bowers & Wilkins 4 owner's manual

Sonance SONOS OUTDOOR Series installation manual

Sonance

Sonance SONOS OUTDOOR Series installation manual

Electro-Voice EVID FM4.2 Brochure & specs

Electro-Voice

Electro-Voice EVID FM4.2 Brochure & specs

Pioneer XW-HTD630 manual

Pioneer

Pioneer XW-HTD630 manual

Onn BWA16AA002 Product guide

Onn

Onn BWA16AA002 Product guide

https://manuals.online logo
https://manuals.online logoBrands
  • About & Mission
  • Contact us
  • Privacy Policy
  • Terms and Conditions

Copyright 2026 Manuals.Online. All Rights Reserved.

Retro Wireless Speaker
Included In the Box
1. Speaker 1pc
2. Micro- USB Charging Cable 1pc
3. 3.5 mm Audio Cable 1pc
4. User Manual 1pc
5. Warranty Card 1pc
Specifications
Device Operation
Attach the small connector of the supplied micro-USB charging
cable to the micro-USB charging port on the back of the speaker.
Attach the other connector to the USB port on your computer, a
USB charging device, or a 5V USB Adapter (not included) and
plug into a wall socket.
The charging LED indicator will turn RED while charging and turn
off when the speaker is fully charged.
Note: - Before moving or installing this product, make sure the
Power switch of the unit is in OFF position.
- Disconnect the USB cable from the speaker when unused
for long periods of time.
Note: - Playback is controlled through your connected device,
volume adjustment can be controlled with the volume knob.
- After the unit has paired and connected, it will re-connect
automatically when the unit is powered on and the device
is in range.
Note: - When powering on, it will automatically go to FM Radio
mode.
- Control the volume through the volume knob.
For service assistance and product information,
please call: 1-800-968-9853.
Curtis International Ltd.
7045 BECKETT DRIVE, UNIT 15, MISSISSAUGA, ON, L5S 2A3
www.curtisint.com
Charging the Speaker
Turn the speaker ON by moving the [POWER] switch to the ON
position.
Turn the speaker OFF by moving the [POWER] switch to the OFF
position.
Powering ON/OFF
Attach one connector of the supplied 3.5mm audio cable to the Aux
in port the back of the speaker, Attach the other connector to the
headphone jack on your media-playing device.
When plugged in, the speaker will automatically switch to AUX
mode, and the LED indicator will turn solid RED. Playback is
controlled through your connected device. Volume adjustment
can still be controlled with the volume knob on the front of the
speaker.
Aux-In Mode
For best reception, extend the FM radio antenna. You may need
to adjust or position the antenna for certain stations.
· When in FM radio mode, the LED indicator will flash RED.
· Use the FM tuner dial on the front of the speaker to select a radio
station.
Using the FM Radio
1. Turn the speaker ON by moving the [POWER] switch to the
ON position. A tone will be heard and the speaker will turn on
in FM radio mode. Press the [MODE] button to switch modes.
When the speaker is in Bluetooth pairing mode, the LED
indicator will quickly flash GREEN.
2. Set your mobile device to search for Bluetooth devices. When
it appears, select Sylvania SP563 from the list of found devices.
3. Once successfully paired, a tone will be heard and the LED
indicator will slowly flash GREEN.
Bluetooth Mode
LED Status
Green Solid
Green flash quickly
Red flash slowly
bluetooth waiting for pairing
Powering on
FM radio mode
Aux-In mode / charging
Green flash slowly
Red solid
Bluetooth paired
TROUBLE SHOOTING GUIDE
No power
- Make sure the power switch is set in the
“ON” position.
- Speaker needs to be charged
- Check whether the volume is set at
minimum level.
No sound
Unit doesn’t connect to device - Speaker needs to be connected/re-paired
to device
SP563-BLACK/BLUE/PINK
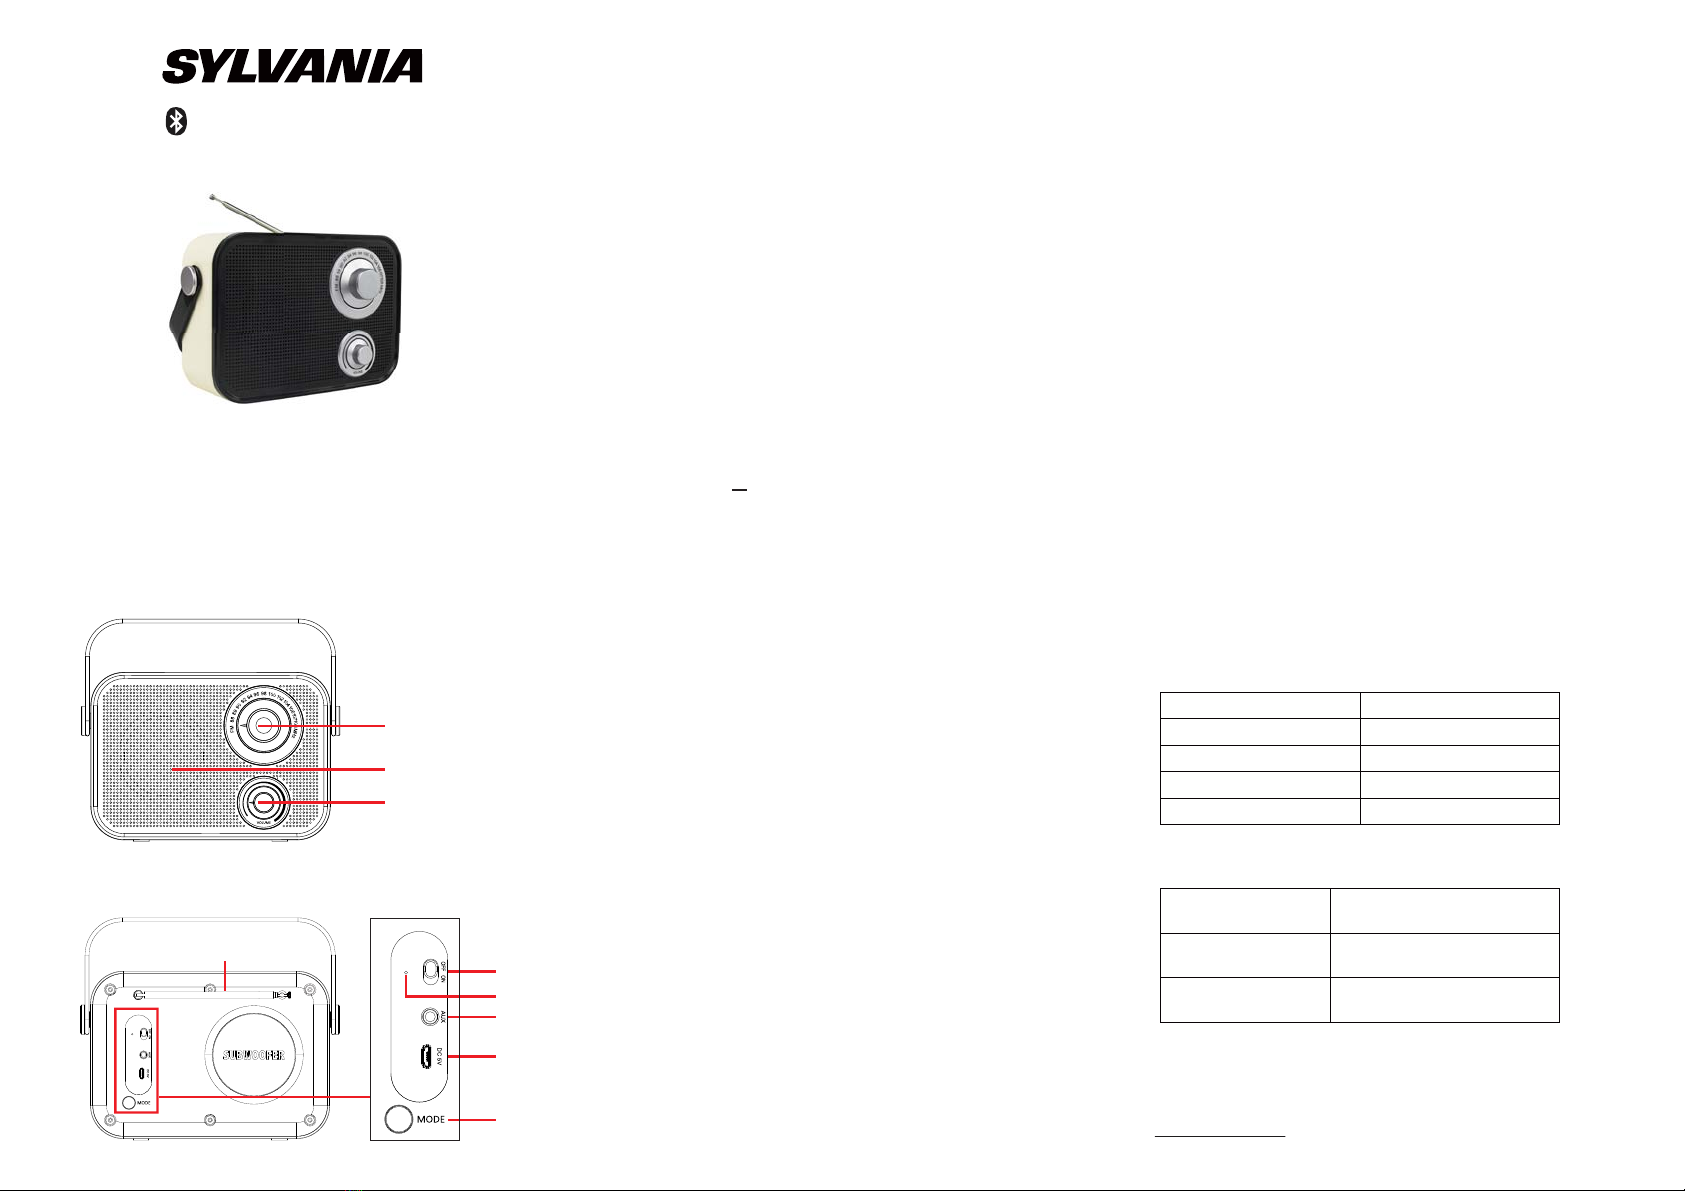
Device Overview
Front Panel
Back Panel
Thank you for purchasing this product. Please read this manual
carefully, and save it for future reference.
FM Tuner Dial
1. Power ON/OFF Switch
2. LED Indicator
3. AUX in Port
4. Micro USB Charging Port
5. Mode Button (Change mode: Bluetooth, FM Radio, Aux-In)
6. FM Radio Antenna
Speaker
Volume Knob
1
2
3
4
5
6
SYLVANIA is a registered trademark of OSRAM Sylvania Inc. used under license.
Speaker Driver: 3"
Bluetooth Version : 4.1
Bluetooth Range: 33ft (10m)
FM: 87.5 ~108.0MHZ
Battery: 1200mah rechargeable lithium battery
Charging: DC 5V --- 1 A
FCCWarningStatement
Changesormodificationsnotexpresslyapprovedbythepartyresponsibleforcompliancecould
voidtheuser’sauthoritytooperatetheequipment.Thisequipmenthasbeentestedandfoundto
complywiththelimitsforaClassBdigitaldevice,pursuanttoPart15oftheFCCRules.These
limitsaredesignedtoprovidereasonableprotectionagainstharmfulinterferenceinaresidential
installation.Thisequipmentgeneratesusesandcanradiateradiofrequencyenergyand,ifnot
installedandusedinaccordancewiththeinstructions,maycauseharmfulinterferencetoradio
communications.However,thereisnoguaranteethatinterferencewillnotoccurinaparticular
installation.Ifthisequipmentdoescauseharmfulinterferencetoradioortelevisionreception,
whichcanbedeterminedbyturningtheequipmentoffandon,theuserisencouragedtotryto
correcttheinterferencebyoneormoreofthefollowingmeasures:
ϋϋ Reorientorrelocatethereceivingantenna.
ϋϋ Increasetheseparationbetweentheequipmentandreceiver.
ϋϋConnecttheequipmentintoanoutletonacircuitdifferentfromthattowhichthereceiveris
connected.
ϋϋ Consultthedealeroranexperiencedradio/TVtechnicianforhelp.

Thisdevicecomplieswithpart15oftheFCCRules.Operationissubjecttothefollowing
twoconditions:(1)Thisdevicemaynotcauseharmfulinterference,and
(2)thisdevicemustacceptanyinterferencereceived,includinginterferencethatmaycause
undesiredoperation.
