Synergy SM-073-WML User manual

7.3 Inch Car Rear View Mirror Monitor
with wireless Mirror link
User manual
SM-073-WML

Chapter One: Product Introduction...................................1
1.1 Package................................................1
1.2 Features...............................................1
1.3 Specification............................................1
1.4 Operating panel.........................................2
Chapter Two: Adjustable Guideline..................................3
2.1 About guide line.........................................3
2.2 What is the regular guide line..............................3
2.3 How to adjust the guide line ..............................4
Chapter Three: Menu Setting...................................5
3.1 Remote control.........................................5
3.2 Menu setting guidance...................................5
Chapter Four: Mirror Link..........................................8
4.1 How to connect.........................................8
4.2 Channel switching.......................................11
Table of contents

Chapter one: Product Introduction
1.3 Specification
The packing box contains the following accessories, please check:
7.3 inch car Rear view mirror monitor with mirror link
wire harness
User's manual
wire cover
Remote control
If any damage has occurred, please contact the distributor or the agent
as soon as possible.
1.1 Package
●
●
●
●
●
7.3 inch widescreen LCD display
2-way video input
Back up camera display
Automatic brightness adjustment
4.0 mm glass and 21 mm car factory OEM bracket
Adjustable guide line
Mode switch between wide screen and dual screens LCD display separately
1.2 Features
●
●
●
●
●
●
Screen size: 7.3 inch
Display screen: TFT-LCD
Aspect resolution: 1280(H)*390(V)
Working voltage: 12V
Working temperature: -20℃~+65℃
Signal system: PAL/Auto/NSTC
●
●
●
●
●
●
●
1

Mirror link mode switch. When not in the menu press to switch
between iOS and Android mode
1.4 Operating panel
7.3 inch ultra high brightness display screen
1
Turn on/off the display screen
Indicator
1
2
3
4
5
6
7
2 3 4
7
6
5
Front light sensor
Selection of video input channel
Short press switches the video channel displayed on the monitor.
Viewing options: DOUBLE, VIDEO1, PHONE, CAMERA channels.
When reverse wire is connected to 12V, system will switch to BACK
UP CAMERA screen automatically and reverse guideline is available.
Adjustable by remote control.
Colour mode adjustment
Short press adjusts the colour mode of the image. Four
modes are available: STANDARD, BRIGHT, BEAUTIFUL,
and SOFT. Please note that these modes only are accessible
when not in reversing mode.
2

3
Generally, to help drivers estimate the distance from obstacles, there are three
lines for reference: red, yellow and green. Those three lines are displayed on the
monitor when car is reversing. The green line is 3m from the back of car and the
yellow line is 2m. The open red line is 1m from the back end of car while the
closed red line is 0.4m. Both reference lines on the left and right should leave
0.2m space from the car.
20CM20CM
2.1 About guide line
Regular guide line is fixed, but car size and camera mounting position are different
vehicle to vehicle. The fixed guide line is not accurate enough for drivers. There will
be significant difference between regular and fixed guide lines and car's real guide
lines, especially when camera is mounted on the left or right side of car.
2.2 What the regular guide line is
Chapter two: Adjustable Guideline

Up Clockwise
Down
Right
left
Move the guide line Rotate the guide line
anticlockwise
Press the button to choose the L or R adjustable guideline
Remote control
RL
Wrong position
Right position
4
According to the site of standard reference line, we can put reference objects such
as desks in the back area of car. Compared with the marked reference objects, we
can adjust the sites and angle of two guide lines displayed on the monitor. You will
get the accurate guide lines once they coincide with the reference objects.
Press setting button to enter “guide line adjustment” mode. The system is
defaulted to adjust left guide line first. Press the button again to switch to
the right guide line. The up down left and right buttons are to
adjust the corresponding location of guide lines. The clockwise rotation and
anti-clockwise rotation buttons are to adjust the angle of guide lines. It is
easy to operate and calibrate. After finishing calibration, switch to reverse
gear to save the information.
Caution: keep the remote control 0.5m-1.0m from rearview mirror when you use the remote to
adjust the parking lines.
2.3 How to adjust the guide line
Display on the monitor

5
Chapter Three: Menu Setting
Enter picture menu
Guide line clockwise
Menu parameter decrease
Menu parameter increase
Guide line up
Guide line left
Enter guide line
adjustment
Guide line anti-clockwise
Guide line right
Guide line down
Press to reset all
menu and parameters
3.1 Remote control
The menu can only be accessed by remote control:
3.2 Menu setting guidance
Short press “MENU” to enter “PICTURE”, then you can switch among
“BRIGHTNESS”, “COLOUR”, “CONTRAST”, “SCALE”, “START LOGO”, “PRESET”,
or exit. When it switches to “PRESET”, short press the MENU button, and you
would close the menu. UP and DOWN are to change the figure of each setting.
3.2.1 BRIGHTNESS ADJUSTMENT
The defaulted setting is 50, ranging from 0 to 100, and only CVBS signal can work.

6
3.2.2 COLOUR ADJUSTMENT
The defaulted setting is 50, ranging from 0 to 100, and only CVBS signal can work.
3.2.3 CONTRAST ADJUSTMENT
The defaulted setting is 50, ranging from 0 to 100, and only CVBS signal can work.
3.2.4 SCALE ADJUSTMENT
Only for the model with guide lines, and no such setting for those without
this function. ON is defaulted setting, and you can manually set it to OFF.

It's defaulted as OFF, and ON is to preset the menu, then it switches to OFF
It's is defaulted as “ON”, you can set it to “OFF” manually.
The reversing mode is the top priority, then the touch panel is ineffective. The
video cannot be changed until the parking mode is ended. But the manual
button is accessible. Short press to adjust the brightness of the monitor, long
The defaulted setting is 80, ranging from 0 to 100, and only CVBS signal can work.
3.2.6 PRESET ADJUSTMENT
3.2.5 START LOGO ADJUSTMENT
automatically.
press to turn off the screen.
7
3.2.7 VOLUME ADJUSTMENT

Chapter Four: Mirror Link
This is a special device to project your mobile phone to Rear view mirror
monitor through WiFi connection, and the popular standards like DLNA,
Miracast and Air Play. The driver can set the navigation path on the phone
before setting off, and then as long as the phone WiFi is connected to the
rearview mirror, the navigation audio and video can be simultaneously
displayed on the rearview mirror. While driving, the navigation path can be
set by a passenger using a mobile phone, then the image is simultaneously
displayed on the rearview mirror.
4.1 How to connect
1: First, make sure Android phone has wireless projection function.
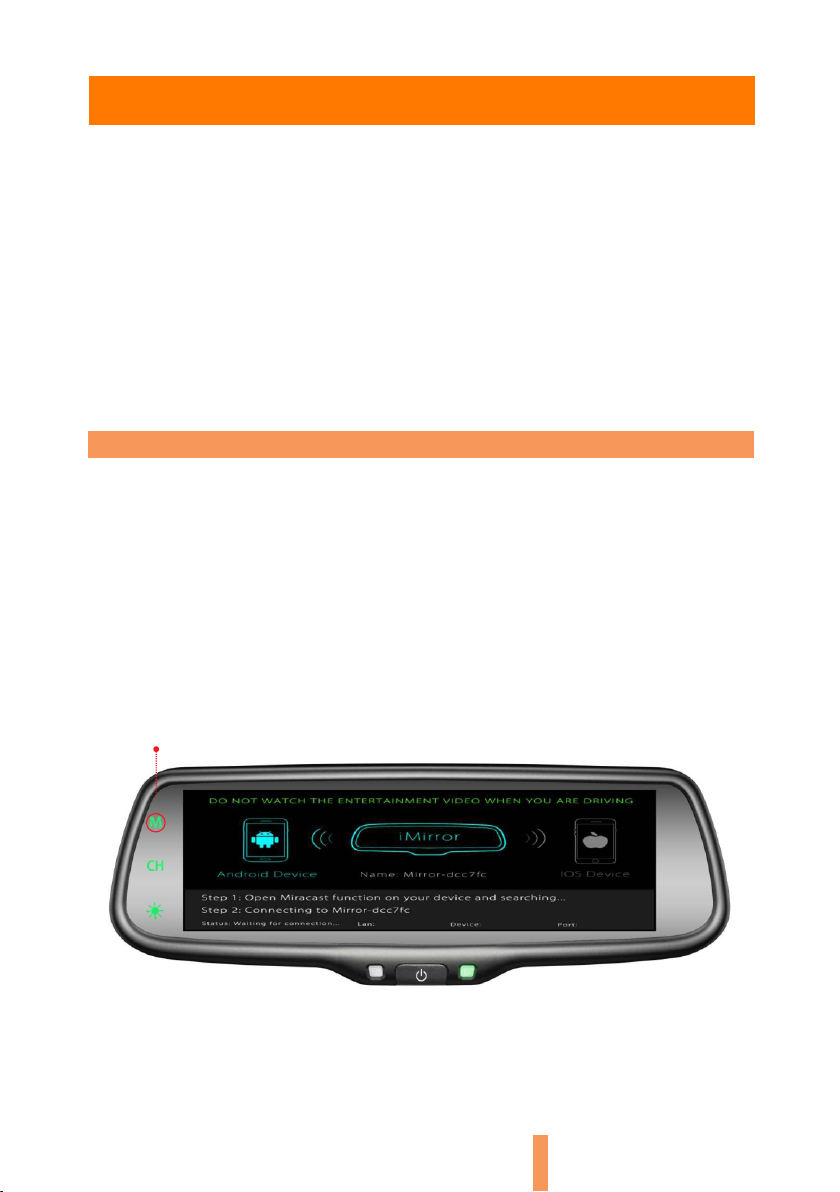
2: Click the “M” button on the TP button, switch wireless mode to Android
mode; open the WiFi on your phone, then search for a WiFi device in the
phone's wireless projection function, connect the device according to the
wireless device names displayed on the screen:
“M”button
8
4.1.1 How to connect with Android phone (Android versions have more on
how to use wireless projection function, please consult the phone
instructions)
Please note: Keep the bluetooth off when you use mirror link function
and connect your phone!

tap here
tap here
9
After connection, the phone screen is projected onto the rear view mirror.
You can press “CH” on TP button to cycle through dual mode or
single-screen mode.
tap here

WIFI name
10
“M”button
1: First, click the “M” button on TP button, switch the wireless mode to iOS
mode.
4.1.2 How to connect with iPhone
2: Using iPhone search WiFi (WiFi name is displayed on the screen and
shown as below), then enter the default password: 12345678. After
finishing WiFi connection, bring up the shortcut menu, click on the AirPlay
function, select the device name, and open the Mirroring.
Tap here
Turn on
Tap here

11
4.2 Channel switching
4.2.1 Camera full screen display
Press the “CH” button on the screen; this switches display between CAMERA
(default and only full screen display), VIDEO1, MOBILE, VIDEO1 full screen
display and MOBILE full screen display.
After connection, the phone screen is projected onto the rear view mirror.
You can press “CH” on TP button to cycle through dual mode or
single-screen mode.

12
4.2.2 VIDEO1 and MOBILE display simultaneously
4.2.3 VIDEO1 full screen display
4.2.4 MOBILE full screen display

13
Notes

Synergy Automotive Electronics Ltd
Unit 10 Glenmore Business Park,
Chippenham, Wiltshire, SN14 6BB
www.synergy-automotive.com
www.synergytradeshop.com
info@synergy-automotive.com
Telephone: 01249 401000
Technical: 07584 485189
Distributed in the UK by:
Table of contents
Other Synergy Automobile Accessories manuals
Popular Automobile Accessories manuals by other brands

HAUL MASTER
HAUL MASTER 41005 Assembly and operating instructions

Keith
Keith LeakProof III owner's manual

Bilstein
Bilstein 25-187632 Mounting instruction

travall
travall TDG 1512D Fitting instructions

In the Garage
In the Garage Car Shield manual

Edscha Trailer Systems
Edscha Trailer Systems TipperRoof quick guide

Smittybilt
Smittybilt 76716 installation instructions

Manson Engineering Industrial
Manson Engineering Industrial SDC–5203 user manual

Hayman Reese
Hayman Reese 03353RW installation instructions

Heritage
Heritage Quick-Fit Installation

Alu-Cab
Alu-Cab SH-BKT-FR Fitment Instructions

Thule
Thule 301768 instructions