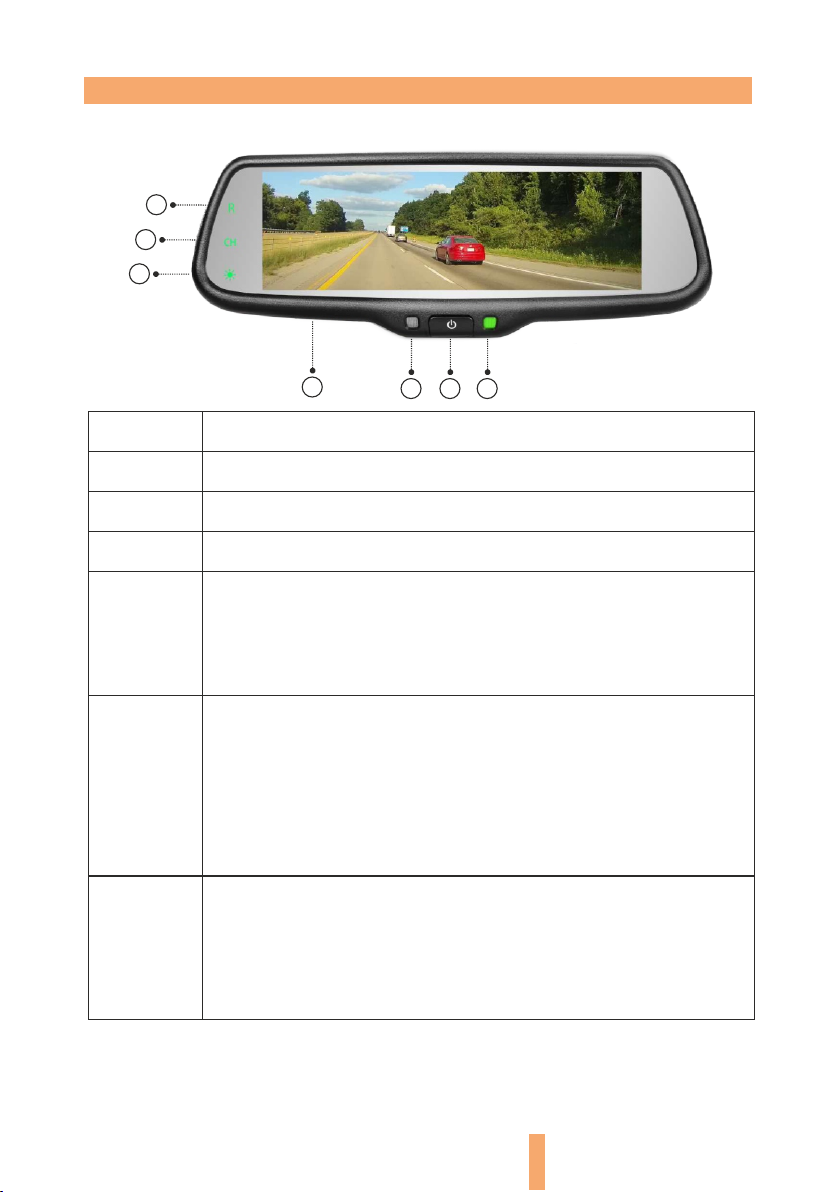
Synergy SM-073 User manual

7.3 Inch Car Rear View Mirror Monitor
User manual
SM-073

Chapter One: Product Introduction...................................1
1.1 Package................................................1
1.2 Features...............................................1
1.3 Specification............................................1
1.4 Operating panel.........................................2
Chapter Two: Adjustable Guideline..................................3
2.1 About guide line.........................................3
2.2 What is the regular guide line..............................3
2.3 How to adjust the guide line ..............................4
Chapter Three: Menu Setting...................................5
3.1 Remote control.........................................5
3.2 Menu setting guidance...................................5
Table of contents
3.3 Displaying camera feeds...................................8

Chapter one: Product Introduction
1.3 Specification
The packing box contains the following accessories, please check:
7.3 inch car Rear view mirror monitor with mirror link
wire harness
User's manual
wire cover
Remote control
If any damage has occurred, please contact the distributor or the agent
as soon as possible.
1.1 Package
●
●
●
●
●
7.3 inch widescreen LCD display
3-way video input
Back up camera display
Automatic brightness adjustment
4.0 mm glass and 21 mm car factory OEM bracket
Adjustable guide line
Mode switch between wide screen and dual screens LCD display separately
1.2 Features
●
●
●
●
●
●
Screen size: 7.3 inch
Display screen: TFT-LCD
Aspect resolution: 1280(H)*390(V)
Working voltage: 12V
Working temperature: -20℃~+65℃
Signal system: PAL/Auto/NSTC
●
●
●
●
●
●
●
1

1.4 Operating panel
2
7.3 inch ultra high brightness display screen
1
Turn on/off the display screen
Indicator
1
2
3
4
5
6
7
2 3 4
7
6
5
Front light sensor
Shortcut key to back up camera
Short press any key in the le unl the indicator light is on.
Short press “R” to Back Up Camera. But it doesn't work when
it's in reversing mode.
Switch between different video channels
Short press it to make the video channels switch among
DOUBLE, VIDEO1, VIDEO2, BACK UP CAMERA. No guide line
display on the monitor no maer how many mes when you
press “CH”. When the reversing line is connected to the 12V, it
would change to BACK UP CAMERA automacally, and guide line
is on the monitor, which can be adjusted by the remote.
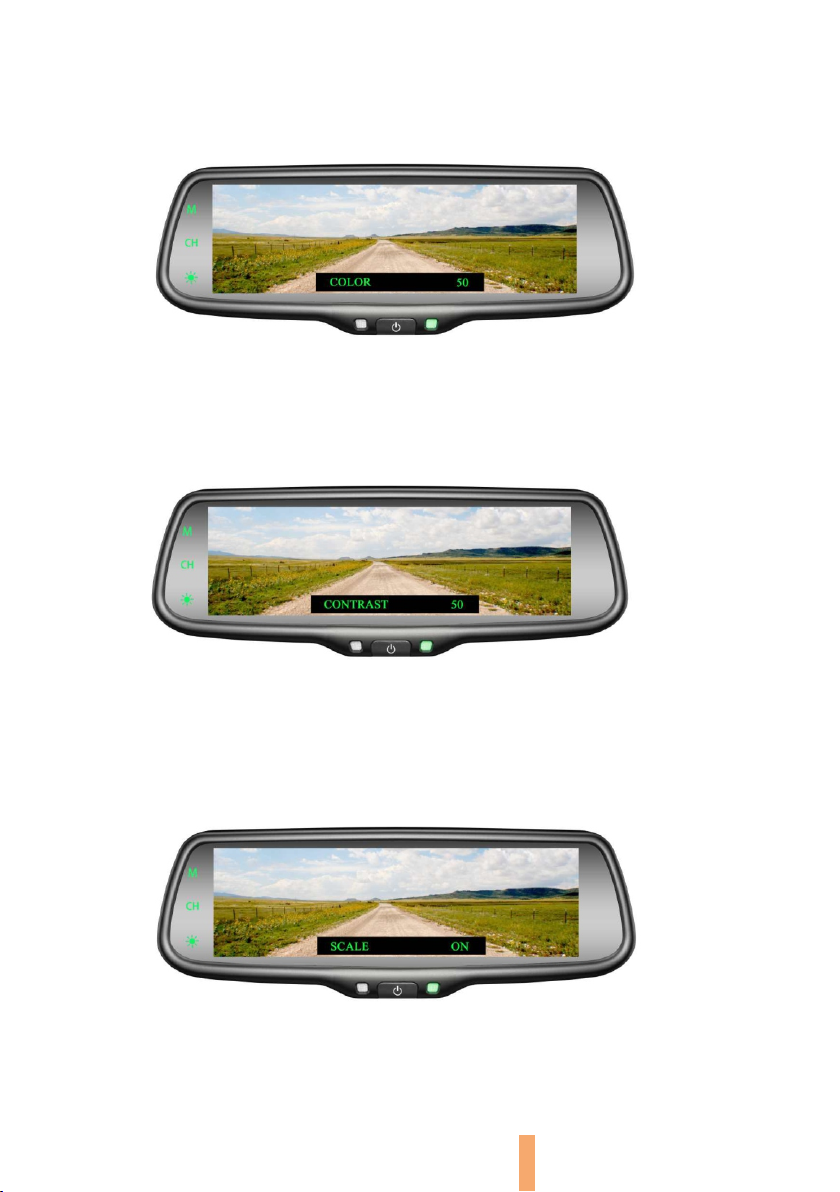
Color mode adjustment
Short press it can adjust the color mode of the image. Four
modes are available, that is STANDARD, BRIGHT, BEAUTIFUL,
and SOFT. Please be noted that these modes only are accessible
when it's not in reversing mode.

3
Generally, to help drivers estimate the distance from obstacles, there are three
lines for reference: red, yellow and green. Those three lines are displayed on the
monitor when car is reversing. The green line is 3m from the back of car and the
yellow line is 2m. The open red line is 1m from the back end of car while the
closed red line is 0.4m. Both reference lines on the left and right should leave
0.2m space from the car.
20CM20CM
2.1 About guide line
Regular guide line is fixed, but car size and camera mounting position are different
vehicle to vehicle. The fixed guide line is not accurate enough for drivers. There will
be significant difference between regular and fixed guide lines and car's real guide
lines, especially when camera is mounted on the left or right side of car.
2.2 What the regular guide line is
Chapter two: Adjustable Guideline

Up Clockwise
Down
Right
left
Move the guide line Rotate the guide line
anticlockwise
Press the button to choose the L or R adjustable guideline
Remote control
RL
Wrong position
Right position
4
According to the site of standard reference line, we can put reference objects such
as desks in the back area of car. Compared with the marked reference objects, we
can adjust the sites and angle of two guide lines displayed on the monitor. You will
get the accurate guide lines once they coincide with the reference objects.
Press setting button to enter “guide line adjustment” mode. The system is
defaulted to adjust left guide line first. Press the button again to switch to
the right guide line. The up down left and right buttons are to
adjust the corresponding location of guide lines. The clockwise rotation and
anti-clockwise rotation buttons are to adjust the angle of guide lines. It is
easy to operate and calibrate. After finishing calibration, switch to reverse
gear to save the information.
Caution: keep the remote control 0.5m-1.0m from rearview mirror when you use the remote to
adjust the parking lines.
2.3 How to adjust the guide line
Display on the monitor

5
Chapter three: Menu Setting
Enter picture menu
Guide line clockwise
Menu parameter decrease
Menu parameter increase
Guide line up
Guide line left
Enter guide line
adjustment
Guide line anti-clockwise
Guide line right
Guide line down
Press to reset all
menu and parameters
3.1 Remote control
The menu can only be accessed by remote control:
3.2 Menu setting guidance
Short press “MENU” to enter “PICTURE”, then you can switch among
“BRIGHTNESS”, “COLOUR”, “CONTRAST”, “SCALE”, “START LOGO”, “PRESET”,
or exit. When it switches to “PRESET”, short press the MENU button, and you
would close the menu. UP and DOWN are to change the figure of each setting.
3.2.1 BRIGHTNESS ADJUSTMENT
The defaulted setting is 50, ranging from 0 to 100, and only CVBS signal can work.

6
3.2.2 COLOUR ADJUSTMENT
The defaulted setting is 50, ranging from 0 to 100, and only CVBS signal can work.
3.2.3 CONTRAST ADJUSTMENT
The defaulted setting is 50, ranging from 0 to 100, and only CVBS signal can work.
3.2.4 SCALE ADJUSTMENT
Only for the model with guide lines, and no such setting for those without
this function. ON is defaulted setting, and you can manually set it to OFF.

It's defaulted as OFF, and ON is to preset the menu, then it switches to OFF
It's is defaulted as “ON”, you can set it to “OFF” manually.
The reversing mode is the top priority, then the touch panel is ineffective. The
video cannot be changed until the parking mode is ended. But the manual
button is accessible. Short press to adjust the brightness of the monitor, long
The defaulted setting is 80, ranging from 0 to 100, and only CVBS signal can work.
3.2.6 PRESET ADJUSTMENT
3.2.5 START LOGO ADJUSTMENT
automatically.
press to turn off the screen.
7
3.2.7 VOLUME ADJUSTMENT

8
3.3 How to display the rear view mirror screen.
Status B:Wide screen would display the rear image when it's in parking mode.
Status A: In normal driving, the car monitor can display left and right video,
to facilitate drivers to observe the condition of the two sides (There will be
different video displayed on mirror according to the different location of
camera ).
Status C : When the car is turning to left, the left light is on, and (option)
turning left signal would trigger automatically the left camera to get the full
screen. After it closes for 3S, the screen would get back.

Status D(option): When the car is turning to right, the right light is on, and
turning right signal would trigger automatically the right camera to get the
full screen. After it closes for 3S, the screen would get back.
Status E(option): When the front two turning lights are on, the signal would
trigger automatically the left and right cameras. After it closes for 3S, the
screen would get back.
9

Synergy Automotive Electronics Ltd
Unit 10 Glenmore Business Park,
Chippenham, Wiltshire, SN14 6BB
www.synergy-automotive.com
www.synergytradeshop.com
info@synergy-automotive.com
Telephone: 01249 401000
Technical: 07584 485189
Distributed in the UK by:
Table of contents
Other Synergy Automobile Accessories manuals
Popular Automobile Accessories manuals by other brands

HAUL MASTER
HAUL MASTER 41005 Assembly and operating instructions

Keith
Keith LeakProof III owner's manual

Bilstein
Bilstein 25-187632 Mounting instruction

travall
travall TDG 1512D Fitting instructions

In the Garage
In the Garage Car Shield manual

Edscha Trailer Systems
Edscha Trailer Systems TipperRoof quick guide

Smittybilt
Smittybilt 76716 installation instructions

Manson Engineering Industrial
Manson Engineering Industrial SDC–5203 user manual

Hayman Reese
Hayman Reese 03353RW installation instructions

Heritage
Heritage Quick-Fit Installation

Alu-Cab
Alu-Cab SH-BKT-FR Fitment Instructions

Thule
Thule 301768 instructions