SYNQ AUDIO RESEARCH DLP-6 Mk2 User manual


ENGLISH OPERATION MANUAL
SYNQ®1/96 DLP-6 MK2
OPERATION MANUAL
Thank you for buying this SYNQ®product. To take full advantage of all possibilities, please read these
operating instructions very carefully.
FEATURES
This unit is radio-interference suppressed. This appliance meets the requirements of the current European
and national guidelines. Conformity has been established and the relevant statements and documents have
been deposited by the manufacturer.
Professional digital loudspeaker management processor based on dual 24bit DSP technology
Used to tune your loudspeakers to perfection!
2 inputs and 6 outputs with full matrix routing capability
Both inputs have:
6 Band equalizer (parametric, high shelf, low shelf)
Delay (adjustable up to 682ms [= 235m] in 21µs steps)
All 6 outputs have:
Crossover (Linkwitz/Riley, Bessel, Butterworth) with adjustable slope (12 / 18 / 24 and 48dB/oct)
4 Band equalizer (parametric, high shelf, low shelf)
Delay (adjustable up to 2000ms [= 688,86m] in 21µs steps)
Phase reverse
Limiter (adjustable attack, release, threshold and hold time)
30 different speaker setups can be stored in memory
Program locking with password protection
Firmware updates and parameter setup via PC:
Via USB: easy setup but cable length limited to 5m
Via RS485: (RS485/USB converter included) CAT-5E network cable up to 100m can be used.
Complete Windows®software included with visually attractive and easy setup capabilities
Soft power on operation to avoid disturbing clicks
Clear blue 2x20 character back light LCD display
High quality components and rugged construction make it road proof
Balanced XLR in/outputs
Can be used for professional PA and studio but also for Pro DJ’s
BEFORE USE
Before you start using this unit, please check if there’s no transportation damage. Should there be any, do
not use the device and consult your dealer first.
Important: This device left our factory in perfect condition and well packaged. It is absolutely necessary
for the user to strictly follow the safety instructions and warnings in this user manual. Any damage caused
by mishandling is not subject to warranty. The dealer will not accept responsibility for any resulting defects
or problems caused by disregarding this user manual.
Keep this booklet in a safe place for future consultation. If you sell the fixture, be sure to add this user
manual.
To protect the environment, please try to recycle the packing material as much as possible.
Check the contents:
Check that the carton contains the following items:
User manual
DLP-6 MK2 unit
RS485/USB converter
CDROM with PC software + user manual
Mains cable

ENGLISH OPERATION MANUAL
SYNQ®2/96 DLP-6 MK2
SAFETY INSTRUCTIONS:
To prevent fire or shock hazard, do not expose this appliance to rain or moisture.
To avoid condensation to be formed inside, allow the unit to adapt to the surrounding temperatures when
bringing it into a warm room after transport. Condense sometimes prevents the unit from working at full
performance or may even cause damages.
This unit is for indoor use only.
Don’t place metal objects or spill liquid inside the unit. No objects filled with liquids, such as vases, shall be
placed on this appliance. Electric shock or malfunction may result. If a foreign object enters the unit,
immediately disconnect the mains power.
No naked flame sources, such as lighted candles, should be placed on the appliance.
Don’t cover any ventilation openings as this may result in overheating.
Prevent use in dusty environments and clean the unit regularly.
Keep the unit away from children.
Inexperienced persons should not operate this device.
Maximum save ambient temperature is 40°C. Don’t use this unit at higher ambient temperatures.
Minimum distances around the apparatus for sufficient ventilation is 2cm.
Always unplug the unit when it is not used for a longer time or before you start servicing.
The electrical installation should be carried out by qualified personal only, according to the regulations for
electrical and mechanical safety in your country.
Check that the available voltage is not higher than the one stated on the rear panel of the unit.
The socket inlet shall remain operable for disconnection from the mains.
The power cord should always be in perfect condition. Switch the unit immediately off when the power cord
is squashed or damaged. It must be replaced by the manufacturer, its service agent or similarly qualified
persons in order to avoid a hazard.
Never let the power-cord come into contact with other cables!
When the power switch is in OFF position, this unit is not completely disconnected from the mains!
This appliance must be earthed to in order comply with safety regulations.
In order to prevent electric shock, do not open the cover. Apart from the mains fuse there are no user
serviceable parts inside.
Never repair a fuse or bypass the fuse holder. Always replace a damaged fuse with a fuse of the same
type and electrical specifications!
In the event of serious operating problems, stop using the appliance and contact your dealer immediately.
Please use the original packing when the device is to be transported.
Due to safety reasons it is prohibited to make unauthorized modifications to the unit.
CAUTION
CAUTION: To reduce the risk of electric shock, do not
remove the top cover. No user-serviceable parts inside.
Refer servicing to qualified service personnel only.
The lightning flash with arrowhead symbol within the equilateral triangle is intended to alert the
use or the presence of un-insulated “dangerous voltage” within the product’s enclosure that may
be of sufficient magnitude to constitute a risk of electric shock.
The exclamation point within the equilateral triangle is intended to alert the user to the presence of
important operation and maintenance (servicing) instructions in the literature accompanying this
appliance.
This symbol means: indoor use only
This symbol means: Read instructions
This symbol means: Safety Class I appliance

ENGLISH OPERATION MANUAL
SYNQ®3/96 DLP-6 MK2
INSTALLATION GUIDELINES:
Install the unit in a well-ventilated location where it will not be exposed to high temperatures or humidity.
Placing and using the unit for long periods near heat-generating sources such as amplifiers, spotlights, etc.
will affect its performance and may even damage the unit.
The unit can be mounted in 19-inch racks. Attach the unit using the 4 screw holes on the front panel. Be
sure to use screws of the appropriate size. (screws not provided) Take care to minimize shocks and
vibrations during transport.
When installed in a booth or flight case, please make sure to have good ventilation to improve heat
evacuation of the unit.
To avoid condensation to be formed inside, allow the unit to adapt to the surrounding temperatures when
bringing it into a warm room after transport. Condense sometimes prevents the unit from working at full
performance.
CLEANING THE APPLIANCE:
Clean by wiping with a polished cloth slightly dipped with water. Avoid getting water inside the unit. Do not
use volatile liquids such as benzene or thinner which will damage the unit.
CONNECTIONS
Connections can be made with balanced/unbalanced XLR-
cables. Please only use good quality balanced cables to
minimize noise and interference. There are many different
possibilities but mainly the unit will be connected between the
output of your mixer and the different amplifiers in your
installation.
IMPORTANT: always test your connections to exclude any wiring errors!
Make sure all MUTE buttons (8) are on.
Activate the HF-outputs first: if your cabling is wrong, high frequencies will come out of your
subwoofers (but HF-units are still alive )
FUNCTIONS (FRONT)
1. INPUT SIGNAL METER: Indicates the level of the incoming music signal.
2. OUTPUT SIGNAL METER: Indicates the level of the music signals at the different outputs.
3. MULTIFUNCTIONAL DISPLAY: Indicates the status of the several function settings.
4. PARAMETER ENCODER: endless dial with integrated push button.
Push button: used to browse the different in/outputs
Dial: used to adjust all kinds of parameters, password characters etc. (see further)
5. PREVIOUS BUTTON: used to browse submenu options in backward direction, etc.
6. NEXT BUTTON: used to browse submenu options in forward direction, etc.
7. RECALL BUTTON: used to recall stored programs and quit menus
8. OUTPUT MUTE BUTTONS: used to put the outputs in mute (red LED is lit while in mute mode)
9. BUTTON: used to select the different parameter values in direction.
10. BUTTON: used to select the different parameter values in direction.
11. SAVE/ENTER BUTTON: used to save programs and confirm options

ENGLISH OPERATION MANUAL
SYNQ®4/96 DLP-6 MK2
FUNCTIONS (rear)
12. ON/OFF SWITCH: used to switch the unit on/off. Even though the unit has soft startup, we advice to
switch the processor on before the amplifiers.
13. MAINS INPUT with IEC socket and integrated fuse holder, connect the supplied mains cable here.
14. USB CONNECTOR: used to connect the processor to a PC or laptop. With the supplied software you
can set all parameters in real time with your PC. This is much more convenient than setting up
everything directly on the processor. See further for more information.
15. RS-485 IN/OUT: can be used to interconnect several DLP-6 MK2 processors in a larger installation,
using CAT-5E (Ethernet) cable. Don’t for get to set the device ID’s! (see chapter “how to use”) You can
also use these connections to extend the PC-link to max 100m. On the PC-side you should connect the
supplied RS-485/USB converter.
16. BALANCED OUTPUTS: use balanced XLR-cables to connect the different amplifiers to the processor.
17. BALANCED INPUTS: use balanced XLR-cables to connect the processor to the output of you mixer.
SOME WORDS EXPLAINED
Maybe it’s a good idea to briefly explain some terms before we explain how this unit should be used.
DELAY ON INPUT
In big venues and for outdoor applications delays can be very useful to compensate the time lag between
individual speaker stacks. For example between the speaker stack near the podium and delay towers further
in the audience. The DLP-6 MK2 can introduce input delays up to 682,52ms or 235,07m!
DELAY ON OUTPUTS
Is used to align the individual components of a speaker stack with each other. For example you can have
mid/high cabinets flown and subwoofers on the floor: in this case the DLP-6 MK2 can compensate the time
differences with a delay, up to 2000ms or 688,86m, on each output.
PARAMETRIC EQ
A parametric equalizer is a very effective band-pass filter with adjustable gain, center frequency and
bandwidth. It’s often used to correct speakers, prevent feedback, eliminate unwanted resonances, etc. In
most cases a 5band parametric EQ is more than enough to adjust the sound to perfection.
HIGH / LOW SHELF FILTERS
Shelving filters are useful to restore the overall balance of high and low frequencies.
A low-shelf filter: passes all frequencies, but boosts or cuts frequencies below the cutoff frequency by
specified amount.
Example1: if the overall bass response of a
system is weak, you can use a low-shelf filter
to increase the low frequencies.
Example2: On the drawing a low-shelf filter is
used with frequency = 200Hz and gain set to
-18dB
all frequencies below 200Hz are
reduced by -18dB.
A high-shelf filter: passes all frequencies,
but boosts or cuts frequencies above the
cutoff frequency by specified amount.
Example: If your mix sounds a little harsh, you can use a high-shelf to reduce the high frequencies without
completely eliminating some frequencies, as would happen with a normal high-cut filter.

ENGLISH OPERATION MANUAL
SYNQ®5/96 DLP-6 MK2
HIGH-PASS / LOW-PASS / BAND-PASS FILTERS
A low-pass filter: blocks unwanted high-frequency signals.
Example: you can use a LP-filter at 150Hz to filter the input of a subwoofer.
A high-pass filter: blocks unwanted low-frequency signals.
Example: you can use a HP-filter at 150Hz to filter the input of a mid/high cabinet.
A band-pass filter: you can combine a low-pass and high-pass filter to obtain a band-pass filter.
Example: you can use a BP-filter at 1,2kHz and 8,0kHz to filter the input of compression driver.
LIMITER AND COMPRESSOR - DIFFERENCES
The main difference between a limiter and compressor is the compression ratio. A limiter uses a ratio of 10:1
to 100:1 or even infinite, while a compressor will use a ratio of 10:1 or less.
A compressor reduces the dynamic range (louder parts made softer, softer parts made louder) so it reacts
as a sort of dynamic volume control. Therefore it’s often used in radio studios.
A limiter “limits” the signal as soon as it reaches the threshold level. Therefore limiters are often used to
reduce peaks and protect your equipment (loudspeakers). The higher the compression ratio, the better the
protection.
HOW TO USE
Speaker management processors can tune your sound to perfection but in the hands of people with little or
no experience they can literally destroy the sound, and sometimes even the loudspeakers! So please
experiment and read a lot about their possibilities before you start using them, on the internet you can find a
lot of fine articles… Don’t say we didn’t warn you!
TWO METHODS TO ADJUST THE SETTINGS
PC-SOFTWARE: this is the easiest, fastest and most intuitive way, see further for more information.
ON THE DLP-6 MK2: more time consuming, this method is explained below.
USING THE MENUS AND GENERAL SETUP
The complete menu structure is shown below: press the DIAL (4) to browse the different menu items, press
the NEXT/PREVIOUS buttons (5&6) to browse the submenus. Below you can find more information on each
item. Some terms are briefly explained in the previous chapter.
INPUT PARAMETERS –GAIN
Used to adjust the input gain of the DLP-6
MK2 processor.
INPUT GAIN: turn the DIAL (4) to adjust
the input gain from -40dB to +12dB in
0,1dB steps.
INPUT MUTE: press the button (10) to
activate, press the button (9) to
deactivate.
INPUT PARAMETERS –DELAY
The display shows the delays in meter,
milliseconds and foot. The DLP-6 MK2 can
introduce input delays up to 682,52ms or
235,07m!
SMALL STEPS: turn the DIAL (4) to
adjust the delay in small 21µs steps.
BIG STEPS: press the /buttons
(9&10) to adjust the delay in big 5,20ms
steps.
INPUT PARAMETERS –EQUALIZER
Both input channels have a 6band EQ,
each band can have different settings. Use
the /buttons (9&10) to jump between
the different parameter settings:
ON/OFF: for each band you can choose

ENGLISH OPERATION MANUAL
SYNQ®6/96 DLP-6 MK2
if it should be on or off, simply turn the DIAL (4) to select.
EQ BAND: turn the DIAL (4) to choose the desired EQ-filter: you can choose 1 to 6.
EQ TYPE: turn the DIAL (4) to choose the desired EQ-filter type:
PEQ: Parametric equalizer, with the following parameters:
oGAIN: turn the DIAL (4) to adjust the gain from -30dB to +15dB in 0,1dB steps.
oFREQ: turn the DIAL (4) to adjust the center frequency from 19,7Hz to 20kHz.
oBANDWIDTH: turn the DIAL (4) to change from 0,016 (narrow) to 4,000 (wide).
LS1: Low-shelf 6dB, with the following parameters:
oGAIN: turn the DIAL (4) to adjust the gain from -30dB to +15dB in 0,1dB steps.
oFREQ: turn the DIAL (4) to adjust the frequency from 19,7Hz to 2kHz.
LS2: Low-shelf 12dB, with the following parameters:
oGAIN: turn the DIAL (4) to adjust the gain from -30dB to +15dB in 0,1dB steps.
oFREQ: turn the DIAL (4) to adjust the frequency from 19,7Hz to 2kHz.
HS1: High-shelf 6dB, with the following parameters:
oGAIN: turn the DIAL (4) to adjust the gain from -30dB to +15dB in 0,1dB steps.
oFREQ: turn the DIAL (4) to adjust the frequency from 3886Hz to 21,9kHz.
HS2: High-shelf 12dB, with the following parameters:
oGAIN: turn the DIAL (4) to adjust the gain from -30dB to +15dB in 0,1dB steps.
oFREQ: turn the DIAL (4) to adjust the frequency from 3886Hz to 21,9kHz.
INPUT PARAMETERS –LINK SETTINGS
You can link the settings of input channels A and B so you only have to setup one input (A or B) all
settings of the other input will be identical at all times. Turn the DIAL (4) to set the link ON or OFF and press
the SAVE-button (11). You will be asked if you are sure: press the /buttons (9&10) to choose OK or
CANCEL and press the SAVE button (11) again to confirm.
INPUT PARAMETERS –COPY SETTINGS
You can copy the settings between the input channels (“A to B” or “B to A”). This means that only the
ACTUAL SETTINGS are copied, there will be no constant synchronization between the channels! This is
what you can do:
DON’T COPY: press the /buttons (9&10) to go to another parameter setting.
COPY: press the SAVE button (11) to confirm copying all settings will be copied between the inputs.
OUTPUT PARAMETERS –GAIN + PHASE + SOURCE
Used to adjust the gain and phase of the 6 outputs. For each output you can also select to which input it
should be linked. Use the /buttons (9&10) to jump between the different parameter settings:
OUTPUT GAIN: turn the DIAL (4) to adjust the input gain from -40dB to +12dB in 0,1dB steps.
PHASE: turn the DIAL (4) to choose “+” (output in phase) or “-“ (output in anti-phase)
SOURCE SELECT: turn the DIAL (4) to select the input that should be linked to the selected output:
OFF: selected output is not used.
A: selected output is linked to input A.
B: selected output is linked to input B.
A+B: selected output is linked to inputs A and B.
OUTPUT PARAMETERS –DELAY
The display shows the delays in meter, milliseconds and foot. You can choose delays up to 2000ms or
688,52m!
SMALL STEPS: turn the DIAL (4) to adjust the delay in small 21µs steps.
BIG STEPS: press the /buttons (9&10) to adjust the delay in big 5,20ms steps.
OUTPUT PARAMETERS –EQUALIZER
All output channels have a 4band EQ, each band can have different settings. Use the /buttons (9&10) to
jump between the different parameter settings:
ON/OFF: for each band you can choose if it should be on or off, simply turn the DIAL (4) to select.
EQ BAND: turn the DIAL (4) to choose the desired EQ-filter: you can choose 1 to 4.
EQ TYPE: turn the DIAL (4) to choose the desired EQ-filter type:
PEQ: Parametric equalizer, with the following parameters:
oGAIN: turn the DIAL (4) to adjust the gain from -30dB to +15dB in 0,1dB steps.
oFREQ: turn the DIAL (4) to adjust the center frequency from 19,7Hz to 20kHz.

ENGLISH OPERATION MANUAL
SYNQ®7/96 DLP-6 MK2
oBANDWIDTH: turn the DIAL (4) to change from 0,016 (narrow) to 4,000 (wide).
LS1: Low-shelf 6dB, with the following parameters:
oGAIN: turn the DIAL (4) to adjust the gain from -30dB to +15dB in 0,1dB steps.
oFREQ: turn the DIAL (4) to adjust the frequency from 19,7Hz to 2kHz.
LS2: Low-shelf 12dB, with the following parameters:
oGAIN: turn the DIAL (4) to adjust the gain from -30dB to +15dB in 0,1dB steps.
oFREQ: turn the DIAL (4) to adjust the frequency from 19,7Hz to 2kHz.
HS1: High-shelf 6dB, with the following parameters:
oGAIN: turn the DIAL (4) to adjust the gain from -30dB to +15dB in 0,1dB steps.
oFREQ: turn the DIAL (4) to adjust the frequency from 3886Hz to 21,9kHz.
HS2: High-shelf 12dB, with the following parameters:
oGAIN: turn the DIAL (4) to adjust the gain from -30dB to +15dB in 0,1dB steps.
oFREQ: turn the DIAL (4) to adjust the frequency from 3886Hz to 21,9kHz.
OUTPUT PARAMETERS –HIGH-PASS FILTER (CROSSOVER)
All outputs are equipped with a fully adjustable high-pass filter. Use the /buttons (9&10) to jump
between the different parameter settings:
CUTOFF FREQUENCY: turn the DIAL (4) to adjust the frequency from 19,7Hz to 21,9kHz or to turn it OFF.
FILTER TYPE: turn the DIAL (4) to select one of the filter types (Butterworth, Bessel or Linkwitz-Riley) and
corresponding slopes (12dB/oct, 18dB/oct, 24dB/oct or 48dB/oct)
OUTPUT PARAMETERS –LOW-PASS FILTER (CROSSOVER)
All outputs are equipped with a fully adjustable low-pass filter. Use the /buttons (9&10) to jump between
the different parameter settings:
CUTOFF FREQUENCY: turn the DIAL (4) to adjust the frequency from 19,7Hz to 21,9kHz or to turn it OFF.
FILTER TYPE: turn the DIAL (4) to select one of the filter types (Butterworth, Bessel or Linkwitz-Riley) and
corresponding slopes (12dB/oct, 18dB/oct, 24dB/oct or 48dB/oct)
OUTPUT PARAMETERS –LIMITER
All outputs are equipped with a fully adjustable limiter. Use the /buttons (9&10) to jump between the
different parameter settings:
ON/OFF: turn the DIAL (4) to set the limiter ON or OFF.
THRESHOLD: turn the DIAL (4) to set the threshold value between -20dBu and +10dBu in 1dBu-steps.
RATIO: turn the DIAL (4) to set the limiter compression ratio:
Lower ratios: 1,2/1 ~ 1,5/1 ~ 2/1 ~ 3/1 ~ 4/1 ~ 6/1
Higher ratios: 10/1 ~ 20/1 ~ Infinite (brick-wall limiter)
If you want to use the limiter for protection then you should choose a higher compression ratio (20/1 or inf.)
ATTACK: turn the DIAL (4) to set the attack time: 0,5ms ~ 1ms ~ 2ms ~ 5ms ~ 10ms ~ 20ms ~ 50ms.
RELEASE: turn the DIAL (4) to set the release time: 10ms ~ 20ms ~ 50ms ~ 100ms ~ 200ms ~ 500ms ~
1s.
OUTPUT PARAMETERS –LINK SETTINGS
You can link the settings of the selected output channel with one or more of the other
5 outputs. You only have to setup the current output all settings of the linked
outputs will be identical at all times. The example below will show you how to link one
or more outputs:
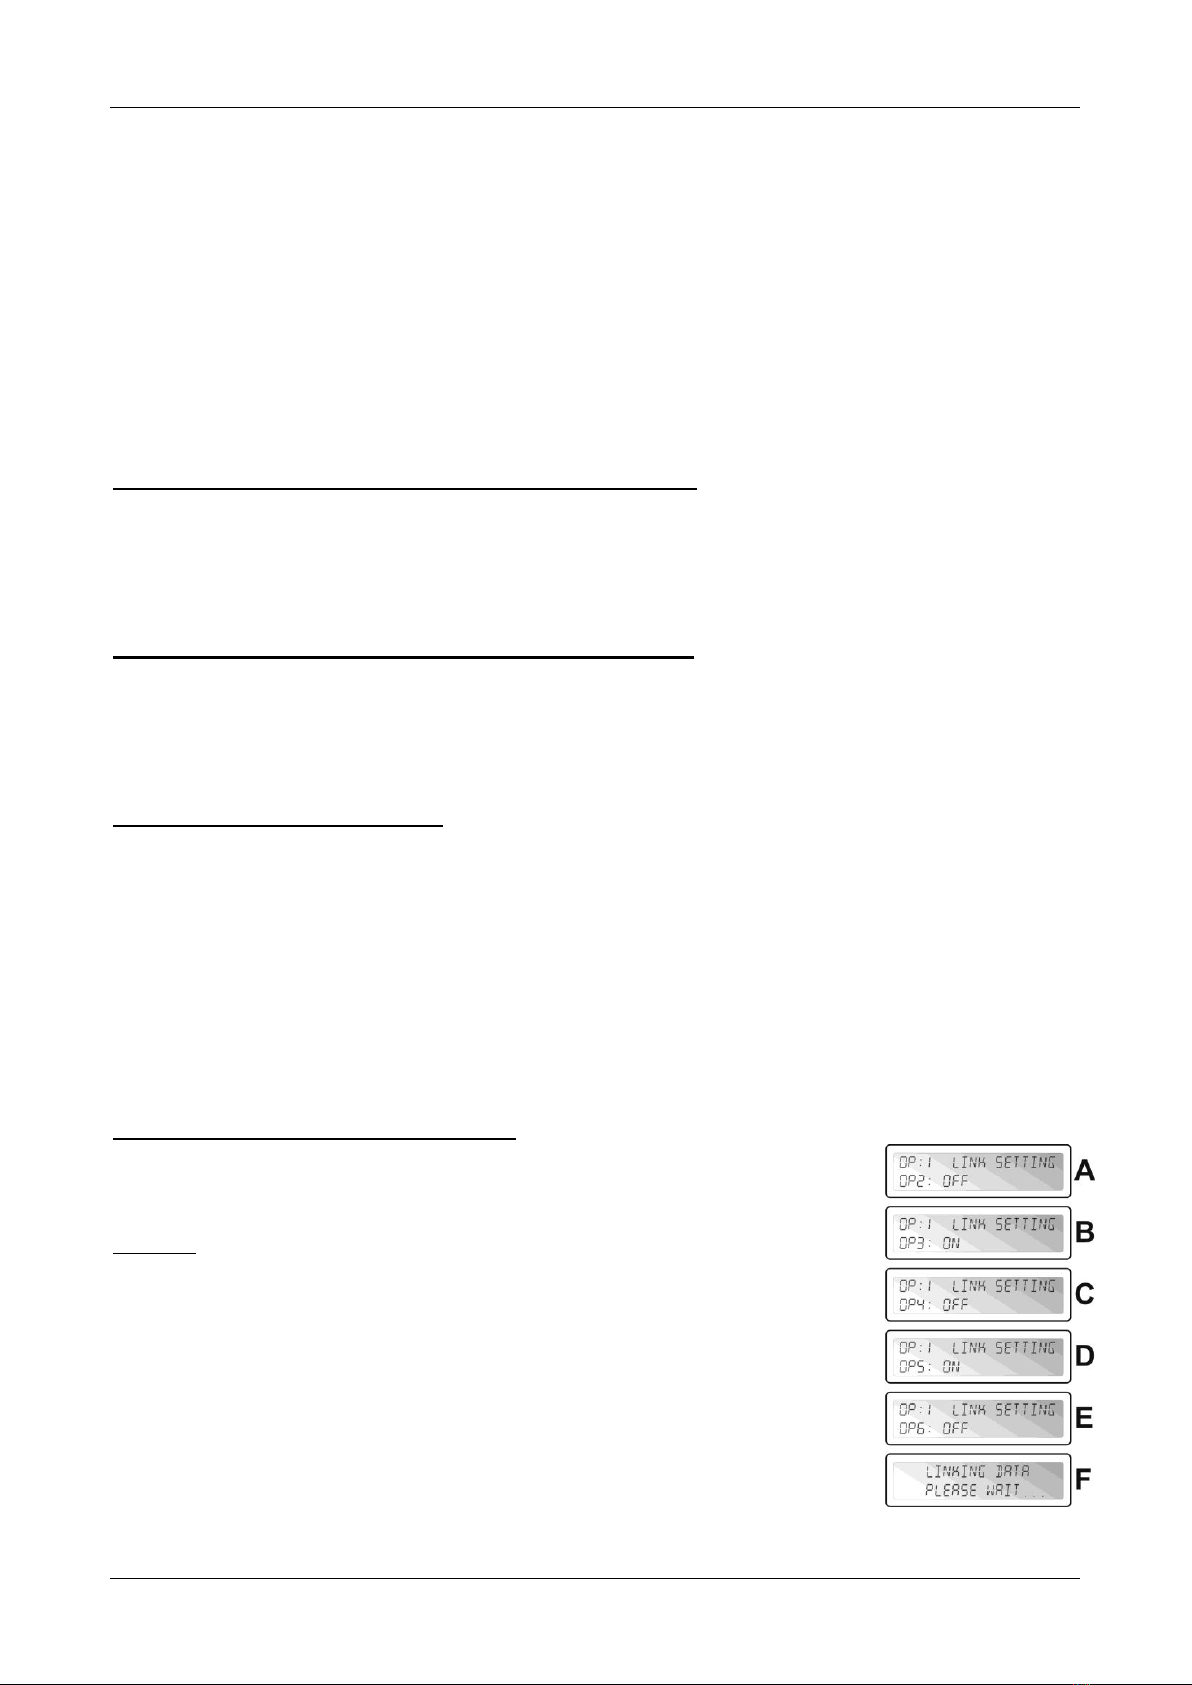
Example: we will link output1 “OP1” to outputs “OP3” and “OP5” (and NOT to outputs
“OP2”, ”OP4” and “OP6”):
Picture A: Turn the DIAL (4) to set the link OFF, press
button(10) for next
output.
Picture B: Turn the DIAL (4) to set the link ON, press
button(10) for next output.
Picture C: Turn the DIAL (4) to set the link OFF, press
button(10) for next
output.
Picture D: Turn the DIAL (4) to set the link ON, press
button(10) for next output.
Picture E: Turn the DIAL (4) to set the link OFF
Picture F: Press the SAVE-button (11) to confirm
the links are made, from now
on outputs 1, 3 and 5 will have the same settings!

ENGLISH OPERATION MANUAL
SYNQ®8/96 DLP-6 MK2
OUTPUT PARAMETERS –COPY SETTINGS
You can copy the settings from the current output channel to one or more other outputs. This means that
only the ACTUAL SETTINGS are copied, there will be no constant synchronization between the channels!
Turn the DIAL (4) to choose the target channel you want to copy the settings (of the current output) to.
Press the SAVE button (11) to confirm copying all settings will be copied between the two outputs.
If you like, you can choose another target output to copy the current settings.
MAIN MENU –PROGRAM: Load settings
You can make any personal setting but to make life easier the DLP-6 MK2 has some standard configurations
pre-programmed. If you like you can use these standard settings to start your configuration and fine-tune all
parameters step by step. On the last page of this manual you will find an
overview of the standard settings.
Press the DIAL (4) until the first display on the right is shown.
Press the ENTER button (11) to enter the submenu “program”.
The display now shows “Load presets”
Press the ENTER button (11) again and turn the DIAL (4) to choose one of the
presets:
1: 2x2-WAY+SUM X-OVER
2: 2x3-WAY X-OVER
3: 4WAY X-OVER + 2
4: 5WAY X-OVER + 1
5: 6WAY X-OVER
6: Muted all
Press the ENTER button (11) to confirm your choice the selected standard settings are loaded.
You can fine tune this standard configuration and save it as a custom program (see further to learn how)
MAIN MENU –PROGRAM: Store a Program (1 –30)
You can save and recall up to 30 personalized user programs. First you should make the complete
parameter setup, when this is done you can save it as follows:
Press the DIAL (4) until the first display on the right is shown.
Press the ENTER button (11) to enter the submenu “program”.
Press the NEXT button (6) until the display shows “Store a program”
Press the ENTER button (11) and turn the DIAL (4) to choose the location (1 to
30) where you want to store the program.
Press the NEXT button (6) to insert a name for the program on the second
line of the display the cursor starts flashing.
Turn the DIAL (4) to select a character and press the NEXT button (6) to set the next character, …
When the name is ready, press the ENTER button (11) to save the program.
MAIN MENU –PROGRAM: Load a Program (1 –30)
You can save and recall up to 30 personalized user programs. Follow the steps below to load one of the 30
programs:
Press the DIAL (4) until the first display on the right is shown.
Press the ENTER button (11) to enter the submenu “program”.
Press the NEXT button (6) until the display shows “Load a program”
Press the ENTER button (11) and turn the DIAL (4) to choose the program you
want to load.
Press the ENTER button (11) to confirm your choice the selected program
will be loaded and is ready to be used.
MAIN MENU –SECURITY: Lock type
Imagine you worked a long time to have the perfect settings and some idiot
changes everything without knowing what he’s doing: a complete disaster and in
worst case even damaged speakers … That’s why we give you the possibility
to lock your settings! This is how to protect your precious work:
Press the DIAL (4) until the first display on the right is shown.
Press the NEXT button (6) until the display shows “SECURITY”
Press the ENTER button (11) to enter the submenu.
IF THE PROCESSOR IS LOCKED: you will be asked to Enter your password

ENGLISH OPERATION MANUAL
SYNQ®9/96 DLP-6 MK2
to unlock it (display on the right appears):
Turn the DIAL (4) to select a character and press the NEXT button (6) to set the next character, …
When the password is entered, press the ENTER button (11) to confirm.
IF THE PROCESSOR IS NOT LOCKED: you will have 4 different ways to lock the processor:
Locktype = Modify
All parameters and settings are visible but you can’t change them without
introducing a password first. Only the mute switches can be used:
Turn the DIAL (4) until the display on the right is shown.
Press the ENTER button (11) you will be asked to set a password.
Turn the DIAL (4) to select a character and press the NEXT button (6) to set
the next character, … (maximum 8 characters –DON’T forget it !!!)
When the password is entered, press the ENTER button (11) to confirm.
Remark: if you don’t want to set a password, simply leave it blank.
Locktype = Modify & View
You can’t see or change parameters and settings without introducing a
password first. Only the mute switches can be used:
Turn the DIAL (4) until the display on the right is shown.
Press the ENTER button (11) you will be asked to set a password.
Turn the DIAL (4) to select a character and press the NEXT button (6) to set
the next character, … (maximum 8 characters –DON’T forget it !!!)
When the password is entered, press the ENTER button (11) to confirm.
Remark: if you don’t want to set a password, simply leave it blank.
Locktype = Modify & Mute
All parameters and settings are visible but you can’t change them without
introducing a password first. Also the mute switches are locked:
Turn the DIAL (4) until the display on the right is shown.
Press the ENTER button (11) you will be asked to set a password.
Turn the DIAL (4) to select a character and press the NEXT button (6 to set
the next character, … (maximum 8 characters –DON’T forget it !!!)
When the password is entered, press the ENTER button (11) to confirm.
Remark: if you don’t want to set a password, simply leave it blank.
Locktype = Everything
You can’t see or change parameters and settings without introducing a
password first. Also the mute switches are locked:
Turn the DIAL (4) until the display on the right is shown.
Press the ENTER button (11) you will be asked to set a password.
Turn the DIAL (4) to select a character and press the NEXT button (6) to set
the next character, … (maximum 8 characters –DON’T forget it !!!)
When the password is entered, press the ENTER button (11) to confirm.
Remark: if you don’t want to set a password, simply leave it blank.
WARNING! don’t forget your password, write it down in a safe place.
The password CANNOT be recovered if forgotten or lost!!!
MAIN MENU –CONFIG:
In a big setup more than one processor can be used and interconnected with the
RS-485 connections on the rear panel (15). To identify each processor, they all
need a unique device ID.
This is how you can change the device ID:
Press the DIAL (4) until the first display on the right is shown.
Press the NEXT button (6) until the display shows “CONFIG”
Press the ENTER button (11) to enter the submenu.
Turn the DIAL (4) to change the Device ID number (116, actual ID is marked
with an asterisk “*”)
Press the ENTER button (11) to confirm.

ENGLISH OPERATION MANUAL
SYNQ®10/96 DLP-6 MK2
MAIN MENU –DUMP PROGRAM:
It is possible to copy the user programs from a “master” unit [network cable connected to RS-485 output (15)]
to one or more “slave” units [network cable connected to RS-485 input (15)] At the same time you should set
the master and slave units so communication is possible (read the next point “RECEIVE DUMP” also before
you start!)
This is how you prepare the master unit:
Press the DIAL (4) until the first display on the right is shown.
Press the NEXT button (6) until the display shows “DUMP PROGRAM”
Press the ENTER button (11) to enter the submenu.
The display asks “Are you sure?” and proposes “NO”
Turn the DIAL (4) to change the “NO“ to “YES” if you want to send a dump.
NOW WAIT and prepare the slaves first (see next point) before you continue!
Press the ENTER button (11) to confirm The master starts dumping all programs. If an error occurs The
display shows “ERR”.
Remark: the dumping process can’t be interrupted. When the dump is finished the master returns to normal
working mode.
MAIN MENU –RECEIVE DUMP:
It is possible to copy the user programs from a “master” unit [network cable connected to RS-485 output (15)]
to one or more “slave” units [network cable connected to RS-485 input (15)] At the same time you should set
the master and slave units so communication is possible (read the previous point “DUMP PROGRAM” also
before you start!)
This is how you prepare the slave unit:
Press the DIAL (4) until the first display on the right is shown.
Press the NEXT button (6) until the display shows “RECEIVE DUMP”
Press the ENTER button (11) to start the receiving process, the display shows
“RECEIVING DUMP” while the unit is waiting for the master.
NOW you can start the DUMP program on the master!
Remark: press the RECALL button (7) if you want to interrupt the process.
When the dump is finished the slave returns to normal working mode.
PC SOFTWARE
Our personal favorite because it’s so much faster! The PC-software is so easy to use that it doesn’t need a
lot of explanation. If you are familiar with the use of all parameters than you can use it right away, we will just
give you some basic explanations. You can connect the DLP-6 MK2 in two different ways to your PC:
Via USB: This is the easiest way but the length of your cable is limited to only
5m. Use a standard USB-cable to connect the USB-slot on the rear of the
DLP-6 MK2 to one of the USB-slots of your PC.
Via RS485: This is a little more complicated but the length of your cable can
be extended to 100m. You will need the supplied RS485/USB converter (see
picture). Connect one side of a standard straight CAT-5E network cable to one
of the RS-485 connectors on the rear of the DLP-6 MK2. Connect the other
side of the network cable to the RJ-45 input of the RS485/USB converter and
insert it in a free USB-slot on your PC.
INSTALLING THE SOFTWARE:
Very important: before you install the Windows®software you should install a driver to ensure the
USB or RS485 communication!
Part1 –installing the USB driver
AUTOMATIC installation:
First connect the DLP-6 MK2 with your PC (via USB or RS485) and switch the DLP-6 MK2 on.
Windows will detect new hardware and ask you if it can search and install a driver via internet: accept
this option. Windows will try to install the driver automatically. After some time windows will inform you
if it could install the driver or not.
Proceed with the manual driver installation if the driver could not be found and installed.

ENGLISH OPERATION MANUAL
SYNQ®11/96 DLP-6 MK2
MANUAL installation:
Don’t yet connect the DLP-6 MK2 to your PC!
The installation file for the driver can be found on the supplied CDROM or you can download it from
the SYNQ-website (see download section of the DLP-6 MK2 product page).
UNZIP the file and double-click the exe-file named “PL-2303 Driver Installer.exe” and follow the
instructions to install the driver properly.
To check if the driver is installed, open the Windows®
device manager and check if the driver is available, you
can also check which COM-port is emulated (in most
cases it will be COM3, as shown on the picture) To be
able to see the driver listed, you should connect the DLP-
6 MK2 to your PC and turn it on.
Remark: depending on the hardware inside your DLP-6
MK2 the drivername shown in windows can be different!
Part2 –installing the DLP-6 MK2 PC-software
The DLP-6 MK2 PC-software can be found on the supplied CDROM or you can download it from the
SYNQ-website (see download section of the DLP-6 MK2 product page).
Double-click the file named “DigitalSpeakerSetup_V110 SYNQ Audio.exe”and follow the instructions to
install the software.
Part3 –first time use
First connect the DLP-6 MK2 with your PC via USB or RS485.
The USB output of the PC will be treated by the software as an RS-232 connection. Therefore you will
have to set the correct RS232 port when you use the software for the first time:
Start the PC software. In the left upper corner you will notice the sign on the right, indicating
that the software is not connected to the processor.
Open the “CONFIG” menu and select the “RS-232” option.
Normally you should choose “COM3”. To be sure you can check the COM-port in the Windows®device
manager.
Open the “CONFIG” menu again and select “OnLine”: a popup window will open where you have to
select “DLP-6 MK2:2In6Out”
If the software can connect to the processor than you should see the sign on the right. If this
doesn’t work, you should also select some other COM-settings and try again to establish a
connection.
CHECKING THE SOFTWARE VERSION
Open the “HELP” menu and select the “About” option. In the popup window you can see the software
version and program build:

ENGLISH OPERATION MANUAL
SYNQ®12/96 DLP-6 MK2
USING THE SOFTWARE:
Keep in mind that the software is always connected to the processor so all parameters and settings you
change in the software are immediately sent to the DLP-6 MK2! This means that you have “live” interaction
with the audio of your audio system. On the screen you can see that the PC software has a very easy
interface with clickable icons.
You can click the icons to start your setup (start with the “Source” icons), you can choose a preset (“config”
menu, option “preset”) or you can simply load a custom made program to further tune it:
Program Manager
Choose option “Device Program Manage” in the
menu Program. the window “memory” appears.
This window allows you to send programs between
the PC and the processor and save/load them on
your laptop. These are the different options:
Store to device: used to store the current
configuration in the DLP-6 MK2. First select one of
the 30 memory locations before you press the “Store
To Device” button! You will be asked for a proper
name and if you are sure you want to overwrite the
current memory location in the processor.
Recall from device: used to recall one of the 30
memories in the DLP-6 MK2 and transfer it to the PC
so you can edit/store it.
Store to PC: used to store the selected memory (1
out of 30) to a file on your PC.
Recall from PC: used to recall one memory, stored
on your PC, and load it to the selected memory location.
Store all to PC: used to store the complete set of 30 memories from the DLP-6 MK2 in a file on your PC.
Recall all from PC: used to recall a file, containing a set of 30 memories, from your PC and send it to the
DLP-6 MK2.
Linking the parameters on inputs and outputs
In many cases the parameters of the in/outputs should simply be equal. To make life easier you can link
two or more in/outputs you only have to change the parameters of one in/output, the linked in/output(s)
will be set a the same time!

ENGLISH OPERATION MANUAL
SYNQ®13/96 DLP-6 MK2
NO LINKS SET INPUTS A&B are linked
OUTPUTS 1+2 and 3+4+5+6 are linked
Open the “CONFIG” menu
Select the option “Link Setting” window will open, similar to the windows shown above.
Set the desired links:
See the 2 example windows: on the right window you can clearly see:
oThe inputs are linked (Link1 = InA + InB)
oOutputs 1 + 2 are linked (Link1 = Out1 + Out2)
oOutputs 3 + 4 + 5 + 6 are linked (Link3 = Out3 + Out4 + Out5 + Out6)
Once you have set the links, press the “Set Link” button.
Please note: It can take 5seconds or more before the window closes, this in normal!
Adjusting the different parameters
Simply click the icons of the parameters you want to change, screens like the ones below will appear.
On top of the windows you have extra TABs that make it very easy to jump from one parameter to the
other.
Remark 1: when you key in the parameters you must confirm them with the “ENTER” button on your PC-
keyboard, otherwise the values are not saved!
Remark 2: If you have doubts about certain parameters, please read the previous chapters for more
information.

ENGLISH OPERATION MANUAL
SYNQ®14/96 DLP-6 MK2
APPENDIX
Chart with standard presets stored in the DLP-6 MK2:
PRESET NAME OUTPUT INPUT HP-FILTER FREQ LP-FILTER FREQ
1: 2x 2-way + SUM x-over OUT1 A 19,7 Hz 1000 Hz
OUT2 A 1000 Hz OFF
OUT3 B 19,7 Hz 1000 Hz
OUT4 B 1000 Hz OFF
OUT5 A + B 19,7 Hz 1000 Hz
OUT6 A + B 1000 Hz OFF
2: 2x 3-way x-over OUT1 A 35,1 Hz 153 Hz
OUT2 A 153 Hz 2000 Hz
OUT3 A 2000 Hz OFF
OUT4 B 35,1 Hz 153 Hz
OUT5 B 153 Hz 2000 Hz
OUT6 B 2000 Hz OFF
3: 4-way x-over + 2 OUT1 A OFF 81,1 Hz
OUT2 A 81,1 Hz 408 Hz
OUT3 A 408 Hz 2000 Hz
OUT4 A 2000 Hz OFF
OUT5 B OFF OFF
OUT6 B OFF OFF
4: 5-way x-over + 1 OUT1 A OFF 40,5 Hz
OUT2 A 40,5 Hz 153 Hz
OUT3 A 153 Hz 1000 Hz
OUT4 A 1000 Hz 3084 Hz
OUT5 A 3084 Hz OFF
OUT6 B OFF OFF
5: 6-way x-over OUT1 A OFF 81,1 Hz
OUT2 A 81,1 Hz 408 Hz
OUT3 A 408 Hz 2000 Hz
OUT4 A 2000 Hz 4000 Hz
OUT5 A 4000 Hz 10 kHz
OUT6 A 10 kHz OFF
6: All muted OUT1 OFF OFF OFF
OUT2 OFF OFF OFF
OUT3 OFF OFF OFF
OUT4 OFF OFF OFF
OUT5 OFF OFF OFF
OUT6 OFF OFF OFF

ENGLISH OPERATION MANUAL
SYNQ®15/96 DLP-6 MK2
SPECIFICATIONS
Power Supply: 90Vac ~ 240Vac, 50Hz (30W)
Fuse: 20mm glass fuse 250V 1A slow
Frequency response: 10-20.000Hz (+/-0,1dB)
Dynamic range: 102 dB
THD + noise: <0.003% @ 1kHz, 0dB
S/N Ratio (IHF-A): >100dB @ 1kHz.
Crosstalk: >95dB
Input level (max): 4Vrms
Input Impedance: 8kΩbalanced
Output Impedance: 150Ωbalanced
Output level (max): 2Vrms
AD/DA: 24bit Sigma/Delta
Sample rate: 48kHz
Crossover slopes: 12, 18, 24 or 48 dB/oct
Crossover types: Butterworth, Bessel or Linkwitz/Riley
Delay inputs / steps: 682,52ms (235m) / 21µs steps
Delay output / steps: 2000ms (688,86m) / 21µs steps
EQ # input: 6 per input
EQ # output: 4 per output
EQ types: Parametric, L-Shelf 6dB, L-Shelf 12dB,
H-Shelf 6dB, H-Shelf 12dB
EQ gain: -30dB ~ +15dB / 0,1dB steps
EQ Bandwidth: 0,016 ~ 4 octaves
EQ frequencies: 19,7Hz ~21,9kHz
Limiters –threshold: -20dBu ~ +10dBu / 1dBu steps
Limiters –attack time: 0,5 ~ 50ms
Limiters –release time: 10 ~ 1000ms
Limiters –compression ratio: 1,2/1 ~ infinite/1
Dimensions: 482(W) x 44(H) x 225(D) mm
Weight: 3kg
Every information is subject to change without prior notice
You can download the latest version of this user manual on our website: www.synq-audio.com

FRANCAIS MODE D’EMPLOI
SYNQ®16/96 DLP-6 MK2
MODE D’EMPLOI
Nous vous remercions d’avoir acheté ce produit SYNQ®. Veuillez lire ce mode d’emploi très attentivement
afin de pouvoir exploiter toutes les possibilités de cet appareil.
CARACTERISTIQUES
Cet appareil ne produit pas d’interférences radio. Il répond aux exigences nationales et européennes. La
conformité a été établie et les déclarations et documents correspondants ont été déposés par le fabricant.
Processeur de gestion digitale professionnelle pour haut-parleurs, basé sur la technologie d'un double
DSP à 24 bits
Cet appareil sert à assurer un fonctionnement parfait de vos haut-parleurs !
Appareil à 2 entrées et 6 sorties, avec des possibilités étendues de cheminement des signaux (full matrix
routing)
Les deux entrées possèdent les caractéristiques suivantes :
égalisation à 6 bandes (paramétrique, high shelf, low shelf)
Retard (réglable jusqu'à 682 ms [= 235 mètres] par pas de 21 µs)
Limiteur (attaque, relâche, seuil et temps de tenue sont réglables)
Les six sorties possèdent les caractéristiques suivantes :
Crossover (Linkwitz/Riley, Bessel, Butterworth) avec pente réglable (12 / 18 / 24 et 48 dB/oct)
égalisation à 4 bandes (paramétrique, high shelf, low shelf)
Retard (réglable jusqu'à 2000 ms [= 688,86 mètres] par pas de 21 µs
Inversion de phase
Limiteur (attaque, relâche, seuil et temps de tenue sont réglables)
30 configurations de haut-parleurs différentes peuvent être mises en mémoire
Verrouillage des programmes via un mot de passe de protection
mises à jour du firmware et le réglage des paramètres via PC :
Via USB: installation facile, mais la longueur du câble est limité à 5m
Via RS485: (utilisez le convertisseur RS485/USB fourni) un câble réseau CAT-5E jusqu’à 100m peut
être utilisé.
Software Windows®complet inclus, avec des possibilités de configuration aisées et visuellement très
attractives
Toutes les opérations se déroulent sans à-coups, ce qui permet d'éviter des bruits gênants
Ecran rétro-éclairé à cristaux liquides, couleur bleu clair, à deux lignes de 20 caractères
L'appareil est prévu pour résister à la vie en tournée grâce à ses composants de grande qualité et à sa
construction des plus robustes
Entrées et sorties symétriques au standard XLR
L'appareil peut être utilisé à des fins professionnelles (sonorisation et studio), mais convient aussi pour les
DJ
AVANT L’UTILISATION
Quelques instructions importantes:
Avant d’utiliser cet appareil, assurez-vous de l’absence de dommages liés au transport. En cas de
dommages, n’utilisez pas l’appareil et contactez le vendeur.
Important: Cet appareil a quitté notre usine en parfaite condition et bien emballé. Il est primordial que
l’utilisateur suive les instructions de sécurité et avertissements inclus dans ce manuel. La garantie ne
s’applique pas en cas de dommage lié à une utilisation incorrecte. Le vendeur ne prend pas la
responsabilité des défauts ou de tout problème résultant du fait de n’avoir pas tenu compte des mises en
garde de ce manuel.
Conservez ce manuel dans un endroit sûr pour toute consultation future. Si vous vendez l’appareil,
assurez-vous d’y joindre ce manuel également.
Afin de protéger l’environnement, merci de recycler les emballages autant que possible.

FRANCAIS MODE D’EMPLOI
SYNQ®17/96 DLP-6 MK2
Vérifiez le contenu:
Vérifiez si l'emballage contient bien les articles suivants :
Mode d'emploi
Appareil DLC-6
Convertisseur RS485/USB
CD ROM avec le software destiné au PC + mode d’emploi
Câble d’alimentation
INSTRUCTIONS DE SECURITE:
Afin d’éviter tout risque d’incendie ou de décharge électrique, ne pas exposer cet appareil à la pluie ou
l’humidité.
Pour éviter la formation de condensation à l’intérieur de l’appareil, patientez quelques minutes pour laisser
l’appareil s’adapter à la température ambiante lorsqu’il arrive dans une pièce chauffée après le transport.
La condensation empêche l'appareil de fonctionner de manière optimale, et elle peut même causer des
dommages.
Cet appareil est destiné à une utilisation à l’intérieur uniquement.
Ne pas insérer d’objet métallique ou renverser de liquide dans l’appareil. Aucun objet contenant un liquide,
tels que des vases, ne peut être placé sur cet appareil. Cela risquerait de provoquer une décharge
électrique ou un dysfonctionnement. Si un corps étranger est introduit dans l’appareil, déconnectez
immédiatement de la source d’alimentation.
Aucune source de flamme nue, telle que des bougies allumées, ne peut être placée sur l'appareil.
Ne pas couvrir les orifices de ventilation, un risque de surchauffe en résulterait.
Ne pas utiliser l'appareil dans un environnement poussiéreux et le nettoyer régulièrement.
Ne pas laisser l'appareil à portée des enfants.
Les personnes non expérimentées ne doivent pas utiliser cet appareil.
La température ambiante maximale d’utilisation de l’appareil est de 40°C. Ne pas l’utiliser au-delà de cette
température.
Rien ne doit se trouver contre l'appareil : la distance minimum pour en permettre une ventilation suffisante
est de 2cm.
Débranchez toujours l’appareil si vous ne l’utilisez pas de manière prolongée ou avant d’entreprendre des
réparations.
Les installations électriques ne peuvent être faites que par du personnel qualifié et conformément aux
règlements de sécurité électrique et mécanique en vigueur dans votre pays.
Assurez-vous que la tension d’alimentation de la source d’alimentation de la zone dans laquelle vous vous
trouvez ne dépasse pas celle indiquée à l’arrière de l’appareil.
La prise doit toujours être accessible pour que le cordon secteur puisse être enlevé à tout moment.
Le cordon d’alimentation doit toujours être en parfait état. Mettez immédiatement l’unité hors tension si le
cordon devait être écrasé ou endommagé. Pour éviter tout risque de choc électrique, le cordon doit être
remplacé par le constructeur, son agent ou un technicien qualifié.
Ne laissez jamais le cordon d’alimentation entrer en contact avec d’autres câbles !
CAUTION
ATTENTION: afin de réduire le risque d’électrocution,
n’enlevez jamais le couvercle de l’appareil. Il n’y a aucune
pièce à l’intérieur de l’appareil que vous puissiez
remplacer vous-même. Confiez l’entretien uniquement à
des techniciens qualifiés.
La flèche dans un triangle met l'utilisateur en garde contre la présence de haute tension sans
isolation dans l'appareil, ce qui peut causer un risque d'électrocution.
Un point d'exclamation dans un triangle prévient de la présence d'instructions relatives au
fonctionnement et à la maintenance se trouvant dans le manuel fourni avec l'appareil.
Ce symbole signifie: uniquement pour usage à l'intérieur.
Ce symbole signifie : Lire le mode d’emploi.
Ce symbole signifie: appareil construit selon les normes de sécurité classe I

FRANCAIS MODE D’EMPLOI
SYNQ®18/96 DLP-6 MK2
Quand l’interrupteur principal est en position OFF, cet appareil n'est pas complètement isolé du courant
230V !
L’appareil doit être à la masse selon les règles de sécurité.
Utilisez toujours des câbles appropriés et certifiés lorsque vous installez l’appareil.
Pour éviter toute décharge électrique, ne pas ouvrir l’appareil. En dehors du fusible principal, il n’y a pas
de pièces pouvant être changées par l’utilisateur à l’intérieur.
Ne jamais réparer ou court-circuiter un fusible. Remplacez systématiquement un fusible endommagé par
un fusible de même type et ayant les mêmes spécifications électriques !
En cas de problèmes de fonctionnement sérieux, arrêtez toute utilisation de l’appareil et contactez votre
revendeur immédiatement.
Utilisez l’emballage d’origine si l’appareil doit être transporté.
Pour des raisons de sécurité, il est interdit d’apporter une quelconque modification à l’appareil non
spécifiquement autorisée par les parties responsables.
CONSEILS D'INSTALLATION:
Installer l'appareil dans un lieu bien aéré, à l'abri de l'humidité et des fortes températures.
Placer et utiliser l'appareil à proximité de sources de chaleur telles que spots, amplis,… pourrait affecter
ses performances et même endommager l'appareil.
L'appareil peut être installé dans un rack de 19''. Fixez l'appareil en utilisant les 4 trous pour vis sur la face
avant. Assurez-vous d'utiliser des vis aux dimensions adaptées (vis non fournies). Essayez d'éviter les
vibrations et les coups lors du transport.
En cas d'installation dans un 'flight case', assurer une bonne ventilation afin d'évacuer la chaleur produite
par l'appareil.
Pour résorber la condensation à l'intérieur de l'appareil, le laisser s'adapter à la nouvelle température
ambiante après le transport. La condensation peut altérer les performances de l'appareil.
NETTOYAGE:
Nettoyez l’appareil à l’aide d’un chiffon doux, légèrement humide. Evitez d’introduire de l’eau à l’intérieur de
l’appareil. N’utilisez pas de produits volatils tels que le benzène ou le 'thinner', qui peuvent endommager
l’appareil.
CONNEXIONS
Les connexions peuvent être réalisées au moyen de câbles
munis de prises symétriques ou asymétriques au standard
XLR. S'il vous plait, utilisez des câbles symétriques de bonne
qualité afin de minimiser les bruits indésirables et les
interférences. Il y a une multitude de possibilités de
branchements, mais en règle générale, l'appareil sera connecté entre la sortie de votre mixer et les différents
amplificateurs de votre installation.
IMPORTANT : il faut toujours tester les connexions afin d'éviter des erreurs de branchement !
Assurez-vous que toutes les touches MUTE (8) sont bien en fonction.
Activez les sorties HF en premier lieu : si votre câblage n'est pas correct, les fréquences aiguës
seront diffusées par vos subwoofers (mais les satellites HF seront toujours entiers ! ).
FONCTIONS (FACE AVANT)
1. INDICATEUR DE NIVEAU D'ENTREE, A LED : indique le niveau du signal entrant.
2. INDICATEUR DE NIVEAU DE SORTIE, A LED : indique le niveau du signal musical sortant sur les
différentes sorties.
Table of contents
Languages:
Other SYNQ AUDIO RESEARCH Recording Equipment manuals