Akai MPC Renaissance User manual

QUICKSTART GUIDE
ENGLISH ( 3 – 10 )
GUÍA DE INICIO RÁPIDO
ESPAÑOL ( 11 – 19 )
GUIDE D'UTILISATION RAPIDE
FRANÇAIS ( 20 – 28 )
GUIDA RAPIDA
ITALIANO ( 29 – 37 )
SCHNELLSTART-ANLEITUNG
DEUTSCH ( 38 – 46 )


3
2 TK
2TK
2TK
QUICKSTART GUIDE (ENGLISH)
INTRODUCTION
Fusing Akai Professional’s legendary MPC layout and workflow with the power of your computer, MPC
Renaissance is an unrivaled instrument for music production. MPC Renaissance allows you to create music
using classic hardware controls and an integrated pop-up display, while its exclusive MPC Software
empowers you with unprecedented, expandable production capabilities on your Mac or PC.
BOX CONTENTS
•MPC Renaissance
•Power adapter *
•USB cable
•Software/driver DVD
•Quickstart Guide
•Safety Instructions & Warranty Information booklet
SETUP DIAGRAM
* The power adapter is in a white box stored in one of
the foam end-pieces that holds MPC Renaissance in
p
lace in the box.
USB MIDI KEYBOARD
MICROPHONE
POWER
MONITORS
(for main mix)
MONITORS
(for ASSIGNABLE OUT mix)
EXTERNAL MIXER
COMPUTER
Any items shown here but not
mentioned in the BOX CONTENTS
are sold separately.

4
SYSTEM REQUIREMENTS
Before proceeding, make sure your computer meets the following system requirements:
Windows:
•2 GHz Pentium® 4 or Celeron®-compatible CPU or faster (multicore CPU recommended)
•2 GB RAM (4 GB recommended)
•Windows 7 (32- or 64-bit)
•DVD-ROM drive
Mac:
•2 GB RAM (4 GB recommended, if supported by your computer)
•Mac OS X 10.6 or later
•DVD-ROM drive
IMPORTANT!
1. INSTALL THE SOFTWARE & DRIVERS
Before connecting MPC Renaissance to your computer, follow these steps:
IMPORTANT: We highly recommend temporarily disabling your computer's anti-virus software. Some anti-
virus programs can slow down or interfere with the installation of the drivers. Remember to enable it again
after the installation is done.
Windows:
1. Insert the included software DVD into your computer's DVD drive.
2. When the software setup "wizard" appears, click Next.
If you don't see this screen, open Computer, right-click the DVD, select Explore, and double-click the
.exe file.
3. Follow the on-screen instructions to install the software and drivers. (You will be asked to connect MPC
Renaissance to your computer during the installation.)
Mac:
1. Insert the included software DVD into your computer's DVD drive.
2. Double-click the DVD icon.
3. Double-click the .pkg file.
4. Follow the on-screen instructions to install the software and drivers. (You will be asked to connect MPC
Renaissance to your computer during the installation.)
2. CONNECT
Follow this sequence of steps whenever you use MPC Renaissance with your computer:
1. Connect MPC Renaissance to a power source.
2. Connect MPC Renaissance's COMPUTER USB PORT to a free USB port on your computer, using a
standard USB cable.
3. Power on MPC Renaissance.
Windows users: The first time your computer detects MPC Renaissance as a connected device, you'll
see some Found New Hardware dialog boxes. This just means MPC Renaissance is being recognized
by your computer for the first time and is installing the appropriate drivers. Wait until these dialog boxes
have disappeared before continuing.
4. Open the MPC software.
See the GET STARTED section of this manual for some quick instructions on how to use your MPC
Renaissance with the MPC software!

5
MPC SOFTWARE OVERVIEW
This is just a broad overview of the MPC software's features. Virtually all of the software elements can be
accessed and controlled by MPC Renaissance. Please also refer to the in-depth Reference Manual (in the
Help menu). The Reference Manual contains a quick tutorial on how to get started making a song so you can
use MPC's features right away – and more detailed information for experienced users.
•Menu: The software's menus.
•Tabs: Click these tabs to view the different parts of the software (e.g., Program Edit, Program Mixer,
Track Mixer, etc.).
•Browser: The software's file browser. From here, you can load files by clicking and dragging with your
mouse or by using the MPC Renaissance's controls.
•Workspace: The main area where you build and edit the different parts of your Project. Depending on
what tab is selected, the Workspace will show the Sequence Grid, the Track Grid, a Song, or a sample
waveform.
•Parameter Controls: This area below the Workspace contains the parameter controls for the current tab.
Depending on what tab is selected, this space can show the Q-Link knob parameters, the pads their
banks and samples, pad layers and their tuning, mixer controls for the Program or Tracks, etc.
•Time/Tempo: The current time and tempo information.
•Transport: Controls related to playback and recording, identical to the MPC Renaissance's transport
controls.
•Master Level: The software's master output level and volume meter. Note that this level is independent of
(and comes before) the MPC Renaissance's MAIN VOLUME knob.
Browser
Workspace
Parameter Controls
Menu Tabs
Master LevelTransportTime/Tempo

6
GET STARTED
1. CONNECT, OPEN & CONFIGURE
1. Connect MPC Renaissance to a power source and to a USB port on your computer, as shown in the
CONNECTION DIAGRAM.
2. Power on MPC Renaissance and open MPC software.
3. In the software, go to Edit fPreferences, and click the Audio & MIDI tab.
4. Click the Device pop-up menu, and select MPC Renaissance ASIO driver. Click OK. Make sure your
MPC Renaissance's DIRECT MON knob is set at the COMP position (to monitor your computer's output).
Test your sound setting: Increase the volume of your speakers (connected to MPC Renaissance's
STEREO OUT jacks), and click Test, next to the Device pop-up menu. You will hear a tone, indicating
your sound is properly configured.
2. ASSIGN SAMPLES TO THE PADS
1. On MPC Renaissance, press BROWSER.
2. User the CURSOR BUTTONS and DATA DIAL to navigate the file structure on your computer, and find
the samples you want to use with the MPC software.
3. You can press F3 (Play) to preview the sample before loading it, or you can press F2 (Auto) to enable
Auto Preview (selecting a sample will preview it immediately).
4. Whenever you find a sample you want to use, hit the pad you want to assign it to (it will light up green),
and press F6 (Open). The sound will be assigned to the pad as well as added to that Program for future
use.
5. Repeat this process for additional pads. Hit those pads to hear your samples in action!
3. RECORD & PERFORM
1. Press MAIN to return to the Main mode.
2. Press OVERDUB to record-arm the Sequence. The light above the PLAY button will flash.
3. Press PLAY to start recording. You will hear the metronome count 4 beats before the recording starts.
4. The Sequence will start playing in a loop:
•Perform using the pads! Each note will be recorded in the Sequence. Even if you aren't playing
exactly in time with the beat, the software's Time Correct feature (T.C.) will automatically "quantize"
the notes so they are lined up in the Grid.
•You can erase notes by holding the ERASE button and pressing (or holding down) a pad whose notes
you want to erase. As the audio pointer moves through the Sequence, any note from that pad will be
erased.
•Tip: If you are a beginning performer, we recommend playing one pad at a time. The Sequence will
keep looping, so there's no rush to record all the pads at once!
5. To stop recording, press STOP. To play back the Sequence without recording, simply press PLAY.
4. IMPORTANT!
To save your Project, press SHIFT + SAVE. Select where you want to save your file and enter a file name.
We recommend leaving the Also save samples box checked, so you won't have to reload your samples
when you want to open that Project. Save often so you don't lose any of your great work!
We highly recommend going through the Quick Start Tutorial in the MPC Reference Manual: In the software,
go to the Help menu and select MPC Help. The Reference Manual PDF will appear. It contains:
•An easy-to-follow yet in-depth tutorial: This walkthrough will get you started using MPC's features
quickly and easily.
•More details about software features: If you're already familiar with MPCs or digital audio
workstations (DAWs) in general, you can dig deeper with the more advanced features.
•Trusted MPC workflow—with software: MPC Renaissance and the MPC software work together
seamlessly, retaining the original MPCs' legendary workflow. You'll learn how to use your MPC
Renaissance to control the MPC software for the most efficient, streamlined experience—producing or
performing!

7
FEATURES
MPC Renaissance is hardware specifically designed to control the MPC software. This section describes all
the hardware controls. For a complete explanation of the software, please see the MPC Reference Manual in
the software in the Help menu.
TOP PANEL
NAVIGATION / DATA ENTRY CONTROLS
1. DISPLAY – This LCD shows all the information
relevant to MPC Renaissance's current operation.
Much of this information is also shown in the software.
Use the CURSOR BUTTONS to navigate through the
display, and use the DATA DIAL, and -/+ buttons to
adjust the currently selected setting/parameter. Use the MODE buttons to change what page is
shown, and use the F-BUTTONS to change what tab is shown.
2. F-BUTTONS – Press one of these buttons to select its corresponding tab, shown above the button in
the display.
3. CURSOR BUTTONS – Use these buttons to navigate through the fields of menus and options shown
in the DISPLAY.
4. DATA DIAL – Use this dial to scroll through the available menu options or adjust the parameter
values of the selected field in the DISPLAY.
5. -/+ – Press these buttons to increase/decrease the value of the selected field in the display.
6. NUMERIC KEYPAD – If the selected field in the DISPLAY is a number, use these numbered buttons
as a standard numeric keypad to enter a value. Press the keypad's ENTER to enter it.
7. UNDO / REDO – Press this button to undo your last action. Hold down SHIFT and press this button to
redo the last action you undid.
You can adjust the display contrast by
holding down SHIFT and turning the
DATA DIAL.
1
2
8
24
11
47
11
13 14
15
11 11
10 10 10 10
10 10 10 10
10 10 10 10
10 10 10 10
12
41
16
43 44 45 46
20 21 22 23
28
19
29 30 31 32
38 38 40 39 39
36 37 35 33 34
18
17
42
25 26 27
888
8888
8888
8888
7
3
4
5
65
9
22222

8
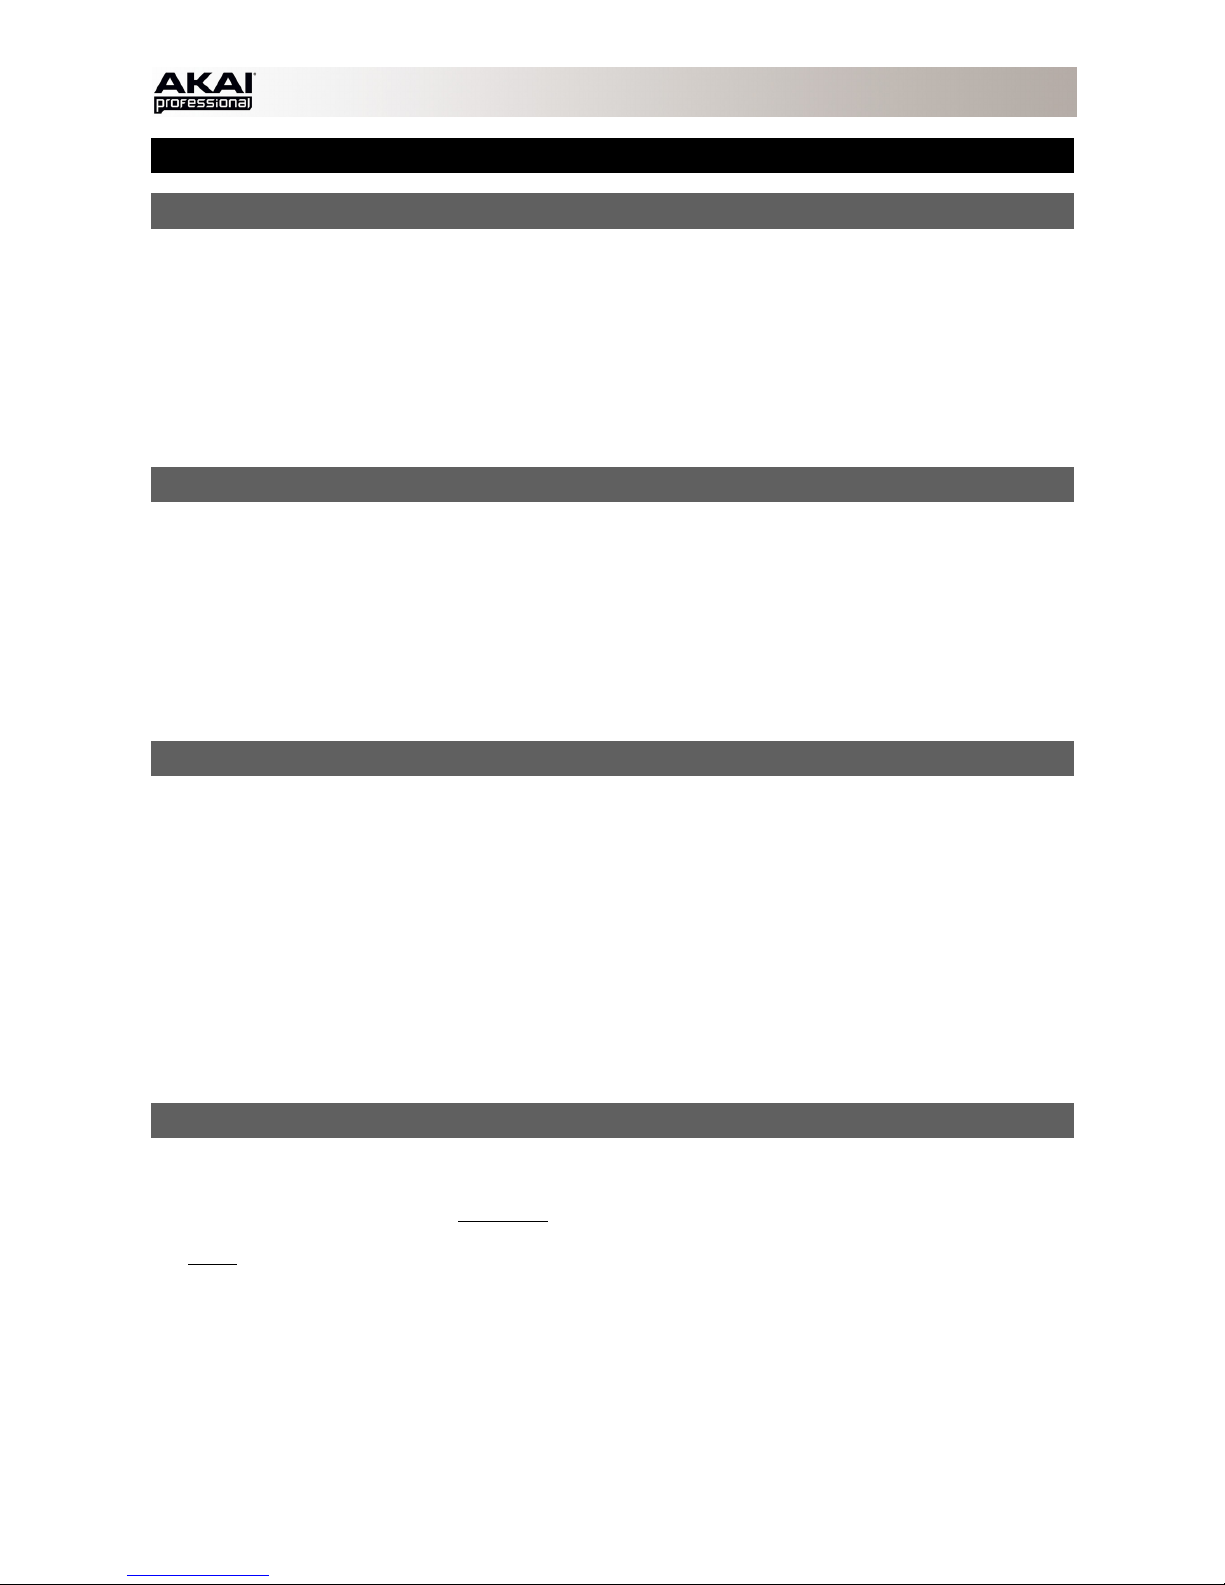
PAD / Q-LINK KNOB CONTROLS
8. Q-LINK KNOBS – Use these touch-sensitive knobs to adjust various parameters and settings. The LEDs
surrounding each knob indicate the knob's current position.
9. Q-LINK TRIGGER – Hold this button down, then touch one of the Q-LINK KNOBS to make that knob's
parameter's value jump to its minimum or maximum (depending on the Trig parameter in the software).
10. PADS – Use these pads to trigger drum hits or other samples in your software. The pads are velocity-
sensitive and pressure-sensitive, which makes them very responsive and intuitive to play.
11. PAD BANK BUTTONS – These 4 buttons switch among Pad Banks A – H. Between these 8 banks with 16
pads per bank, you can access up to 128 MIDI events using the pads.
12. PAD ASSIGN / PAD COPY – Press this button to assign a sample to a pad. In the display, the 4x4 grid
that appears represents the 16 pads. Use the CURSOR BUTTONS to navigate through the grid, and use
the DATA DIAL or -/+ buttons to select a Program (when the Program field is highlighted) or a sample
(when a pad is highlighted).
Hold down SHIFT and press this button to copy the samples and parameters from one pad to another. Use
the CURSOR BUTTONS to select the From Pad ("source") or To Pads ("destination") field and hit a pad to
select it (you can copy to multiple pads). Use the F-BUTTONS to confirm or cancel the operation.
13. FULL LEVEL / HALF LEVEL – Press this button to activate/deactivate Full
Level. When activated, the pads always play back at a maximum velocity (127),
no matter how hard or soft you hit them.
Hold down SHIFT and press this button to activate/deactivate Half Level. When
activated, the pads always play back at half-velocity (63).
14. 16 LEVEL – Press this button to activate/deactivate 16 Level. When activated,
the last pad that was hit will be temporarily copied to all 16 pads. The pads will
now output the same note number as the initial pad, but a selectable parameter
will be fixed at the values shown in the diagram on the right, regardless of how
hard you hit them. The available parameters are velocity, tuning, filter, layer,
attack or decay.
15. NOTE REPEAT / LATCH – Hold this button down and press a pad to retrigger that pad's sample at a rate
based on the current Tempo and Time Correct settings (the available Time Correct settings will appear in
the display, which you can select with the F-BUTTONS). Hold down SHIFT and press this button to latch
the Note Repeat feature. When latched, the button does not need to be held down for Note Repeat to be
activated. Press NOTE REPEAT once more to unlatch it.
MODE / VIEW CONTROLS
16. SHIFT – Hold this button down to access some buttons' secondary functions (indicated by orange writing).
17. MAIN / TRACK – Press this button to view the Main screen in the display and software. Hold down SHIFT
and press this button to view the Track View screen in the display and software.
18. BROWSER / SAVE – Press this button to view the file browser in the display. Hold down SHIFT and press
this button to save the current Project (including its samples, Programs, Sequences, and Songs).
19. PROG EDIT / Q-LINK – Press this button to view the Program Edit screen in the display and software. Hold
down SHIFT and press this button to assign a parameter to a Q-LINK KNOB: use the CURSOR BUTTONS
to select the desired Q-LINK KNOB, then use the DATA DIAL or -/+ buttons to select the desired
parameter.
20. PROG MIX / TRACK MIX – Press this button to view the Program Mixer screen in the display and software.
Hold down SHIFT and press this button to view the Track Mixer screen in the display and software.
21. SEQ EDIT / EFFECTS – Press this button to enter Sequence Edit mode. Hold down SHIFT and press this
button to enter Effects mode, where you can assign the Q-LINK KNOBS to the parameters of the currently
selected effect.
22. SAMPLE EDIT / SAMPLE REC – Press this button to view the Sample Edit screen in the display and
software. Hold down SHIFT and press this button to view the Sample Record screen in the display and
software.
23. SONG / OTHER – Press this button to view the Song screen in the display and software. Hold down SHIFT
and press this button to enter Other mode, which allows you to set: the minimum number of taps for the
TAP TEMPO button; pad threshold, sensitivity, and curve; the footswitches' messages; and the Program
Change target.
24. STEP SEQ – Press this button to view the Step Sequence screen in the display and software.
25. NEXT SEQ – Press this button to view the Next Sequence screen in the display and software.
26. TRACK MUTE / PAD MUTE – Press this button to view the Track Mute screen in the display and software.
Hold SHIFT and press this button to view the Pad Mute screen in the display and software.
127119111103
71 79 87 95
39 47 55 63
7152331

9
27. WINDOW / FULL SCREEN – When this button is lit, it means the selected field in the display contains additional
functions; press this button to access them. Use the F-BUTTONS, CURSOR BUTTONS, and DATA DIAL or -/+
buttons to execute (or cancel) these additional functions.
Hold SHIFT and press this button to switch between Full Screen and Half Screen modes. In Full Screen mode,
the workspace occupies the whole screen. In Half Screen mode, the parameter controls (Q-Link knobs, pads,
Sequence and Track information, Project Information, etc.) are shown underneath the workspace.
28. PROJECT / FOLDER 1 – Press this button to view only Project files in the File Browser. Hold down SHIFT and
press this button to select the Browser's Folder 1 shortcut.
29. SEQUENCE / FOLDER 2 – Press this button to view only Sequence files in the File Browser. Hold down SHIFT
and press this button to select the Browser's Folder 2 shortcut.
30. PROGRAM / FOLDER 3 – Press this button to view only Program files in the File Browser. Hold down SHIFT
and press this button to select the Browser's Folder 3 shortcut.
31. SAMPLE / FOLDER 4 – Press this button to view only Sample files in the File Browser. Hold down SHIFT and
press this button to select the Browser's Folder 4 shortcut.
32. NO FILTER / FOLDER 5 – Press this button to view all files in the File Browser. Hold down SHIFT and press this
button to select the Browser's Folder 5 shortcut.
TRANSPORT / RECORDING CONTROLS
33. PLAY – Press this button to play the Sequence from the audio pointer's current position.
34. PLAY START – Press this button to play the Sequence from its start point.
35. STOP – Press this button to stop playback.
36. REC – Press this button to record-arm the Sequence. Press PLAY or PLAY START to start recording.
37. OVERDUB – Press this button to enable Overdub, which allows you to record note events in a Sequence without
overwriting any previously recorded note events. You can enable Overdub either before or during recording.
38. < / > ( |< / >| ) – Use these buttons to move the audio pointer left/right, one step at a time. Hold LOCATE and
press one of these buttons to move the audio pointer to the previous/next event in the Sequence Grid.
39. << / >> (START/END) – Use these buttons to move the audio pointer left/right, one bar at a time. Hold LOCATE
and press one of these buttons to move the audio pointer to the start or end of the Sequence Grid.
40. LOCATE – Hold this button down to activate the secondary functions of the < / > and << / >> buttons (i.e., |< / >|
and START/END, respectively).
41. ERASE – As a Sequence is playing, hold this button down and press a pad to delete the note event for that pad
at the current playback position. This is a quick way to delete note events from your Sequence without having to
stop playback.
42. TAP TEMPO – Press this button in time with the desired tempo to enter a new tempo (in BPM) in the software.
I/O & LEVEL CONTROLS
43. MIC IN / PHONO IN SWITCH – Use this switch to select the MIC IN or PHONO IN jacks on the rear panel. If you
are using a mic or other line-level audio source connected to the MIC IN jacks, select MIC IN. If you are using a
phono-level device like a turntable connected to the PHONO IN jacks, select PHONO IN.
44. REC GAIN – Use this knob to adjust the gain of the incoming signal from the MIC IN or PHONO IN jacks on the
rear panel. Monitor the recording level by viewing the level meter (LEDs) above the MIC/LINE / PHONO
SWITCH.
45. DIRECT MON – Use this knob to adjust the balance between the INPUT and COMP signals in the headphones.
The INPUT signal consists of the MIC IN or PHONO IN jacks – turn the knob all the way to INPUT for zero-
latency direct monitoring. The COMP signal is the normal software playback. When not recording, we
recommend turning this knob all the way to the COMP position.
46. MAIN VOLUME – Use this knob to adjust the volume level of the STEREO OUT jacks.
47. VINTAGE MODE – Press this to toggle through the available Vintage Modes. The MPC3000 and MPC60 settings
emulate the sounds of those classic MPCs, while the OTHER setting emulates the sound of vintage sampling
drum machines. When none of the LEDs are lit, Vintage Mode is off.
FRONT PANEL
1. FOOTSWITCH INPUTS – Connect optional 1/4" TS
footswitches to these inputs.
2. MIX KNOB – Use this knob to adjust the balance
between the MAIN and ASSIGN signals in your
headphones. MAIN is a summed mono signal of the left and right STEREO OUTS. ASSIGN is a summed mono
signal of ASSIGNABLE MIX OUTS 1 and 2.
3. HEADPHONES – Connect your headphones (not included) to one of these standard TRS outputs (1/8" or 1/4").
Use the MIX KNOB to determine what signal is heard in the headphones.
4. HEADPHONES VOLUME – Use this knob to adjust the headphone volume.
1 1 2 3 3 4

10
REAR PANEL
1. POWER INPUT –Connect a 12V DC – 2A power adapter (center pin positive) to this jack then into an
electrical outlet.
2. POWER ADAPTER RESTRAINT – You can secure a power adapter cable to this restraint to prevent it
from accidentally unplugging.
3. POWER SWITCH – Turns MPC Renaissance's power on/off.
4. COMPUTER USB PORT– Use the included USB cable to connect this port to an available USB port on
your computer. This connection allows MPC Renaissance to send/receive MIDI data to/from the MPC
software.
5. USB HUB OUTPUTS – You can connect additional USB devices (controllers, hard drives, etc.) to these
powered USB ports. In addition to being an audio interface, these ports allow MPC Renaissance to function
as a powered USB hub when it is powered on.
6. STEREO OUT – Connect these 1/4" TRS outputs to your speaker system (not included). The signal sent
out of these outputs is the main mix. In the MPC software, you can set what is routed to these outputs in
the Program Mixer tab, by selecting 1,2 as the OUT for one pad or multiple pads.
7. ASSIGNABLE MIX OUT – Connect these 1/4" TRS outputs to an external mixer (not included). The signal
sent from these outputs is full-volume (0 dB). In the MPC software, you can set what is routed to these
outputs in the Program Mixer tab, by selecting 3,4 as the OUT for one pad or multiple pads.
8. S/PDIF IN/OUT – Use standard RCA cables to connect these jacks to devices that can send/receive digital
audio.
9. MIC IN – Connect an external sound source or microphone to these jacks using standard 1/4" TRS or XLR
cables. Make sure to set the MIC/LINE SWITCH appropriately.
10. MIC/LINE SWITCH – Set this switch appropriately for the device you connected to the MIC IN jacks. If your
sound source is a microphone, set it to MIC. If your sound source is a line-level device, like an external
mixer or keyboard, set it to LINE.
11. PHANTOM POWER SWITCH – This switch activates and deactivates phantom power. When activated,
phantom power supplies +48V to both MIC IN inputs. Please note that most dynamic microphones do not
require phantom power, while most condenser microphones do. Consult your microphone's documentation
to find out whether it needs phantom power.
12. PHONO IN – Connect these RCA inputs to an external sound source (e.g., a turntable, CD player, etc.).
Make sure to set the PHONO/LINE SWITCH appropriately.
13. PHONO/LINE SWITCH – Flip this switch to the appropriate position, depending on the device connected to
the AUX INPUTS. If you are using phono-level turntables, set this switch to "PHONO" to provide the
additional amplification needed for phono-level signals. If using a line-level device, such as a CD player or
sampler, set this switch to "LINE."
14. GROUND TERMINAL – If you connected a phono-level turntable to the PHONO IN jacks and are hearing a
low hum or buzz, this could mean that the turntable is not grounded. If the turntable has a grounding wire,
connect it to this terminal.
Note: Some turntables have a grounding wire built into the RCA connection and, therefore, nothing needs
to be connected to the grounding terminal.
15. MIDI IN – Use a five-pin MIDI cable to connect the MIDI OUT of an optional external MIDI device to the
MIDI IN of MPC Renaissance.
16. MIDI OUT – Use a five-pin MIDI cable to connect the MIDI OUT of MPC Renaissance to the MIDI IN of an
optional external device.
SUPPORT & UPDATES
For additional information, technical support, and the most current versions of software, firmware, or drivers,
please visit:
www.akaipro.com/mpcrenaissance
1
2
3
4
5
67 8
99 12
14
15 1516 1616 16
10 11 13

11
2 TK
2TK
2TK
GUÍA DE INICIO RÁPIDO (ESPAÑOL)
INTRODUCCIÓN
Combinando la disposición y el flujo operativo del legendario MPC de Akai Professional con la potencia de su
computadora, MPC Renaissance es un instrumento sin igual para la producción musical. MPC Renaissance
le permite crear música usando controles de hardware clásicos y una pantalla emergente integrada, mientras
su exclusivo software MPC pone en sus manos unas capacidades de producción sin precedentes y
ampliables en su Mac o PC.
CONTENIDO DE LA CAJA
•MPC Renaissance
•Adaptador de alimentación *
•Cable USB
•DVD de software/drivers
•Guía de inicio rápido
•Folleto de instrucciones de seguridad e
información sobre la garantía
DIAGRAMA DE INSTALACIÓN
* El adaptador de alimentación está en una caja
blanca alojada en una de las piezas de espuma de los
extremos que sostienen al MPC Renaissance en su
sitio en la caja.
TECLADO MIDI USB
MICRÓFONO
SUMINISTRO
ELÉCTRICO
MONITORES
(para la mezcla principal)
MONITORES
(para la mezcla de la SALIDA ASIGNABLE)
MEZCLADOR EXTERNO
COMPUTADORA
Todos los elementos que se
muestran en la ilustración pero no
se mencionan en CONTENIDO DE
LA CAJA se venden por separado.

12
REQUISITOS DE SISTEMA
Antes de continuar, asegúrese de que su computadora cumpla los siguientes requisitos de sistema:
Windows:
•CPU Pentium® 4 de 2 GHz o compatible con Celeron® o más rápida (se recomienda CPU multinúcleo)
•2 GB de RAM (se recomienda 4 GB)
•Windows 7 (de 32 ó 64 bits)
•Lector de DVD-ROM
Mac:
•2 GB de RAM (se recomienda 4 GB si la soporta su computadora)
•Mac OS X 10.6 o posterior
•Lector de DVD-ROM
IMPORTANTE
1. INSTALACIÓN DEL SOFTWARE Y LOS DRIVERS
Antes de conectar el MPC Renaissance a su computadora, siga estos pasos:
IMPORTANTE: Recomendamos especialmente desactivar temporalmente el software antivirus de su
computadora. Algunos programas antivirus pueden enlentecer o interferir con la instalación de los drivers.
Recuerde activarlo nuevamente después de realizar la instalación.
Windows:
1. Inserte el DVD de software incluido en el lector de DVD de la computadora.
2. Cuando aparezca el "asistente" de instalación, haga clic en Next (Siguiente).
Si no ve esta pantalla, abra Computer (Mi PC), haga clic derecho en el DVD, seleccione Explore
(Explorar) y haga doble clic en el archivo .exe.
3. Siga las instrucciones de la pantalla para instalar el software y los drivers. (El sistema le solicitará que
conecte MPC Renaissance a la computadora durante el proceso de instalación.)
Mac:
1. Inserte el DVD de software incluido en el lector de DVD de la computadora.
2. Haga doble clic en el icono del DVD.
3. Haga doble clic en el archivo .pkg.
4. Siga las instrucciones de la pantalla para instalar el software y los drivers. (El sistema le solicitará que
conecte MPC Renaissance a la computadora durante el proceso de instalación.)
2. CONEXIÓN
Siga esta secuencia de pasos toda vez que use MPC Renaissance con su computadora:
1. Conecte el MPC Renaissance a una fuente de alimentación eléctrica.
2. Conecte el PUERTO USB COMPUTER del MPC Renaissance a un puerto USB de la computadora, con
un cable USB estándar.
3. Encienda el MPC Renaissance.
Usuarios de Windows: La primera vez que su computadora detecta el MPC Renaissance como
dispositivo conectado, verá varios cuadros de diálogo Found New Hardware (Nuevo hardware
encontrado). Esto significa simplemente que el MPC Renaissance está siendo reconocido por su
computadora por primera vez y está instalando los drivers apropiados. Espere que estos cuadros de
diálogo hayan desaparecido antes de continuar.
4. Abra el software MPC.
Consulte la sección PARA COMENZAR de este manual para conocer algunos instrucciones rápidas
sobre cómo usar el MPC Renaissance con el software MPC.

13
DESCRIPCIÓN GENERAL DEL SOFTWARE MPC
Ésta es solo una descripción general amplia de las características del software MPC. El MPC Renaissance
puede acceder y controlar virtualmente todos los elementos del software. Consulte también el Manual de
referencia con mayor profundidad (en el menú Help (Ayuda)). El Manual de referencia contiene un tutorial
rápido sobre cómo comenzar a hacer un tema, de modo que pueda usar inmediatamente las características
de MPC —así como información detallada para los usuarios más experimentados.
•Menú: Menús del software.
•Pestañas: Haga clic en estas pestañas para ver las distintas partes del software (por ej., Program Edit
(Edición de programas), Program Mixer (Mezclador de programas), Track Mixer (Mezclador de pistas),
etc.).
•Navegador: Navegador de archivos del software. Desde aquí, es posible cargar archivos haciendo clic y
arrastrándolos con el mouse o usando los controles del MPC Renaissance.
•Espacio de trabajo: Área principal donde usted construye y edita las distintas partes de su proyecto.
Según la pestaña que seleccione, aparece en el espacio de trabajo la Sequence Grid (Grilla de
secuencia), la Track Grid (Grilla de pistas), Song (Tema) o la forma de onda de una muestra.
•Controles de parámetros: Esta área que está debajo del espacio de trabajo contiene los controles de
parámetros correspondientes a la pestaña seleccionada. Según cuál sea la pestaña que seleccionó, este
espacio puede mostrar los parámetros de perillas Q-Link, los pads, sus bancos y muestras, las capas de
pads y su afinación, los controles del mezclador para el programa o las pistas, etc.
•Tiempo/Tempo: Información del tiempo y tempo actuales.
•Transporte: Controles relacionados con la reproducción y la grabación, idénticos a los controles de
transporte del MPC Renaissance.
•Nivel maestro: Nivel de salida maestro y medidor de volumen del software. Tenga en cuenta que este
nivel es independiente (y está antes) de la perilla MAIN VOLUME (Volumen principal) del MPC
Renaissance.
Navegador
Espacio de trabajo
Controles de
parámetros
Menú Pestañas
Nivel maestro
Transporte
Tiempo/Tempo

14
PARA COMENZAR
1. CÓMO CONECTAR, ABRIR Y CONFIGURAR
1. Conecte el MPC Renaissance a una fuente de alimentación y a un puerto USB de su computadora, como se muestra
en el DIAGRAMA DE CONEXIÓN.
2. Encienda el MPC Renaissance y abra el software MPC.
3. En el software, vaya a Edit fPreferences (Editar > Preferencias) y haga clic en la pestaña Audio & MIDI.
4. Haga clic en el menú emergente Device (Dispositivo) y seleccione MPC Renaissance ASIO driver (Driver ASIO de
MPC Renaissance). Haga clic en OK (Aceptar). Asegúrese de que la perilla DIRECT MON (Monitoreo directo) de
MPC Renaissance esté en la posición COMP (para monitorear la salida de su computadora.
Pruebe los ajustes de sonido: Aumente el volumen de sus altavoces (conectados a los conectores hembra
STEREO OUT (Salida estéreo) del MPC Renaissance) y haga clic en Test (Prueba), junto al menú emergente
Device. Oirá un tono, que indica que el sonido está configurado correctamente.
2. CÓMO ASIGNAR MUESTRAS A LOS PADS
1. En MPC Renaissance, pulse BROWSER (Navegador).
2. Use los BOTONES DE CURSOR y el CUADRANTE DE DATOS para navegar por la estructura de archivos de su
computadora y encontrar las muestras que desea usar con el software MPC.
3. Puede pulsar F3 (Play) (Reproducir) para tener una presentación preliminar de la muestra antes de cargarla o F2
(Auto) para activar Auto Preview (Presentación preliminar automática) (al seleccionar una muestra se realiza la
presentación automática inmediatamente).
4. Toda vez que encuentre una muestra que desea usar, toque el pad al que desea asignarla (se ilumina con luz verde)
y pulse F6 (Open) (Abrir). El sonido se asigna al pad y también se agrega a ese programa para uso futuro.
5. Repita este proceso para los pads adicionales. ¡Toque esos pads para oír sus muestras en acción!
3. COMO GRABAR Y TOCAR
1. Pulse MAIN para volver al modo principal.
2. Pulse OVERDUB (Sobregrabar) para preparar la grabación de la secuencia. La luz que está arriba del botón PLAY
(Reproducir) destella.
3. Pulse PLAY para comenzar a grabar. Oirá que el metrónomo cuenta 4 beats antes de comenzar la grabación.
4. La secuencia comienza a tocarse en un loop:
•¡Toque usando los pads! Cada nota se graba en la secuencia. Incluso si no está tocando exactamente en
sincronismo con el beat, la característica Time Correct (T.C.) (Corrección de tiempo) del software "cuantizará"
automáticamente las notas de modo que se alineen en la grilla.
•Puede borrar notas manteniendo pulsado el botón ERASE (Borrar) y pulsando (o manteniendo pulsado) el pad
cuyas notas desea borrar. A medida que el puntero de audio se mueve por la secuencia, se borran todas las
notas de ese pad.
•Consejo: Si es un ejecutante principiante, le recomendamos tocar un pad por vez. La secuencia continuará
realizando el loop, de modo que no hay apuro de grabar todos los pads a la vez.
5. Para detener la grabación, pulse STOP (Parar). Para reproducir la secuencia sin grabarla, pulse solamente PLAY.
4. IMPORTANTE
Para guardar su proyecto, pulse SHIFT + SAVE (Función secundaria + Guardar). Seleccione donde desea guardar su
archivo e ingrese un nombre de archivo. Recomendamos dejar seleccionada la casilla Also save samples (Guardar
también muestras), de modo que no tenga que volver a cargar sus muestras cuando desee abrir el proyecto. Guarde con
frecuencia a fin de no perder nada de su excelente trabajo.
Recomendamos especialmente leer el Tutorial de inicio rápido en el Manual de referencia de MPC: En el software, vaya
al menú Help (Ayuda) y seleccione MPC Help (Ayuda de MPC). Aparece el PDF del Manual de referencia. Contiene lo
siguiente:
•Un tutorial fácil de seguir pero suficientemente profundo: Esta recorrida le permitirá iniciarse en el uso de las
características de MPC rápida y fácilmente.
•Más detalles acerca de las características del software: Si ya está familiarizado con los MPC o las estaciones de
trabajo de audio digital (DAW) en general, puede profundizar con las características más avanzadas.
•Flujo operativo de MPC confiable —con software: El MPC Renaissance y el software MPC funcionan fluidamente
juntos, reteniendo el legendario flujo operativo del MPC original. Aprenderá a usar su MPC Renaissance para
controlar el software MPC a fin de lograr la experiencia más eficiente y dinámica —¡produciendo o ejecutando!

15
CARACTERÍSTICAS
El MPC Renaissance es un equipo diseñado específicamente para controlar el software MPC. En esta
sección se describen todos los controles de hardware. Para una explicación completa del software, consulte
el Manual de referencia de MPC en el menú Help del software.
PANEL SUPERIOR
CONTROLES DE NAVEGACIÓN / INGRESO DE DATOS
1. PANTALLA – Esta pantalla LCD muestra toda la información relevante para la operación actual del MPC
Renaissance. Gran parte de esta información se muestra también en el software. Use los BOTONES DE
CURSOR para navegar por la pantalla y los botones -/+ del CUADRANTE DE DATOS para ajustar el
valor/parámetro seleccionado en ese momento. Use los botones MODE (Modo) para cambiar la página
que se muestra y los botones F para cambiar la pestaña que se muestra.
2. BOTONES F – Pulse uno de estos botones para seleccionar su pestaña correspondiente, mostrada
arriba del botón en la pantalla.
3. BOTONES DE CURSOR – Estos botones se usan para navegar por los campos de menús y opciones
que se muestran en la PANTALLA.
4. CUADRANTE DE DATOS – Use este cuadrante para desplazarse por las opciones de menú disponibles
o ajustar los valores de los parámetros del campo seleccionado en la PANTALLA.
5. -/+ – Pulse estos botones para aumentar o disminuir el valor del campo seleccionado en la pantalla.
6. TECLADO NUMÉRICO – Si el campo seleccionado en la PANTALLA es un número, use estos botones
numerados como teclado numérico estándar para ingresar valores. Pulse ENTER del teclado para
ingresarlo.
7. DESHACER / VOLVER A HACER – Pulse este botón para deshacer su última acción. Mantenga pulsado
SHIFT y pulse este botón para volver a hacer la última acción que deshizo.
1
2
8
24
11
47
11
13 14
15
11 11
10 10 10 10
10 10 10 10
10 10 10 10
10 10 10 10
12
41
16
43 44 45 46
20 21 22 23
28
19
29 30 31 32
38 38 40 39 39
36 37 35 33 34
18
17
42
25 26 27
888
8888
8888
8888
7
3
4
5
65
9
22222

16
CONTROLES DE PAD / PERILLAS Q-LINK
8. PERILLAS Q-LINK – Use estas perillas sensibles al tacto para ajustar diversos parámetros y valores.
Los LED que rodean a cada perilla indican la posición actual de la misma.
9. DISPARADOR Q-LINK – Mantenga pulsado este botón y toque una de las PERILLAS Q-LINK para hacer
que el valor del parámetro de esa perilla salte a su mínimo o máximo (dependiendo del parámetro Trig
del software).
10. PADS – Use estos pads para disparar golpes de batería u otras muestras existentes en su software. Son
sensibles a la velocidad y a la presión, lo que los hace muy responsivos e intuitivos para tocar.
11. BOTONES DE BANCO DE PADS – Estos 4 botones conmutan entre los bancos de pads A – H. Entre
estos 8 bancos con 16 pads por banco, puede acceder a hasta 128 eventos MIDI usando los pads.
12. ASIGNAR / COPIAR A PAD – Pulse este botón para asignar una muestra a un pad. La grilla 4x4 que
aparece en la pantalla representa los 16 pads. Use los BOTONES DE CURSOR para navegar por la
grilla y el CUADRANTE DE DATOS o los botones -/+ para seleccionar un programa (cuando se resalta el
campo Program) o una muestra (cuando se resalta un pad).
Mantenga pulsado SHIFT y pulse este botón para copiar las muestras y parámetros de un pad a otro.
Use los BOTONES DE CURSOR para seleccionar el campo From Pad ("origen") o To Pads ("destino") y
toque un pad para seleccionarlo (puede copiar a varios pads). Use los BOTONES F para confirmar o
cancelar la operación.
13. NIVEL MÁXIMO / NIVEL MEDIO – Pulse este botón para activar y desactivar el nivel máximo. Cuando se
activa, los pads siempre reproducen a máxima velocidad (127), independientemente de lo fuerte o
débilmente que usted los golpee.
Mantenga pulsado SHIFT y pulse este botón para activar y desactivar el nivel
medio. Cuando se activa, los pads siempre reproducen a media velocidad (64).
14. NIVEL 16 – Pulse este botón para activar y desactivar el nivel 16. Cuando se
activa, se copia temporalmente en los 16 pads el último pad que se golpeó. Los
pads producen el mismo número de nota que el pad inicial, pero un parámetro
seleccionable se fija a los valores mostrados en el diagrama de la derecha,
independientemente de la fuerza con que se golpee cada pad. Los parámetros
disponibles son velocidad, afinación, filtro, capa, ataque o decaimiento.
15. REPETICIÓN / ENGANCHE DE NOTA – Mantenga pulsado este botón y pulse un pad para volver a
disparar la muestra de ese pad a una frecuencia basada en los valores actuales de Tempo y Time
Correct (los valores disponibles de Time Correct aparecen en la pantalla donde puede seleccionarlos con
los BOTONES F). Mantenga pulsado SHIFT y pulse este botón para enganchar la característica Note
Repeat (Repetición de notas). Cuando está enganchada, no es necesario mantener pulsado el botón
para activar la repetición de nota. Pulse NOTE REPEAT una vez para desengancharla.
CONTROLES DE MODO Y VISUALIZACIÓN
16. SHIFT (FUNCIÓN SECUNDARIA) – Mantenga pulsado este botón para acceder a las funciones
secundarias de algunos botones (indicadas por el texto color naranja).
17. PRINCIPAL / PISTA – Pulse este botón para ver la pantalla Main (Principal) en la pantalla y en el
software. Mantenga pulsado SHIFT y pulse este botón para ver la pantalla Track View (Vista de pistas)
en la pantalla y el software.
18. NAVEGADOR / GUARDAR – Pulse este botón para ver el navegador de archivos en la pantalla.
Mantenga pulsado SHIFT y pulse este botón para guardar el proyecto actual (incluidos sus muestras,
programas, secuencias y temas).
19. EDICIÓN DE PROGRAMAS / Q-LINK – Pulse este botón para ver la pantalla Program Edit (Edición de
programas) en la pantalla y en el software. Mantenga pulsado SHIFT y pulse este botón para asignar un
parámetro a una PERILLA Q-LINK: use los BOTONES DE CURSOR para seleccionar la PERILLA Q-
LINK deseada y luego use el CUADRANTE DE DATOS o los botones -/+ para seleccionar el parámetro
deseado.
20. MEZCLA DE PROGRAMAS / MEZCLA DE PISTAS – Pulse este botón para ver la pantalla Program
Mixer (Mezclador de programas) en la pantalla y en el software. Mantenga pulsado SHIFT y pulse este
botón para ver la pantalla Track Mixer (Mezclador de pistas) en la pantalla y el software.
21. EDICIÓN DE SECUENCIA / EFECTOS – Pulse este botón para entrar al modo Sequence Edit (Edición
de secuencia). Mantenga pulsado SHIFT y pulse este botón para entrar al modo Effects (Efectos), donde
puede asignar las PERILLAS Q-LINK a los parámetros del efecto seleccionado en ese momento.
22. EDICIÓN / GRABACIÓN DE MUESTRAS – Pulse este botón para ver la pantalla Sample Edit (Edición
de muestras) en la pantalla y en el software. Mantenga pulsado SHIFT y pulse este botón para ver la
pantalla Sample Record (Grabación de muestras) en la pantalla y el software.
127119111103
71 79 87 95
39 47 55 63
7152331

17
23. TEMA / OTROS – Pulse este botón para ver la pantalla Song (Tema) en la pantalla y en el software.
Mantenga pulsado SHIFT y pulse este botón para entrar al modo Other (Otros) que le permite ajustar: el
número mínimo de golpecitos para el botón TAP TEMPO, el umbral, la sensibilidad y la curva del pad, los
mensajes de los interruptores de pedal y el destinatario de Program Change (Cambio de programa).
24. SECUENCIA DE PASOS – Pulse este botón para ver la pantalla Step Sequence (Secuencia de pasos)
en la pantalla y en el software.
25. SECUENCIA SIGUIENTE – Pulse este botón para ver la pantalla Next Sequence (Secuencia siguiente)
en la pantalla y en el software.
26. SILENCIO DE PISTA / PAD – Pulse este botón para ver la pantalla Track Mute (Silencio de pista) en la
pantalla y en el software. Mantenga pulsado SHIFT y pulse este botón para ver la pantalla Pad Mute
(Silencio de pad) en la pantalla y el software.
27. VENTANA / PANTALLA COMPLETA – Cuando este botón está iluminado, significa que el campo
seleccionado de la pantalla contiene funciones adicionales. Pulse este botón para acceder a las mismas.
Use los BOTONES F, los BOTONES DE CURSOR y el CUADRANTE DE DATOS o los botones -/+ para
ejecutar (o cancelar) estas funciones adicionales.
Mantenga pulsado SHIFT y pulse este botón para cambiar entre los modos Full Screen (Pantalla
completa) y Half Screen (Media pantalla). En modo de pantalla completa, el espacio de trabajo ocupa
toda la pantalla. En modo de media pantalla, los controles de parámetros (perillas Q-Link, pads,
información de secuencia y pista, etc.) se muestran debajo del espacio de trabajo.
28. PROYECTO / CARPETA 1 – Pulse este botón para ver solo los archivos de proyectos en el navegador
de archivos. Mantenga pulsado SHIFT y pulse este botón para seleccionar el acceso directo Folder 1
(Carpeta 1) del navegador.
29. SECUENCIA / CARPETA 2 – Pulse este botón para ver solo los archivos de secuencia en el navegador
de archivos. Mantenga pulsado SHIFT y pulse este botón para seleccionar el acceso directo Folder 2
(Carpeta 2) del navegador.
30. PROGRAMA / CARPETA 3 – Pulse este botón para ver solo los archivos de programas en el navegador
de archivos. Mantenga pulsado SHIFT y pulse este botón para seleccionar el acceso directo Folder 3
(Carpeta 3) del navegador.
31. MUESTRAS / CARPETA 4 – Pulse este botón para ver solo los archivos de muestras en el navegador de
archivos. Mantenga pulsado SHIFT y pulse este botón para seleccionar el acceso directo Folder 4
(Carpeta 4) del navegador.
32. SIN FILTRO / CARPETA 5 – Pulse este botón para ver todos los archivos en el navegador de archivos.
Mantenga pulsado SHIFT y pulse este botón para seleccionar el acceso directo Folder 5 (Carpeta 5) del
navegador.
CONTROLES DE TRANSPORTE Y GRABACIÓN
33. REPRODUCIR – Pulse este botón para reproducir las secuencias desde la posición actual del puntero de
audio.
34. REPRODUCCIÓN DESDE INICIO – Pulse este botón para reproducir la secuencia desde su punto inicial.
35. PARAR – Pulse este botón para detener la reproducción.
36. GRABAR – Pulse este botón para preparar la grabación de la secuencia. Pulse PLAY o PLAY START
para comenzar la grabación.
37. SOBREGRABAR – Pulse este botón para activar la función Overdub (Sobregrabar), que permite grabar
eventos de notas en una secuencia sin sobrescribir los eventos de nota grabados anteriormente. Puede
activar Overdub antes o durante la grabación.
38. < / > ( |< / >| ) – Use estos botones para desplazar el puntero de audio a la derecha/izquierda, de a un
paso por vez. Mantenga pulsado LOCATE (Localizar) y pulse uno de estos botones para desplazar el
puntero de audio al evento anterior/siguiente en la grilla de secuencia.
39. << / >> (INICIO/FINAL) – Use estos botones para desplazar el puntero de audio a la derecha/izquierda,
de a una barra por vez. Mantenga pulsado LOCATE (Localizar) y pulse uno de estos botones para
desplazar el puntero de audio al inicio o final de la grilla de secuencia.
40. LOCALIZAR – Mantenga pulsado este botón para activar las funciones secundarias de los botones < / >
y << / >> (es decir, |< / >| y START/END respectivamente)
41. BORRAR – Mientras se reproduce una secuencia, mantenga pulsado este botón y pulse un pad para
suprimir el evento de nota de ese pad en la posición de reproducción actual. Ésta es una manera rápida
de suprimir eventos de nota de su secuencia sin tener que detener la reproducción.
42. TAP TEMPO – Pulse este botón en sincronismo con el tempo deseado para ingresar un tempo nuevo (en
BPM) en el software.

18
CONTROLES DE E/S Y NIVEL
43. CONMUTADOR MICRÓFONO/LÍNEA / FONO – Use este conmutador para seleccionar los conectores
hembra MIC IN (Entrada de grabación) o PHONO IN (Entrada de nivel fonográfico) del panel trasero. Si
está usando un micrófono u otra fuente de audio de nivel de línea conectada a los conectores hembra
MIC IN, seleccione MIC IN. Si está usando un dispositivo de nivel fonográfico como un giradiscos
conectado a los conectores hembra PHONO IN, seleccione PHONO IN.
44. GANANCIA DE GRABACIÓN – Use esta perilla para ajustar la ganancia de la señal entrante
proveniente de los conectores hembra MIC IN o PHONO IN del panel trasero. Monitoree el nivel de
grabación observando el medidor de nivel (los LED) que están arriba del CONMUTADOR MIC/LINE /
PHONO.
45. MONITOREO DIRECTO – Use esta perilla para ajustar el balance entre las señales INPUT (Entrada) y
COMP (Computadora) de los auriculares. La señal INPUT consiste en la señal de los conectores hembra
MIC IN o PHONO IN –gire la perilla totalmente a INPUT para lograr un monitoreo directo con cero
latencia. La señal COMP es la reproducción normal del software. Cuando no está grabando,
recomendamos girar esta perilla totalmente a la posición COMP.
46. VOLUMEN PRINCIPAL – Use esta perilla para ajustar el nivel de volumen de los conectores hembra
STEREO OUT (Salida estéreo).
47. MODO CLÁSICO – Pulse este botón para recorrer los modos Vintage (Clásicos) disponibles. Los ajustes
MPC3000 y MPC60 emulan los sonidos de esos MPC clásicos, mientras que el ajuste OTHER (Otros)
emula el sonido de las cajas de ritmo de muestreo clásicas. Cuando no está encendido ninguno de los
LED, el modo Vintage está desactivado.
PANEL FRONTAL
1. ENTRADAS DE INTERRUPTORES DE PEDAL –
Conecte a estas entradas interruptores de pedal
de 1/4" TS opcionales.
2. PERILLA DE MEZCLA – Use esta perilla para
ajustar el balance entre las señales MAIN
(Principal) y ASSIGN (Asignada) de los auriculares. MAIN es una señal mono sumada de las STEREO
OUT (Salidas estéreo) izquierda y derecha. ASSIGN es una seña mono sumada de las ASSIGNABLE
MIX OUT (Salidas de mezcla asignables) 1 y 2.
3. AURICULARES – Conecte sus auriculares (no incluidos) a una de estas salidas TRS estándar (1/8" o
1/4"). Use la PERILLA MIX para determinar qué señal se oye en los auriculares.
4. VOLUMEN DE AURICULARES – Use esta perilla para ajustar el volumen de los auriculares.
PANEL TRASERO
1. ENTRADA DE ALIMENTACIÓN –Conecte el adaptador de alimentación de 12 V CC – 2 A (de pin
central positivo) a este conector y luego a un tomacorriente.
2. PRESILLA DEL ADAPTADOR DE ALIMENTACIÓN – Puede fijar el cable del adaptador de alimentación
a esta presilla para evitar que se desenchufe accidentalmente.
3. INTERRUPTOR DE ENCENDIDO – Permite encender y apagar el MPC Renaissance.
4. PUERTO USB DE LA COMPUTADORA – Use el cable USB incluido para conectar este puerto a un
puerto USB disponible en la computadora. Esta conexión permite que el MPC Renaissance envíe y
reciba datos MIDI hacia y desde el software MPC.
5. SALIDAS DE CONCENTRADOR (HUB) USB – Es posible conectar a estos puertos USB alimentados
dispositivos USB adicionales (controladores, discos duros, etc.). Además de ser una interfaz de audio,
estos puertos permiten que MPC Renaissance funcione como concentrador (hub) USB cuando está
alimentado.
1 1 2 3 3 4
1
2
3
4
5
67 8
99 12
14
15 1516 1616 16
10 11 13

19
6. SALIDA ESTÉREO – Conecte estas salidas TRS de 1/4" a su sistema de altavoces (no incluido). La
señal enviada desde estas salidas es la mezcla principal. En el software MPC, es posible establecer qué
se encamina a estas salidas en la pestaña Program Mixer, seleccionando 1, 2 como OUT (Salida) para
uno o varios pads.
7. SALIDA DE MEZCLA ASIGNABLE – Conecte estas salidas TRS de 1/4" a un sistema mezclador (no
incluido). La señal enviada desde estas salidas es de máximo volumen (0 dB). En el software MPC, es
posible establecer qué se encamina a estas salidas en la pestaña Program Mixer, seleccionando 3, 4
como OUT (Salida) para uno o varios pads.
8. ENTRADA/SALIDA S/PDIF – Use cables RCA estándar para conectar estos conectores hembra a
dispositivos que puedan enviar y recibir audio digital.
9. ENTRADA PARA GRABACIÓN – Conecte a estos conectores hembra una fuente de sonido o micrófono
externos mediante cables TRS o XLR de 1/4" estándar. Asegúrese de ajustar el CONMUTADOR
MIC/LINE (Micrófono/Línea) correctamente.
10. CONMUTADOR MICRÓFONO/LÍNEA – Ajuste este conmutador correctamente para el dispositivo que
conectó a los conectores hembra MIC IN. Si su fuente de sonido es un micrófono, ajústelo a MIC. Si su
fuente de sonido es un dispositivo de nivel de línea, como un mezclador o teclado externo, ajústelo a
LINE.
11. INTERRUPTOR DE ALIMENTACIÓN FANTASMA – Este interruptor activa y desactiva la alimentación
fantasma. Cuando se activa, la alimentación fantasma suministra +48 V a ambas entradas MIC IN. Tenga
en cuenta que la mayoría de los micrófonos dinámicos no requieren alimentación fantasma, mientras que
la mayoría de los micrófonos de condensador la requieren. Consulte la documentación de su micrófono
para averiguar si necesita alimentación fantasma.
12. ENTRADA DE NIVEL FONOGRÁFICO – Conecte estas entradas RCA a una fuente de sonido externa
(por ej. un giradiscos, reproductor de CD, etc.). Asegúrese de ajustar el CONMUTADOR PHONO/LINE
correctamente.
13. CONMUTADOR FONO/LÍNEA – Coloque este conmutador en la posición apropiada, en función del
dispositivo conectado a las ENTRADAS AUX (Auxiliares). Si usa giradiscos de nivel fonográfico, coloque
este conmutador en “PHONO” para proporcionar la amplificación adicional necesaria para las señales de
este nivel. Si usa un dispositivo de nivel de línea, tal como un reproductor de CD o muestreador, coloque
este conmutador en “LINE”.
14. TERMINAL DE TIERRA – Si conectó un giradiscos de nivel de línea a los conectores hembra PHONO
IN y escucha un zumbido grave, puede significar que el giradiscos no está conectado a tierra. Si el
giradiscos tiene un cable de conexión a tierra, conéctelo a esta terminal.
Nota: Algunos giradiscos tienen el cable de conexión a tierra incorporado a la conexión RCA y, por lo
tanto, no es necesario conectar nada al terminal de tierra.
15. ENTRADA MIDI – Use un cable MIDI de cinco pines para conectar la SALIDA MIDI de un dispositivo
MIDI externo opcional a MIDI IN (Entrada MIDI) del MPC Renaissance.
16. SALIDA MIDI – Use un cable MIDI de cinco pines para conectar MIDI OUT (Salida MIDI) del MPC
Renaissance a la ENTRADA MIDI de un dispositivo externo opcional.
SOPORTE Y ACTUALIZACIONES
Para obtener información adicional, soporte técnico y las versiones más actualizadas del software, firmware o
drivers, visite:
www.akaipro.com/mpcrenaissance

20
2 TK
2TK
2TK
GUIDE D’UTILISATION SIMPLIFIÉ (FRANÇAIS)
PRÉSENTATION
La fusion entre la disposition des commandes et du flux de production légendaire du MPC d'Akai Professional
avec la puissance d’un ordinateur, le MPC Renaissance est un instrument incomparable pour la production de
musique. Le MPC Renaissance vous permet de créer de la musique en utilisant des commandes matérielles
classiques et un affichage intégré, alors que son logiciel MPC exclusif vous offre des possibilités de
production sans précédent et extensibles sur votre Mac ou le PC.
CONTENU DE LA BOÎTE
•MPC Renaissance
•Adaptateur secteur*
•Câble USB
•DVD d’installation du logiciel/des pilotes
•Guide d’utilisation simplifié
•Consignes de sécurité et informations concernant la garantie
SCHÉMA D'INSTALLATION
* L'adapteur secteur se trouve dans une boîte blanche
insérée dans une des extrémités du matériel qui tient
le MPC Renaissance en
p
lace dans la boîte.
CLAVIER MIDI USB
MICROPHONE
ALIMENTATION
MONITEURS
(MIX GÉNÉRAL)
MONITEURS
(Pour ASSIGNABLE OUT mix) CONSOLE DE MIXAGE
EXTERNE
ORDINATEUR
Tous les articles montrés ici, mais non
mentionnés dans le CONTENU DE LA
BOÎTE sont vendus séparément.
Table of contents
Languages:
Other Akai Recording Equipment manuals