manuals.online logo
Brands
  1. Home
  2. •
  3. Brands
  4. •
  5. SYR
  6. •
  7. Plumbing Product
  8. •
  9. SYR 315 User manual

SYR 315 User manual

1605 - Printed in Germany 9.0002.21
CZ
PL
I
E
F
GB
D
NL
ARMATUREN
Made in Germany
Gebrauchsanleitung
Instructions for use
Notice de montage
Instrucciones de uso
Gebruikshandleiding
Istruzioni per l´uso
Instrukcja obsługi
Návod k použití
Druckminderer 315 / 315 AB
Pressure reducer 315 / 315 AB
Réducteur de pression 315 / 315 AB
Reductor de presión 315 / 315 AB
Drukregelaar 315 / 315 AB
Riduttore di pressione 315 / 315 AB
Reduktor ciśnienia 315 / 315 AB
Redukční ventil 315 / 315 AB
DN15+20: 0315.20.904
DN25: 0315.25.904
DN 32-50: 0315.32.902
MPA
DN15-DN25: P-IX 7635/I
DN32: P-IX 7729/I
Temperatura pracy: maks.30oC (wydanie specjalne 80°C);
Ciśnienie wejściowe: maks.25 bar; Ciśnienie wyjściowe:
1,5-6 bar; Media: woda, powietrze sprężone, neutralne nieklejące płyny
i gazy. Aprobata techniczna COBRTI INSTAL AT/2000-02-1044 (315).
Temperatura d´esercizio: mass. 30°C (edizione straordinaria
80°C); Pressione d´entrata: mass. 25 bar; Pressione d´uscita:
1,5-6 bar; Mezzi: Acqua, aria compressa, liquidi neutri non adesivi e gas.
Temperatura máxima de trabajo: 30°C (ejecutión especial
80°C); Presión máxima de entrada: 25 bar; Presión de sa-
lida: 1,5-6 bar; Medios: Agua, Aire a presión, Liquidos neutrales no
pegadizos y Gases.
Operating Temp.: max. 30°C (Special design 80°C); Inlet
Pressure: max. 25 bar; Outlet Pressure: 1,5-6 bar; Media:
Water, compressed air, neutral non-adhesive liquids and gases. Au-
stralian Standard: AS 1357.2, LIC 2532 (315)
Betriebstemp.: max. 30°C (Sonderausführung 80°C); Ein-
gangsdruck: max. 25 bar; Ausgangsdruck: 1,5-6 bar; Me-
dien: Wasser (nach DIN EN 1567), Pressluft, neutrale nichtklebende
Flüssigkeiten und Gase.
Instalacja i obsługa może być wykonywana jedynie przez autoryzo-
wany zakład instalacyjny. Opakowanie pełni rolę ochronną podczas
transportu.W przypadku znacznego uszkodzenia opakowania należy
odstąpić od instalacji armatury.
L´installazione e la manutenzione é da eseguire unicamen-te da una
ditta specializzata ed autorizzata.
In caso d´imballo considerevolmente danneggiato, l´articolo non é da
montare.
La instalación y el mantenimiento pueden ser sólo realizadas por un
distribuidor autorizado.
En caso de deterioro considerable en el embalaje, el reductor de presión
no debe de montarse.
Installation and maintenance should only be undertaken by competent
personnel.
The packing is provided to protect the valve during transport. Please do
not install the valve if damage is evident.
Die Installation und Wartung darf nur durch einen autorisierten Fachbe-
trieb vorgenommen werden.
Die Verpackung ist Transportschutz. Bei starker Beschädigung der
Verpackung, Armatur nicht einbauen.
0828.08.000
0828.08.000
Hans Sasserath GmbH & Co. KG
Mühlenstr. 62 D-41352 Korschenbroich
Tel.: +49 2161 6105-0 Fax: +49 2161 6105-20
[email protected] www.SYR.de
Provozní teplota: max. 30°C (speciální provedení 80°C); vstupní
tlak: max. 25 barů; výstupní tlak: 1,5-6 barů; média: voda (podle
DIN EN 1567), tlako-vý vzduch, neutrální nelepivé kapaliny a plyny.
Instalaci a údržbu smí provádět pouze autorizovaná odborná rma. Balení
je ochranou při transportu. Při silném poško-zení balení se armatura
nesmí instalovat.
Nennweite DN 15 20 25 32 40 50
Vsin m³/h
nach
DIN
EN 1567
Wohnbauten bei
2 m/s 1,3 2,3 3,6 5,8 9,1 14
Vsin m³/h
nach
DIN 1988
Gewerbliche
Anlagen bei
3 m/s 1,8 3,3 5,4 8,6 13,7 21,2
: Bedrijfstemp.: max 30°C ( speciale uitvoeringen 80°C ) ;
Ingangsdruk: max. 25 bar. Uitgangsdruk: 1.5-6 bar. Media:
Water ( volgens DIN EN 1567 ), Perslucht, neutrale niet klevende vlo-
eistoffen en gassen.
De installatie en het onderhoud mogen enkel door geautoriseerde vakmen-
sen uitgevoerd worden. De verpakking dient als transportbescherming.
Bij sterk beschadigde verpakking, het product niet installeren.
Temp. De service: max 30°C ( exécution spéciale 80°C ); Pressi-
on d’entrée: max. 25 bar. Pression de sortie: 1.5-6 bar, Fluides:
Eau potable, air comprimé, uide neutre non adhésive, gaz neutres
L’ installation et l’entretien doit être exécuter par des personnes compétant
autorisée. L’ emballage sert à protéger le produit pendant le transport.
Ne pas installer le produit quand l’emballage est fort endommagé.
Zgodność z normą PN EN 1567.
na podstawie 1605 / 9.0002.21
1605 - Printed in Germany 9.0002.21
12
3
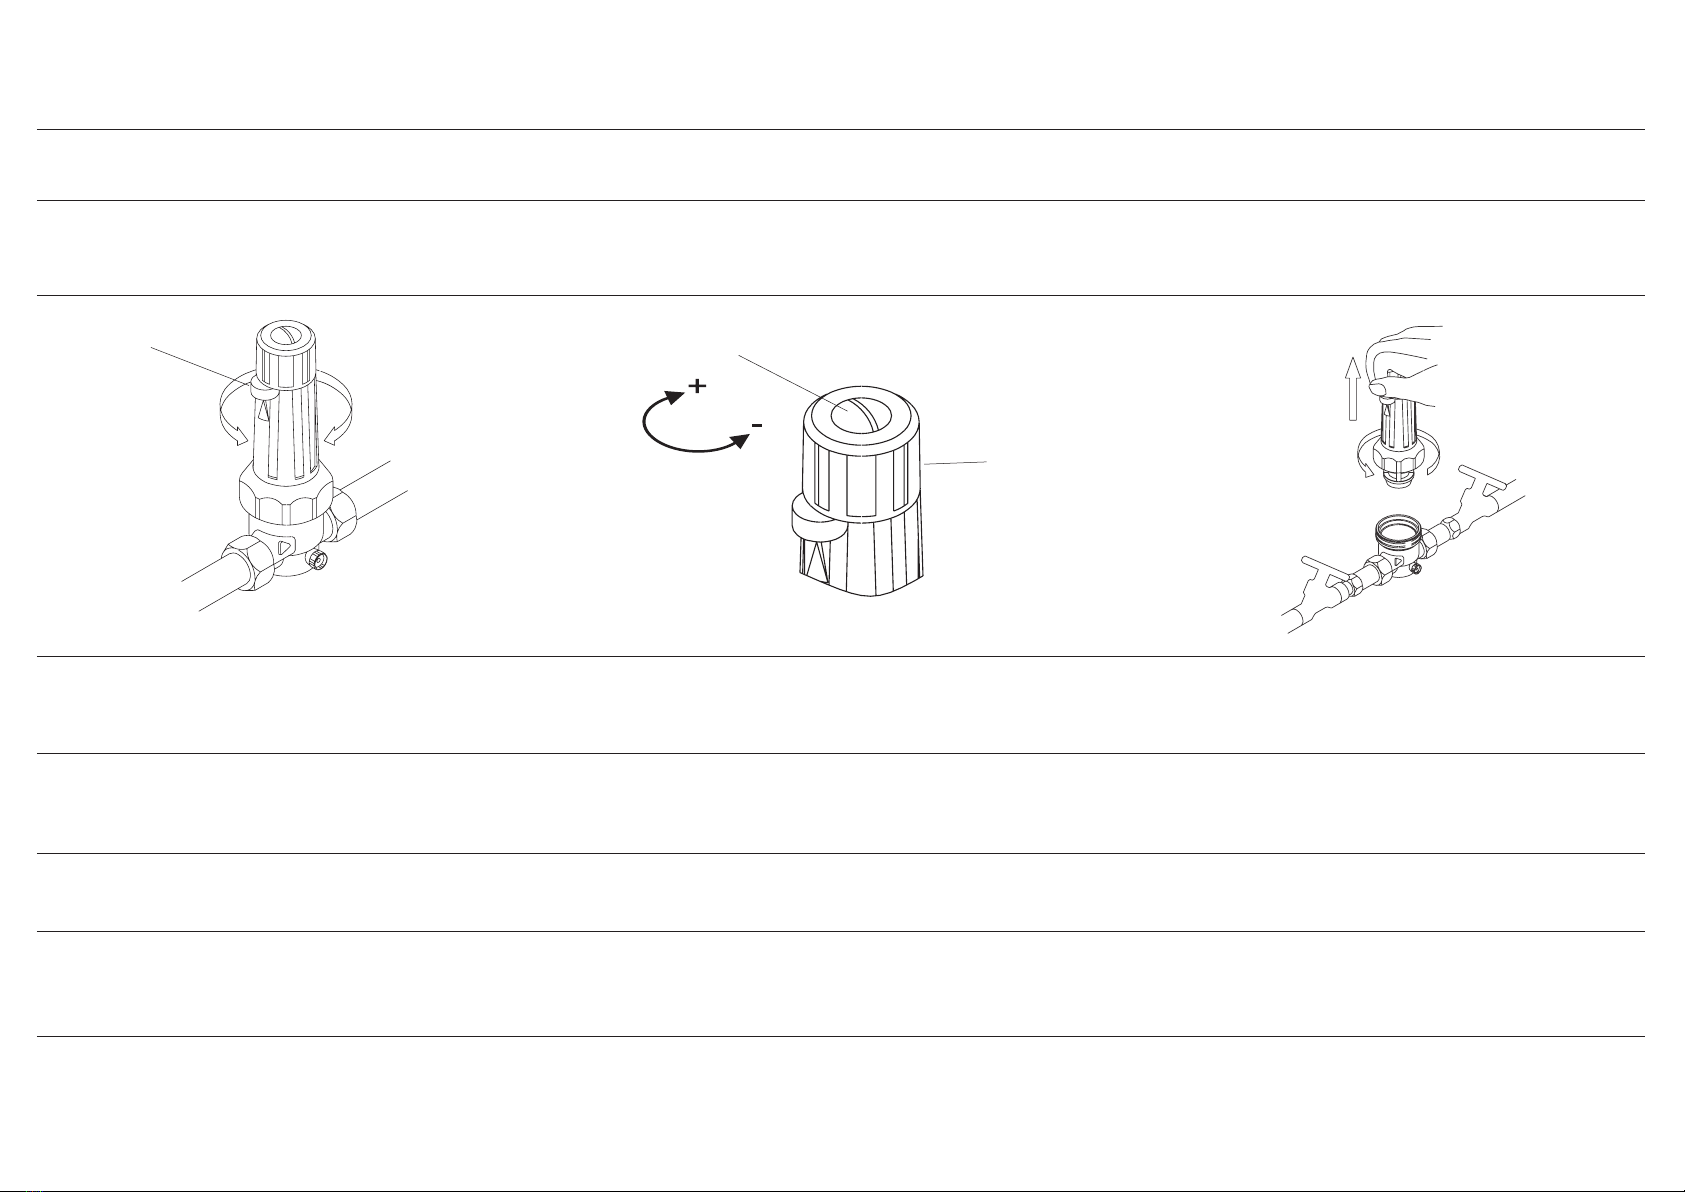
Obsługa: Aby przestawić ciśnienie należy odkręcić śrubę zabezpieczającą
(2) w kołpaku.Obrót pokrętła (3) w kierunku (-) obniża, a w (+) podnosi
nastawę ciśnienia wyjściowego. Nastawa fabryczna wynosi 4 bar.
Montaż: Reduktor należy zamontować zgodnie z kierunkiem przepływu
(strzałka na korpusie) unikając naprężeń rurociągu na korpus. Kołpak
reduktora można obrócić tak (także podczas działania), że widoczny
jest wskaźnik ciśnienia wyjściowego (1).
Montaggio: Montare il riduttore zenzo pressione. Attenzione alla direzione
di passagio! Anche durante la funzione, il capuccio di molla é girabile in
modo che l´indicatore di pressione (1) sia visibile.
Montaje: El reductor de presión va directamente montado en la tubería
de la línea. Tener en cuenta la dirección del agua al uír. También du-
rante el funcionamiento del reductor, el capuchón superior puede girar
de manera que el inducador de presión de salida quede asegurado (1).
Installation: Install the valve in the direction of ow (indicated by arrow).
Do not put the valve under stress in the pipework. Turn spring cap (even
under ow conditions) to allow observing the pressure indicator (1).
Montage: Druckminderer spannungsfrei in die Rohrleitung einbauen.
Fließrichtung beachten. Einbaulage: beliebig. Die Federkappe kann so
verdreht werden (auch während des Betriebs), daß die Ausgangsdruck-
anzeige (1) sichtbar ist.
Uso: Per regolare la pressione, svitare la vite di sicurezza (2) nella
maniglia di regolazione (3). Girare verso meno (-) per ridurre e verso
(+) per aumentare la pressione d´uscita. Regolazione originale: 4 bar.
Utilización: Para seleccionar la presión, soltar el tornillo de seguridad
(2) en el mango de selección (3). Para reducir la presión de salida, se
precisa que el mango de selección se aumente en dirección más (+).
Preselección de fábrica: 4 bar
Operation: For setting the outlet pressure, slacken the screw (2) in the
knob (3). Turn counterclockwise (-) for decreasing, clockwise (+) for
increasing the pressure. The valves are factory preset at 4 bar.
Bedienung: Zur Druckverstellung, Sicherungsschraube (2) im Einstellgriff
(3) lösen. Einstellgriff nach minus (-) um den Ausgangsdruck zu reduzie-
ren, in Richtung plus (+) zum Erhöhen. Werkseitige Einstellung: 4 bar.
Serwis: Zamknąć zawory odcinające przed i za reduktorem Zdemontować
wkład reduktora ciśnienia po odkręceniu nakrętki łączącej. Używając
zimnej wody wymyć elementy wewnętrzne, a zwłaszcza siatkę ltra
wewętrznego.
Manutenzione: Chiudere l´intercettazione davanti e dietro del riduttore .
Svitare il dado di raccordo e smontare la parte di funzione del riduttore.
Lavare solamente con acqua!
Conservación: Cerrar el bloqueador delantero y trasero. Desmontar las
piezas de función del reductor de presión después de haber cerrado la
tuerca de conexión. ¡Limpiar las piezas de función aolamente con agua!
Maintenance: Close isolating valves upstream and down-stream. Uns-
crew connecting ring and remove pressure reducer cartridge. Only use
cold water for any cleaning work.
Wartung: Absperrungen vor und hinter dem Druckminderer schließen.
Demontage des Druckminderer-Funktionsteils nach Lösen der Verbin-
dungsmutter. Funktionsteil nur mit kaltem Wasser reinigen!
Montáž: Redukční ventil namontovat bez pnutí do trubkového vedení.
Je nutné dbát na směr průtoku. Montážní poloha: libovolná. Pružinovou
krytku lze otočit tak (i během provozu), aby byla vidět indikace výstup-
ního tlaku (1).
Obsluha: Pro přestavení tlaku uvolnit pojistný šroub (2) v nastavovací
rukojeti (3). Potom se otočí na-stavovací rukojetí ve směru mínus (-)
pro snižování výstupního tlaku a ve směru plus (+) pro jeho zvyšo-vání.
Nastavení z výroby: 4 bary.
Údržba: Uzavřít uzávěry před redukčním ventilem a za redukčním venti-
lem. Demontáž funkční části redukčního ventilu se provede po uvolnění
spojovací matice. Funkční díl čistit pouze studenou vodou!
Montage: Le réducteur de pression doit être raccorder sans tension.
Tenir compte de la direction du débit. Position de montage : aux choix.
Le capuchon peut-être tourner ( même pendant que l’appareil est utiliser
)an que l’indice de la pression de sortie (1) est visible.
Service: Pour changer l’ajustage de la pression de sortie, desserrer la
vis de sécurité (2) dans la poignée d’ajustage (3). Tourner la poignée
en direction (-) pour diminuer la pression de sortie, en direction (+) pour
augmenter la pression de sortie. La pression de sortie mise à l’usine : 4 bar.
Entretien: fermer les robinets d’arrêt devant et après le réducteur de
pression. Dévisser le raccord de la cartouche. Retirer la cartouche.
Rincer la cartouche avec de l’eau froide.
Montage: de drukregelaar spanningsvrij in het leidingnetwerk inbouwen.
Stroomrichting volgen. Inbouwpositie : naar wens. De veer kap kan ver-
draait worden ( ook tijdens gebruik ), zodat de uitgangsdrukaanduiding
(1) zichtbaar is.
Bediening: Voor het wijzigen van de drukinstelling, zekerheidsschroef
(2) in de instelgreep (3) losdraaien. De greep naar (-) draaien om de
uitgangsdruk te reduceren, in richting (+) om te verhogen. Afstelling
vanuit de fabriek: 4 bar.
Onderhoud: Stopkranen voor en na de drukregelaar sluiten. De car-
touche verwijderen na het losdraaien van de moer. De cartouche enkel
met koud water reinigen!
na podstawie 1605 / 9.0002.21

This manual suits for next models

1

Other SYR Plumbing Product manuals

SYR 2128 User manual

SYR

SYR 2128 User manual

SYR BA 6600 User manual

SYR

SYR BA 6600 User manual

SYR HygBox Connect User manual

SYR

SYR HygBox Connect User manual

SYR 2128 User manual

SYR

SYR 2128 User manual

SYR HygBox Connect Installation guide

SYR

SYR HygBox Connect Installation guide

Popular Plumbing Product manuals by other brands

American Standard CADET 3 FloWise 2829.128 Specifications

American Standard

American Standard CADET 3 FloWise 2829.128 Specifications

GoodHome carya 3663602481881 manual

GoodHome

GoodHome carya 3663602481881 manual

Franke F5LT2020 2030066509 Installation and operating instructions

Franke

Franke F5LT2020 2030066509 Installation and operating instructions

American Standard Lynbrook Urinal 6601.012 Specification sheet

American Standard

American Standard Lynbrook Urinal 6601.012 Specification sheet

Gessi RETTANGOLO K 53037 manual

Gessi

Gessi RETTANGOLO K 53037 manual

Omnires FR7133CR Installation and Maintenance

Omnires

Omnires FR7133CR Installation and Maintenance

Pegasus LUXURY AT HAND 729071 Installation

Pegasus

Pegasus LUXURY AT HAND 729071 Installation

CRISTINA PRIME CRIPE221 installation instructions

CRISTINA

CRISTINA PRIME CRIPE221 installation instructions

newform NIO 68955 instructions

newform

newform NIO 68955 instructions

Hans Grohe Metropol 32526 1 Series Installation/User Instructions/Warranty

Hans Grohe

Hans Grohe Metropol 32526 1 Series Installation/User Instructions/Warranty

Dornbracht 25 000 360-FF installation instructions

Dornbracht

Dornbracht 25 000 360-FF installation instructions

Hans Grohe Vernis Blend 71553 Series Instructions for use/assembly instructions

Hans Grohe

Hans Grohe Vernis Blend 71553 Series Instructions for use/assembly instructions

Electrolux 153980 Specifications

Electrolux

Electrolux 153980 Specifications

Hans Grohe ShowerSelect S 15747000 Instructions for use/assembly instructions

Hans Grohe

Hans Grohe ShowerSelect S 15747000 Instructions for use/assembly instructions

California Faucets Bel Canto CF-TO-VE302-7 quick start guide

California Faucets

California Faucets Bel Canto CF-TO-VE302-7 quick start guide

agape Cristalplant DROP ACER1099M Assembly instructions

agape

agape Cristalplant DROP ACER1099M Assembly instructions

Aquadon Shower Hero 5885369 Instructions for use

Aquadon

Aquadon Shower Hero 5885369 Instructions for use

Bristan RV SNK C Fitting Instructions & Contents List

Bristan

Bristan RV SNK C Fitting Instructions & Contents List

manuals.online logo
manuals.online logoBrands
  • About & Mission
  • Contact us
  • Privacy Policy
  • Terms and Conditions

Copyright 2025 Manuals.Online. All Rights Reserved.