manuals.online logo
Brands
  1. Home
  2. •
  3. Brands
  4. •
  5. Syris
  6. •
  7. Control System
  8. •
  9. Syris SY120SA User manual

Syris SY120SA User manual

SY120SA Series
Operating Manual
Version 3.0
© 2004 by SYRIS Technology Corp.
SY120SA Series Operating Manual
© 2004 by SYRIS Technology Corp. 1
1. SY120SA system brief introduction
SY120SA is a low price & multiple function accesscontrol system, which can expand to
connect one card reader and control one door unit. It also equipted with four types of inputs, two
types of outputs, and two “CALL” function keys which are programable I/O access points.
SY120SA can work with SYBASE program in order to form the network connection function.
With this combination, it can process the data, e-map, manual control, remote control, and emergency
control. It could be used as the controller for door access, parking lot access, elevator access and
many other use which could be able to apply on SY120SA. The build-in functions also includes two
section’s anti-theft and emergency control which can work with alarm system for arm and disarm.
In SY120SA’s System Setting Function Table shows all of the functions. For more detail please
check the following instructions.
User can use all of the control setting form the reader’s kekpad. The follow is keypad’s diagram.
1.1 SY120SA system control function list
1.1.1 General use function
1. Proximity Card Open. 2. Proximity Card + Card Password.
3. Proximity Card + Anti-Anti-duress Password. 4. Card Password or Card Number+ Password.
5. Card Number + Anit-Anti-duress Password. 6. Set or modify Card Password.
7. Remove Alarm Status
CALL: Call LED
! : Error LED
OK : OK LED
*: Power LED
FUN : Function Key
▲: Up Key
▼: Down Key
MENU: Menu Key
EN : Enter Key
CLR : Clear Key
SY120SA Series Operating Manual
© 2004 by SYRIS Technology Corp. 2
1.1.2 System setting function
Code Function Code Function Code Function
0 Remove security 42 Setup Master card 58 Setup I/O data mode
1 To deploy security 43 Setup Anti-duress password 59 Setup extern reader
2 Login / Logout 44 Remove Anti-duress alarm
45 Enabled or Disable Door Forced 61 Configure Input point setting
31 Add single card 46
Enabled or Disable Door Time-Out
32 Delete single card 48 Encryption Card setting 71 Configure Output point setting
33 Modify single card group data 49 Restore to Default setting
34 Modify single card group status 51 Access with password 81 Setup system time
35 Add multiple card 52 Change default password 82 Setup time period
36 Delete multiple card 53 Setup error password lockdown 83 Setup Group
37 Modify multiple cards group data 54 Setup alarm source 84 Setup Weekly Group schedule
38 Modify multiple cards group status 55 Setup alarm enabled 85 Setup Holiday access limit
56 Setup doorbell enabled
41 Modify Master card password 57 Setup extend module 91 Setup controller ID
* Please see the reader display list for more particular system light description.
1.2 Reader LED status list
Show light & sound Footnote
code Status description OK LED
(SY120SA)
Power LED
(SY120SA)
Error LED
(error)
BEEPER
(voice)
0 Normal status off LED Red LED Orange no action
1 Correct status LED Green LED Red off short beep(0.5sec) Return to original status
2 Error status off LED Red LED Orange 2 short beep Return to original status
3 Armed status off LED Red twinkling long beep(2sec) Work until remove guard
4 Login status off twinkling off long beep(1sec) Work until login out
5 Alarm status off LED Red twinkling keep rapid beep Work until remove guard
6 Finishing setting status LED Green LED Red off long beep(1sec) Return to original status
7 Activate alarm delay status twinkling LED Red off keep short beep Work until finish guard
8 Waiting input status twinkling LED Red off short beep(0.5sec) Work until finish guard or delay
9 Lockdown status twinkling LED Red twinkling No action Return to original status
*Keep waiting 30secs to response card & password, if delay or push enter and system will login out.
*After 2 mins the system will login out when login and no any keypad enter action.
SY120SA Series Operating Manual
© 2004 by SYRIS Technology Corp. 3
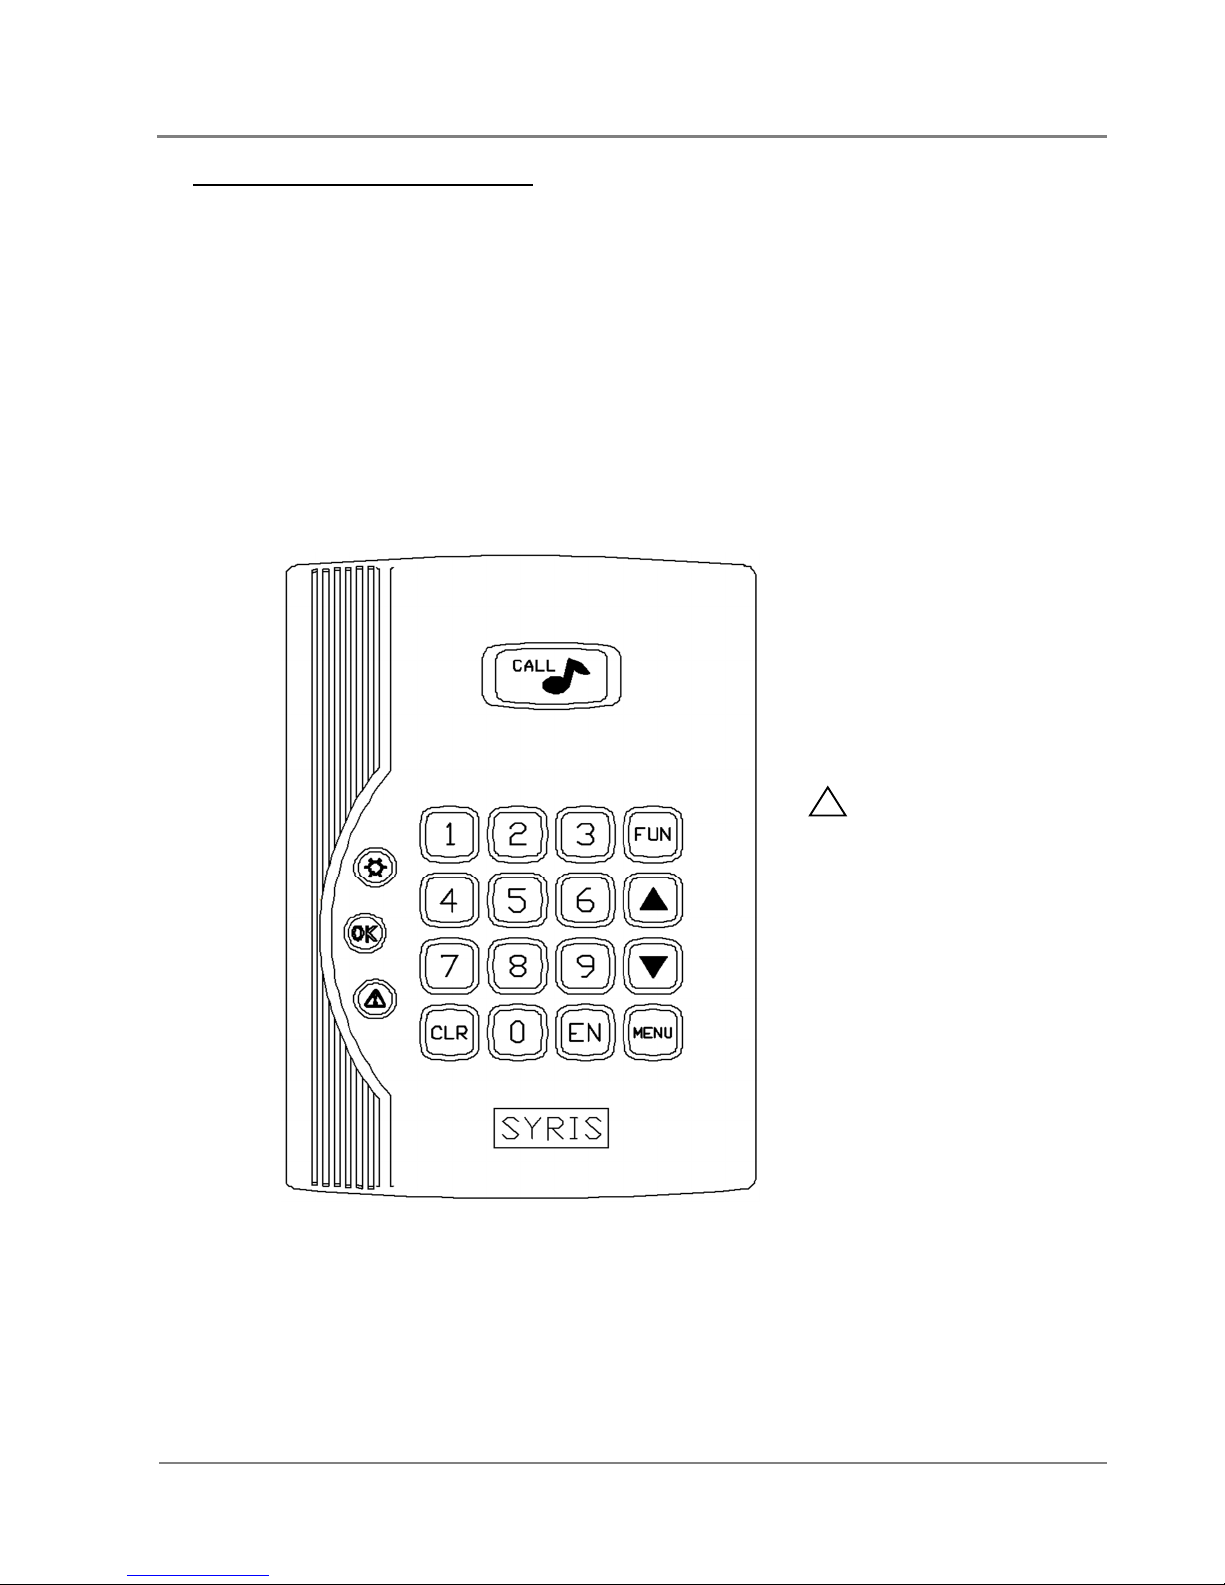
2Operating manual
2.1 Access with Prox. card
2.1.1 Prox. card enter
1. Present Prox card to reader; waiting for confirmation from controller.
2. If the card is valid, system will open the door automaticaly.
3. If the card is invalid, system will show error message.
2.1.2 Access with Prox. card and password
1. Present card to reader and wait for confirmation from controller.
2. If card is valid, the controller will wait for password and stop reading function until the
password has inserted and push [EN]. If the password is correct the controller will show
correct message, and the door will be opened automaticaly.; Password range: 0000 – 9999
3. If the card is invalid or error password, the system will show error message.
2.1.3 Access with Prox. Card and Anti-duress (with anti-duress output)
1. Present card to reader and wait for confirmation from controller.
2. If card is valid then reader will wait for password entered and stop reading function until
password had been confirmed. After varified password is correct anti-anti-duress, on the
controller will show correct LED message and will open the door automatically. If anti-druess
mode had been activated, the controller will has anti-duress action at same time.
3. If invalid card or wrong password and system will response error message.
2.2 Access without Prox. card.
2.2.1 Access with card’s password or card number and card password
1. Enter (pppp)[EN], system will confirm correct or error, if correct will response correct status
and control open automatic.
(pppp):card password; default value :0000
* Enter password to open Æplease see 2.9.1 detail
2. Enter(NNNN)(pppp)[EN], and wait for confirmation from controller,
if correct will response correct message and the door will open automatically.
(NNNN):valid card number: 0001~2000
(pppp): Card’s password; default: 0000
2.2.2 Access with card number and anti-duress password
1. Enter (NNNN)(pppp) [EN], and wait for confirmation from controller, if correct will back to
normal ststus and anti-duress alarm will be initiated automatically.
(NNNN): valid card number are in the range between 0001~2000
(pppp): anti-duress password (The password is four digit)
* If anti-duress password & personal password are the same, the personal password will be the
first priority to be checked and the alarm won’t be triggered.
SY120SA Series Operating Manual
© 2004 by SYRIS Technology Corp. 4
2.3 Modify card’s password
[Access with car and password mode]
1. Present the Prox. card to controller which the one user wants to modify, wait for
confirmation from controller. if the card had setup a password, the controller will wait for
password entered and stop reading function until the password had been varified. If the card
didn’t setup any password, the controller will open the door automatically.
2. Follow the sequence of (pppp) (nnnn) (nnnn)[EN], wait for the confirmation from controller.
If correct, system will show correct message and change previous password to new one.
(pppp): use old password or original system password;
(nnnn)(nnnn): new password needs to be entered twice.
[Password enter mode]
1. Follow the sequence of (NNNN)(pppp)(nnnn)(nnnn)[EN], wait for confirmation from
controller ,if correct then the old password will be changed to new one and show “correct”
message..
(NNNN): Valid card number. The range are in between 0001~2000.
(pppp): Previus password or system original passowrd; Defualt: 0000
(nnnn)(nnnn): new password needs to be entered twice.
2.4 Method of Deactivate alarm
1. Deactivate alarm status is the same as access
2.5 Activate/Deactivate security system [needs in login mode]
2.5.1 Deactivate security system
1. Enter[FUN][0][EN], if correct the “OK” LED will twinkling.
2. Present valid card, if correct system will check the configure of the security system’s setting
weather needs to enter password or not.
3. If new enter password and response waiting enter password status,keypasd enter and check
card password.
4. If not need enterpassword or card password correct andwill remove guard system(normal
ststus)
SY120SA Series Operating Manual
© 2004 by SYRIS Technology Corp. 5
2.5.2 Setting security syatem
1. Enter[FUN][1][EN]if correct and response correct status and show waiting proximity card
status.
2. Response avail card,if correct and will response correct status and decide need to enter
password or not.
3. If need enter password and show waiting password enterstatus,keypad enter and confirm with
the card password.
4. If don’t need enter password or card password to enter and system will show spread delay
status.
5. Spread delay status will back to speard statusat the end of time or alram response response
finished setting.
2.6 System login & logout function [Function needs to deactivate security system]
2.6.1 Login system
1. Push [FUN] Æ[2] Æ[EN] in logout status and wait for system response
2. If Master card and system into waiting response proximity card status .correct or no setting
card andneed to into the next step.
3. System enter waiting password enter status,waiting to enter setting card password
4. If correct and login directly.
If use setting card and need to use card and password; default setting card password:1234
2.6.2 Logout system
1. During login status, follow the squence of [FUN][2][EN]. The “OK” LED will blink, and
system will logout.
2.7 Card Management [needs to be in the login status]
2.7.1 Add single card
1. Enter[FUN][3][1](NNNN)(G)[EN],if correct and response to wait proximity card.
2. response need to add card, if card already response or error status and will back to original
status.
(NNNN):set card number; Range :0001~2000
(G):set card group code; Range :1~4
2.7.2 Delete single card
1. Enter[FUN][3][2](NNNN)[EN]
(NNNN):wanna delete card number; Range :0001~2000
SY120SA Series Operating Manual
© 2004 by SYRIS Technology Corp. 6
2.7.3 Configure single card’s group setting
1. Enter[FUN][3][3](NNNN)(G)[EN]
(NNNN):amend card group number; Range : 0001~2000
(G):give card group code; Range :1~4
2.7.4 Configure single card’s setting
1. Enter[FUN][3][4](NNNN)(S)[EN]
(NNNN):give card status number; Range :0001~2000
(S):S = 1 use to set card;
S = 0 use to set stop card enter.
2.7.5 Add multiple cards
1. Enter[FUN][3][5](NNNN)(G)[EN], if correct and response to wait proximity card.
2. Keep response the add card ,if correct and continue,if card are already login or full and will
response error status and continue add card.
3. Finish all add card and press [EN]to exit
(NNNN):add card group start number; Range :0001~2000
(G):add card group code; Range :1~4
*Add card number will be start and response step by step until 2000
*After add card and will be seeting in the same group code.
2.7.6 Delete multiple cards
1. Enter[FUN][3][6](NNNN)(EEEE)[EN]
(NNNN):start delete group card number; Range :0001~2000
(EEEE):the end of delete group card number; Range :0001~2000
2.7.7 Configure multiple cards’ group setting
1. Enter[FUN][3][7](NNNN)(EEEE)(G)[EN]
(NNNN):amend card group number; Range :0001~2000
(EEEE):amend card group end number; Range :0001~2000
(G):new group card code; Range :1~4
2.7.8 Configure multiple cards’ setting
1. Enter[FUN][3][8](NNNN)(EEEE)(S)[EN]
(NNNN):amend card status card number; Range :0001~2000
(EEEE):amend card status end number; Range :0001~2000
(S):S = 1 for setting card;
S = 0 for setting stop card
SY120SA Series Operating Manual
© 2004 by SYRIS Technology Corp. 7
2.8 System & password setting function[need to be in the login status]
2.8.1 Configure Master card password (needs to be in the login status)
1. Follow the sequence of [FUN] [4] [1] (nnnn) (nnnn) [EN]
(nnnn)(nnnn):new password need enter 2 times to confirm
* system default value is 1234.
2.8.2 Usage of Master card (Maximum 3 Master cards)
1. Follow the sequence of [FUN][4][2](K)(D)[EN], if correct and response normal ststus and see
(K)to decide back to original ststus or waiting setting card response.
2. If K = 1 and enter proximity card modeand waiting setting card response.Correct response
back to correct status and original status.
(K):K = 1 use to set card;K = 0 use to cancel card
(D):Set or cancel setting card number, Range:1~3
* if use any setting card(1-3) , the other card password need to operate with setting card
password.
2.8.3 Settup anti-duress password
1. Enter[FUN][4][3](N)(pppp)[EN]
(N): anti-duress group, Range:1~4
(pppp): enter anti-duress password
* System default value is 1~4 units, all is 5555. If personal passowrd is the same as anti-duress
password. (It can be personal password.)
2.8.4 Enabled or Disable anti-duress
1. Enter[FUN][4][4](E)[EN]
(E):E = 1 enabled anti-duress alarm;
E = 0 cancel anti-duress (default)
2.8.5 Enabled or Disable Door Forced(V2.8)
1. Enter[FUN][4][5](E)[EN]
(E):E = 1 enabled door forced alarm;
E = 0 cancel door forced (default)
2.8.6 Enabled or Disable Door Time-Out(V2.9)
1. Enter[FUN][4][6](E) (TT) [EN]
(E):E = 1 enabled door time-out alarm;
E = 0 cancel door time-out (default)
(TT): Time-Out time setting, Range:01~99; default :20,unit:sec
2.8.7 Enabled or Disable Encryption Card (V3.0)
1. Enter[FUN][4][8](E) [EN]
(E):E = 1 enabled Encryption Card Mode(Use SYRIS Encryption Card);
E = 0 cancel Encryption Card Mode (default)
SY120SA Series Operating Manual
© 2004 by SYRIS Technology Corp. 8
2.8.8 Restore Default setting (including Master card, parameter,card and record)
1. Enter[FUN][4][9][EN],if correct and will response correct status.
2. Enter again[FUN][4][9][EN]Æwait 5 seconds to clean all setting. System will restore all.
2.9 Configure System parameter [needs to be in the login status]
2.9.1 Card number with password or password only
1. Enter[FUN][5][1](P)[EN]
(P):P = 1 use card number and password(default);
P = 0 password enter
2.9.2 Change user default password(default = 0000)
1. Enter[FUN][5][2](nnnn)(nnnn)[EN]
(nnnn)(nnnn):new password need enter 2 times to confirm.
2.9.3 Error psaaword keylock setting
1. Enter[FUN][5][3](K)(L)(A)[EN]
(K):setting acceptable error times,range:1~9;default :6
(L):enter lock time setting,range:1~9,unit: min;default :3
(A):enter lock time and show alarm setting status;
A = 1 start,
A = 0 close(default)
2.9.4 Activate guard and indicate source, delay time
1. Enter[FUN][5][4](R)(TT)[EN]
(R):R = 0 set inside delay,time us TT to set.It’s default
R = 1 seting inport enter,please follow:system inport setting function
(TT): Activate guard delay time setting, Range:01~99; default :05,unit:sec
2.9.5 Setting alarm enabled
1. Enter[FUN][5][5](B)[EN]
(B):B = 0 close alarm voice output,
B = 1 allow alarm voice output(default)
2.9.6 Setting doorbell enabled
1. Enter[FUN][5][6](B)[EN]
(B):B = 0 close doorbell voice output,
B = 1 allow doorbell voice output(default)
2.9.7 Configure Extern Module(V2.0)
1. Enter[FUN][5][7](E)[EN]
(E):E = 0 no extern module(default)
E = 1 use extern module
SY120SA Series Operating Manual
© 2004 by SYRIS Technology Corp. 9
2.9.8 Configure Input/Output Data(V2.0)
1. Enter[FUN][5][8](M)[EN]
(M):M = 0 only in out data mode
M = 1 all in out data mode(default)
2.9.9 Configure Extern Reader(V2.9)
1. Enter[FUN][5][9](S)[EN]
(S): S = 0 Keypad Reader(default)
S = 1 Standard Reader
2.10 Configure System’s input points [needs to be in the login status]
1. Enter[FUN][6][1](K)(F)(J)[EN]
(K):Setting enter point number,Range: 1~8
K = 5 is SY120SA CALL pad;
K = 6 is extra connect keypad reader CALL
pad;
K = 7 is extern module DI 1;
K = 8 is extern module DI 2.
(F):input point purpose code,please follow the input point function code list
(J):If ‘0’ and set normal NO(default value),if ‘1’ and set normal close NC
Input point function code list
Code Purpose Remark
0 Don’t use
1 Door sensor (DI1 default)
2 Open switch (DI2 default)
3 Emergent open switch Start door area and send alarm, until remove
4 Detect guard setting status Detect setting guard or not
5 Doorbell enter (CALL keypad default)
6 Emergent help switch Send alarm until remove
7 First area alarm detect Send alarm until remove (spread status)
8 Second area alarm detect Send alarm until remove(spread status)
9 Tamper switch detect Send alarm until remove
2.11 Setting system ouput function [needs to be in the login status]
1. Enter[FUN][7][1](K)(F)(TTT)[EN]
(K):setting outport point code;
K = 1 is e-lock output, K = 2 is relay output, K = 3 is extern relay, K = 4 is temp
(F):output purpose code,please follw the purpose code list
(TTT):output action time setting,Range: 000~255,Unit: sec;
Default e-lock output point is 5 sec,relay inport point is 2 sec.
SY120SA Series Operating Manual
© 2004 by SYRIS Technology Corp. 10
Output contact purpose code list
Code Purpose Remark
0 Don’t use
1 open control (E-lock output point default)
2 Doorbell contact output (relay output point default )
3 Guard system set output Control and remove guard
4 Alarm contact output Use remove guard to cancel alarm
5 Anti-duress contact output Use[FUN][4][4]to cancel anti-duress
※ Action time if set 0 and will action until remove.
2.12 System group & timezone control function [needs to be in the login status]
2.12.1 Configure system time
1. Enter[FUN][8][1](YYYY)(MM)(DD)(hh)(mm)(ss)[EN]
(YYYY):year,Range :2000~2199.(MM):month,Range 01~12.
(DD):day,Range 01~31
(hh):hour,Range 00~23. (mm):min,Range 00~59.
(ss):sec,Range 00~59
2.12.2 Configure timezone
1. Enter[FUN][8][2](HHMM)(hhmm)[EN]
(HHMM):Set start time;
HH = hour , MM = minute; default: 0700
(hhmm):setting timezone end ;
hh = hour; mm = minute; default: 1900
2.12.3 Setting group timezone
1. Enter[FUN][8][3](G)(D)(N)(A)[EN]
(G):group code(1 to 4)
(D):on timezone ( 0 to 3)
(N):out of timezone (0 to 3)
Timezone function code list:
0:stop enter
2:card(system default)
1:card or password
3:card+password
(A):pass dooe area,1 = enable [EN] (default),0 = disable [EN];
2.12.4 Group weekly schedule
1. Enter[FUN][8][4](G)(WWWWWWW)(H)[EN]
(WWWWWWW):week schedule, from Sunday to saturday,
1 = Enable enter(default),0 = Disable enter;
(G):Group No; Range1~4
(H):Holiday control,1 = can enter(default),0 = can’t enter;
SY120SA Series Operating Manual
© 2004 by SYRIS Technology Corp. 11
2.12.5 Holiday Setting
1. Enter[FUN][8][5](HH)(MMDD)[EN]
(HH): Holiday number, Range 01~30, Insert 00 to clean all holidaysetting.
(MMDD): holiday number date; MM = month, DD = day
2.13 Configure system communication ID code [needs to be in the login status]
1. Enter[FUN][9][1](NNN)[EN]
(NNN):SY120SA Controller ID, Range 001~999; default :001
2.14 Notice:
1. While change Master card’s password, one needs to change 3 cards at same time. if one uses
Master card to login then system will make it (itÆAccess with Master card’s passwrod) as
invalid.
2. SY120SA controller(system) and reader needs to be connected the GND. Please use parallel
cable while using parallel cable with 0.75mm shield cover cable, it can connect up to 100
meter long. While useing normal phone line the distance limits is within 20 meters.
3. The voltage output limits is 5A current. If one needs higher electric current, then please add
another relay.
4. Relay output can only accept up to 1A current. if one needs to increase the limits, then please
add another relay.
SY120SA Series Operating Manual
© 2004 by SYRIS Technology Corp. 12

Other manuals for SY120SA

1

Popular Control System manuals by other brands

Fancom 743 user manual

Fancom

Fancom 743 user manual

Crestron CP2 Operation guide

Crestron

Crestron CP2 Operation guide

Pentair EASYTOUCH PL4 installation guide

Pentair

Pentair EASYTOUCH PL4 installation guide

Pilz PNOZ  ml1p operating manual

Pilz

Pilz PNOZ ml1p operating manual

Minka Group minkaAire AireControl WC1000 instructions

Minka Group

Minka Group minkaAire AireControl WC1000 instructions

CPS FX134a Series Operation manual

CPS

CPS FX134a Series Operation manual

Comunello Automation BORDER 400 Installation and user manual

Comunello Automation

Comunello Automation BORDER 400 Installation and user manual

iZone 211 Installation, Configuration & User Manual

iZone

iZone 211 Installation, Configuration & User Manual

D.Electron CNC Z32 Florenz Series Programming guide

D.Electron

D.Electron CNC Z32 Florenz Series Programming guide

Samson Series 420 manual

Samson

Samson Series 420 manual

Roth Touchline PL Installation

Roth

Roth Touchline PL Installation

Spike TC-100 user guide

Spike

Spike TC-100 user guide

GSK GSK928TE user manual

GSK

GSK GSK928TE user manual

Woodward ECM3 product manual

Woodward

Woodward ECM3 product manual

Altronic DE-4000 installation instructions

Altronic

Altronic DE-4000 installation instructions

Roger Technology H70 Series INSTRUCTIONS AND RECOMMENDATIONS FOR THE INSTALLER

Roger Technology

Roger Technology H70 Series INSTRUCTIONS AND RECOMMENDATIONS FOR THE INSTALLER

Interspace Industries FiliBuster user manual

Interspace Industries

Interspace Industries FiliBuster user manual

Radionics D2212 installation manual

Radionics

Radionics D2212 installation manual

manuals.online logo
manuals.online logoBrands
  • About & Mission
  • Contact us
  • Privacy Policy
  • Terms and Conditions

Copyright 2025 Manuals.Online. All Rights Reserved.