T.J.M. T13 Outback Frontal Protection System User manual

FITTING INSTRUCTIONS
Product:
T13 Outback Frontal Protection System
Vehicle:
Toyota LandCruiser 200 Series 2007+
Part No.
070SB13R82A
For further information contact T.J.M. Head Office on (07) 3865 9999. Distributors Australia
wide.
File: F-1434.docx
Page 1 of 18
11/12/2013
Australian Standards Relating to Installing Vehicle Frontal Protection Systems (VFPS): AS 4876.1-2002
a) Do not attach V.F.P.S. to vehicle using anchorages not intended for this purpose (e.g. engine mounting bolts), other than those
specified by the V.F.P.S. manufacturer in this instruction.
b) Do not use this product for any vehicle make or model other than those specified by the V.F.P.S. manufacturer (as above).
c) Do not remove any plaques or labels from the V.F.P.S.
d) Do not modify the structure of the V.F.P.S. in any way.
Read instructions fully before commencing fitment.
Estimated Fitting Time: 4hrs
Left hand and Right hand components are determined as seated in
the vehicle.
Check for (and remove) any build up in all captive nuts fitted to the
FPS.
Warranty
1. If any product or part of a product manufactured by TJM is found to be defective during a period of three (3) years after the date of
purchase, TJM shall repair (at TJM’s discretion) the defective product or part.
2. Any defect in a product distributed by TJM, but not manufactured by TJM, shall be dealt with in accordance with, and to the extent of,
the warranty offered by the manufacturer of that product.
3. TJM does not warranty that the products manufactured by it comply with the laws of the place where those product are purchased or
used. It is the sole responsibility of the purchaser to ascertain whether products being purchased, or the affixation of those products to
any other object, comply with local laws.
4. Except to the extent described in this warranty, TJM shall not be liable for any other claims, including claims arising from incorrect
fitment, product or vehicle modification, faulty design, the use of the product on any indirect special or consequential damage or injury to
any person, company or other entity.
5. Modification or alteration to any product manufactured by TJM to enable fitment in conjunction with other vehicle accessories or
modifications (e.g. lift kits) will void any warranty claims.
Bolt tensions
Dia. (mm)
Nm
ft.lbs
Dia. (inch)
Nm
ft.lbs
All bolt tensions
are as follows
unless otherwise
specified.
5
5
4
1/4”
9
7
6
9
7
5/16”
22
15
8
22
16
3/8”
33
27
10
44
32
7/16”
55
43
12
77
57
1/2”
86
66

FITTING INSTRUCTIONS
Product:
T13 Outback Frontal Protection System
Vehicle:
Toyota LandCruiser 200 Series 2007+
Part No.
070SB13R82A
For further information contact T.J.M. Head Office on (07) 3865 9999. Distributors Australia
wide.
File: F-1434.docx
Page 2 of 18
11/12/2013

FITTING INSTRUCTIONS
Product:
T13 Outback Frontal Protection System
Vehicle:
Toyota LandCruiser 200 Series 2007+
Part No.
070SB13R82A
For further information contact T.J.M. Head Office on (07) 3865 9999. Distributors Australia
wide.
File: F-1434.docx
Page 3 of 18
11/12/2013
ITEM
NO.
Description
Qty
Part
Number
PARTS LIST
1
Outback FPS
1
F-1656
2
Chassis Mount / Winch Frame
1
F-1604
3
Wing Guard LH
1
F-1574L
4
Wing Guard RH
1
F-1574R
5
Headlight Trim LH
1
92583L
6
Headlight Trim RH
1
92583R
FITTING KIT
7
Chassis Mount / Winch Frame Brace
1
F-2008
8
Wing Brace LH
1
F-2041L
9
Wing Brace RH
1
F-2041R
10
Chassis Rail End Spacer LH
1
F-2005L
11
Chassis Rail End Spacer RH
1
F-2005R
12
Spacer Plate
2
F-2052
13
Mounting Block
2
92547
14
M12 x 1.75 x 280mm Threaded Rod
2
F-1613
15
Grille Bracket
1
F-2777
16
Underbody Guard Cover
1
F-2825
17
Inner Guard Bracket LH
1
F-1668L
18
Inner Guard Bracket RH
1
F-1668R
19
Fog-Light Angle Bracket
2
89745
20
LED Indicator / Park Light
2
92600
21
LED General Fog-Light LH
1
92669L
22
LED General Fog-Light RH
1
92669R
23
Fairlead Cover
1
F-1669
24
Winch Slot Cover Insert
1
92106
N/A
Cable Tie –300mm
12
K1148
N/A
3/16” Rubber Hose
2m
92517
ITEM
NO.
Description
Qty
Part
Number
BOLT KIT
N/A
10g x 3/4" Philips Head Screw
10
K0734
N/A
10g Speed Clip (U-Nut)
10
K2078
N/A
M5 x 0.8mm x 20mm Pan Screw
4
K0688
N/A
M5 x 0.5 Nyloc Nut
4
K0604
N/A
M5 x Ø10mm Flat Washer
8
K0417
N/A
3/16” x Ø3/4” Flat Washer
10
K2913
N/A
M6 x 1.0 x 16mm Hex Screw
12
K1232
N/A
M6 x 1.0 x 20mm Hex Bolt
8
K0550
N/A
M6 x 1.0 Flange Nut
12
K3033
N/A
M6 Spring Washer
8
K0915
N/A
M6 x Ø12.5 Flat Washer
20
K0897
N/A
M8 x 1.25 x 20mm Hex Bolt
4
K0552
N/A
M8 x 1.25 x 25mm Hex Bolt
18
K0553
N/A
M8 x 1.25 Nyloc Nut
22
K0606
N/A
M8 x Ø19mm Flat Washer
46
K0628
N/A
M10 x 1.25 x 30mm Hex Screw
8
K0564
N/A
M10 x 1.5 x 40mm Hex Screw
4
K0559
N/A
M10 x 1.25 Nyloc Nut
16
K3099
N/A
M10 Spring Washer
2
K0621
N/A
M10 x Ø30mm Flat Washer
18
WSST-W13
N/A
M12 x 1.25 x 40mm Hex Screw
6
K0571
N/A
M12 x 1.25 x 45mm Hex Bolt
4
K0772
N/A
M12 x 1.25 Nyloc nut
6
K1200
N/A
M12 x 1.75 Hex Nut
2
K0587
N/A
M12 Spring Washer
6
K0977
N/A
M12 x Ø24mm Flat Washer
2
K0425
N/A
1/2" x Ø1-1/4” Flat Washer
16
K0623
N/A
3/16” One Way Check Valve
2
92514
N/A
3/16” Y Connector
1
92515
N/A
3/8” to 1/4” Reducer Fitting
1
92516
N/A
Washer Nozzle
2
92501
N/A
Ø10mm Plastic Plug
2
92518
N/A
Plastic Push Clips
4
92629
N/A
Nylon Plug
4
K0665
25
Fog-Light Washer Plate
2
88057

FITTING INSTRUCTIONS
Product:
T13 Outback Frontal Protection System
Vehicle:
Toyota LandCruiser 200 Series 2007+
Part No.
070SB13R82A
For further information contact T.J.M. Head Office on (07) 3865 9999. Distributors Australia
wide.
File: F-1434.docx
Page 4 of 18
11/12/2013
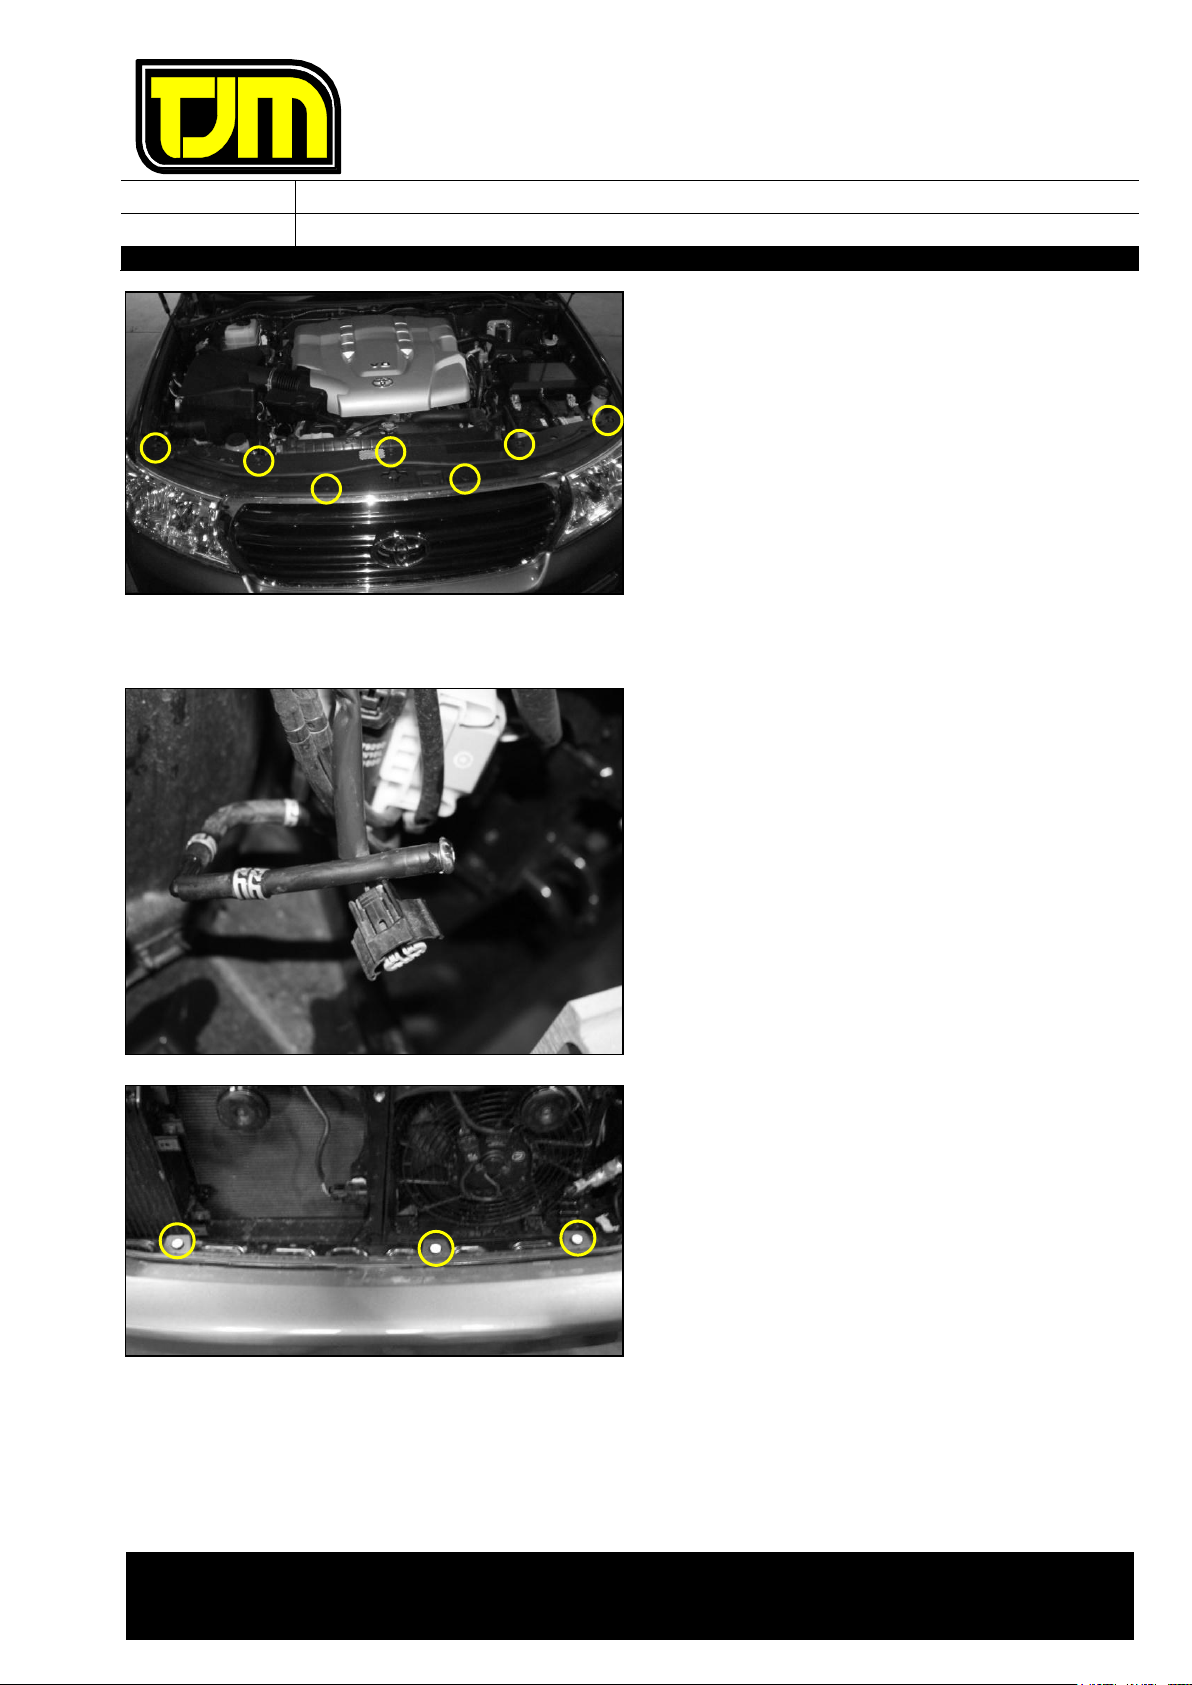
1. Remove (& retain) the clips (7) securing
the front plastic cover panel.
2. Remove (& retain) the front plastic cover
panel.
3. Remove (& retain) the screws (3) along
the top of the grille.
4. Reach in behind the grille & compress
the two clips that are retaining the top of
the grille. Now, release the eight clips
along the bottom. Retain all of the O.E.
fasteners.
5. Remove (& retain) the grille.
6. If fog-lights are installed, disconnect the
wiring harness from the fog-lights.
The OE fog-lights are not required for
the installation of this FPS.
7. If O.E. headlight washers are installed,
disconnect the washer tube & temporarily
plug it.
8. If O.E. parking sensors are installed,
disconnect the parking sensor wiring
loom from the vehicle.
9. Remove the three clips along the top of
the bumper, then the eight screws along
the bottom. Now, remove the three
screws located inside the front edge of
both wheel arches. Retain all of the O.E.
fasteners.
10. Remove (& discard) the bumper.

FITTING INSTRUCTIONS
Product:
T13 Outback Frontal Protection System
Vehicle:
Toyota LandCruiser 200 Series 2007+
Part No.
070SB13R82A
For further information contact T.J.M. Head Office on (07) 3865 9999. Distributors Australia
wide.
File: F-1434.docx
Page 5 of 18
11/12/2013
11. Remove (& retain) the upper bumper
support & OE fasteners (indicated).
12. Locate the fasteners securing the
indicated plastic air-guides to the vehicle.
Remove (& retain) the air-guides & O.E.
fasteners.
13. Trim the plastic air-guides removed in
the previous step as shown
Refer to the images on the following
page also.
14. Re-fit the plastic air-guides to the
vehicle, using the O.E. fasteners
removed in step 12.
15. Re-fit the upper bumper support using
the OE fasteners removed in step 11.

FITTING INSTRUCTIONS
Product:
T13 Outback Frontal Protection System
Vehicle:
Toyota LandCruiser 200 Series 2007+
Part No.
070SB13R82A
For further information contact T.J.M. Head Office on (07) 3865 9999. Distributors Australia
wide.
File: F-1434.docx
Page 6 of 18
11/12/2013
16. Remove (& discard) the front intrusion
beam & mounting brackets from the
front of the chassis & lower bumper
retainers.
17. Remove (& retain) the tow lugs
(discarding the fasteners).
18. Remove (& discard) the shipping lugs.
19. Remove (& retain) the front 2 underbody
guard fasteners.
20. Fit the grille bracket to the upper bumper
support, using M8 x 1.25 x 20mm hex
bolts (2), M8 x Ø19mm flat washers (4)
& M8 nyloc nuts (2).
21. Remove/Trim the bumper clips under the
headlight so that they will not interfere
with the headlight trim once it has been
fitted.
22. Repeat the previous step for the opposite
side of the vehicle.
RHS SHOWN
UPPER BUMPER
SUPPORT

FITTING INSTRUCTIONS
Product:
T13 Outback Frontal Protection System
Vehicle:
Toyota LandCruiser 200 Series 2007+
Part No.
070SB13R82A
For further information contact T.J.M. Head Office on (07) 3865 9999. Distributors Australia
wide.
File: F-1434.docx
Page 7 of 18
11/12/2013
23. Position the chassis rail mounting block
in the chassis rail (as shown), through
the rectangular opening.
Ensure the grooves machined into the
chassis rail mounting block align with
the outside walls of the chassis rail &
that the hole is positioned away from
the centre-line of the vehicle.
24. Apply locktight to one end of the M12 x
1.75 x 280mm threaded rod, then weave
this end through the large hole in the
chassis rail end & secure it into the chassis
rail mounting block that was installed in the
previous step.
25. Repeat the previous two steps for the
opposite side of the vehicle.
26. Orientating the chassis rail end spacers as
shown, position them on the end of the
chassis rail, over the studs & threaded rod.
Ensure the fold on the chassis rail end
spacer is positioned away from the
centre-line of the vehicle & that it is
facing forward.
27. Lift the chassis mount into position over the
captive studs in the end of the chassis rail &
align it centrally on the vehicle.
RHS SHOWN
RHS SHOWN
THREADED ROD

FITTING INSTRUCTIONS
Product:
T13 Outback Frontal Protection System
Vehicle:
Toyota LandCruiser 200 Series 2007+
Part No.
070SB13R82A
For further information contact T.J.M. Head Office on (07) 3865 9999. Distributors Australia
wide.
File: F-1434.docx
Page 8 of 18
11/12/2013
28. Secure both sides of the chassis mount in
place to the captive studs, using M10 x 1.25
nyloc nuts (6) & 3-hole spacer plates (2).
29. Secure both sides of the chassis mount in
place to the captive studs, using M10 x
Ø30mm flat washers (2) & M10 x 1.25 nyloc
nuts (2).
30. Reposition the tow lugs (step 17) on the
underside of the chassis mount, as per their
original orientation, then secure the chassis
mount in place, using M12 x 1.25 x 45mm
hex bolts (4), 1/2" x Ø1-1/4" flat washers
(4) & M12 spring washers (4).
31. Secure both sides of the chassis mount in
place to the M12 x 1.75 x 280mm threaded
rods, using M12 x Ø24mm flat washers (2),
M12 spring washers (2) & M12 x 1.75mm
hex nuts (2).
RHS SHOWN
RHS SHOWN
STEP 28
STEP 29

FITTING INSTRUCTIONS
Product:
T13 Outback Frontal Protection System
Vehicle:
Toyota LandCruiser 200 Series 2007+
Part No.
070SB13R82A
For further information contact T.J.M. Head Office on (07) 3865 9999. Distributors Australia
wide.
File: F-1434.docx
Page 9 of 18
11/12/2013
32. Position the chassis mount brace on the
chassis mount as shown & secure it in
place, using M10 x 1.25 x 30mm hex screws
(4) M10 x Ø30mm flat washers (8) & M10
nyloc nuts (4).
Be aware that some manipulation of the
chassis mount brace may be required to
ensure that the winch mounting holes
are aligned with the respective holes in
the chassis mount.
If a winch is to be fitted, leave the 4
winch mounting holes vacant.
33. Secure the upper locations with M8 x 1.25
25mm hex bolts (2), M8 x Ø19mm flat
washers (4) & M8 nyloc nuts (2).
34. Ensuring that the indicated slots in the side
of the chassis mount align with the
respective slots in the centre support brace,
tighten the fasteners from the two previous
steps to the specified torque settings, listed
on page 1.
35. Fit the inner guard brace to the radiator
support panel as shown, using an M5 x 0.8
x 20mm pan screw (1), M5 x Ø10mm flat
washers (2) & M5 nyloc nut (1).
36. Using the holes in the inner guard brace as
a template, mark & drill two Ø8mm holes in
the plastic inner guard.
37. Secure the plastic inner guard to the inner
guard brace, using supplied plastic push
clips (2).
38. Repeat steps 35 through to 37 for the
opposite side of the vehicle.
LHS SHOWN
STEP 35
STEP 37

FITTING INSTRUCTIONS
Product:
T13 Outback Frontal Protection System
Vehicle:
Toyota LandCruiser 200 Series 2007+
Part No.
070SB13R82A
For further information contact T.J.M. Head Office on (07) 3865 9999. Distributors Australia
wide.
File: F-1434.docx
Page 10 of 18
11/12/2013
39. Trim the LHS plastic inner guard as shown.
40. Trim the RHS plastic inner guard in line with
the bottom of the radiator support panel.
Steps 41 through to 43 only apply if parking
sensors are to be installed. Otherwise,
proceed to step 44.
41. On each side of the FPS, drill the required
Ø22mm hole for the parking sensors,
following the dimensions shown.
42. De-burr the holes, then clean the
area/surface of any swarf/debris.
RHS SHOWN
LHS SHOWN
RHS SHOWN

FITTING INSTRUCTIONS
Product:
T13 Outback Frontal Protection System
Vehicle:
Toyota LandCruiser 200 Series 2007+
Part No.
070SB13R82A
For further information contact T.J.M. Head Office on (07) 3865 9999. Distributors Australia
wide.
File: F-1434.docx
Page 11 of 18
11/12/2013
43. Treat the exposed raw surfaces with a rust
preventative.
Step 44 only applies if no headlight washers
are to be installed. Otherwise, proceed to
step 45.
44. In each wing, insert a plastic plug into the
indicated hole.
Steps 45 & 46 only apply if headlight washers
were originally installed. Otherwise, proceed
to step 47.
45. Secure the supplied washer nozzle in place
at the indicated location.
46. So as to install the 3/16” one way check
valve near the headlight washer, cut a
length off the 3/16” rubber hose &, using
the supplied cable ties, fit one end to the
headlight washer & the other to the outlet
end of the 3/16” one way check valve.
Ensure that the one way check valve is
orientated correctly as it will only allow
flow in one direction.
Steps 47 through to 51 only apply if a winch
is to be fitted. Otherwise, proceed to step 52.
47. Referring to the winch fitting instructions, fit
the winch to the winch frame, utilizing the
two rear fastening holes only.
Use the supplied M10 x 1.5 x 40mm hex
bolts (2) to replace the winch fastening
bolts in the winch fitting kit.
48. Referring to the winch fitting instructions, fit
fairlead roller to the winch frame.
49. Secure the control box to the motor end of
the winch, using the bracket supplied with
the OX winch.
RHS SHOWN
RHS SHOWN

FITTING INSTRUCTIONS
Product:
T13 Outback Frontal Protection System
Vehicle:
Toyota LandCruiser 200 Series 2007+
Part No.
070SB13R82A
For further information contact T.J.M. Head Office on (07) 3865 9999. Distributors Australia
wide.
File: F-1434.docx
Page 12 of 18
11/12/2013
50. With the OE underbody guard situated
between the underbody guard cover & the
winch frame, position the underbody guard
cover on the winch frame as shown &
secure it in place, using the fasteners listed
below:
50.1. M10 x 1.5 x 40mm hex bolts (2), M10
x Ø30mm flat washers (2) & M10
spring washers (2).
These fasteners are also used to
secure the winch in place, through
the two front fastening holes.
50.2. M8 x 1.25 x 25mm hex screws (2), M8
x Ø19mm flat washers (4) & M8 nyloc
nuts (2).
51. Using the fasteners retained in step 19 &
M8 x Ø19mm flat washers (2), secure the
OE underbody guard at the indicated
locations.
Steps 52 & 53 only apply if a winch is not
fitted. Otherwise, proceed to step 54.
52. With the OE underbody guard situated
between the underbody guard cover & the
winch frame, position the underbody guard
cover on the chassis mount as shown &
secure it in place, using the fasteners listed
below:
52.1. M10 x 1.25 x 30mm hex bolts (2), M10
x Ø30mm flat washers (4) & M10 nyloc
nuts (2).
52.2. M8 x 1.25 x 25mm hex screws (2), M8
x Ø19mm flat washers (4) & M8 nyloc
nuts (2).
52.3. M8 x Ø19mm flat washers (2) & the
fasteners retained in step 19.
STEP 50.2
STEP 50.1
STEP 51
STEP 52.3
STEP 52.2
STEP 52.1

FITTING INSTRUCTIONS
Product:
T13 Outback Frontal Protection System
Vehicle:
Toyota LandCruiser 200 Series 2007+
Part No.
070SB13R82A
For further information contact T.J.M. Head Office on (07) 3865 9999. Distributors Australia
wide.
File: F-1434.docx
Page 13 of 18
11/12/2013
53. Fit the fairlead cover plate to the FPS, using
M8 x 1.25 x 20mm hex bolts (2), M8 x
Ø19mm flat washers (4) & M8 nyloc nuts
(2).
54. Install each fog-light's wiring harness to the
vehicle's wiring harness.
55. Check the operation of the fog-lights, then
un-plug them.
56. Loosely attach the fog-light angle bracket to
the fog-light (as shown), using M6 x 1.0 x
16mm hex screws (2), M6 x Ø12.5mm flat
washers (2) & M6 flange nuts (2).
The fog-lights are left & right. Ensure that the
wiring loom plug is facing the ground
57. Attach the fog-light to the FPS (as shown),
using M6 x 1.0 x 16mm hex screws (4), M6
x Ø12.5mm flat washers (4), M6 flange nuts
(4) & a fog-light washer plate (1).
Position the fog-
light washer plate
on the inside of the
fog-light bracket.

FITTING INSTRUCTIONS
Product:
T13 Outback Frontal Protection System
Vehicle:
Toyota LandCruiser 200 Series 2007+
Part No.
070SB13R82A
For further information contact T.J.M. Head Office on (07) 3865 9999. Distributors Australia
wide.
File: F-1434.docx
Page 14 of 18
11/12/2013
58. Repeat the previous two steps for the
opposite side of the FPS.
59. Adjust the fog-lights so that they are
positioned in the center of the pressing &
are projecting forward.
60. As per the table below, route & splice the
indicator/park light’s wiring to the vehicle,
then solder & seal the joins.
LED WIRING
Ground
Parker
Indicator
White
Brown
Yellow
61. Check the operation of the indicator/park
lights, then un-plug them.
62. Insert the nylon plugs supplied, into the
square cut-outs for the indicator/park lights
(as shown).
63. Separate the indicator/park light body from
the backing plate.
64. Secure the backing plate to the FPS, using
the screws provided with the light
assemblies.
65. Supporting the backing plate, re-fit (clip)
each indicator / park light body (ensuring
that an adequate seal is achieved).
Ensure that the park light is towards
the outside of the vehicle.
66. Repeat the previous six steps for the
opposite side of the FPS.

FITTING INSTRUCTIONS
Product:
T13 Outback Frontal Protection System
Vehicle:
Toyota LandCruiser 200 Series 2007+
Part No.
070SB13R82A
For further information contact T.J.M. Head Office on (07) 3865 9999. Distributors Australia
wide.
File: F-1434.docx
Page 15 of 18
11/12/2013
67. Position the headlight trim as shown, then
loosely secure it in place, using 10g x 3/4"
screws (5), 3/16" x Ø3/4" flat washers (5) &
10g speed nuts (5) so that the fasteners will
still allow adjustment.
Place the speed clips on top of the
headlight trim tabs (not clipped on) so
that the clips are not visible when on the
FPS.
To position the headlight trim, the holes
in the trim must match those in the FPS.
Where required, slot the headlight trim
holes for adjustment.
68. Repeat the previous step for the opposite
side of the FPS.
Steps 69 through to 71 only apply if headlight
washers were originally installed. Otherwise,
proceed to step 72.
69. Unplug the OE washer tube &, using the
supplied cable tie, connect it to the supplied
3/8” → 1/4” reducer fitting.
70. Cut a length off the 3/16” rubber hose &,
using the supplied cable ties, fit one end to
the 3/8” → 1/4” reducer fitting & the other
to the inlet of the 3/16” Y connector.
71. Using the remaining 3/16” rubber hose &
supplied cable ties, connect each outlet of
the 3/16” Y connector to a 3/16” one way
check valve.
Steps 72 through to 74 only apply if parking
sensors are to be installed. Otherwise,
proceed to step 75.
72. Remove the O.E. parking sensors & wiring
assembly from the O.E. bumper.
73. Using the O.E. parking sensor shrouds,
install the parking sensors to the FPS.
74. Run the O.E. parking sensor wiring through
the indicated openings & connect all of the
O.E. parking sensors.
WASHER NOZZLE
WASHER NOZZLE
3/16” ONE WAY CHECK
VALVE
3/16” ONE WAY CHECK
VALVE
Y CONNECTOR
3/8” → 1/4” REDUCER FITTING
OE WASHER TUBE
RHS SHOWN

FITTING INSTRUCTIONS
Product:
T13 Outback Frontal Protection System
Vehicle:
Toyota LandCruiser 200 Series 2007+
Part No.
070SB13R82A
For further information contact T.J.M. Head Office on (07) 3865 9999. Distributors Australia
wide.
File: F-1434.docx
Page 16 of 18
11/12/2013
75. With the assistance of another person,
carefully lift the FPS into position on the
chassis mount & secure the FPS in place,
using M12 x 1.25 x 40mm hex bolts (6),
1/2" x Ø1-1/4" flat washers (12) & M12
nyloc nuts (6) at the indicated locations.
76. Adjust the FPS so it is level & that there is a
minimum of 30mm gap between the wings
and vehicle guards then tighten the
fasteners to the appropriate torque settings.
The minimum clearance between the
wings and guards must be maintained to
prevent clashing during off-road driving.
77. Adjust the headlight trims then tighten the
screws.
The headlight trims must sit forward of
the headlights to prevent clashing during
off-road driving.
78. Using the indicated hole in the bar mount as
a template, drill a Ø10mm hole through
both vertical mounts in the chassis mount.
79. De-burr the hole & clean the areas/surfaces
of any swarf/debris, then treat the raw
exposed surfaces with a rust preventative.
80. Secure through the holes drilled in step 78
using M10 x 1.25 x 30mm hex screws (2),
M10 x Ø30mm flat washers (4) & M10 nyloc
nuts (2).
81. Tighten the fasteners installed in the
previous step to the specified torque
settings listed on page 1.
LHS SHOWN

FITTING INSTRUCTIONS
Product:
T13 Outback Frontal Protection System
Vehicle:
Toyota LandCruiser 200 Series 2007+
Part No.
070SB13R82A
For further information contact T.J.M. Head Office on (07) 3865 9999. Distributors Australia
wide.
File: F-1434.docx
Page 17 of 18
11/12/2013
82. Position the wing brace as shown & secure
it in place at the indicated locations, using
M8 x 1.25 x 25mm hex bolts (6), M8 x
Ø19mm flat washers (12) & M8 nyloc nuts
(6).
83. Tighten the fasteners installed in the
previous step to the specified torque
settings listed on page 1.
84. Repeat the previous six steps for the
opposite side of the FPS.
85. Re-fit the grille back to its original position,
using the O.E. fasteners previously retained.
86. Re-fit the front plastic cover panel back to
its original position, using the O.E. fasteners
previously retained.
87. Re-connect the indicator/park lights.
88. Position the wing guard as shown & secure it
in place, using the fasteners listed below:
88.1. M6 x 1.0 x 20mm hex bolts (4), M6
spring washers (4) & M6 x Ø12.5mm
flat washers (4).
88.2. M8 x 1.25 x 25mm hex bolt (1), M8 x
Ø19mm flat washers (2) & M8 nyloc
nuts (1).
89. Repeat the previous step for the opposite
side of the FPS.
90. Secure the number plate to the FPS using
the M5 x 0.8 x 20mm screws (2), M5 flat
washers (4) & M5 nyloc nuts (2).
91. Place the winch slot cover in place in the
winch viewing hole.
RHS SHOWN
RHS SHOWN
STEP 88.2

FITTING INSTRUCTIONS
Product:
T13 Outback Frontal Protection System
Vehicle:
Toyota LandCruiser 200 Series 2007+
Part No.
070SB13R82A
For further information contact T.J.M. Head Office on (07) 3865 9999. Distributors Australia
wide.
File: F-1434.docx
Page 18 of 18
11/12/2013
92. Ensure that all of the relevant wiring looms
are connected & check that the indicators,
park lights, winch, fog-lights, etc are
functioning correctly.
93. Ensure that all fasteners are fully tightened
& that, as a result of fitting the FPS, no
vehicle components are crushed of will
chaff.
Table of contents
Popular Automobile Accessories manuals by other brands

James Baroud
James Baroud Odyssey user guide

Kuda-Phonebase
Kuda-Phonebase 1390 Installation instruction

Metra Electronics
Metra Electronics 99-5800 installation instructions

Alpine
Alpine i509-WRA-JK installation manual

Innovate Motorsports
Innovate Motorsports SCG-1 user manual

Phonocar
Phonocar 5/928 Mounting instructions

Whelen Engineering Company
Whelen Engineering Company 6-button WeCan Configuration guide

Westfalia
Westfalia F-2010-2B instruction manual

Polaris
Polaris 2880325 quick guide

E&G Classics
E&G Classics 1045-019U-15B Upper Replacement

BURY
BURY Take&Talk Universal Installation and operating manual

Toyota
Toyota PZQ22-89320 installation instructions