T-Mobile SDA II User manual


SDA
Quick Start Guide
2
SDA
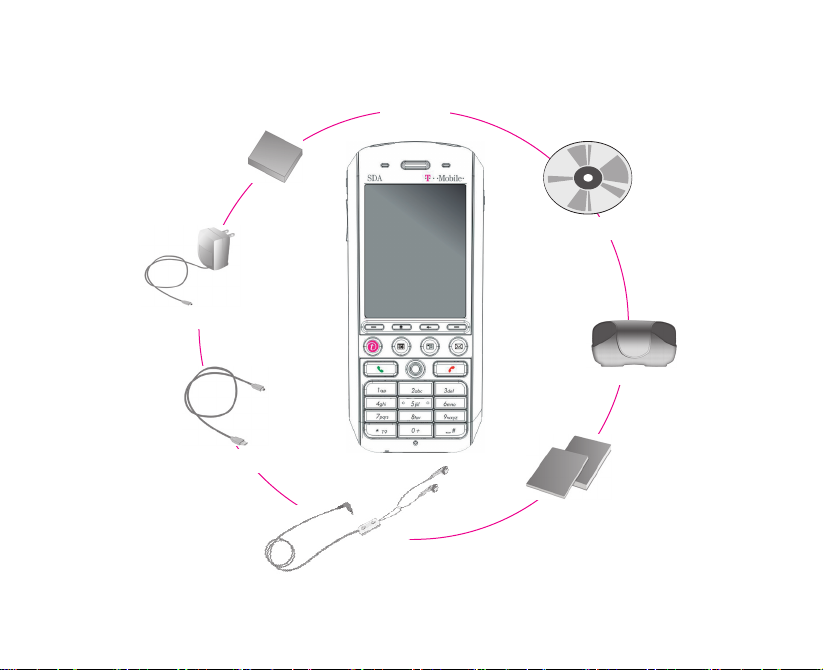
What's in the Box?
Headset
User Manual and
Quick User Guide
Battery
Carrying pouch
Companion CD
Sync Cable
AC Adapter

3
Your SDA
Speaker
Infrared Port
BACK - Goes to the previous
screen, or backspaces over
characters.
Right SOFT KEY - Performs
the command shown in the label
above the button.
END - Ends calls, or press and
hold to lock the device.
# Key - Press and hold to display
a list of symbols.
CAMERA - Launches the
Camera mode if not already
running. If already running,
captures an image or starts
capturing a video clip.
POWER Button
LED Indicators
Volume Up / Voice Notes
HOME - Goes to the
Home screen.
TALK - Dials a phone number;
answers, switches, or holds a call.
NAVIGATION Control - Use to
scroll left, right, up, or down. Or press
straight down for ENTER button.
* Key - Switches upper and lower
case text input, and input modes.
Light Sensor
Calendar - Press for quick
access to your calendar.
Volume Down / Voice Tag
Volume Up / Voice Notes
Left SOFT KEY - Performs
the command shown in the
label above the button.
Microphone
Display Screen
t-zone - Goes to the T-Mobile
website.
Contacts - Press for quick
access to your contacts.
Messaging - Press for
quick access to E-mail or SMS
messages.
4
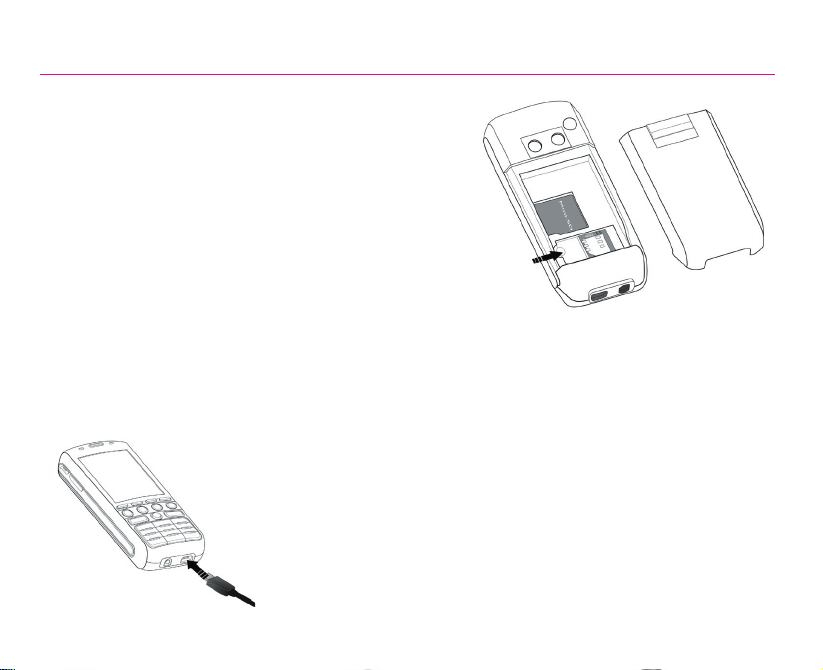
1. SIM Card and Battery
Inserting the SIM card
Press and move the backside cover downward to open,
and the remove the battery by lifting it up from both sides
of the bottom end. Lift up the SIM metal socket. Insert
the SIM card with the gold-plated contact area on the
card facing down. Push the metal socket down to lock
into place.
Inserting the battery
Insert the battery by aligning the exposed copper part of
the battery pack with the protruding copper conductor,
then gently push the bottom of the battery into place.
Slide the cover on the phone.
Charging the battery
Charge the battery in your SDA fully before turning it on for the first
time. Connect the power cable to the phone and plug it into an
electrical outlet. You can also charge the battery using the Sync
cable while connected to the PC's USB port.
Installing SIM card
Battery cover

5
2. Turning On Your SDA and Making a Call
Turning on your SDA
Press and hold the POWER for about 2~3 seconds to turn your SDA on
(or off). Your mobile operator's screen and your SDA’s Home screen will
appear, prompting you to enter a PIN.
Activating your PIN
Activate the PIN (Personal Identification Number) as set by your
mobile operator. Enter the PIN number, then press the Left SOFT KEY
(Done). Top View
Power Button
Making a phone call
When in the Home screen, dial the phone number and press the TALK. You can also make a call
directly from your Contacts or from the Photo Caller ID utility, as explained in Chapter 2 of the User’s
Manual.

6
3. Synchronising with ActiveSync
If you use Outlook on your desktop or notebook PC, you can synchronise E-mail, Contacts, Calendar,
and other data with your SDA.
Installing ActiveSync on your PC
Insert the ActiveSync CD into the CD drive of your PC. Follow the instructions on the screen. Once
installation is completed, connect the Sync cable to your SDA, and plug it into your PC's USB port
to synchronise.
Establishing a partnership
Turn on your SDA. When the PC detects the USB connection, it will automatically start
the ActiveSync New Partnership Setup Wizard. Follow the instructions on the screen and
select the items that you wish to be synchronised. Your data will begin to synchronise
between your SDA phone and your PC.

7
4. Surfing the Internet
You need to set up your SDA's data connection in order to surf the Internet, or access web-based E-
mail accounts. Your SDA is already configured for Operator services.
Setting up an Internet connection
In the Home screen, select Start > Settings > Data Connections. In the Internet connection field,
select the service offered by your mobile operator. (See Connecting to the Internet in Chapter 5 of
the User’s Manual for more information.)
Starting Internet Explorer
Select Start > Internet Explorer. Select an item from the Favourites list, and then press the Left SOFT
KEY (Go). Choose from the web sites listed, or select Address Bar from the menu and enter the URL
address of the site you want to access. Then, press the Left SOFT KEY (Go).
Connecting to T-Mobile Favourites
The Opera browser allows you to connect to T-Mobile Favourites website quickly and conveniently.
To launch the Opera browser, simply select the Internet icon when in the Home screen.
Setting up Data Connections Favourites list Address bar Connecting to T-Mobile
Favourites

8
5. Using the Camera
Your SDA is equipped with a camera (the lens is on the back of the device). You can capture photos
and short videos; then view, manage, and manipulate them using the Album utility, as explained in
Chapter 3 of the User’s Manual. You can also directly send newly-captured or existing files via E-mail
or MMS, and edit still images. For downloaded DRM-protected files, Album recognises and conforms
to Digital Rights Management specifications.
Taking a picture or filming a short video
Select Start > Camera, or simply press CAMERA on your SDA (as shown below) to switch to Camera
mode. The screen functions as a viewfinder. From the menu, select the desired Capture Mode (Photo,
Video, MMS Video, Photo ID, or Picture Theme), and customise your options. To capture a photo,
press CAMERA or ENTER on your SDA, or the Left SOFT KEY (Capture). For video, press any of
them to start and to stop recording.
CAMERA Button, located
on the right side of your
SDA.

9
6. Entering Text, Numbers, and Symbols
To start a new line: Press ENTER.
To delete one character: Press BACK once.
To delete all characters in a field: Press and hold BACK.
To enter a symbol: Press and hold the # key, select the symbol you want, and then select Done.
Input Modes
To choose or change the input mode: Press and hold the * key to pop up a shortcut menu; then,
select the desired mode from the menu. An icon indicating the current input mode is shown in the
Title bar, as follows:
Multipress mode: To enter the first alphabetic letter shown on a key, press the key once. If you
want to enter the second letter, press the key twice quickly, and so on.
T9 English mode: Press the number keys that contain the letters you want to form a word, and T9
will complete the word with suggestions, matching your entries character by character. If a suggestion
does not match the word you are looking for, enter the next letter of the word.
Numeric mode: Press the key containing the number you want to enter.

10
Setting Up E-Mail Service
You won’t miss your e-mail while on the road; you can check your important e-mail easily using your
SDA. EmailWiz allows you to set up your POP3 or IMAP4 e-mail account in just a few steps, and
immediately start checking and editing e-mail. You can also view attachments in *.doc, *.rtf, *.xls,
*.ppt, and *.pps format.
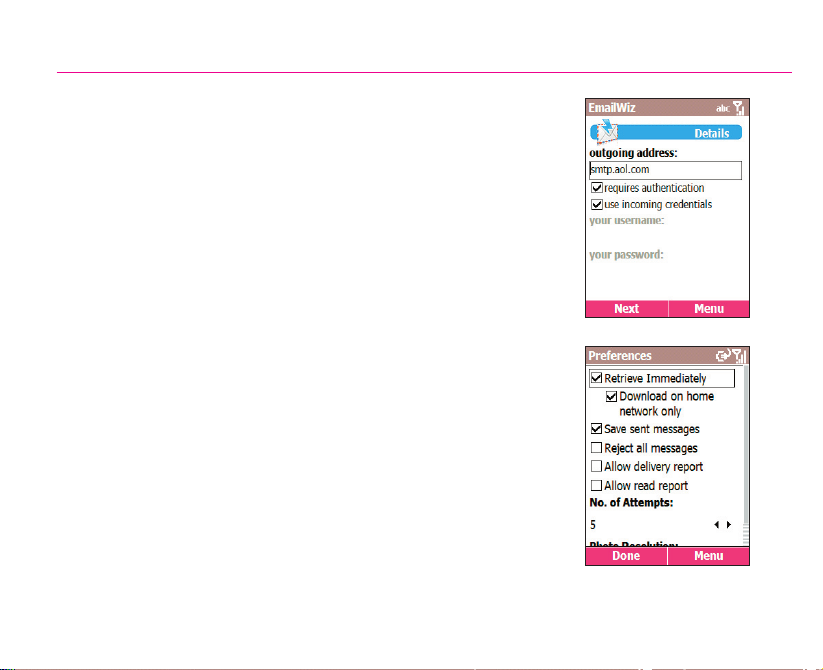
7. Setting Up E-Mail and MMS Messaging
To write e-mail while travelling, you need to specify an Outbox server. To do this, select Start >
Messages > Messaging. Select E-Mail in the Messaging screen, and then select Menu > Options. In
the Options screen, select Account Setup, and then select your e-mail account from the list. The next
screen displays your User Name and E-mail Address. In the next two screens, select Next. You can
then edit your Incoming and Outgoing Server. An example of this screen is shown on the next page.
Select Start > Messages
> EmailWiz, and then
select Next. Enter
your e-mail address
and select Next again.
EmailWiz will try to match
it with a service provider
contained in a database
in your SDA.
If found, the screen,
s h o w n a t r i g h t
displays. Enter your
password and select
Next to complete the
configuration. You are
now ready to check
your e-mail!
11
After specifying your Outbox server, you will set your download
options (such as entire message or specific number of bytes; how
often to automatically connect and check for messages; etc.) in the
next few screens. Your E-mail service is now set up completely.
MMS Multimedia Messaging
With MMS of T-Mobile, you can take photos and videos using your
SDA and then send them directly to a mobile phone number or an
E-mail address complete with text and sound.
Select Start > Messages > MMS. Then, select New in the MMS
screen. In the To field, enter a mobile phone number or E-mail
address. You can opt to attach a picture, video, audio, and/or insert
a short text message. When completed, select Send to send the
MMS message.
To change the related settings of MMS, open the Preferences screen
(as shown at right). To do this, select Start > Configurations >
MMS Settings.

12
8. Program Icons
Messages
Lets you read received E-Mail, MMS, or SMS
messages; or compose new ones.
Contacts
Opens your contacts list alphabetically.
Calendar
Record your important events, and set alarms to
remind you when important events come up.
Settings
Personalise your phone to suit the way you use it.
Internet Explorer
Browse the Internet or visit your favourite sites on
your SDA, even while on the move.
ActiveSync
Keep your Contacts, Tasks, E-mail, and Calendar
events up-to-date on both your computer and your
phone, by synchronizing regularly.
Call Register
View information about phone calls you have
made and received, such as length of last call
and Missed Calls.
MSN Messenger
Keep in touch with your friends in real-time by
subscribing to this free service.
Album
View, organize, manage, and manipulate your
audio, video, and image files.
Some of the applications available on your SDA’s Start menu/submenus are listed below. To start one,
highlight it on the menu and then press the Action button, or on the keypad press the number shown
to the left of the program name. Some of them also have dedicated hardware buttons.

13
Camera
This application launches the Camera mode, which
lets you take pictures and shoot video clips using
any of five capture modes.
Photo Caller ID
Assign photos or animated GIF files to your
Contacts, so that when people call you, their Photo
ID will appear on your SDA's screen.
Tasks
Keep track of what you need to do, or have your
phone alert you of important pending events.
Voice Notes
Record your thoughts using your phone’s built-in
audio recorder, and save for later playback.
Windows Media Player
Play music and watch video clips while on the
move.
t-zones
Goes to the T-Mobile web site, where you can
access your E-mail, t-news, t-sports, t-music, t-
games, and more.
Opera
Goes to the T-Mobile Favourites website.
Java Manager
With Java MIDlet Manager, you can download and
manage additional Java games and utilities.
SIM Manager
This is the SIM Application Toolkit (dependent on
which services you subscribe to).
14
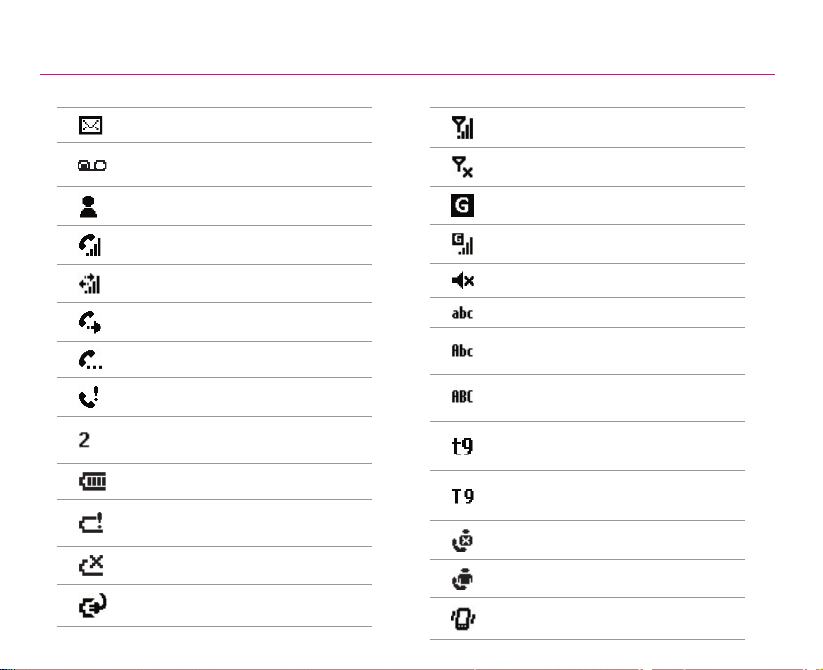
9. Status Indicators
Status indicators are displayed in the Title Bar at the top of your SDA’s screen.
New message
New voice mail
New instant message (MSN)
Voice call active
Data call active
Call forwarding
Call on hold
Missed call
“1” indicates Line 1; “2”
indicates Line 2
Battery full
Battery very low (less than
4%)
Battery fault
Battery charging
Signal strength
Radio off
GPRS available
GPRS in use
Ringer off
Multipress input lower
Multipress text input mode,
uppercase
Multipress text input mode,
caps lock
T9 text input mode,
lowercase
T9 text input mode,
uppercase
Caller ID monitor is off
Caller ID monitor is running
Vibration mode is on

Table of contents
Other T-Mobile Telephone manuals


