Doro Magna 4000 User manual

English
Doro Magna 4000

OK
C
A B
R
b
60dB
4
2
3
16
17
11
12
13
14
15
10
8765
1
9
English
1. Handset volume control
2. Speaker
3. Service access keys
4. Hanging peg for handset
5. Clear
6. OK
7. Speed dial keys
8. Caller ID (access received
numbers)
9. New call indicator
10. Up/Down
11. Phonebook
12. Menu
13. Recall
14. Redial
15. Extra amplification (boost)
16. Amplifier on/ringer indicator
17. Speaker on

English
Installation
This device is intended for the analogue telephone network lines in AT,
BE, BG, CH, CY, CZ, DE, DK, EE, ES, FI, FR, GB, GR, HU, IE, IS, IT, LV, LT,
LU, MT, NL, NO, PL, PT, RO, SI, SK, SE.
Connection
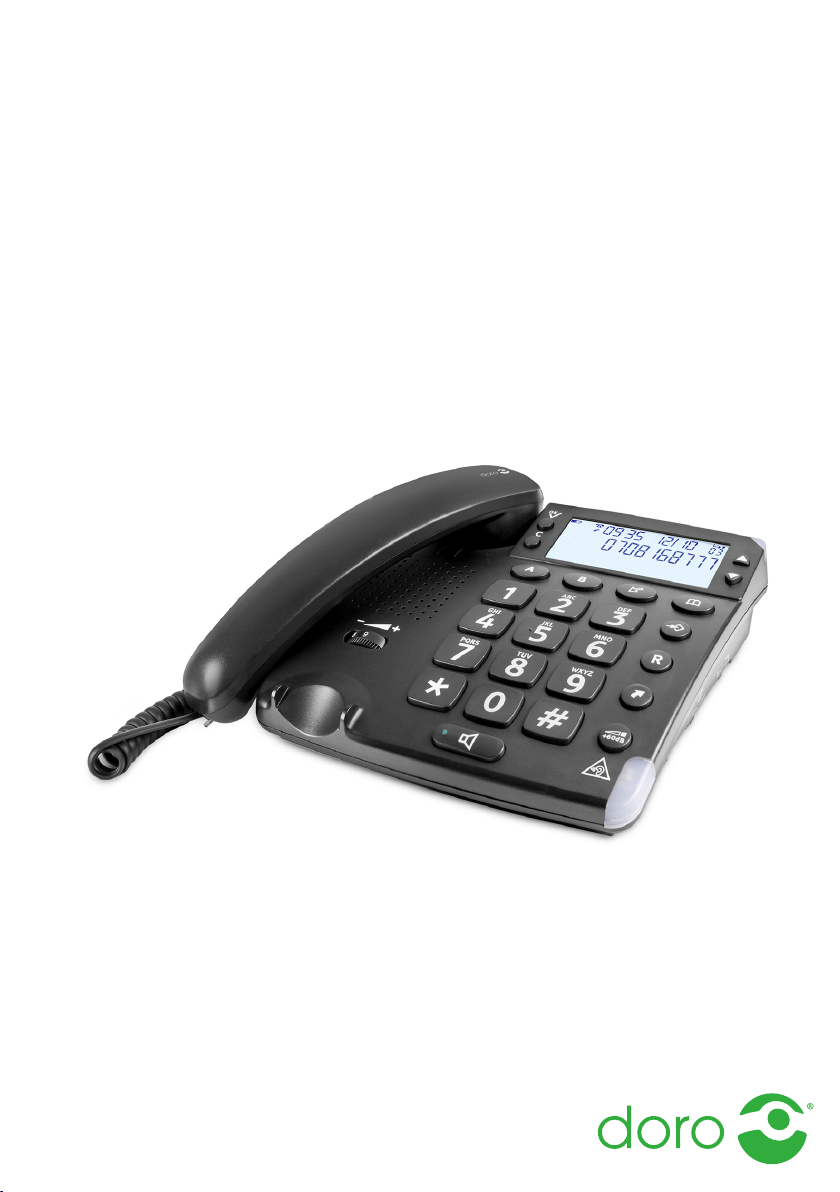
1. Connect the curly cord to the handset and to the socket marked
Qon the unit.
2. Connect the mains adapter to an electrical wall socket and then to
the socket marked DC 12V on the unit.
3. Connect the telephone line cord to a network wall socket and then
to the socket marked Ton the unit.
4. Lift the handset and listen for the dial tone.
Note! Use supplied telephone line cord, an existing cord from a previous
phone may not be compatible.
Setup
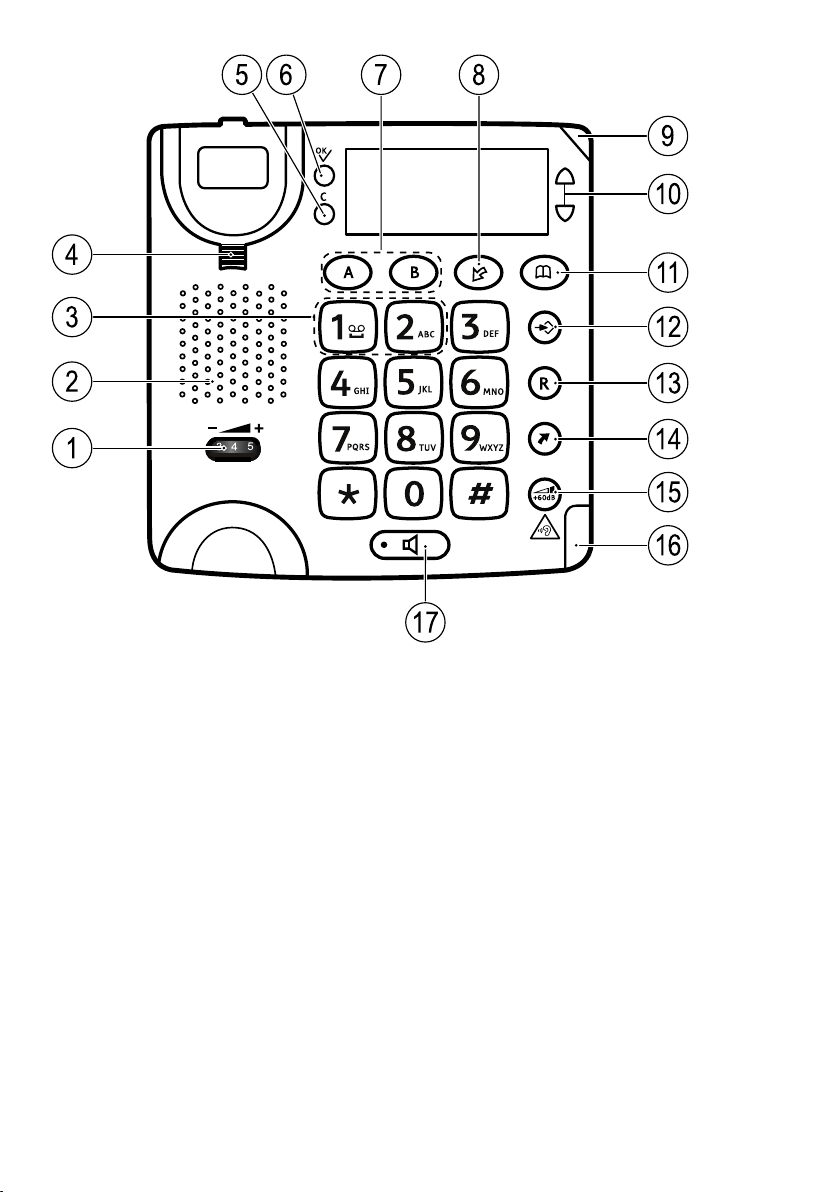
The setup menu is opened directly after plugged into the mains. The
phone will return to standby mode after 60 seconds of inactivity or when
pressing b. Confirm with 0and the next setting is displayed. Scroll with
v/V. Access the setup menu at any time with .
1. Press .
2. ENGLISH is displayed.
3. Select desired language using v/V. Press 0.
4. Select desired contrast setting (LCD CONTRAST, 2=normal) using
v/V. Press 0.
5. Select desired hour (00-23) using v/V. Press 0.
6. Select desired minute using v/V. Press 0.
7. Select desired day using v/V. Press 0.
8. Select desired month using v/V. Press 0.
9. Select TONE or PULSE using v/V. Press 0.
Note! If unsure of which mode to use, select TONE as this works in
most locations.
10. Select FLASH TIME using v/V(100 for EU/GB/AUS, 270 France/
Portugal and 600 New Zealand). Press 0.
1

English
11. NEW CALL IND. is displayed, press 0. Enable/disable the LED indi-
cator for new calls. Select ON/OFF, and confirm with 0.
12. Buttons 1and 2can be programmed with service access num-
bers. SERVICE ACCESS is displayed, press 0. Use v/Vto select
KEY 1 or KEY 2, and then press 0. Use the keypad to edit/enter
the access number. Press 0. Enter the name for the service. Press
0.
Changing the clock, language or contrast
If you wish to change the settings for time or language etc. later on, re-
peat steps as above.
Batteries
4 x AA alkaline batteries are needed for the display operation (no back-
light) in the event of a power cut. Extra amplification (boost) and speaker-
phone will not work in the event of a power cut.
When is displayed, replace all 4 batteries. Use only good quality
batteries.
1. Unplug the telephone cord and remove the battery cover.
2. Insert the batteries (4 x AA) ensuring that the correct battery polarity
is observed.
3. Replace the battery cover and connect the telephone cord.
Wall mounting
The telephone can be wall mounted by using the included wall mount
bracket and two screws.
WARNING
Make sure that no cables, water pipes or gas pipes are located inside
the wall before drilling into it.
1. Drill two holes in the wall, vertically 83 mm apart.
2. Insert the screws, allowing them to project ~5 mm out from the wall.
3. Unplug and remove the handset.
4. Fit the guide tabs (A) on the bracket into the slots (B) on the back of
the telephone, then slide the bracket upwards until it snaps into
place.
2

English
B
A
5. Position the phone so that the screws on the wall fit into the slots in
the bracket, then slide the phone downwards until it is hanging on
the screws.
6. Remove the handset hook (C) by pushing it upwards, and insert it in
the reversed position so that the small tab (D) protrudes. The hook
will now keep the handset in the cradle when the phone is wall
mounted.
C
D
C
7. Replace the handset, on the hanging peg, in the hook switch.
Operation
The display
In standby mode the date and time is indicated on the display, the total
number of calls that have been stored in the Caller ID memory, and the
number of new calls. See also Message, p.8.
Timer
During a call the display shows a call timer, indicating the duration of the
call. The timer is a simple way to help you keep track of how long the call
lasts.
3

English
Make a call
Normal call
1. Lift the handset.
2. Enter the phone number.
Pre dial
Pre dial allows you to enter and change a phone number before it is
dialled.
1. Enter the phone number. Delete with c.
2. Lift the handset to dial.
Re dial
Re dial allows you to call the last dialled phone numbers.
•Lift the handset and press to dial the most recently dialled phone
number.
•Repeatedly press to scroll through the dialled numbers. Lift the
handset to dial the phone number.
Handsfree/speakerphone
It is only possible for one person at a time to talk in handsfree mode.
Avoid loud background noises, e.g. music, as this interferes with the
handsfree function.
1. Press to activate the handsfree function.
2. Enter the phone number.
3. Press to end the call.
Tip: You can switch between handset and handsfree mode during a call,
press or lift the handset.
Service access dial
Shortcut keys to operator service access numbers.
1. Press and hold or 1or 2until the service access number is
displayed.
2. Lift the handset, press 0or to dial.
4

English
Volume control
The handset volume may be adjusted during a call with located
under the handset when not used.
The handset tone may be adjusted during a call with located on
the side of the phone.
Note! The tone control only works when the extra amplification is active.
To adjust the speakerphone volume (handsfree), use located on
the side of the phone.
Extra amplification (boost)
Press the
60dB
button to activate amplification. When activated the Am-
plifier on light is lit. The amplification is deactivated at the end of each
call to avoid harming people with normal hearing.
WARNING
The handset/headset volume can be turned up very loud. The
amplification should only be used by people with impaired hearing
ability.
Hearing aid compatible
WARNING
Do not use extra amplification (boost) together with a hearing aid if not
necessary. The handset volume can be turned up very loud.
This telephone is hearing aid compatible. Select the T-mode on your hear-
ing aid to use this feature. Hearing-aid compatibility is not a guarantee
that a specific hearing aid will work with a specific telephone. To ensure
that a specific hearing aid works well with this telephone, test them to-
gether before making a purchase.
T: To use your hearing aid in this mode, make sure that your hearing aid
is set to "T-mode" or telecoil coupling mode (not all hearing aid have this
mode). For the best results, try using the telephone in different positions
relative to your hearing aid-for example, placing the receiver slightly be-
low or in front of the ear may result in better performance.
5

English
Ringer
The ringer volume may be adjusted using the switch located on the
side of the phone.
Speed dial
You can use A,Bas speed dials.
Storing speed dial numbers
1. Press and hold until STORE NUMBER is displayed.
2. Enter the phone number. Press .
3. Enter the name. Press .STORAGE PLACE? is displayed.
4. Select A–Bby pressing the corresponding key. SAVED is displayed
Speed dial
1. Press the speed dialling keys Aand B. The stored phone number
is displayed.
2. Lift the handset, press 0or to dial.
Phonebook
The phonebook will store 50 sets of names and phone numbers. Con-
tacts in the phonebook are arranged alphabetically. Each name can be
up to 16 characters in length, and phone numbers can be up to 22 digits
in length.
If you subscribe to a Caller ID service, the name/number of the caller will
be shown when you receive an incoming call (for those numbers stored
in the phonebook or the memories).
Note! To access the phonebook features make sure that bis displayed.
If is displayed, press b.
Character table
Each number key has been allocated certain characters.
1[Espace] + & - / X 1
2A B C Å Ä Æ æ å ä ß 2
6

English
3D E F ë 3
4G H I ï 4
5J K L 5
6M N O Ñ ñ Ö əö 6
7P Q R S 7
8T U V 8 Ü ü
9W X Y Z 9
*` @ ( ) * < >
0, . : ? = 0
#$ _ % ! #
Storing contacts
1. Press b.
2. Press and hold until SAVE? is displayed. Press .
3. Enter the phone number. Press .
4. Enter the name. Press the corresponding digit key for the first letter,
one or more times, see Character table.
5. Press .SAVED is displayed.
If you need to insert a pause in the phone number press . Mistakes
can be erased with c.
Dialing from the phonebook
1. Press b.
2. Scroll using v/V. Quick search by pressing the corresponding digit
key for the first letter, one or more times, see Character table.
3. Press 0, and lift the handset.
Edit contacts
1. Press b.
2. Scroll to the desired entry using v/V.
3. Press and hold until EDIT? is displayed.
4. Press and hold .
5. Correct/change the number using cand v/V. Press .
7

English
6. Correct/change the name, see Character table. Press . SAVED is
displayed.
Deleting contacts
1. Press b.
2. Scroll to the desired contact using v/V.
3. Press cthe display shows DELETE?.
Tip: To delete all contacts, press and hold cuntil DELETE ALL? is
displayed.
4. Hold cdown until the number disappears.
Caller ID (caller identification)
Caller ID allows you to see who is calling before you answer a call and to
see who has called in your absence. If the number is stored in the phone-
book, the caller’s name will be shown. Received calls are stored chrono-
logically, the sequential number shown on the display.
When the Caller ID memory is full, the oldest number will be deleted au-
tomatically as the new call is logged. New calls are indicated on the dis-
play and indicated with T, the New call indicator flashes.
Note! In order for numbers to be shown you must subscribe to the Caller
ID service provided by your network operator. Contact your operator for
more information.
Retrieving and dialling incoming numbers
1. Press .
2. Press v/Vto scroll through received phone numbers/calls.
3. Press 0and lift the handset.
Message
Apart from phone numbers, the display can show:
OUT OF AREA No information received, e.g. an international call
PRIVATE The call comes from a withheld number or a PBX
TNumber not previously seen
8

English
ZSeveral calls have been received from this particular
person
qA call is received while using the Call Waiting function
MESSAGE WAIT-
ING / 5
Message indication*
*Message indication can be erased manually with c.
Deleting phone numbers
1. Scroll to the desired number using v/V.
2. Press c,DELETE? is displayed or press and hold cuntil DELETE
ALL? is displayed.
3. Hold down cuntil the number disappears.
Transferring numbers to the phonebook
1. Press .
2. Scroll to the desired entry using v/V.
3. Press and hold until COPY NUMBER? is displayed.
4. Press and hold .SAVED is displayed.
Number and name can be added/edited in the same way as Edit con-
tacts, p.7.
Other
Troubleshooting
Check that the telephone cord is undamaged and properly plugged in. Disconnect any
additional equipment, extension cords and other phones. If the problem is resolved, the
fault is with some other equipment.
Test the equipment on a known working line (e.g. at a neighbour’s house). If the equip-
ment works there the fault is probably with your telephone line. Please inform your net-
work operator. If the telephone still does not work, contact the place of purchase for
service. Don’t forget the receipt or a copy of the invoice.
9
Other manuals for Magna 4000
1
Table of contents
Other Doro Telephone manuals

Doro
Doro 5030 User manual

Doro
Doro HearPlus 317ci User manual

Doro
Doro 212IPC User manual

Doro
Doro AlertEasy 314C User manual

Doro
Doro MemoryPlus 319i ph User manual

Doro
Doro AFTI 30 User manual

Doro
Doro TEL2 User manual

Doro
Doro PhoneEasy 331ph User manual

Doro
Doro COMFORT 4005 User manual

Doro
Doro AFTI 45 User manual