TALAMEX QLS200 User manual

Talamex inflatable boats –User’s manual
TLM-GB2021-01
Pagina 1 van 17

Talamex inflatable boats –User’s manual
Pagina 2 van 17
Contents
1. General............................................................................................................................................................3
1.1 Introduction.................................................................................................................................................3
1.2 Design categories........................................................................................................................................3
1.3 Capacity plate..............................................................................................................................................4
1.4 National legislation .....................................................................................................................................4
1.5General safety information..........................................................................................................................4
2. Specifications, description and features ...............................................................................................................4
2.1 Specifications..............................................................................................................................................4
2.2 Boat model..................................................................................................................................................4
2.3 Number of persons......................................................................................................................................5
2.4 Payload........................................................................................................................................................5
2.5 Outboard Engine.........................................................................................................................................5
2.6 Fire extinguisher .........................................................................................................................................5
2.7 Electrical system.........................................................................................................................................5
2.8 Certification ................................................................................................................................................5
2.9 Specifications..............................................................................................................................................6
2.10 Drawings.....................................................................................................................................................7
3. Assembly and disassembly...................................................................................................................................8
3.1 Valves .........................................................................................................................................................8
3.2 Rowing equipment......................................................................................................................................8
3.3 Seatbench....................................................................................................................................................8
3.4 Inflation of the tubes ...................................................................................................................................8
3.5 Floorboard...................................................................................................................................................9
3.6 Installing aluminium floor ..........................................................................................................................9
3.7 Installing airfloor ......................................................................................................................................10
3.8 Installing slatted floor ...............................................................................................................................10
3.9 Slide drain valve .......................................................................................................................................10
3.10 Drain plug (Alu-Rib models)....................................................................................................................10
3.11 Engine installation ....................................................................................................................................10
3.12 Installing the console (Silverline / S-Line) ...............................................................................................11
3.13 Deflation ...................................................................................................................................................11
3.14 Folding the boat ........................................................................................................................................12
4. Transportation ....................................................................................................................................................12
4.1 Lifting the boat out of the water................................................................................................................12
4.2 Towing the boat ........................................................................................................................................12
4.3 Lifting the boat in hoist.............................................................................................................................12
5. Operation- and safety instructions......................................................................................................................13
5.1 Important safety information ....................................................................................................................13
5.2 Pre-operating check list.............................................................................................................................13
5.3 Stability and buoyancy..............................................................................................................................13
5.3.1 Position of persons and luggage ...........................................................................................................13
5.3.2 Rowing .................................................................................................................................................13
5.3.3 Under engine power..............................................................................................................................13
5.4 Hazards .....................................................................................................................................................14
5.5 Reboarding................................................................................................................................................15
6. Maintenance .......................................................................................................................................................15
6.1 General maintenance.................................................................................................................................15
6.2 Repairs ......................................................................................................................................................15
6.3 (Winter) storage ........................................................................................................................................16
7. Warranty.............................................................................................................................................................17

Talamex inflatable boats –User’s manual
Pagina 3 van 17
1. General
1.1 Introduction
This manual has been compiled to help you to
operate your Talamex inflatable boat with safety and
pleasure. It contains details of the Talamex inflatable
boat, assembly, disassembly, equipment and
information on its operation and maintenance. Please
read it carefully, and familiarize yourself with the
Talamex inflatable boat, before using it.
Ensure that the anticipated wind and sea conditions
will correspond to the design category of the
Talamex inflatable boat and that you and your crew
are able to handle the Talamex inflatable boat in
these conditions.
Even when your boat is categorized for them, the sea
and wind conditions corresponding to the design
categories A, B and C range from severe storm
conditions for category A, to strong conditions for
the top of category C, open to the hazards of a freak
wave or gust. These are therefore dangerous
conditions, where only a competent, fit and trained
crew using a well maintained craft can satisfactorily
operate.
This owner's manual is not a detailed maintenance or
trouble-shooting guide. In the case of difficulty,
refer to your Talamex inflatable boat dealer.
Always use trained and competent people for
maintenance, fixing or modifications to your boat.
Modifications that may affect the safety
characteristics of the Talamex inflatable boat, should
be executed by competent people. The boat builder
cannot be held responsible for modifications that he
has not approved.
In some countries, a driving license or authorization
are required, or specific regulations are in force.
Always maintain your Talamex inflatable boat
properly and make allowance for the deterioration
that will occur in time and as a result of heavy use or
misuse of the Talamex inflatable boat.
Any Talamex inflatable boat, no matter how strong it
may be, can be severely damaged if not used
properly. This is not compatible with safe boating.
Always adjust the speed and direction of the
Talamex inflatable boat to sea conditions.
The Talamex inflatable boats should have onboard
the appropriate safety equipment (lifejackets, fire
extinguisher, etc.)
This manual uses the following safety alerts to draw
your attention to special safety instructions that
should be followed.
warning
WARNING - indicates a potentially hazardous
situation that, if not avoided, could result in death
or serious injury.
danger
DANGER - indicates an imminently hazardous
situation that, if not avoided, will result in death or
serious injury.
caution
CAUTION - indicates a potentially hazardous
situation that, if not avoided, may result in minor or
moderate injury or property damage. It may also be
used to alert against unsafe practices.
PLEASE KEEP THIS MANUAL IN A SECURE
PLACE AND HAND IT OVER TO THE NEW
OWNER WHEN YOU SELL YOUR TALAMEX
INFLATABLE BOAT.
REGISTER YOUR TALAMEX BOAT FOR
WARRANTEE DIGITALLY ON:
WWW.TALAMEXINFLATABLES.COM
1.2 Design categories
Category C –“Inshore”. A watercraft given design
category C is considered to be designed for a wind
force up to, and including, 6 and significant wave
height up to, and including, 2 m.
Category D –“Sheltered waters”. A watercraft
given design category D is considered to be designed
for a wind force up to, and including, 4 and
significant wave height up to, and including, 0,3 m,
with occasional waves of 0,5 m maximum height.
The boat you obtained is meant to be used in
category C or D, depending on the model you are
using (see paragraph 2.9).

Talamex inflatable boats –User’s manual
Pagina 4 van 17
1.3 Capacity plate
The manufacturer's capacity plate is located on the
inside of the boat transom. Never exceed the
maximum values as mentioned on the plate.
1.4 National legislation
Before you prepare for the water with your Talamex
inflatable boat, check the local legislation on any
restrictions on the specific water you want to use.
You might check for sailing restrictions, speed-
restriction, restrictions on the use of outboard
engines, restrictions on the airborne sounds, etc.
1.5 General safety information
In order to safely enjoy the waterways, familiarize
yourself with local and other governmental boating
regulations and restrictions, and consider the
following suggestions.
Use flotation devices. Have an approved personal
flotation device of suitable size for each person
aboard (it is the law) and have it readily accessible.
Do not overload your boat. Most boats are rated and
certified for maximum load (weight) capacities (refer
to your boat capacity plate). If in doubt, contact your
dealer.
Perform safety checks and required maintenance.
Follow a regular schedule and ensure that all repairs
are properly made.
Know and obey all nautical rules and laws of the
waterways.
Make sure everyone in the boat is properly seated.
Do not allow anyone to sit or ride on any part of the
boat that was not intended for such use.
This includes any part of your boat, at which an
unexpected acceleration, sudden stopping,
unexpected loss of boat control, or sudden boat
movement could cause a person to be thrown
overboard or into the boat.
Never be under the influence of alcohol or drugs
while boating (it is the law). Alcohol or drug use
impairs your judgment and greatly reduces your
ability to react quickly.
Prepare other boat operators. Instruct at least one
other person on board in the basics of starting and
operating the outboard, and boat handling, in case the
driver becomes disabled or falls overboard.
Stop the engine whenever passengers are boarding,
unloading, or are near the back (stern) of the boat.
Just shifting the outboard into neutral is not
sufficient.
Be alert. The operator of the boat is responsible by
law to maintain a proper lookout by sight and
hearing. The operator must have an unobstructed
view particularly to the front. No passengers, load, or
fishing seats should block the operators view when
operating the boat above idle speed.
Never drive your boat directly behind a water skier in
case the skier falls. Watch fallen skiers. When using
your boat for water skiing or similar activities,
always keep a fallen or down skier on the operator's
side of the boat while returning to assist the skier.
The operator should always have the down skier in
sight and never back up to the skier or anyone in the
water.
2. Specifications, description and features
2.1 Specifications
Declaration of conformity: The Talamex inflatable
boats smaller than 2,50 meter, do not come under the
aegis of the recreational Craft Directive 2013/53/EC
and therefore cannot be certified as complying with
it. However, these models are built to meet all
specifications required in the above-mentioned
Directive as well as the ISO 6185 standards.
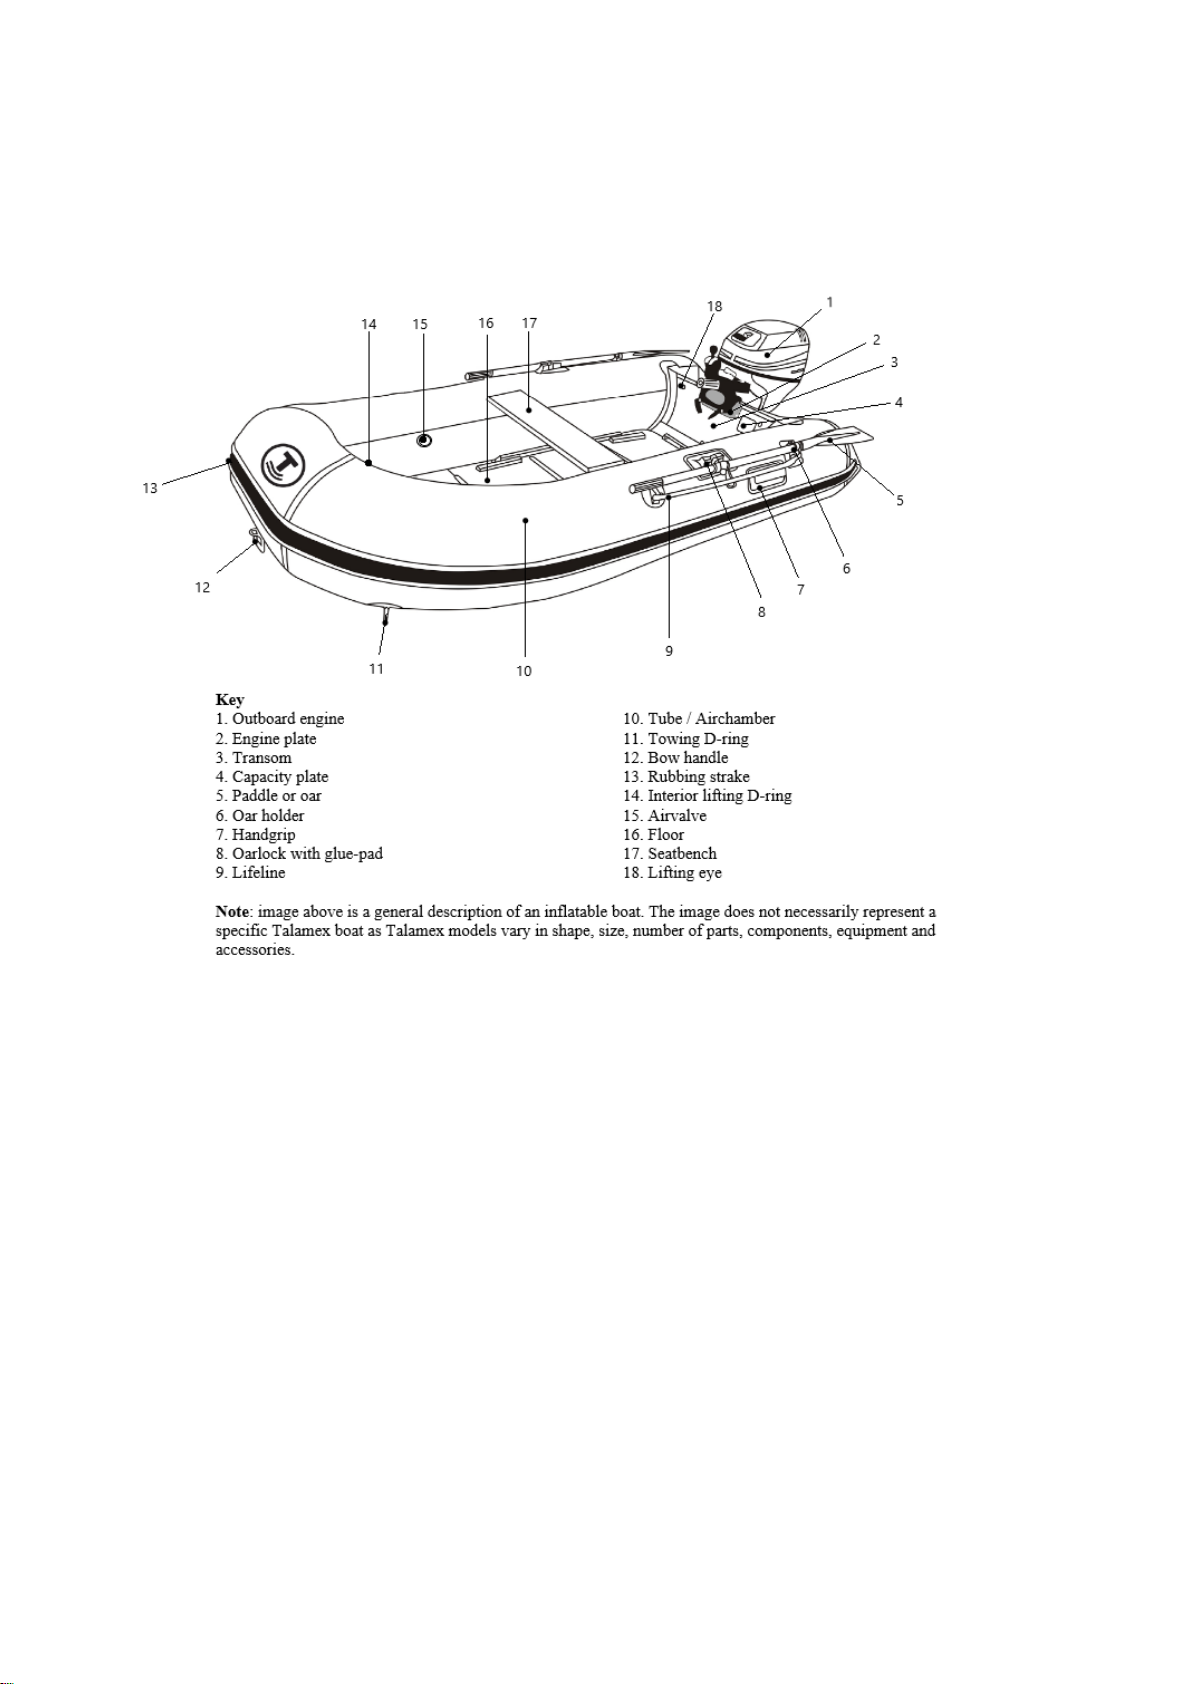
2.2 Boat model
This is an inflatable boat that gets its form, strength
and buoyancy by means of inflation with air. The
boat is designed for small voyages in sheltered and
open waters, depending on the design category (see
2.9).

Talamex inflatable boats –User’s manual
Pagina 5 van 17
2.3 Number of persons
warning
Do not exceed the maximum recommended number
of persons. Regardless of the number of persons
aboard, the total weight of persons and equipment
must never exceed the maximum recommended
load.
2.4 Payload
warning
When loading the Talamex inflatable boat, never
exceed the maximum recommended load. Always
load the Talamex inflatable boat carefully and
distribute loads appropriately to maintain design
trim (approximate level). Avoid placing heavy
weight high up.
2.5 Outboard Engine
The maximum motor power of this boat is given in
2.9 in this manual.
danger
Overpowering a boat can result in serious injury,
death or boat damage.
danger
You might lose control of the boat when using the
motor at full speed, accidents may occur.
Talamex cannot be held responsible for these
actions.
warning
Be cautious when refuelling, e.g., no smoking and
direct treatment of fuel spillage in craft.
Prevent the fuel lines from damaging when installing
the engine.
Avoid and prevent contact of flammable materials
with hot engine parts.
2.6 Fire extinguisher
warning
In case you have a boat with outboard engine
having more than 25kW (34HP). Then you are
required by NEN-EN ISO 9094-1 to have one or
more fire extinguishers on board with a collective
capacity of 8A/68B.
Ask your dealer for supply of a fire extinguisher
that is conform the requirements.
2.7 Electrical system
let op
Your Talamex boat comes standard without
electrical system and connections. If you install an
electrical system, it must meet the following
international standards for water resistance: ISO
10133, ISO 9097 of ISO 8849. Navigation lights
must comply with Colreg 72.
Ask your dealer for supply of a system that is
confirm the requirements.
2.8 Certification
All boats from 250cm and up are CE certified by the
Notified Body DMI (NoBo nr. 2248) or EMCI
(NoBo nr. 2832).

Talamex inflatable boats –User’s manual
Pagina 6 van 17
2.9 Specifications
Model
CE design category
ISO standard
Type
Length (cm)
Width (cm)
Tube diameter (cm)
Weight incl. oars (kg)
Max load (kg)
Max HP
Max kW
Max engine weight
(kg)
Max persons
Shaft length
Nr. of airchambers
Packing dimensions
(cm)
QLS200 D 200 134 36 18 300 2,5 1,8 20 2 Kort 3 93 x 47 x 20
QLS230 D 230 134 36 20 325 4 2,9 25 2+1 Kort 3 98 x 45 x 25
QLS250 D 6185-1 II 250 152 42 23 350 5 3,7 30 2+1 Kort 3 98 x 50 x 25
QLA230 D 230 134 36 26 350 4 2,9 30 2+1 Kort 3+1+1 98 x45 x 25
QLA250 D 6185-1 II 250 152 42 28 400 6 4,4 30 2+1 Kort 3+1+1 98 x50 x 25
QLA270 D 6185-1 II 270 152 42 29 410 6 4,4 30 3 Kort 3+1+1 100 x52 x 21
QLA300 C 6185-2 V 300 152 42 31 425 10 7,4 45 4 Kort 3+1+1 100 x 51x 24
QLA350 C 6185-2 V 350 180 45 40 490 15 11,0 60 5 Kort 3+1+1 112 x50 x 21
QLX250 D 6185-1 II 250 152 42 32 400 6 4,4 30 2+1 Kort 3+1 98 x 50 x 25
QLX270 D 6185-1 II 270 152 42 40 410 6 4,4 30 3 Kort 3+1 100 x52 x 21
QLX300 C 6185-2 V 300 152 42 46 425 10 7,4 45 4 Kort 3+1 100 x 51x 24
QLX350 C 6185-2 V 350 180 45 56 490 15 11,0 60 5 Kort 3+1 112 x50 x 21
TLS200 D 200 134 36 21 300 2,5 1,8 20 2 Kort 3 95 x 47 x 22
TLS230 D 230 134 36 23 325 4 2,9 25 2+1 Kort 3 95 x 53 x 22
TLA230 D 230 134 36 25 372 5 3,7 30 2+1 Kort 3+1+1 97 x 58 x 24
TLA250 D 6185-1 II 250 152 42 28 400 6 4,4 30 2+1 Kort 3+1+1 100 x54 x 25
TLA300 C 6185-2 V 300 152 42 37 465 15 11,0 50 4 Kort 3+1+1 102 x 55 x 24
TLA350 C 6185-2 V 350 172 45 46 696 20 14,7 60 5 Kort 3+1+1 116 x60 x 30
TLX250 D 6185-1 II 250 152 42 35 400 6 4,4 30 2+1 Kort 3+1 100 x54 x 25
TLX300 C 6185-2 V 300 152 42 49 465 15 11,0 50 4 Kort 3+1 102 x 55 x 24
TLX350 C 6185-2 V 350 172 45 59 696 20 14,7 60 5 Kort 3+1 116 x 60 x 30
TLRA270 C 6185-2 V 270 163 42 38 370 10 7,4 45 3+1 Kort 3 220 x 100 x 50
HXL195 D 195 143 42 21 360 3,5 2,6 20 2 Kort 3+1+1 90 x43 x 20
HXL230 D 230 145 42 24 380 3,5 2,6 20 3 Kort 3+1+1 90 x46 x 21
HXL250 D 6185-1 II 250 145 42 26 400 4 2,9 25 3 Kort 3+1+1 98 x 57 x 22
HXL275 D 6185-1 II 275 145 42 28 600 6 4,4 40 4 Kort 3+1+1 98 x 65 x 28
HLA230 D 230 145 42 29 460 5 3,7 35 3 Kort 3+1+1 90 x 46 x 21
HLA250 D 6185-1 II 250 145 42 32 480 6 4,4 40 3+1 Kort 3+1+1 98 x57 x 22
HLA300 C 6185-2 V 300 170 45 40 700 15 11,0 50 5 Kort 3+1+1 115 x 57 x 22
HLA350 C 6185-2 V 350 170 45 46 750 20 14,7 60 6 Kort 3+1+1 113 x 60 x 25
HLX250 D 6185-1 II 250 145 42 42 480 6 4,4 40 3+1 Kort 3+1 98 x 57 x 22
HLX300 C 6185-2 V 300 170 45 53 700 15 11,0 50 5 Kort 3+1 115 x57 x 22
HLX350 C 6185-2 V 350 170 45 62 750 20 14,7 60 6 Kort 3+1 113 x60 x 25
HLX400 C 6185-3 VII 400 200 50 72 1100 30 22,1 90 8+1 Kort 3+1 135 x 77 x 36
GLB170 170 116 34,5 17 160 1 3+1+1 75 x50 x 35
GLS160 D 160 131 34 18 200 2,5 1,8 20 1 Kort 3 93 x 55 x 20
GLA250 D 6185-1 II 250 152 42 28 400 6 4,4 30 2+1 Kort 3+1+1 98 x50 x 25
GLW300 C 6185-2 V 300 152 42 49 425 10 7,4 45 4 Kort 3+1 100 x 51x 24
HDX400 C 6185-3 VII 400 194 52 109 850 30 22,1 90 6 Kort 3+1 135 x 74 x 40
HDX450 C 6185-3 VII 450 194 52 123 1000 40 29,4 100 8 Kort 3+1 135 x 74 x 43
HDX500 C 6185-3 VII 500 194 52 139 1200 60 44,1 125 10 Kort 5+1 135 x 74 x 46
SLA230 D 230 132 32 14,1 325 4 2,9 25 2 Kort 2+1 90 x 40 x 28
SLA250 D 6185-1 II 250 136 34 14,7 425 5 3,7 25 3 Kort 3+1 96 x 50 x 30
SLR270 C 6185-2 V 270 163 42 45 370 10 7,4 45 4 Kort 3
SLR290 C 6185-2 V 290 163 42 52 480 15 11,0 50 4 Kort 3
SLR310 C 6185-2 V 310 163 42 60 550 20 14,7 60 5 Kort 3
SLR350 C 6185-3 VII 350 163 42 69 680 25 18,4 80 6 Kort 3
SLN380 C 6185-3 VII 380 185 46 143 690 30 22,1 90 6Long 4

Talamex inflatable boats –User’s manual
Pagina 7 van 17
2.10 Drawings

Talamex inflatable boats –User’s manual
Pagina 8 van 17
3. Assembly and disassembly
3.1 Valves
The Talamex valves are especially designed for safe
and comfortable use. The valves are designed flat to
increase the comfort in the boat and to prevent
damage to the boat.
Operation of the valve:
•Take off outside cap. This is for protection from
dirt and damage.
•Push the valve once to open it.
•Push the valve again to close it.
Pump connection:
Put end piece (the part than must be turned) of the
pump on the valve.
•Turn right (clockwise) and start pumping.
•Keep pumping until the right pressure is
reached.
•When ready, be sure to take off the pump.
•Be sure to put on the protection cap again.
A hand pump (air pump) is standard delivered with
your Talamex inflatable boat.
3.2 Rowing equipment
Talamex boats come standard or with paddles or with
oars, oarlocks, and a seatbench. The oars can be
taken apart for easy transport.
•Ensure the seatbench is installed properly (see
3.3).
•For Highline and Silverline: To install the oars,
you should keep up to this order: add the oarlock
to the oar and assemble the oars. Point the blade
to the bow and place the oarlock in the pad. Turn
the oar a quarter turn, so that the blade points to
the outside. The boat is now ready to row.
•For Aqualine, Comfortline Greenline and
Superlight: remove the cap from the stainless
steel pin, insert the oar, then replace the cap on
the pin.
•The HLX400, S-Line and Heavy-Duty models
are equipped with two paddles, these are placed
on the tube, right above the floor.
•If the oars are not in use, put the oars in the clips
on the sides of the boat, with the blade pointing
to the transom.
3.3 Seatbench
Inflate the boat for 75% and install the seatbench.
When the seatbench is installed, the Talamex
inflatable boat can be fully inflated.
3.4 Inflation of the tubes
The proper inflation and deflation is essential for a
long life of your boat.
To inflate the boat, roll out the boat on the floor.
Remove any sharp objects from the flat surface
where the boat will be assembled.
•If the boat is unpacked, check if all parts are
present.
•Check if the valves are closed, by removing the
safety cap from the valve.
•Get your delivered pump. Push the nozzle, end
piece on the valve and turn right. The pump will
tighten on the valve.
•Put enough air in the boat to give the boat some
form.
How to inflate:
Step 1: Start filling the bow and side changers (see
below for correct sequence).
Step 2: Put in enough pressure to allow the boat to
spread out, but do not fully inflate the tube.
Step 3: Repeat procedure, pump the remaining
chambers to right pressure.
If inflation is done in right order then the boat has the
correct pressure and there is no distortion of fabric
near the bulkheads.
All chambers should be inflated equally to avoid
damage to the bulkheads that separate the chambers.
We highly recommend using a manometer in order to
bring the boat to optimal pressure. Manometer is not
included with the Talamex inflatable boats.
Order of inflation of the tubes:
Inflate the boat in the following order:
1. front chamber (bow chamber)
2. side chambers
3. floor chamber (if applicable)
4. keel chamber (if applicable)
Always inflate the keel chamber last.

Talamex inflatable boats –User’s manual
Pagina 9 van 17
Never surpass these values
Inflate the boat to 0,25 bar = 3,6 PSI = 25 kPa
Inflate the airkeel to 0.4 bar
Inflate the airfloor to 0,8 bar
caution
Over-inflation can cause structural damage to your
boat. Avoid the boat to stand in the direct sunlight
when the boat is not in the water. This might heat
up the air in the boat so much that expansion causes
damage to your boat (except with properly used
overpressure valve).
Do not use mechanical compressors to inflate your
boat. The pump that is delivered gives exactly the
right pressure to your boat.
3.5 Floorboard
Talamex boats that are equipped with an inflatable or
a non-inflatable floorboard must be operated with
these floorboards properly installed before use. Using
the boat without provided floorboard is unsafe,
uncomfortable and it might result in damage to the
boat. See points 3.6, 3.7 and 3.8 for floorboard
installation.
3.6 Installing aluminium floor
Instructions to install the floorboards in the
Talamex models with an aluminium floor:
•Inflate the boat including the keel section (see
3.4).
•Check if no parts of the tubes keep sticking
together.
•Deflate the keel, and deflate the boat for about
2/3.
•Place the front section (bow board 1) of the
floorboard as far in the front of the boat as
possible. Make sure the hole in the bottom is
straight above the valve of the keel section.
Place the side with the sticker faced down.
•Place part two into the boat. Put the two parts of
the floorboard “in line”.
•Take part three and eventually part four of the
floorboard.
•Make a bridge of the last two floor parts.
•Push down the two parts to the bottom of the
boat.
•Inflate the keel approximately 5-10 strokes. The
floorboards will be in a level position.
•Deflate the side-tubes of the boat completely and
install the aluminium stringers.
Installing the aluminium stringers:
After installation of the floorboards, place the
stringers (A) in the sides of the floor (B) next to the
tubes (C). The stringers are marked with numbers,
number 1 should overlap floorboard 2 and 3, etc.
Talamex models vary in lengths and number of
stringers. The length of the stringer should be evenly
distributed over the length of the floorboard.
To install the stringers easier it is recommended to
put an oar (paddle) under the bottom of the boat.
This lifts up the floorboards to have easier access to
put the stringers on the sides of the floor. Also we
recommend sliding the stringer in a rotating
movement from top to bottom around the floor
profile.

Talamex inflatable boats –User’s manual
Pagina 10 van 17
B
A
D
C
3.7 Installing airfloor
Instructions for installing floorboards in Talamex
models with an inflatable floor.
In the back of the boat there are two transom tracks
fixed against the transom. To fix the floor at the
transom, you have to slide the flaps that are attached
at the back of the floor through the track .
If you fully inflate the air deck, it will push itself
underneath the tube and it will stay there tight in its
place.
•Put the flaps (A) at the after side of the floor in
the transom track (B).
•Install the thrustboard (C) to the belt on the
underneath of the airfloor.
•Install the thrustboard (C) at the forward most
point of the port and starboard tubes. The
thrustboard must be placed under the air floor
and on top of the keel (D) on the reinforced spot
that you find on the inside in front of the tubes.
•Place the deflated air floor D in the bottom of
the inflated boat (DO NOT inflate the keel).
•Make sure the hole is exactly on top of the keel-
valve.
•Inflate the inflatable floorboard to approximately
50% air pressure.
•Push the sides of the floorboard under the tubes
as far as possible.
•Inflate the air floor to minimum 700 mb,
maximum 825 mb.
•Inflate the keel.
•Close the valves by putting the caps on top of it
and turning them to the right.
3.8 Installing slatted floor
Instructions for installing floorboards in Talamex
models with a slatted floor.
The slatted floor of your Talamex boat has already
been installed. You only need to inflate the tubes in
order to prepare your boat.
3.9 Slide drain valve
The Talamex Aqualine, Comfortline, Highline,
Greenline, Superlight and Heavy-Duty series are
equipped with a slide drain valve. When underway,
slide the drain to open position and the water will
automatically run out. The inner membrane will
prevent water from returning. After the water has
been drained, slide the drain to the closed position.
3.10 Drain plug (Alu-Rib models)
The Silverline, S-Line and TLRA Alu-Ribs are
equipped with a drain plug in the transom. The plug
must be installed when the boat is exposed to water.
The hull cavity plug must be regularly removed to
allow collected water to escape from the inner hull
(bilge). For Alu-Ribs which lie in the water for an
extended period of time, an automatic bilge pump is
recommended. The deck drain plug should only be
removed if the boat is operated in forward direction
or if the boat is stored in the davits or on deck
shelves.
B
A

Talamex inflatable boats –User’s manual
Pagina 11 van 17
3.11 Engine installation
Outboard motor power:
danger
Overpowering a boat can result in serious injury,
death or boat damage.
Using an outboard that exceeds the maximum
horsepower limit of a boat can:
1) result in severe handling and/or stability problems
2) place too much weight at the transom altering the
designed flotation characteristics of the boat
3) cause the boat to break apart particularly around
the transom area.
The maximum motor power to be used see 2.9 of this
manual.
USE A LANYARD SWITCH. This switch will stop
the engine if, for any reason, the operator leaves the
control, see paragraph 5.
Mounting the engine:
•Make sure you are standing safely and stable.
•Unlock the motor for tilting and mount the
motor on the transom.
•The motor must be in the middle of the transom
for proper operation.
•Screw the brackets securely on the stern.
Position of the outboard engine:
The outboard motor must be so installed that in the
normal running position, it stands vertically in the
water.
This means that the “cavitation plate” on the low side
or the outboard engine is horizontal in the water if
the boat is lying in its normal position. All Talamex
boats are designed for using a short shaft motor The
motor position is essential for the right sailing
features. Make sure the motor is trimmed properly,
eventually use the spacers (not delivered with all
models) to determine the right height of the motor.
A motor installed improperly, may cause spray water
or cavitation (racing of the motor)
Starting the engine:
•Pull the boat into the water.
•Secure the motor in the downwards position
•Stand securely and start the engine.
•Avoid very high speeds when running the boat
backwards, water can come in the boat over the
transom.
3.12 Installing the console (Silverline / S-Line)
We recommend to always use the expertise of a
Talamex dealer for installation of a console.
•Place the console on the desired spot in the boat
on the anti-skid foam.
•Mark the areas where the holes should be drilled
through the aluminium bottom.
•Use grease while drilling the hole (it is possible
to drill through the anti-skid foam).
•Use aluminium flatserts to create a screw-thread
into the aluminium bottom.
•Use sealant to avoid corrosion of the drilled
holes.
•Install the console by bolting the console onto
the flatserts.
3.13 Deflation
General information:
NOTE: Boat should be clean and dry before rolling
up for storage. Remove any sand and debris that may
cling to the fabric.
When deflating the boat, do not deflate one chamber
at once. Deflate all chambers evenly; this prevents
damage to the bulkheads in the boat.
Deflating the boat:
•Lay the boat down on the floor.
•Push the valve once to open it.
•Release some air from all chambers.
•Make sure the valve stays open (to enable the air
to get out during folding).
•Push evenly on the whole boat to let as much air
out as possible.

Talamex inflatable boats –User’s manual
Pagina 12 van 17
3.14 Folding the boat
•Lay the boat down on the floor.
•Take out the aluminium or wooden floorboards,
if applicable. An inflatable floor can be left in
place.
•Fold the boat to the middle of the boat, so that
the whole boat is as wide as the transom (1-2).
•Bring the back of the side chambers to the
middle (3).
•Roll the transom forward. This helps to get the
air out. Be sure all valves are in the open
position (4).
If you prefer the oars to be in the same pack / sack as
the boat take care that the oars will not damage the
pack / sack. Put in the round parts of the oars first.
4. Transportation
General information:
warning
- Never tow and/or lift your craft with people aboard.
- Frequently inspect the towing line.
- Periodically check the towing conditions and
especially that the craft is not taking in water.
IMPORTANT: Only use components specifically
designed for lifting, towing, mooring and anchoring.
- Lifting out of the water: use handgrips and bow
handle.
- Towing: use port and starboard towing D-rings.
- Lifting in hoist: lifting D-ring(s) and lifting eyes in
the boat/transom.
- Mooring: bow handle and/or handgrips.
- Anchoring: bow handle and/or handgrips.
See drawing 2.10 for location of these components.
IMPORTANT: Remove outboard engine, fuel tank,
all equipment and make sure no passengers are
onboard during lifting and/or towing.
4.1 Lifting the boat out of the water
Make sure there are no sharp edges under the boat on
the place where you want to lift the boat out of the
water. Make sure the boat is empty. Only use the
handgrips and bow handle for lifting out of the water.
See drawing 2.10 for location of these components.
4.2 Towing the boat
If the boat is to be towed by another boat, the boat
must be empty.
Use the port and starboard points on the bow of the
boat for towing (towing D-rings). Towing this way
makes the boat steady and secure behind the towing
boat, and helps to avoid damage to your Talamex
boat. See drawing 2.10 for location of these
components.
Attach a line between the towing D-rings to form a
bridal/triangle. Attach a towing line to this
bridle/triangle and tow the boat at slow speed.
4.3 Lifting the boat in hoist
When using a hoist to lift the boat, attach the hoist to
three/four lifting points in the boat. The number and
location of lifting points depends per Talamex boat
model. See drawing 2.10 for location of these
components.
Make sure the boat is empty and remove the drain
plug during the whole time the boat is stowed to
allow water to run out.

Talamex inflatable boats –User’s manual
Pagina 13 van 17
5. Operation- and safety instructions
5.1 Important safety information
The purpose of a lanyard stop switch is to stop the
engine when the operator moves far enough away
from the operator's position to activate the switch.
This would occur if the operator accidentally falls
overboard or moves within the boat a sufficient
distance from the operator's position.
warning
Should the operator fall out of the boat, the
possibility of serious injury or death from being run
over by the boat can be greatly reduced by stopping
the engine immediately. Always properly connect
both ends of the stop switch lanyard to the stop
switch and the operator.
warning
Avoid serious injury or death from deceleration
forces resulting from accidental or unintended stop
switch activation. The boat operator should never
leave the operator's station without first
disconnecting the stop switch lanyard.
5.2 Pre-operating check list
•Check the inflation pressure of the air chambers.
•Remove the plug from the self-bailer floor drain.
•Remove any obstruction from the self-bailer
floor drain.
•Check outboard for tightness on transom.
•Know the fuel capacity and cruising range.
•Check that the lanyard stop switch for the
outboard works correctly.
•Be sure the boat is not overloaded. Do not
exceed the maximum number of passengers or
load capacity. Look at the boat capacity plate.
•Be sure there is an approved personal flotation
device of suitable size for each person aboard
and readily accessible.
•Check that the paddles are in the boat in case of
engine trouble.
•Operator knows safe navigation, boating, and
operating procedures.
•A ring type life buoy or buoyant cushion
designed to be thrown to a person in the water.
•Arrange passengers and load in the boat so the
weight is distributed evenly and everyone is
seated in a proper seat or on the floor.
•Instruct at least one passenger in the basics of
boat handling and the starting and operation of
the outboard, in case the driver becomes
disabled or falls overboard.
•Before departing, tell someone where you are
going and when you expect to return.
•No alcohol or drugs. It is illegal to operate a boat
while under the influence of alcohol or drugs.
•Know the waters and area you will be boating;
tides, currents, sand bars, rocks, and other
hazards.
warning
Bilge water should be kept to a minimum.
5.3 Stability and buoyancy
5.3.1 Position of persons and luggage
For safe operation it is advised to have people sit in
the middle of the boat as much as possible. Sitting on
the sides of the boat is possible, if there is sitting
someone opposite.
Make sure you secure loose equipment safely when
underway.
5.3.2 Rowing
Due to the position of the oars this Talamex
inflatable boat, you will have a comfortable rowing
position.
5.3.3 Under engine power
The bottom of your Talamex is designed to have a
“V” shape (except from QLS, TLS, GLS, GLB and
SLA boats). This improves the sailing characteristics,
especially when operating an outboard engine.
It is possible as well, to get the Talamex into “aqua-
planing”.
caution
While you are sailing on high speed or in “aqua-
planing”: avoid abrupt corners and high waves, this
might endanger the passengers.
Make sure everybody holds on to the handles.
For comfort and safety, reduce speed in waves.
Small children must be sitting IN the boat.
Breaking waves are a serious stability hazard.
Always wear a lifejacket!

Talamex inflatable boats –User’s manual
Pagina 14 van 17
SINGLE OPERATION. When operating under
power without passengers, DO NOT SIT on inflation
tubes or seat, weight should be as far forward and in
the middle as practical.
Avoid heavy weights near the transom.
RAPID ACCELERATION should be avoided to
prevent the possibility of backward flip-overs.
Wind and wave conditions can be highly dangerous
for your inflatable. You can easily be flipped over if
the load in the boat is not distributed in the bow of
the boat and wind and tide are against. Especially the
Speed models should be driven carefully in
headwind. Distribution of load and weight take the
bow down to a safe situation.
The anti-cavitation plate on the engine should be
about 20 mm under the bottom of the transom.
•If your outboard is too high on the transom, you
will experience a lot of cavitation (air bubbles
and slippage around the propeller).
•If your outboard is too low on the transom it will
create drag and it will throw up water into the
boat.
In both cases you end up with loss of speed, so try to
find the ideal position, eventually using the delivered
spacers, before you definitely bolt your engine to the
transom (consult your supplier).
At every used speed it is advised to keep the boat
LEVEL. Prevent the bow to point UP, and prevent
the bow from pointing DOWN towards the water.
•Use the weight of the people on board to achieve
the level position.
•Adjust your engine angle (see below).
•An outboard tilted too far from the transom will
drive the boat with a bow up attitude.
•An outboard tilted too close to the transom will
drive the bow section too deep into the water,
which ends up in loss of speed and/or cavitation.
•Adjust your engine angle (see below).
1. Occasional checks should be made of motor
attachment screws. Loose screws will cause erratic
boat operation and possible loss of engine overboard.
2. Make at thorough review of the motor’s operator’s
manual before operation.
3. On board loads should be monitored to avoid
chaffing or puncturing of boat skin.
Turning the boat
When taking a sharp turn, reduce the speed of your
boat. The boat will tilt considerably inside towards
the turning centre.
5.4 Hazards
Air chamber failure
Your Talamex boat is designed with more than one
air chamber. Therefore, although in the event one of
the air chamber might leak due to a puncture, the
boat will at least save 50% of the buoyancy. Shift the
weight to the opposite side. Secure the leaking
chamber as necessary (by tying-up or holding-up)
and immediately proceed to the nearest shore or
mother ship, which is nearest.
However, be careful about shallows or reefs, because
they can scratch or further damage your boat.
Sunlight and temperature fluctuations
Always be aware of the air pressure in the air
chambers. The air volume inside the chambers will
expand as the internal air temperature rises; this will
cause the air pressure to fluctuate depending on water
temperature and weather conditions. A boat that is
correctly inflated may experience a drop in air
pressure and require additional air when temperatures
decrease; or it may become over inflated when in
direct sunlight or as the temperatures increase. This
will require the air chamber to be deflated until the
recommended air pressure is reached.
Extreme sunshine (ultra-violet rays) over a longer
period may accelerate ageing of the materials, which
may cause a sticky surface.
Cover the boat to block direct sunlight exposure if
the boat is to be removed from the water for an
extended periods of time.
Beaching
It is recommended to have engine turned off onto the
beach, dragged across rocks, sand, gravel or
pavement as damage to the boat skin may result.
Davits
If the boat is suspended on davits, remove the
drainplug and lift in such an angle that no water can
accumulate in the boat.
Smoking
Refrain from smoking especially while refueling
your boat.
Portable fuel tanks should be placed on a cushioning
base and should be strongly secured to the craft by
means of a girth to avoid bumps and risks of
breaking during navigation.
- When refueling, always stick to the following
recommendations:
- If possible, remove portable tanks from the craft to
refuel.
- Refuel the tanks in the open air, far from heat
sources, sparks or flames.

Talamex inflatable boats –User’s manual
Pagina 15 van 17
- Do not fill the tanks to the brim. The fuel increases
volume with a rise in temperature and there is a
possibility of the tank overflowing or even breaking.
High altitude use
Normal full inflation pressure is 330 mbar. If boat is
inflated at sea level (low altitude) and transported to
a high altitude (i.e., for use in a mountain lake) the
air pressure must be reduced at the higher altitude to
prevent over inflation.
5.5 Reboarding
In the event you fall out of the boat, use the
following re-boarding procedure to get back into the
boat.
•Hold onto the lifeline fixed to the top of the hull
side tubes.
•Hold your breath and duck down whilst holding
on to the lifeline. Kick down hard to force your
body upwards. Your aim is to get as much
momentum as possible. As your body is coming
up, use your arms to push down on the hull tube
to get your stomach on to the tube and your
upper body as far into the boat as you can.
•Using your arms, press down onto the floor
close to hull tube to get the rest of your body
over the tube and into the boat. Use one hand to
reach the opposite lifeline to assist if possible.
•Proceed immediately to shore or mother ship
whichever is nearest.
6. Maintenance
6.1 General maintenance
Cleaners
Cleaners special for inflatable boats, should be used
only and not discharged into waterways. Never mix
cleaners and be sure to use plenty of ventilation in
enclosed area. DO NOT use strong detergents,
solvents or products, which contain phosphates,
chlorine, solvents, non-biodegradable or petroleum
based products. Cleaning your Talamex boat can best
be done using special cleaner for inflatable boats.
IMPORTANT: Waxes or cleaners containing
alcohol or hydrocarbons SHOULD NOT BE USED
on the boat fabric. These products will prematurely
dry out or damage the boat fabric.
IMPORTANT: Wash boat with fresh water after use
of soap and cleaners.
6.2 Repairs
If you have any damage to your Talamex inflatable
boat, it is strongly advised to go to your Talamex
Boat dealer for repairs.
If the damage is a small puncture you can use the
material you find in the repair kit.
Larger areas or if patch will overlap a seam should be
patched by a professional repair technician at an
inflatable repair station. Contact your local Talamex
dealer for the nearest inflatable repair station.
Loss of air pressure
If the boat loses air pressure, first check the valves.
Use a plant sprayer to spray a mix of water and
soap on and around the valves. If you see air
bubbles around the valves, please take the
following steps:
•Take the valve key out of your repair kit.
•Put the valve key into the valve and turn the key
clockwise and check for air bubbles again.
•If the valve still leaks, take back of valve in your
hand and turn the valve stem with the key to the
left (anti-clockwise) and take out the valve stem.
•Inspect the valve on damage.
•If there is any damage (see warranty conditions
point 7), take the defective valve to your selling
dealer.
•Reinstall and lubricate valve stem with silicone
or soapy water solution to ease installation.
•In case of persistent air leakage, contact your
dealer and check warranty conditions.
PVC repairs
For the best results when gluing, the relative
humidity should be less than 60%, ambient air
temperature should be between 18 °C to 25 °C (65 °F
to 77 °F) and not in direct sunlight.
In general, work as follows:
•Cut out a patch large enough to overlap the
damaged area by 30 mm from all sides.
•Centre the overlapping patch over the damaged
area and trace with a pencil the outline of the
patch.
•Clean the surroundings of the puncture and the
patch.
•Apply two thin layers of adhesive using a short
bristle brush, in a circular pattern on both the
backside of the patch and the patch area on the
boat. Allow the first layer to dry completely
(approximately 15 minutes) before applying the
second layer. The second layer should dry until
tacky, then apply the patch to the prepared area
and press down firmly. Using a smooth object
(the back of a tablespoon works well), force out
any air bubbles that may have been trapped
under the patch, working from the center of the
patch to the outside.

Talamex inflatable boats –User’s manual
Pagina 16 van 17
•Wait 24 hours before you inflate the boat again.
Consult your local dealer when experiencing
problems.
A repair kit is standard delivered with your Talamex
inflatable boat.
6.3 (Winter) storage
IMPORTANT: To prevent hull or tube discoloration
from marine growth or polluted waters, DO NOT
store boat in the water for extended periods of time.
1. After use, the boat and all components should be
washed and rinsed with fresh water. Dry all parts
before storage in the carrying bag. This will help
prevent mold or mildew.
2. The transom should be inspected for damage or
deterioration of the finish. Scratches or abrasions
should be refinished with a marine grade varnish.
3. To keep the boat looking new, store the boat in a
cool dry area and avoid excess exposure to direct sun
light.
4. The boat must be covered against solar radiation.
A boat cover is available as an accessory to cover
and protect your boat during storage.
5. If you store your boat for a longer period do not
keep the boat in the delivered boat bag.
To avoid damaging the boat during storage, do not
place heavy objects on the boat.

Talamex inflatable boats –User’s manual
Pagina 17 van 17
7. Warranty
LIMITED WARRANTY
I. We guarantee each new production Talamex inflatable
boat and accessories attached thereto (hereafter referred to
as “Product”) to be free from defects in material and
workmanship, but only when the consumer sale is made in
a country to which distribution is authorized by us.
II. The warranty shall become effective only after digital
registration, which should happen 2 weeks after purchase
at last. The product will be registered by a serial number
This warranty shall remain in effect as described below.
A. For Talamex Highline and S-Line boats, a 3-year
warranty of the hull fabric against cracking, porosity and
rot, is valid. The material of all the other Talamex boats are
covered by a 2-year warranty against cracking, porosity
and rot.
B. Hull seams, end cones and rubbing strakes of Talamex
Highline and S-Line boats are covered against
delaminating by a limited 3-year warranty, where hull
seams, end cones and rubbing strakes of all other Talamex
boats are covered against delaminating by a limited 2-year
warranty.
NOTE: Seams are determined to have delaminated when
the outer coating separates from the fabric base or the seam
loses its structural strength. If delamination occurs on only
one seam and not on the entire boat, the seam is to be
repaired under warranty.
C. The aluminium hull are covered by a limited 2-year
warranty (Silverline and TLRA models).
D. All other boat parts, including but not limited to
components such as oarlocks, handpumps, seatbenches,
boat bag, valves, transom holder, transom, D-rings,
stringers and floor boards are covered by a limited 2 year
warranty.
III. Exclusion of this warranty:
Since this warranty applies only to defects in material and
workmanship, it does not apply to normal wear and tear, or
to damage caused by:
A. Neglect, lack of maintenance, accident, abnormal
operation, improper installation or services, or prolonged
exposure to sunlight and (salt) water;
B. Use of an accessory or part not manufactured or sold by
us;
C. Participating in or preparing for racing or other
competitive activity;
D. Alteration or removal of parts; such as drilling holes in
the transom;
E. Use of an outboard motor with a higher capacity and/or
weight than the capacity plate indicates;
F. Charter, rental and commercial use;
G. Damage as a result of force majeure including, but not
limited to overloading, abnormal water, wind and weather
circumstances, etc.
H. Incorrect use like, but not limited to, incorrect
harbouring, beaching, towing, mooring, lifting, collision,
incorrect use of a trailer;
I. Damage as a result of theft or fire;
J. Damage caused by rainfall from the sky, tree juices,
spilling of chemicals, use in polluted areas;
K. Normal abatement, wear, discolouration, dullness and
aging of cloth, metal, wood and plastic;
L. Damage or abatement of cosmetic surfaces like tears,
hair cracks, discolouration, hallowed spaces, fading or
oxidation of the powder coating;
M. Osmotic blistering or tears in the powder coating
including spider shaped tears;
N. Costs of normal maintenance and cleaning;
O. Consequential damage or incidental damage;
P. Moisture damage to wooden parts as a consequence of
not maintaining a protective coating for these parts.
Q. Damage caused by use of cleaners, other than advised
elsewhere in this manual.
IV. This warranty does not cover incidental or
consequential costs or expenses such as: haul–out, launch,
towing transport and storage charges; telephone or rental
charges of any type, inconvenience, or loss of time or
income; or other consequential damages.
V. Customer must provide reasonable access to the product
for warranty service by delivering the product for
inspection to a Talamex dealer authorized to service the
purchaser’s product. Purchaser shall pay for all related
transportation charges and/or any other expenses
associated with that service. Any product or parts shipped
by purchaser for inspection or repair must be shipped with
transportation charges prepaid. Digital registration, in
combination with the purchasing account, is the only valid
registration identification and must be presented at the time
warranty service is required. Warranty claims will not be
accepted when boat is not timely registered.
VI. Our obligation under this warranty shall be limited to
repairing a defective part, or at our option, refunding the
purchase price or replacing such part or parts as shall be
necessary to remedy any malfunction resulting from
defects in material or workmanship as covered by this
warranty. We reserve the right to improve the design of
any product without assuming any obligation to modify
any product previously manufactured.
VII. This warranty gives you specific legal rights, and you
may also have other legal rights that vary from country to
country.
VII. Transfer of warranty: the limited warranty is
transferable to a subsequent purchaser, but only for the
remainder of the unused portion of the limited warranty.
This does not apply if the vessel is used for rental or
commercial use. Unexpired warranty coverage can only be
transferred to a subsequent purchaser upon proper
registration of the product. To transfer warranty please
register boat digitally.
Other manuals for QLS200
1
This manual suits for next models
39
Table of contents
Other TALAMEX Boat manuals
Popular Boat manuals by other brands

Defender
Defender RIB 265 Operation, maintenance & warranty manual

Canoe Cove
Canoe Cove Full Circle Operation manual

Boston Whaler
Boston Whaler 270 VANTAGE manual

Bestway
Bestway Hydro-Force Treck X1 manual

Kiwi Yachting
Kiwi Yachting Southern Pacific Shearwater 340 AL owner's manual

Aquaglide
Aquaglide BLACKFOOT ANGLER 130 owner's manual