Tama rw 200 User manual

OWNER’S MANUAL
取扱説明書
MODE D’EMPLOI
BEDIENUNGSANLEITUNG
MAMUALE DI ISTRUZIONI
MANUAL DEL USUARIO
用户手册
安全上のご注意
表示について
警告
注意
絵表示の例
ー 以下の指示を必ず守って下さい。ー
警告
注意
PRODUCT SPECIFICATIONS
Power supply 9V battery (S-006P)
9V 200mAAC adapter
(IBANEZ AC509)
Tempo range = 30 ~ 250/minute
Tempo precision ±0.2%
Beats 0, 1, 2, 3, 4, 5, 6, 7, 8, 9
Displays LCD (PROGRAM, SOUND, MODE, BEAT,
TEMPO, Remaining battery level)
Tempo LED x 2
Speaker × 1
Controls , , , , BEAT volume, MASTER vol-
ume, PROGRAM +/–, STORE, BACKLIGHT,
SOUND, MODE, BEAT number, TEMPO dial,
TAP TEMPO, START/STOP
Size 127 x 35 x 150 mm (5” x 1.4” x 6”)
Weight 285g (10oz) including battery
Accessories Soft case, Instruction manual, 9V battery
*Specications and external appearance are subject to change without
notice due to improvements.
*Les spécications ainsi que la comception de l’appareil peuvent être
modiées pour amélioration sans avis préalable.
*Die Technischen Daten und das Design können sich aufgrund des
technischen Forischritts jederzeit ohne Ankündigung ändern.
*Le speciche tecniche e l’aspetto esteriore sono soggetti a variazioni
senza alcun preavviso.
*Las especicaciones y la apariencia externa de este aparato podrán
ser modicadas sin previo aviso, con objeto de mejorar el producto.
*因产品改进,规格或外观可能有所变更,敬请留意。
Thank you for purchasing the Rhythm Watch RW200. Please read this man-
ual carefully before using your product, in order to take full advantage of its
many features and functions, and be sure to store the manual in a safe place
for future reference.
FEATURES
The Rhythm Watch RW200 is a metronome designed for a broad spectrum of
musical activities ranging from practice to live performance. Frequently used
controls and displays are especially large for fast and accurate operation.
Key functions include:
• Stage Mode - For live performance
• Program Function - Record beats, tempos and sounds for up to 30 songs.
• Independent Tap Key - Tap tempo
PRECAUTIONS
*Avoid subjecting the RW200 to impact, such as dropping it or handling it
roughly.
*Turn off the power before storing the RW200.
*Storage or use of RW200 that subjects the unit to direct sunlight, high tem-
perature, or humidity can cause the RW200 to malfunction or fail perma-
nently.
*Do not use thinners, benzene, or other similar solvents to clean the RW200.
*Either a 9 V battery (S-006P) or an AC adaptor (DC9V center minus) can be
used as the power supply. Do not use any other type of power supply. Rec-
ommended AC adapter: IBANEZ AC509
REPLACING THE BATTERY
When the battery begins to run down, the LCD and the LED darkens, and
sound weakens. When the bar of the battery level indicator on LCD disap-
pears, performance will rapidly deteriorate. Replace battery promptly. Note:
Heavy use of the backlight will run batteries down quickly.
Battery Replacement Procedure
1. Slide the battery cover on the back of the RW200 in the direction indicated
by the arrow in the diagram, and take off the battery cover.
2. Take out the old battery and insert the new one.
3. Slide the cover in the opposite direction from that indicated by the arrow,
attaching the cover in its original position.
*Always check to make sure the power switch has been turned off before re-
placing the battery or connecting the AC adaptor.
*After replacing the battery, turn the power on and check to make sure the
RW200 functions properly.
Automatic power-off function
The RW200 has an automatic power-off function to avoid unnecessary battery
power drainage. If the RW200 is powered without being operated for approx-
imately one hour, the power will automatically turn off. In order to turn the
power on next time, you need to slide POWER switch to the off position once
and turn on.
This auto-off feature can be disabled by doing the following: Turn the POW-
ER on while simultaneously pushing START/STOP key. LCD will rst dis-
play “OFF.” Continue to hold buttons until normal display screen appears.
The auto-off feature is now disabled, until the unit’s POWER is shut off.
Once you turn the POWER off, this default auto-off feature becomes effective
again.
Memory backup
The RW200 incorporates a flash-memory device that saves programs
semi-permanently without power supply.
Using the backlight
1. The backlight will be turned on when you operate the POWER switch,
control knobs/switches, or the TEMPO dial, and stay on for approximately
10 seconds from the last operation.
2. The backlight is enabled in the above conditions by default. If the back-
light is unnecessary, it can be disabled by pressing BACKLIGHT/STORE
key for approximately 2 seconds. Press BACKLIGHT/STORE key for 2
seconds again or turn the power off once, and backlight will return to the
default condition.
特徴
使用上のご注意
電池交換
電池交換の手順
オート電源オフ機能
メモリーのバックアップ
バックライトの使用方法
TAMA vous remercie d’avoir porté votre choix sur le métronome Rhythm
Watch RW200. Veuillez lire attentivement ce mode d’emploi avant d’utiliser
l’appareil; ceci vous permettra de tirer le meilleur parti de ses nombreuses
caractéristiques et fonctions. Veillez à conserver ce mode d’emploi, il pourra
vous être très utile pour toute vérication ultérieures.
CARACTÉRISTIQUES
Le Rhythm Watch RW200 est un métronome conçu pour répondre à un large
éventail de besoins pour vos applications musicales, de la répétition à la
scène. L’affichage, ainsi que les commandes indispensables ont été conçus
pour assurer une utilisation rapide et précise.
Principales fonctions :
• Mode scène : pour les spectacles en direct.
• Fonction de programmation : pour enregistrer les battements, les tempos
et les sons de 30 morceaux.
• Touche TAP indépendante : pour taper le tempo.
PRÉCAUTIONS
*Un choc risquerait d’endommager le RW200. Le manier avec soin et ne pas le
laisser tomber.
*Mettre le RW200 hors tension avant de le ranger.
*Le rangement ou l’utilisation du RW200 dans des endroits où il serait expo-
sé à la lumière directe du soleil, à une température élevée ou à de l’humidité
pourraient entraîner une défaillance ou une panne du RW200.
*Ne pas utiliser de solvants tels que du benzène ou du diluant pour nettoyer le
RW200.
*Le RW200 peut être alimenté à l’aide d’une pile de 9 V (S-006P) ou d’un
adaptateur secteur (9 V c.c., polarité négative au centre). N’utiliser aucun
autre type d’alimentation. Adaptateur secteur recommandé : IBANEZ
AC509.
REMPLACER LAPILE
Lorsque la pile commence à être déchargée, l’afchage à cristaux liquides et
les témoins DEL perdent de leur luminosité et le son perd de sa puissance.
Lorsque la barre de l’indicateur de charge de la pile sur l’afchage à cristaux
liquides disparaît, les performances se dégradent rapidement. Il convient de
remplacer la pile sans tarder. Remarque : une utilisation intensive du rétroé-
clairage épuisera la pile plus rapidement.
Comment remplacer la pile
1. Glisser le couvercle du compartiment à pile au dos du RW200 dans la di-
rection indiquée par la èche (se reporter à l’illustration) ; ôter le couvercle.
2. Retirer la pile déchargée et installer la nouvelle pile.
3. Glisser le couvercle du compartiment à pile jusqu’en bout de course dans
la direction opposée à celle indiquée par la èche.
*Toujours s’assurer que l’appareil est hors tension avant de remplacer la pile
ou de connecter l’adaptateur secteur.
*Après avoir remplacé la pile, mettre le RW200 sous tension et s’assurer qu’il
fonctionne correctement.
Fonction de mise hors tension automatique
Le RW200 est doté d’une fonction de mise hors tension automatique, qui per-
met d’éviter tout déchargement inutile de la pile. Le RW200 s’éteint automa-
tiquement s’il est inutilisé pendant environ une heure. Pour remettre l’appareil
sous tension, placer le commutateur POWER sur la position OFF puis sur la
position ON.
La procédure ci-dessous permet de désactiver temporairement la fonction de
mise hors tension automatique : mettre l’appareil sous tension en appuyant
simultanément sur la touche START/STOP. L’afchage à cristaux liquides in-
dique d’abord « OFF ». Maintenir les boutons enfoncés jusqu’à l’afchage de
l’écran normal. La fonction de mise hors tension automatique est désactivée
jusqu’à la prochaine mise hors tension de l’appareil. Une fois l’appareil mis
hors tension, cette fonction de mise hors tension automatique par défaut rede-
vient opérationnelle.
Sauvegarde de la mémoire
Le RW200 est équipé d’un dispositif à mémoire flash, qui stocke les pro-
grammes de façon semi-permanente, y compris sans alimentation électrique.
Utilisation du rétroéclairage
1. Le rétroéclairage s’allume lorsqu’on actionne le commutateur POWER, l’un
des boutons ou commutateurs de commande ou la commande TEMPO, et
il reste allumé pendant environ 10 secondes (à compter de la dernière opé-
ration).
2. Par défaut, le rétroéclairage est activé dans les conditions ci-dessus. L’uti-
lisateur peut désactiver le rétroéclairage en maintenant enfoncée la touche
BACKLIGHT/STORE pendant environ 2 secondes. Maintenez la touche
BACKLIGHT/STORE enfoncée pendant 2 secondes, ou mettez l’appareil
hors tension pour réinitialiser les réglages par défaut du rétroéclairage.
FEDERAL COMMUNICATIONS COMMISSIONRADIO FREQUENCY INTERFERENCE STATEMENT
This equipment has been tested and found to comply with the limits for a Class B digital device, pursuant to part 15 of the FCC Rules. These limits are designed to
provide reasonable protection against harmful interference in a residential installation. This equipment generates, uses and can radiate radio frequency energy and, if
not installed and used in accordance with the instructions, may cause harmful interference to radio communications. However, there is no guarantee that interference
will not occur in a particular installation. If this equipment does cause harmful interference to radio or television reception, which can be determined by turning the
equipment off and on, the user is encouraged to try to correct the interference by one or more of the following measures:
• Reorient or relocate the receiving antenna.
• Increase the separation between the equipment and receiver.
• Connect the equipment into an outlet on a circuit different from that to which the receiver is connected.
• Consult the dealer or an experienced radio/TV technician for help.
This device complies with Part 15 of the FCC Rules. Operation is subject to the following two conditions:
(1) This device may not cause harmful interference, and
(2) This device must accept any interference received, including interference that may cause undesired operation.
Unauthorized changes or modication to this system can void the users authority to operate this equipment.
This equipment requires shielded interface cables in order to meet FCC class B Limit.

Vielen Dank für den Kauf der Rhythm Watch RW200. Bitte lesen Sie diese Anleitung sorg-
fältig, bevor Sie die Rhythm Watch benutzen, so dass Sie alle Fähigkeiten und Funktionen
voll ausnutzen können, und bewahren Sie die Anleitung zum späteren Nachschlagen an
einem sicheren Ort auf.
EIGENSCHAFTEN
Die Rhythm Watch RW200 ist ein Metronom, das für eine Vielzahl musikalischer Aktivi-
täten geschaffen wurde-von der Probe bis zum Live-Auftritt. Oft benutzte Bedienungsle-
mente und Anzeigen sind für die schnelle und sichere Bediegung besonders groß ausge-
führt.
Die Tastenfunktionen beinhalten:
• Modus Stage - für Liveauftritte
• Programmfunktion - Zeichnet Taktschläge, Tempi und Klangbilder für bis zu 30
Songs auf.
• Unabhängige Tap Taste - Tap Tempo
VORSICHTSMAßNAHMEN
*Setzen Sie die RW200 keinen Stößen aus, z. B. durch Fallenlassen oder unvorsichtige Be-
handlung.
*Schalten Sie die Stromversorgung aus, bevor Sie die RW200 verstauen.
*Die Aufbewahrung oder der Gebrauch der RW200, welche das Gerät direktem Sonnen-
licht, hohen Temperaturen oder Luftfeuchtigkeit aussetzen, können zu Fehlfunktionen
oder dauerhaftem Ausfall der RW200 führen.
*Verwenden Sie keine Verdünnung, kein Benzin oder ähnliche Lösungsmittel für die
Reinigung der RW200.
*Als Stromversorgung kann entweder eine 9-V-Batterie (S-006P) oder ein Steckernetzteil
(DC9V negative Polarität) verwendet werden. Benutzen Sie keine andere Spannungs-
quelle. Empfohlenes Steckernetzteil: IBANEZ AC509.
AUSTAUSCHEN DER BATTERIE
Wenn die Batterie fast entladen ist, verdunkeln sich das LC-Display und die LEDs,
und der Klang wird leiser. Wenn der Balken der Batterieladeanzeige am LC-Display
verschwindet, nimmt die Leistung sehr schnell ab. Tauschen Sie die Batterie sofort aus.
Hinweis: Ein häuger Gebrauch der Hintergrundbeleuchtung führt zu einem schnelleren
Verbrauch der Batterien.
Vorgehensweise
1. Schieben Sie die Abdeckung des Batteriefachs der RW200 in Pfeilrichtung (siehe Ab-
bildung), und nehmen Sie die Abdeckung ab.
2. Nehmen Sie die entladene Batterie heraus, und setzen Sie eine neue Batterie ein.
3. Schieben Sie die Abdeckung entgegen der Pfeilrichtung, und befestigen Sie die Abde-
ckung an ihrer ursprünglichen Position.
*Achten Sie vor dem Austausch der Batterie oder dem Anschluss des Steckernetzteils
immer darauf, dass das Gerät ausgeschaltet ist.
*Sobald Sie die neue bzw. aufgeladene Batterie eingesetzt haben, schalten Sie die RW200
ein, und prüfen Sie, ob sie einwandfrei funktioniert.
Automatische Abschaltfunktion
Die RW200 verfügt über eine automatische Abschaltfunktion, um unnötige Batterieen-
tladung zu vermeiden. Wenn Sie die RW200 einschalten ohne sie etwa eine Stunde zu
betreiben, wird die Stromversorgung automatisch abgeschaltet. Um die Stromversorgung
das nächste Mal einzuschalten, müssen Sie den Schalter STROMVERSORGUNG einmal
in Stellung Aus schieben und dann einschalten.
Diese automatische Abschaltung können Sie wie folgt deaktivieren: Schalten Sie die
STROMVERSORGUNG ein, während Sie gleichzeitig die Taste START/STOP drücken.
Das LC-Display zeigt zunächst “OFF” an. Halten Sie die Taste gedrückt, bis der normale
Anzeigebildschirm eingeblendet wird. Die automatische Abschaltfunktion ist nun de-
aktiviert, bis die STROMVERSORGUNG des Geräts abgeschaltet wird. Sobald Sie die
STROMVERSORGUNG abschalten, wird diese standardmäßige automatische Abschalt-
funktion wieder aktiviert.
Datensicherung
Die RW200 ist mit einem Flash-Speicher ausgestattet, welches Programme semi-perma-
nent ohne Stromversorgung speichert.
Verwendung der Rückbeleuchtung
1. Die Hintergrundbeleuchtung wird eingeschaltet, wenn Sie den Schalter POWER, die
Reglerknöpfe/-schalter oder den TEMPO-Regler betätigen, und leuchtet etwa 10 Se-
kunden lang nach der letzten Betätigung.
2. Die Hintergrundbeleuchtung ist unter den oben genannten Bedingungen standardmä-
ßig eingeschaltet. Wenn Sie die Hintergrundbeleuchtung nicht benötigen, können Sie
diese deaktivieren, indem Sie die Taste BACKLIGHT/STORE etwa 2 Sekunden lang
gedrückt halten. Drücken Sie die Taste BACKLIGHT/STORE weitere 2 Sekunden
oder schalten Sie die Stromversorgung einmal aus. Die Hintergrundbeleuchtung wird
zum Grundzustand zurückkehren
Gracias por adquirir el metrónomo Rhythm Watch RW200. Lea el presente manual muy
detenidamente antes de utilizar el producto para poder sacar el mayor provecho de todas las
características y funciones que le ofrece. Guarde el manual en un lugar seguro para poder
consultarlo cada vez que lo necesite.
CARACTERÍSTICAS
El metrónomo Rhythm Watch RW200 ha sido diseñado para una amplia gama de activi-
dades musicales que incluyen tanto prácticas como conciertos. Los controles y pantallas
utilizados con más frecuencia son de tamaño grande, lo cual permite un acceso más preciso
y rápido.
Las funciones principales son:
• Modo Stage - para actuaciones en directo
• Función Program - Registra compases, tempos y sonidos de hasta 30 canciones.
• Tecla Tap independiente - Tap tempo
PRECAUCIONES
*Evite que el RW200 reciba cualquier tipo de impacto, no permita que se caiga y mani-
púlelo con cuidado.
*Apague el RW200 antes de guardarlo.
*Guardar o utilizar el RW200 bajo la luz directa del sol, a altas temperaturas o con ni-
veles de humedad elevados puede provocar errores de funcionamiento en el RW200 o
incluso averiarlo.
*No utilice diluyentes, benceno ni otros disolventes para limpiar el RW200.
*Se puede utilizar con el metrónomo tanto una pila de 9 voltios (S-006P) como un adap-
tador de corriente alterna (DC9V centro negativo). No utilice otro tipo de fuente de
alimentación. Adaptador de CA recomendado: IBANEZ AC509.
SUSTITUCIÓN DE LAPILA
Cuando la pila empiece a agotarse, el LCD y los indicadores LED perderán intensidad
y el sonido se atenuará. Cuando la barra indicadora del nivel de carga de la pila desapa-
rezca en el LCD, las prestaciones irán disminuyendo rápidamente. Sustituya la pila de
inmediato. Nota: el uso intensivo de la luz de fondo agotará la pila más rápidamente.
Procedimiento de sustitución de la pila
1. Deslice la cubierta del alojamiento de la pila situado en la parte trasera del RW200 en la
dirección indicada por la echa en la ilustración y retire la cubierta del alojamiento.
2. Retire la pila usada y coloque una nueva en su lugar.
3. Deslice la cubierta en la dirección contraria a la indicada por la echa y colóquela en su
posición original.
*Asegúrese siempre de que ha apagado el metrónomo antes de proceder a la sustitución de
la pila o a la conexión del adaptador.
*Cuando termine de colocar la pila, encienda el metrónomo y compruebe que el RW200
funciona correctamente.
Función de apagado automático
El RW200 dispone de una función de apagado automático para evitar que las pilas se gasten
innecesariamente. Si el RW200 está encendido y no es utilizado durante una hora aproxi-
madamente, el metrónomo se apagará automáticamente. Para encenderlo de nuevo, coloque
el interruptor POWER en la posición apagado (off) y luego vuelva a ponerlo en encendido
(on).
Esta función de apagado automático puede desactivarse de la siguiente manera: encienda
el aparato mientras pulsa la tecla START/STOP. En el LCD aparecerá primero “OFF”. Siga
apretando los botones hasta que aparezca la pantalla normal. La función de apagado auto-
mático está ahora desactivada, hasta que se apague el metrónomo. Al apagarlo, la función
de apagado automático por defecto vuelve a activarse.
Conservación de la memoria
El RW200 incorpora un dispositivo de memoria ash que guarda programas de forma
semipermanente sin conexión a alimentación eléctrica.
Utilización de la luz de fondo
1. La luz de fondo se activará cuando accione el interruptor POWER, las ruedas/interrup-
tores de control o el cuadrante TEMPO, y permanecerá encendida durante aproximada-
mente 10 segundos tras la última operación.
2. La luz de fondo está activada por defecto en las condiciones anteriores. Si no necesita
la luz de fondo, podrá desactivarla manteniendo pulsada la tecla BACKLIGHT/STORE
durante aproximadamente 2 segundos. Pulse la tecla BACKLIGHT/STORE durante
aproximadamente 2 segundos o vuelva a encender el aparato y se restablecerá el estado
predeterminado de la luz de fondo.
Vi ringraziamo per aver acquistato il Tama Rhythm Watch RW200. Vi raccomandiamo
di leggere attentamente questo manuale prima di usare il prodotto, per essere sicuri di
sfruttare appieno le sue caratteristiche e le sue funzioni. Questo manuale dovrebbe essere
conservato in un luogo sicuro per eventuali future consultazioni.
CARATTERISTICHE
Il Tama Rhythm Watch RW200 è un metronomo studiato per un’ampia gamma di attività
musicali, che vanno dall’esercizio quotidiano alle performance dal vivo. I controlli di
uso più frequente e i display sono ben dimensionati per consentire un impiego veloce ed
accurato.
Le funzioni principali includono:
• modalità Stage - per le esibizioni dal vivo;
• funzione Program - registra i beat, i tempi e i suoni per un massimo di 30 canzoni;
• tasto IndependentTap - per il tap tempo.
PRECAUZIONI
*Evitate che l’RW200 subisca forti urti, cadute o un trattamento troppo brusco.
*Se non dovete utilizzare l’RW200, spegnete l’alimentazione prima di riporlo.
*Evitate di porre l’RW200 in luoghi dove può essere esposto alla luce solare diretta, alle
alte temperature, all’umidità e alla polvere. Questi fattori possono essere causa di catti-
vo funzionamento oppure di rotture.
*Non usate diluenti, benzene o altri solventi di questo tipo per pulire l’RW200.
*Per alimentare lo strumento è possibile usare una batteria da 9 Volt (S-006P) o un adat-
tatore per corrente alternata (9V CC con polarità centro negativo). Non usate altri tipi di
alimentazione.Adattatore per corrente alternata consigliato: IBANEZAC509
SOSTITUZUONE DELLABATTERIA
Quando la batteria comincia ad esaurirsi, il display LCD e i LED diventano più scuri,
mentre il suono diventa più debole. Quando sul display LCD scompare la barra dell’indi-
catore del livello della batteria, le prestazioni calano rapidamente. Sostituire prontamente
la batteria. Nota: l’uso frequente della retroilluminazione causa un rapido consumo delle
batterie.
Procedura di sostituzione batteria
1. Fate scorrere all’indietro il coperchio della batteria dell’RW200 nella direzione indicata
dalla freccia sul diagramma, ed estraetelo.
2. Estraete la vecchia batteria ed inseritene una nuova.
3. Fate scorrere il coperchio in direzione opposta a quella indicata dalla freccia, rimetten-
dolo nella sua posizione originale.
*Controllate sempre che lo strumento sia spento, prima di sostituire la batteria o di collega-
re l’adattatore per corrente alternata.
*Dopo aver sostituito la batteria, riaccendete l’RW200 ed accertatevi che funzioni corret-
tamente.
Funzione di spegnimento automatico
L’RW200 è dotato di una funzione di spegnimento automatico per evitare un consumo
non necessario delle batterie. Se l’RW200 resta acceso ma non utilizzato per circa un’ora,
l’alimentazione viene automaticamente interrotta. Per riattivare l’alimentazione occorre
portare l’interruttore POWER nella posizione di spegnimento e poi in quella di accensio-
ne.
È possibile disattivare tale funzione nel modo seguente. Accendete l’alimentazione te-
nendo premuto il tasto START/STOP; sul display LCD apparirà “OFF”. Tenete premuti i
pulsanti nché non appare la normale schermata del display. A questo punto, la funzione
di spegnimento automatico resta disattivata fino allo spegnimento dell’unità. Dopo lo
spegnimento, la funzione si attiva nuovamente.
Memoria di backup
L’RW200 è dotato di un dispositivo di memoria ash che salva i programmi in modo se-
mi-permanente in assenza di alimentazione.
Uso della retroilluminazione
1. La retroilluminazione si accende quando si usano l’interruttore POWER, i controlli/inter-
ruttori o il controllo rotativo TEMPO e rimane accesa per circa 10 secondi dopo l’ultima
operazione eseguita.
2. La retroilluminazione è abilitata come impostazione predenita nelle condizioni di cui
sopra. Se la retroilluminazione non è necessaria, è possibile disabilitarla tenendo pre-
muto il tasto BACKLIGHT/STORE per circa 2 secondi. Per riportare la retroillumina-
zione alla sua condizione predenita, tenete di nuovo premuto il tasto BACKLIGHT/
STORE per 2 secondi oppure disattivate una volta l’alimentazione.
感谢您购买Rhythm Watch RW200。在使用产品前,请仔细阅读本手册以充分利用
其各种特性及功能,并妥善保存本手册以备日后参考。
特性
RhythmWatchRW200是一款可广泛应用于各种音乐活动的节拍器,无论是日常练
习还是现场表演都能应对自如。为了实现快速准确的操作,本款节拍器专门增大了常用
的控键与显示屏。
主要功能包括 :
••Stage•模式-适用于现场表演
••编程功能-可记录多达30首歌曲的节拍、拍速和声音。
••独立的•Tap•键–打拍 定 速
注意事项
*避免使RW200受到撞击,请勿跌落或粗暴对待本设备。
*在存放RW200之前,请关闭电源。
*请勿在阳光直射、高温或潮湿的环境中使用或存放RW200,这可能导致 RW200发
生故障或是永久性损坏。
*请勿使用稀释剂、苯或其他类似溶剂进行清洁RW200。
*可使用一节 9V 电池 (S-006P) 或一个 AC 电源适配 器(DC9V center minus) 作
为本设备的电源。请勿使用任何其他类型的电源。建议使用的AC电源适配器 :
IBANEZAC509。
更换电池
当LCD显示屏和LED指示灯变暗、声音变小时,意味着电池即将耗尽。当LCD显示
屏上的电量指示条消失时,设备的性能表现将迅速下降。请立即更换电池。注意 :大量
使用背光将加快电池消耗。
电池更换步骤
1.按图中箭头所示的方向滑动RW200背面的电池盖,取下电池盖。
2.取出旧电池并放入新电池。
3.按所示箭头的相反方向滑动电池盖,将电池盖装回原位。
*在更换电池或连接AC电源适配器前,请务必确保已关闭电源开关。
*更换电池后,请打开电源进行检查以确保RW200工作正常。
自动关机功能
RW200具有自动关机功能,以避免不必要的电量消耗。RW200在开机后,如果一个
小时之内无任何操作,将自动关机。再次打开电源时,请先将电源开关滑动到关闭位置,
然后打开。自动关机功能将在下列情况下禁用 :打开电源的同时按下START/STOP键。
LCD屏幕将首先显示“OFF”。继续按住该键,直至出现正常的显示屏幕。自动关机功
能现在处于禁用状态,直至关闭本设备的电源。关闭电源后,默认的自动关机功能将重
新生效。
内存备份
RW200内置了闪存设备,可以在无电源的情况下半永久性地保存编程设定。
使用背光
1.当您操作POWER 开关、控制旋钮 / 开关或TEMPO拨盘时,将打开背光,其亮起
时间将在最后一次操作后持续约10秒钟。
2.在上述情况下,默 认启用背光。如无 需使用背光,可按 BACKLIGHT/STORE 键约
2秒钟以禁用背光。再次按下BACKLIGHT/STORE键约2秒钟或是在关闭电源之
后,背光将恢复为默认启用状态。

DESCRIPTION DES FONCTIONS
a
Commutateur de mise sous tension POWER
Ce commutateur sert à allumer ou éteindre l’appareil.
b
Borne d’alimentation DC IN
Cette borne sert à connecter un adaptateur secteur.
c
Boutons RHYTHM
Ces boutons permettent de régler la balance entre les diffé-
rents sons.
d
Bouton BEAT
Ce bouton permet de régler le volume du battement. Le
premier battement est caractérisé par un son de sonnette.
Si la valeur du battement est 0, aucun son n'est émis.
e
Commande de volume général MASTER
Cette commande permet de régler le volume général.
f
Témoins DELde tempo
Les témoins DEL bicolores de tempo gauche et droit s’il-
luminent alternativement sur le temps, indiquant au mu-
sicien les temps pairs et impairs. Le temps initial (impair)
sera toujours indiqué en rouge par un des deux témoins,
les autres temps de la mesure par les deux témoins (en
vert). (Si la valeur sélectionnée pour le temps correspond à
0, le temps initial sera également indiqué en vert.)
g
Borne REMOTE
Cette prise jack stéréo sert à connecter une pédale de com-
mande. La pointe (tip) du connecteur est associée à la
commande de marche et d’arrêt, alors que l’anneau (ring)
est affecté à l’incrémentation des programmes. Nous re-
commandons l’utilisation de la pédale à deux commandes
IBANEZ IFS2U : le commutateur de gauche est associé à la
commande de marche et d’arrêt, alors que le commutateur
de droite est affecté à l’incrémentation des programmes. Si
une pédale à simple commande est connectée à l’appareil,
seule fonctionne la commande de marche et d’arrêt.
h
Prise jack pour casque d’écoute PHONES
Cette borne stéréo permet de connecter un casque d’écoute.
Lorsqu’un un casque y est connecté, aucun son n’est produit
par le haut-parleur intégré du RW200.
i
Borne LINE
Cette prise jack mono 6,35mm correspond à la sortie ligne.
Y connecter un amplicateur ou encore un retour de scène
amplié. Si un équipement est connecté à cette borne, le
haut-parleur et la sortie PHONES du RW200 n’émettent
aucun signal.
j
Afchage à cristaux liquide
Cet affichage indique les valeurs sélectionnées pour les
paramètres « PROGRAM », « SOUND », « MODE »,
« BEAT » et « TEMPO ». Il indique également le niveau
de charge de la pile.
k
Commande de tempo
TEMPO
Cette commande permet de sélectionner une valeur de
tempo entre =30 ~ 250/minute.
l
Touche START/STOP
Cette touche allume et éteint le métronome.
m
Touches PROGRAM
Ces touches permettent de charger des programmes mé-
morisés. Chaque pression sur ces touches augmente ou
diminue de 1 le numéro du programme.
n
Touche BACKLIGHT/STORE
Cette touche stocke les paramètres, à l’exception de
MODE, indiquées sur l’afchage à cristaux liquides, pour
le numéro de programme afché. Maintenir cette touche
enfoncée pendant environ 2 secondes pour activer ou dé-
sactiver le rétroéclairage de l’afchage à cristaux liquides.
o
Touche SOUND
Cette touche permet de sélectionner le son SOUND 1 ou
SOUND 2.
p
Touche de mesure BEAT
La mesure peut être dénie entre 0 et 10 battements par
mesure. A chaque pression de la touche BEAT, le nombre
de battements à la mesure augmente d’une unité.
q
Touche MODE
Cette touche permet de sélectionner le mode PRACTICE
ou STAGE.
r
Touche TAPTEMPO
La fonction TAP commence la mesure du tempo automa-
tique lorsque l’utilisateur appuie sur cette touche au moins
5 fois.
s
Écrou de xation (M6)
Le RW200 peut être xé à un pied de votre batterie, grâce
à un clamp de xation muni d’un let M6.
FONCTIONNEMENT
Utilisation de la fonction de mémorisation
Le RW200 peut mémoriser jusqu’à 30 numéros de pro-
gramme de battements, de sons et de tempos.
1. À l’aide de la touche PROGRAM ou d’une pédale option-
nelle connectée à la prise REMOTE, sélectionner le numéro
de programme sous lequel le battement ou le tempo doit être
mémorisé.
2. Dénir le battement, le son et le tempo.
3. Vérifier les données sur l’affichage et appuyer sur la
touche STORE/LIGHT SET. Les deux témoins DEL
émettent simultanément un clignotement rouge, indi-
quant que le programme est mémorisé.
Utilisation du métronome: mode PRACTICE
Ce mode par défaut fonctionne comme un métronome de
répétition.
1. Appuyer sur la touche MODE et sélectionner le mode
PRACTICE.
2. Appuyer sur la touche SOUND et sélectionner SOUND
1 ou SOUND 2. Les modes SOUND 1 et SOUND 2
diffèrent par le son ; il convient donc de sélectionner le
mode adapté à l’utilisation. Le mode SOUND 1 produit
un son avec une attaque plus vive, alors que le mode
SOUND 2 produit un son plus doux.
3. Définir le tempo à l’aide de la commande TEMPO et
la mesure à l’aide de la touche BEAT. Pour rappeler le
numéro de programme souhaité, utiliser la touche PRO-
GRAM. ou un commutateur au pied connecté à la borne
REMOTE.
4. Effecteur un réglage adéquat des différentes com-
mandes.
5. Appuyer sur la touche START/STOP pour activer le
métronome. Le son sera reproduit via le haut-parleur et
les témoins DEL s’illumineront alternativement.
6. Effectuer la balance entre le niveau de volume des
notes, du temps initial et le volume général.
7. Appuyer à nouveau sur la touche START/STOP pour
désactiver le métronome.
Utilisation du métronome: mode STAGE
La programmation, par avance, des tempos, des battements
et des sons de chaque morceau, selon l’ordre des morceaux
joués sur scène, est très utile aux groupes qui démarrent
leurs morceaux avec un décompte.
1. Appuyer sur la touche MODE, puis sélectionner le
mode STAGE.
2. Appeler le programme du premier morceau.
3. Appuyer sur la touche START/STOP pour activer le
métronome. Le son sera reproduit via le haut-parleur et
les témoins DELs’illumineront alternativement.
4. Le métronome s’arrête automatiquement après avoir
produit un son pendant 8 barres de mesure. Le numéro
de programme augmente de 1 et le métronome se met
en veille.
5. Chaque pression de la touche START/STOP déclenche
les phases 3 à 4 ci-dessus.
Utilisation de la fonction TAP
La fonction TAP permet d’entrer un tempo manuellement,
et s’applique au tempo du métronome.
1. Dénir le tempo en appuyant sur la touche TAP TEM-
PO selon le rythme suivant. Taper 5 fois pour afcher le
tempo mesuré.
2. Si l’utilisateur tape 6 fois ou plus, l’appareil afche le
tempo moyen des 4 dernières pressions.
3. Si l’utilisateur n’appuie pas sur la touche TAP TEMPO
pendant environ 2,5 secondes, la mesure du tempo
s’arrête et la valeur du tempo clignote sur l’afchage à
cristaux liquides.
4. Si le tempo mesuré dépasse la limite de = 30 ~ 250/
minute, plusieurs messages d’erreur s’affichent. Si le
tempo est inférieur à 30, l’appareil afchera le message
« Lo » et le tempo se dénit automatiquement sur 30. Si
le tempo est supérieur à 250, l’appareil afche le mes-
sage « Hi » et le tempo se dénit automatiquement sur
250.
Réinitialisation des réglages d’usine
Mettre l’appareil sous tension en appuyant sur la touche
BACK-LIGHT/STORE.
NAMESAND FUNCTIONS OF PARTS
a
POWER switch
This is used to turn the power supply on and off.
b
DC IN jack
This is the jack to which the AC adaptor is connected.
c
RHYTHM knobs
These are used to control the volume balance between the various
sounds.
d
BEAT knob
This is used to control the volume of the beat sound. The chime
sound produced for the rst beat. If the beat setting is 0, no beat
sound is produced.
e
MASTER knob
This is used to control the overall volume.
f
TEMPO LEDs
The left LED flashes red in time with the initial beat. The right
LED ashes green in time with the second and after beats. If the
beat setting is 0, the right LED ashes green also in time with the
initial beat. If the beat setting is 1, only the left LED ashes red.
g
REMOTE jack
This is the stereo jack to which the foot switch is connected. Tip
is assigned START/STOP, and ring is assigned program number
increment. We recommend using IBANEZ IFS2U dual footswitch,
left switch is assigned START/STOP and right switch is assigned
program number increment.
If you use a single footswitch, it is assigned START/STOP.
A momentary/unlatch-type of footswitch should be used, and connect
before turning the power supply on.
h
PHONES jack
This is the stereo mini jack for headphones. When connected, no
sound is produced from the RW200’s speaker.
i
LINE jack
This is the 1/4” monaural jack that outputs line level signal. Con-
nect an amplier or a powered monitor speaker etc. When connect-
ed no sound is produced from the RW200’s speaker and PHONES
out.
j
LCD (liquid crystal display)
This displays the values set for the “PROGRAM,” “SOUND,”
“MODE,” “BEAT,” and “TEMPO” parameters. Also shows re-
maining battery level.
k
TEMPO dial
This is used to control the tempo between =30 ~ 250/minute.
l
START/STOP key
This key starts and stops the metronome.
m
PROGRAM keys
These are used to load programs. You can increment/decrement
program number by 1.
n
BACKLIGHT/STORE key
This stores the parameter settings except MODE shown on the
LCD in the displayed program number. Press and hold for approx-
imately 2 seconds to switch the LCD backlight between enabled
and disabled.
o
SOUND key
This selects a sound, SOUND 1 or SOUND 2.
p
BEAT key
The beat can be set within a range from 0 to 9 beats. The number
of beats shift by an increment of one each time the BEAT key is
pressed.
q
MODE key
This selects a mode, PRACTICE mode or STAGE mode.
r
TAPTEMPO key
TAP function starts working and measuring tempo automatically
when this key is pressed at least 5 times.
s
Mounting nut (M6)
The RW200 can be attached to a stand of your drum kit along with
a holder attachment having an M6 thread with Multi Clamp.
各部の名称
a
P O W E R スイッチ
b
D C I N ジャック
c
リズムボリューム
d
B E A T ボリュ ー ム
e
MASTER ボリューム
f
テンポ LED
g
REMOTE ジャック
h
PHONES ジャック
i
L I N E ジャック
j
LCD (液晶ディスプレイ)
k
TEMPO ダイヤル
l
START/STOP スイッチ
m
PROGRAM スイッチ
n
BACKLIGHT/STORE スイッチ
o
SOUND スイッチ
p
B E A T ス イッチ
q
MODE スイッチ
r
TAP TEMPO スイッチ
s
マ ウ ント ス ク リュ ー ( M 6 )
OPERATION
Operating the program function
The RW200 stores up to 30 program numbers of beats, sounds and
tempos.
1. Using the PROGRAM key or the optional REMOTE footswitch, bring
up the program number in which the beat or tempo is to be stored.
2. Set the beat, sound and tempo.
3. Check the contents displayed on the LCD and press the STORE/
LIGHT SET key. At this point, the two LEDs ash red on time,
indicating that the program has been stored.
Metronome Operation -PRACTICE Mode
This is a default mode that works as a metronome for practice.
1. Press the MODE key and select PRACTICE mode.
2. Press the SOUND key and select either SOUND 1 or SOUND
2. The SOUND 1 and SOUND 2 have different voicings, so
select whichever mode is appropriate for the usage conditions.
(SOUND 1 has a sound with a stronger attack, while SOUND 2
produces a softer sound.)
3. Set the tempo using the TEMPO dial, and the beat using the
BEAT key. To load a program, use the PROGRAM key or the
REMOTE footswitch to call out the required number.
4. Adjust the various control knobs to the appropriate positions.
5. Pressing the START/STOP key starts the metronome. Sound is
produced from the speaker, and the LEDs begin ashing.
6. While listening to the sound produced, adjust the balance of the
notes, the beat volume, and the overall volume.
7. Pressing the START/STOP key again to stops the metronome.
Metronome Operation -STAGE Mode
Programming beforehand tempos, beats, and sound of each song
in the exact order of set list you play in live stage, it will be useful
for you when starting songs with count-in.
1. Press the MODE key and select STAGE mode.
2. Call the program of your rst song.
3. Pressing the START/STOP key to start the metronome. Sound is
produced from the speaker, and the LEDs begin ashing.
4. Metronome stops automatically after it sounds for 8 bars, pro-
gram number increments by 1, and metronome will be in stand-
by state.
5. Each time you press the START/STOP key, the above 3 - 4 is
repeated.
Operating the tap function
The tap function lets you measure any desired tapped tempo and
applies to the tempo of metronome.
1. Enter the tempo by pressing the TAP TEMPO key with follow-
ing rhythm. At the moment you tap 5 times, the measured tem-
po is displayed.
2. When you tap 6 times or more, it displays average tempo of the
last 4 taps.
3. If you don’t push the TAP TEMPO key for approximately 2.5
seconds, tempo measurement will nish and tempo value on the
LCD display ashes.
4. If the measured tempo exceeds the range o = 30 ~ 250/minute,
error messages are displayed. If the tempo is lower than 30,
message “Lo” will be displayed and tempo is set 30 automat-
ically. If the tempo is higher than 250, message “Hi” will be
displayed and tempo is set 250 automatically.
Factory reset
Turn the power on with pressing BACKLIGHT/STORE key.
操作方法
プログラム機能の操作方法
メトロノームの操作方法 – PRACTICE モード
メトロノームの操作方法 – STAGE モード
タップ機能の操作方法
工場出荷時設定に戻すには

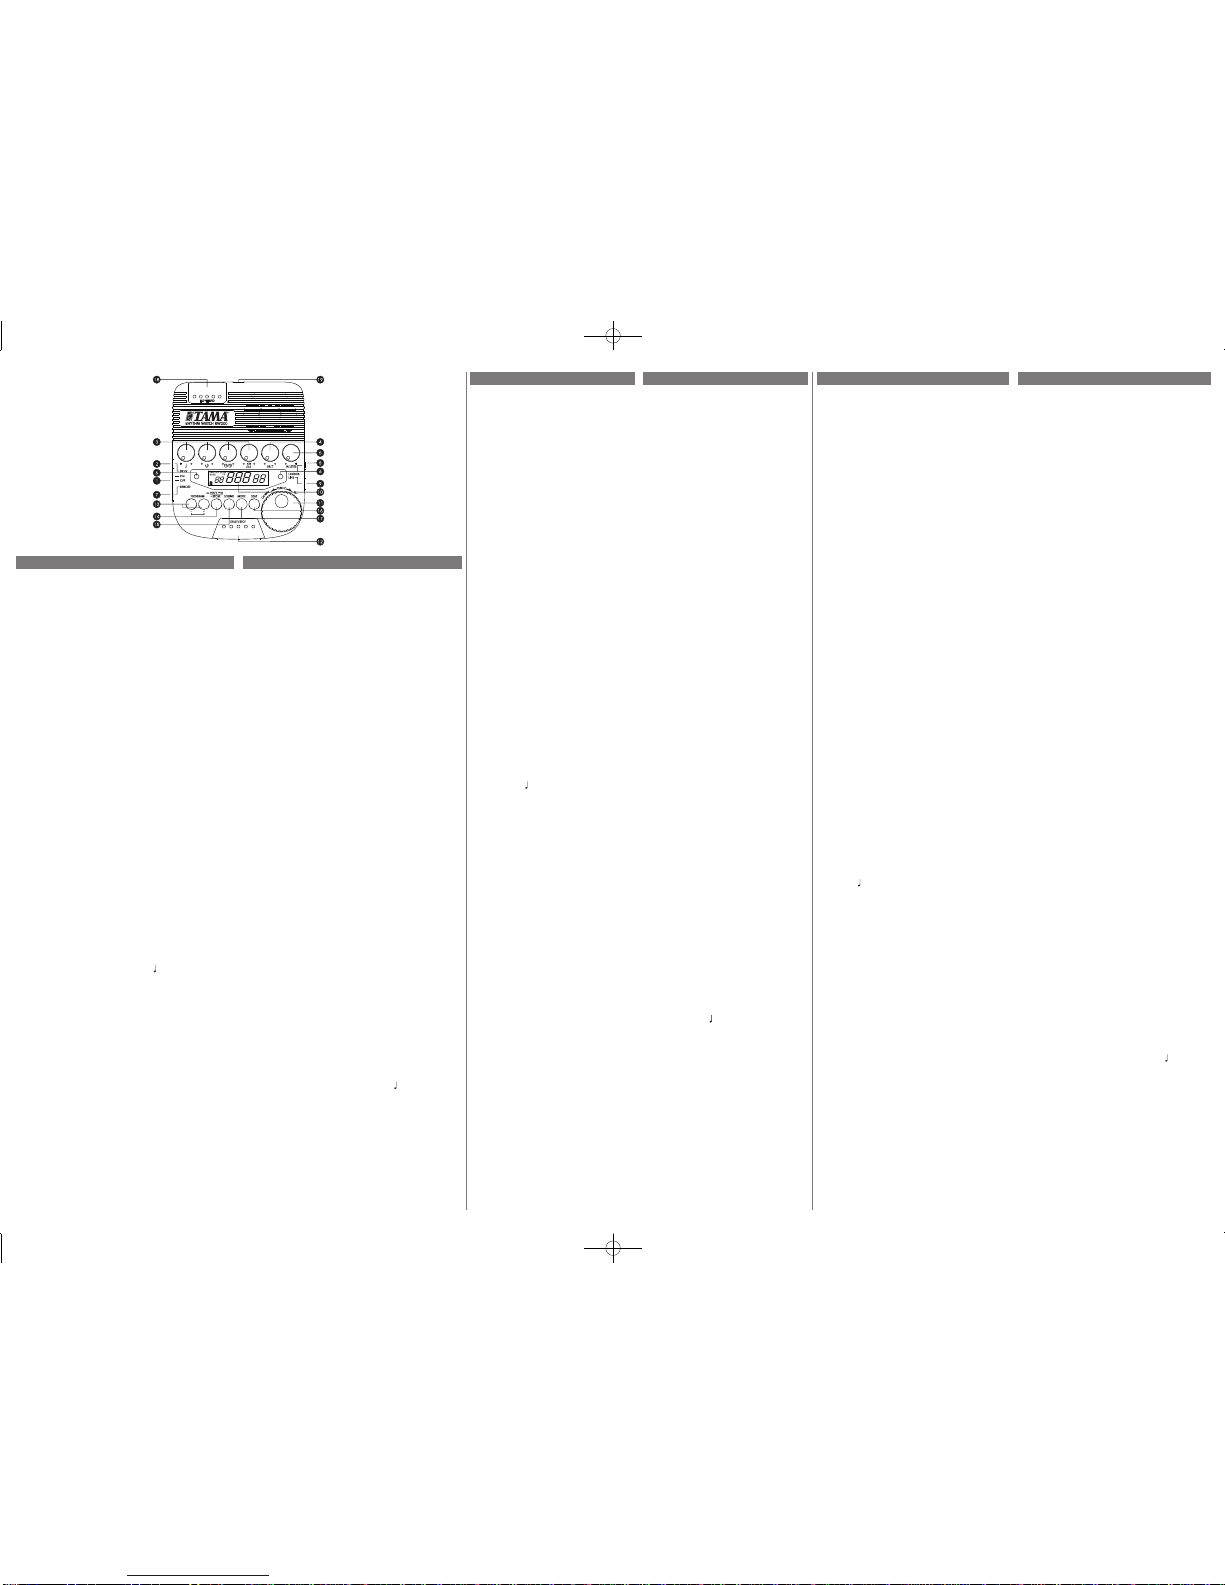
DIE BEDIENUNGSELEMENTE
a
Schalter POWER
Mit diesem Schalter wird das Gerät ein- und ausge-
schaltet.
b
Buchse DC IN
An dieser Buchse kann das Steckernetzteil angeschlos-
sen werden.
c
Drehregler RHYTHM
Mit diesen Reglern kann das Lautstärkeverhältnis zwi-
schen den verschiedenen Sounds eingestellt werden.
d
Drehregler BEAT
Hiermit können Sie die Lautstärke des Schlag-Sounds
regeln. Das ist der Glockenschlag auf den ersten
Taktschlag. In der Einstellung 0 ist der Sound nicht zu
hören.
e
Drehregler MASTER
Hier wird die Gesamtlautstärke eingestellt.
f
LED-Anzeigen TEMPO
Diese beiden LEDs blinken abwechselnd im einge-
stellten Tempo. Auf dem ersten Schlag blinkt eine der
LEDs rot. Ab dem zweiten Schlag blinken die LEDs
grün. (In der Einstellung BEAT = 0 blinkt auch der
erste Schlag grün.)
g
Buchse REMOTE
An dieser Stereobuchse kann der Fußschalter an-
geschlossen werden. Tippen ist START/STOP
zugeordnet, und Ring ist der Schrittweite der Pro-
grammnummer zugeordnet. Wir empfehlen Ihnen den
Dual-Fußschalter IBANEZ IFS2U zu verwenden, der
linke Schalter ist START/STOP zugewiesen, und der
rechte Schalter ist der entsprechenden Schrittweite der
Programmnummer zugewiesen. Wenn Sie einen ein-
zelnen Fußschalter verwenden, wird er START/STOP
zugewiesen.
h
Buchse PHONES
Das ist die Stereo-Minibuchse für die Kopfhörer. Wenn
diese in die Buchse eingesteckt sind, ist der Lautspre-
cher der RW200 abgeschaltet.
i
Buchse LINE
Das ist die 1/4” monaurale Buchse, die das Signal für
den Line-Pegel ausgibt. Schließen Sie einen Verstärker
oder einen aktiven Monitorlautsprecher usw. an. Wäh-
rend des Anschlusses wird kein Ton von den Lautspre-
chern und der PHONE-Ausgänge der RW200 erzeugt.
j
LCD (Flüssigkristallanzeige)
Auf dieser Anzeige können Sie die Werte der Parame-
ter “PROGRAMM”, “SOUND”, “MODE”, “BEAT”
und “TEMPO” ablesen. Es zeigt ebenfalls den verblei-
benden Batterieladezustand an.
k
Datenrad TEMPO
Hier kann das Tempo zwischen =30 und 250 BPM
eingestellt werden.
l
Taste START/STOP
Diese Taste startet und stoppt das Metronom.
m
Tasten PROGRAMM
Hiermit werden Programme abgerufen. Sie können die
Programmnummer um 1 hochzählen/herunterzählen.
n
Taste BACKLIGHT/STORE
Damit werden die Parametereinstellungen mit Aus-
nahme von dem am LCD angezeigten MODUS in der
eingeblendeten Programmnummer gespeichert. Halten
Sie die Taste etwa 2 Sekunden lang gedrückt, um die
LCD-Hintergrundbeleuchtung von aktiviert auf deakti-
viert umzuschalten.
o
Taste SOUND
Mit dieser Taste wählen Sie einen Ton aus, SOUND 1
oder SOUND 2.
p
Taste BEAT
Der ››Beat‹‹ (der Takt bzw. die Schlagzahl pro Takt)
kann zwischen 0 und 9 Schlägen eingestellt werden.
Bei jedem Druck auf die Taste erhöht sich die Zahl der
Beats um 2.
q
Taste MODE
Hiermit werden die Betriebsarten, PRACTICE oder
STAGE gewählt.
r
Taste TAPTEMPO
Die TAP-Funktion nimmt ihren Betrieb auf und misst
das Tempo automatisch, sobald Sie diese Taste min-
destens 5 Mal drücken.
s
Montageschraube (M6)
Die RW200 kann an einem beliebigen Ständer Ihres
Schlagzeugs zusammen mit einer M6-Gewinde-Halter-
befestigung und mithilfe einer Multifunktionsklemme
befestigt werden.
NOMI E FUNZIONI DEI
COMPONENTI
a
Interruttore POWER
Viene usato per accendere e spegnere lo strumen-
to.
b
Presa DC IN
Questa è la presa che serve per collegare l’adatta-
tore per corrente alfernata.
c
Controlli RHYTHM
Vengono usati per controllare il bilanciamento del
volume fra i vari suoni.
d
Controllo BEAT
Viene usato per controllare il volume del suono
del beat (con un suono di campana prodotto per il
primo movimento). Se la regolazione del beat è 0,
non viene prodotto alcun suono.
e
Controllo MASTER
Viene usato per controllare il volume generale.
f
LED del TEMPO
I LED sinistro o destro lampeggiano alternativa-
mente a tempo con il beat. Il primo movimento
è sempre indicato dal lampeggiamento in rosso.
A partire dal secondo movimento, i beat lampeg-
giano in verde. (Se la regolazione del beat è 0, il
primo movimento lampeggia in verde.)
g
Presa REMOTE
È la presa stereo a cui viene collegato l’interruttore
a pedale. A “tip” è assegnato il comando START/
STOP, mentre a “ring” è assegnato l’incremento
del numero del programma. Consigliamo di usare
l’interruttore a pedale doppio IBANEZ IFS2U,
nel quale all’interruttore sinistro è assegnato il
comando START/STOP e all’interruttore destro è
assegnato l’incremento del numero di programma.
Se usate un interruttore a pedale singolo, a esso è
assegnato il comando START/STOP.
h
Presa PHONES
È la presa mini stereo per la cuffia. Quando la
cufa è inserita, dall’altoparlante dell’RW200 non
viene emesso alcun suono.
i
Presa LINE
È la presa monaurale da 1/4” di pollice che
emette il livello del segnale di linea. Serve a
collegare un amplicatore, un monitor da studio
alimentato, ecc. Quando è collegata, l’altoparlante
dell’RW200 e la presa PHONE non producono
alcun suono.
j
Display LCD (a cristalli liquidi)
Serve a mostrare i valori impostati per i parametri
“PROGRAM”, “SOUND”, “MODE”, “BEAT”
e “TEMPO”. Mostra inoltre il livello di batteria
residuo.
k
Controllo rotativo TEMPO
Viene usato per controllare la velocità del tempo
fra = 30~250/minuto
l
Tasto START/STOP
Consente di avviare e arrestare il metronomo.
m
Tasti PROGRAM
Vengono usati per caricare i programmi. È pos-
sibile far aumentare/diminuire di 1 il numero del
programma.
n
Tasto BACKLIGHT/STORE
Memorizza le impostazioni dei parametri mostrati
sul display LCD, ad eccezione di MODE, con il
numero di programma visualizzato. Per attivare e
disattivare la retroilluminazione del display LCD,
tenete premuto il tasto per circa 2 secondi.
o
Tasto SOUND
Consente di scegliere un suono fra SOUND 1 e
SOUND 2.
p
Tasto BEAT
Il beat può essere impostato entro una gamma da
0 a 9 movimenti. Ogni volta che viene premuto
il tasto BEAT, il numero dei movimenti viene
aumentato di 2.
q
Tasto MODE
Serve a selezionare il modo operativo: PRACTI-
CE o STAGE.
r
Tasto TAPTEMPO
La funzione TAP inizia a funzionare e misura au-
tomaticamente il tempo quando questo tasto viene
premuto almeno 5 volte.
s
Dado di montaggio (M6)
L’RW200 può essere ssato a un’asta della bat-
teria utilizzando un supporto dotato di lettatura
M6 e con Multi Clamp.
NOMBRES Y DESCRIPCIÓN DE
LOS COMPONENTES
a
Conmutador POWER
Se utiliza para encender y apagar el RW200.
b
Toma DC IN
Esta toma sirve para conectar el adaptador de
CA.
c
Botones RHYTHM
Se utilizan para regular el volumen entre los
distintos sonidos.
d
Botón BEAT
Se utiliza para modicar el volumen del ritmo.
Emite un sonido de campana en el primer
tiempo. Si se ajusta el tiempo a 0, no se emitirá
ningun sonido.
e
Botón MASTER
Se utiliza para modicar el volumen general.
f
Indicadores LED del TEMPO
Los indicadores LED izquierdo y derecho
parpadean de manera alterna en función del
compás. El tiempo inicial siempre parpadea en
color rojo. A partir del segundo tiempo, parpa-
dean en color verde. (Si se ajusta el tiempo a 0,
el primer tiempo parpadeará en verde.)
g
Toma REMOTE
Esta es la toma estéreo a la que puede conec-
tarse el conmutador de pedal. Con la punta se
acciona START/STOP y con la anilla se incre-
menta el número de programa. Se recomienta
utilizar el conmutador de pedal dual IBANEZ
IFS2U, el interruptor izquierdo acciona START/
STOP y el derecho incrementa el número de
programa. Si utiliza un conmutador de un solo
pedal, este accionará START/STOP.
h
Toma PHONES
Es la toma mini estéreo para auriculares.
Cuando se utiliza esta toma, el altavoz del
RW200 no emite sonidos.
i
Toma LINE
Esta es la salida mono de 1/4” de nivel de lí-
nea. Aquí podrá conectar un amplicador o un
altavoz autoamplicado, etc. Cuando se utiliza
esta salida, el altavoz del RW200 no emite
sonido y PHONES está desconectado.
j
LCD (pantalla de cristal líquido)
En esta pantalla se muestran los valores espe-
cificados para los parámetros “PROGRAM,”
“SOUND,” “MODE,” “BEAT,” y “TEMPO”.
También muestra el nivel de carga de la pila.
k
Marcador TEMPO
Se utiliza para controlar el tempo entre = 30
~ 250/minuto.
l
Tecla START/STOP
Esta tecla pone en marcha y detiene el metró-
nomo.
m
Teclas PROGRAM
Se utilizan para cargar programas. Se puede
aumentar/reducir el número de programas de
uno en uno.
n
Tecla BACKLIGHT/STORE
Con esta tecla se guardan los ajustes de los pa-
rámetros, excepto los del MODE que aparece
en el LCD en el número de programa mostra-
do. Pulse sin soltar durante unos dos segundos
para activar y desactivar la luz de fondo del
LCD.
o
Tecla SOUND
Con esta tecla se selecciona un sonido,
SOUND 1 o SOUND 2.
p
Tecla BEAT
Se puede ajustar el compás entre 0 y 9 tiem-
pos. Cada vez que se pulsa la tecla BEAT, el
número de tiempos aumenta en 1.
q
Tecla MODE
Sirve para seleccionar un modo, modo PRAC-
TICE (ensayo) o modo STAGE (escenario).
r
Tecla TAPTEMPO
La función TAP se activa y empieza a medir el
tempo automáticamente cuando se pulsa esta
tecla cinco veces como mínimo.
s
Tornillo de montaje (M6)
El RW200 puede acoplarse en un atril o en la
batería gracias a un dispositivo de sujeción que
lleva una rosca M6 con abrazadera múltiple.
各部件的名称和功能
a
POWER•开关
此开关用于打开或关闭电源。
b
DC•IN•插孔
此插孔用于连接AC电源适配器。
c
RHYTHM•旋钮
这些旋钮用于控制各种声音之间的音量平
衡。
d
BEAT•旋钮
此旋钮用于控制节拍声音的音量。首个节
拍会发出鸣响。如果节拍设置为0,则不
会产生节拍声音。
e
MASTER•旋钮
此旋钮用于控制整体音量。
f
TEMPO•LED•指示灯
左侧LED指示灯将在首个节拍时闪烁红
色。从第二个节拍起,右侧LED指示灯
将闪烁绿色。如果节拍设置为0,则右侧
LED指示灯也将在首个节拍时闪烁绿色。
如果节拍设置为1,则只有左侧LED指示
灯闪烁红色。
g
REMOTE•插孔
此立体声插孔用于连接脚踏开关。尖端被
分配用于START/STOP,环被分配用于
程序编号的递增。我们建议使用IBANEZ
IFS2U双脚踏开关,左侧开关被分配用于
START/STOP,右 侧开关被 分配用于 程
序编号的递增。
如果您使用的是单脚踏开关,则该开关将
被分配用于START/STOP。
h
PHONES•插孔
此为立体声迷你耳机插孔。当连接耳机时,
RW200的扬声器将不会发出声音。
i
LINE•插孔
此插孔为1/4” 单声道插孔,输出线路电
平信号。可连接放大器或有源监听音箱
等设备。连接后,RW200 的扬声器和
PHONES输出不会发出声音。
j
LCD•显示屏(液晶显示屏)
显示屏将显示所设置的“PRO-GRAM”、
“SOUND”、“MODE”、“BEAT” 以 及
“TEMPO”参数。还会显示电池的剩余电量。
k
TEMPO•拨盘
该拨盘用于将拍速控制在 =30~250/ 分
钟。
l
START/STOP•键
该键用于启动和停止节拍器。
m
PROGRAM•键
这些按键用于载入编程设定。您可以以1
为增量增加 / 减小程序编号。
n
BACKLIGHT/STORE•键
此键用于将LCD显示屏上所显示的参数
设置(MODE设置除外)存入所显示的程
序编号。按住此键约 2秒钟,可以启用或
禁用LCD显示屏的背光。
o
SOUND•键
该键用于选择声音,声音可为SOUND1
或SOUND2。
p
BEAT•键
该键可在0到9拍的范围内设置节拍。每
按一次BEAT键就将增加一拍。
q
MODE•键
此键用于在 PRACTICE 模式和 STAGE
模式之间进行选择切换。
r
TAP•TEMPO•键
当按下此键至少5次后,将开启打拍定速
功能并自动测量拍速。
s
安装螺母•(M6)
您可以使用多功能钳将RW200连同带有
M6螺纹的支架一起,安装在鼓架上。
BEDIENUNG
Bedienung der Programmierungsfunktion
Bei der RW200 können Taktmaße, Klänge und Tempi
in einer von 30 Programmnummern gespeichert wer-
den.
1. Stellen Sie mit der Taste PROGRAM oder dem
optionalen REMOTE Fußschalter die Programm-
nummer ein, auf der Sie ein Taktmaß oder Tempo
speichern möchten.
2. Stellen Sie Taktmaß, Klang und Tempo ein.
3. Überprüfen Sie die angezeigten Werte im LC-Dis-
play, und drücken Sie die Taste STORE/LIGHT
SET. Die beiden LEDs blinken kurzzeitig rot auf,
um anzuzeigen, dass das Programm gespeichert
wurde.
Bedienung des Metronomes -Modus PRACTICE
Das ist ein Standardmodus, der als Metronom für
PRACTICE funktioniert.
1. Drücken Sie die Taste MODE, und wählen Sie den
Modus PRACTICE aus.
2. Drücken Sie die Taste SOUND, und wählen Sie
entweder SOUND 1 oder SOUND 2 aus. SOUND
1 und SOUND 2 haben unterschiedliche Klänge,
wählen Sie also den Modus, der Ihrem Geschmack
oder Ihren Erfordernissen am besten entspricht.
(SOUND 1 ist ein Klang mit einem stärkeren An-
schlag, während SOUND 1 einen weicheren Klang
erzeugt.)
3. Stellen Sie das Tempo mit dem Datenrad TEMPO
und das Taktmaß mit der Taste BEAT ein. Wenn Sie
ein Programm laden möchten, benutzen Sie die Tas-
te PROGRAM. oder den an der Buchse REMOTE
angeschlossenen Fußschalter, um die gewünschte
Nummer abzurufen.
4. Stellen Sie die verschiedenen Regler auf die ent-
sprechenden Positionen.
5. Mit der Taste START/STOP wird das Metronom
gestartet. Sie hören den Klang aus dem Lautspre-
cher, und die LEDs blinken.
6. Stellen Sie, während Sie auf den Klang hören,
das Verhältnis zwischen den Sounds, die BEAT-
Laut-stärke und die Gesamtlautstärke ein.
7. Durch erneutes Drücken der Taste START/STOP
stoppt das Metronom.
Bedienung des Metronomes -Modus STAGE
Programmieren Sie zuvor Tempi, Taktmaße und Klän-
ge des jeweiligen Songs in der exakten Reihenfolge
der Titelliste, die Sie beim Live-Einsatz auf der Bühne
abspielen; das ist nützlich, wenn Sie beginnen Musik-
stücke einzuzählen.
1. Drücken Sie die Taste MODE, und wählen Sie den
Modus STAGE aus.
2. Rufen Sie das Programm Ihres ersten Songs auf.
3. Mit der Taste START/STOP wird das Metronom
gestartet. Sie hören den Klang aus dem Lautspre-
cher, und die LEDs blinken.
4. Metronom stoppt automatisch, sobald es die Ge-
samtanzahl der Taktschläge für 8 Taktstriche be-
endet hat, erhöht die Programmnummer um 1 und
wird im Standby-Modus sein.
5. Jedes Mal, wenn Sie die Taste START/STOP drü-
cken, werden die Schritte 3 - 4 oben wiederholt.
Bedienung der Tap - Funktion
Mit der Tap-Funktion können Sie jedes beliebig ge-
wünschte Tempo messen und dem Tempo des Metro-
noms anpassen.
1. Geben Sie das Tempo ein, indem Sie die Taste TAP
TEMPO anhand des folgenden Rhythmus drücken.
Das gemessene Tempo wird in dem Moment ange-
zeigt, wenn Sie 5 Mal schlagen.
2. Wenn Sie mehr als 6 Mal schlagen, wird das durch-
schnittliche Tempo der letzten 4 Schläge angezeigt.
3. Wenn Sie die Taste TAP TEMPO etwa 2,5 Sekun-
den lang nicht drücken, wird die Tempomessung
beendet. Der Tempowert an der LCD-Anzeige
blinkt.
4. Falls das gemessene Tempo den Bereich von =
30 - 250 BPM unter-oder überschreitet, wird eine
Fehlermeldung angezeigt. Wenn das Tempo unter
30 ist, wird die Meldung “Lo” angezeigt, und das
Tempo wird automatisch auf 30 festgelegt. Wenn
das Tempo über 250 ist, wird die Meldung “Hi”
angezeigt, und das Tempo wird automatisch auf 250
festgelegt.
Werkseitige Rückstellung
Schalten Sie die Stromversorgung ein, indem Sie die Taste
BACKLIGHT/STORE drücken.
FUNZIONAMENTO
Per usare la funzione Program
L’RW200 memorizza fino a 30 numeri di pro-
gramma di beat, suoni e tempi.
1. Usando il tasto PROGRAM oppure l’interrut-
tore a pedale REMOTE opzionale, scegliete il
numero di programma in cui intendete effet-
tuare la memorizzazione del beat o del tempo.
2. Impostate il beat, il suono e il tempo.
3. Controllate i dati visualizzati sull’LCD e pre-
mete il tasto STORE/LIGHT SET. A questo
punto, i due LED si accendono in rosso per in-
dicare che il programma è stato memorizzato.
Funzionamento del metronomo
-
Modo PRACTICE
Questo è un modo predenito che funziona come
un metronomo per esercizi.
1. Premete il tasto MODE e selezionate il modo
PRACTICE.
2. Premete il tasto SOUND e selezionate SOUND
1 o SOUND 2. I modi SOUND 1 e SOUND
2 hanno suoni differenti, pertanto selezionate
quello più appropriato alle condizioni di impie-
go che prevedete. (SOUND 1 ha un suono con
un attacco forte, mentre SOUND 2 produce un
suono più delicato).
3. Impostate la velocità del tempo usando il con-
trollo rotativo TEMPO e il beat utilizzando il
tasto BEAT. Per caricare un programma, usate
il tasto PROGRAM oppure il tasto a pedale
REMOTE per richiamare il numero desiderato.
4. Regolate i vari comandi di controllo sulle appro-
priate posizioni.
5. Premendo il tasto START/STOP si mette in
funzione il metronomo. Il suono viene prodotto
dall’altoparlante e i LED cominciano a lampeg-
giare.
6. Ascoltando il suono prodotto, regolate il bilan-
ciamento tra le note, il volume del beat, cioè
del movimento, e il volume generale.
7. Ripremendo il tasto START/STOP, il metrono-
mo si ferma.
Funzionamento del metronomo
-
Modo STAGE
Se iniziate le canzoni con uno stacco, è utile pro-
grammare in anticipo i tempi, i beat e i suoni di
ciascuna canzone nell’ordine esatto della scaletta
che eseguirete dal vivo.
1. Premete il tasto MODE e selezionate la moda-
lità STAGE.
2. Richiamate il programma della vostra prima
canzone.
3. Premendo il tasto START/STOP si mette in
funzione il metronomo. Il suono viene pro-
dotto dall’altoparlante e i LED cominciano a
lampeggiare.
4. Il metronomo si arresta automaticamente dopo
aver scandito 8 battute, il numero di programma
aumenta di 1 e il metronomo va in standby.
5. Ogni volta che premete il tasto START/STOP,
si ripetono le fasi 3 - 4 di cui sopra.
Per usare la funzione Tap
La funzione Tap vi permette di misurare qualsiasi
tap tempo e si applica al tempo del metronomo.
1. Premete il tasto TAP TEMPO a tempo con il
beat. Una volta premuto il tasto 5 volte, il tem-
po misurato verrà visualizzato.
2. Premendo il tasto 6 o più volte, viene mostrato
il tempo medio degli ultimi 4 tap.
3. Se il tasto TAP TEMPO non viene premuto
per circa 2,5 secondi, la misurazione del tempo
si conclude e il valore del tempo lampeggia sul
display LCD.
4. Se il tempo misurato eccede la gamma di nota
di = 30 ~ 250/minuto, verrà visualizzato un
messaggio di errore. Se il tempo è impostato
su un valore inferiore a 30, apparirà il mes-
saggio “Lo” e il tempo verrà automaticamente
impostato su 30. Se il tempo è impostato su un
valore superiore a 250, apparirà il messaggio
“Hi” e il tempo verrà automaticamente impo-
stato su 250.
Ripristino delle impostazioni di fabbrica
Attivate l’alimentazione premendo il tasto
BACKLIGHT/STORE.
FUNCIONAMIENTO
Funcionamiento de las funciones del programa
El RW200 guarda hasta 30 números de progra-
ma de compases, sonidos y tempos.
1. Con la tecla PROGRAM o el conmutador
de pedal opcional REMOTE se activa el
programa en el que se guardará el compás o
el tempo.
2. Ajuste el compás, el sonido y el tempo.
3. Compruebe las indicaciones que aparecen
en la pantalla LCD y pulse la tecla STORE/
LIGHT SET. Se encenderán a la vez los dos
indicadores LED rojos para indicar que el
programa ha sido almacenado.
Funcionamiento del metrónomo
-Modo
PRACTICE
Este es el modo por defecto, que funciona
como un metrónomo para ensayos.
1. Pulse la tecla MODE y elija el modo
PRACTICE.
2. Pulse la tecla SOUND y elija entre SOUND
1 o SOUND 2. SOUND 1 y SOUND 2
ofrecen armonías distintas. Elija el modo
más adecuado según las circunstancias.
(SOUND 1 tiene un sonido fuerte, mientras
que SOUND 2 tiene un sonido más suave.)
3. Ajuste el tempo con el cuadrante TEMPO
y el compás con la tecla BEAT. Para cargar
un programa, utilice la tecla PROGRAM. o
el conmutador de pedal remoto para activar
el número que necesite.
4. Ajuste los diversos botones de control se-
gún sus deseos.
5. Ponga en marcha el metrónomo pulsando
la tecla START/STOP. El sonido sale del
altavoz y los indicadores LED empiezan a
parpadear.
6. Escuche el sonido producido y ajuste el
equilibrio entre las notas, el volumen del
tiempo y el volumen general.
7. Detenga el metrónomo pulsando otra vez la
tecla START/STOP.
Funcionamiento del metrónomo
-
Modo STAGE
Permite programar de antemano los tempos,
compases y sonidos de cada canción en el
orden exacto en que se tocarán en la actuación
en directo; le resultará muy útil cuando empie-
ce canciones contando.
1. Pulse la tecla MODE y elija el modo STA-
GE.
2. Busque el programa de la primera canción.
3. Ponga en marcha el metrónomo pulsando
la tecla START/STOP. El sonido sale del
altavoz y los indicadores LED empiezan a
parpadear.
4. El metrónomo se detiene automáticamente
cuando ha sonado durante 8 compases, el
número de programa aumenta en 1 y el me-
trónomo se quedará en estado en espera.
5. Cada vez que pulse la tecla START/STOP,
se repetirán los pasos 3 - 4.
Funcionamiento de la función TAP
La función tap le permite medir cualquier
tempo marcado y aplicarlo al tempo del metró-
nomo.
1. Introduzca el tempo pulsando la tecla TAP
TEMPO seguido del ritmo. Cuando haya
marcado cinco veces, se mostrará el tempo
medido.
2. Al marcar 6 veces o más, se muestra una
media del tempo de los últimos cuatro.
3. Si no pulsa la tecla TAP TEMPO durante
unos 2,5 segundos, terminará la medición
del tempo y el valor de tempo en el LCD
parpadeará.
4. Si el tempo medido está fuera del intervalo
= 30 ~ 250/minuto, aparecerán mensajes
de error. Si el tempo es inferior a 30, apare-
cerá el mensaje “Lo” y el tempo se estable-
cerá en 30 automáticamente. Si el tempo es
superior a 250, aparecerá el mensaje “Hi” y
el tempo se establecerá en 250 automática-
mente.
Reseteado a los valores fábrica
Encienda el aparato mientras pulsa la tecla
BACKLIGHT/STORE.
操作
编程功能的操作
RW200 可以储存 多达 30 个节拍、声 音
及拍速的程序编号。
1.使 用 PROGRAM 键 或 是 可 选 的
REMOTE脚踏开关,显示所需的程序
编号以储存节拍或拍速。
2.设置节拍、声音及拍速。
3.检查LCD显示屏上显示的内容,然后
按 下 STORE/LIGHT SET 键。 此 时,
两个LED 指示灯将同时闪烁红色,表
示程序已经储存。
节拍器操作•–•PRACTICE•模式
此为默认模式,选择此模式后节拍器即按
照练习模式工作。
1. 按下 MODE 键并选择PRAC-TICE 模式。
2.按下 SOUND 键,然后选择 SOUND1
或 SOUND2。
SOUND1 与 SOUND 2 具有不同的声
音,因此请根据使用环境来选择合适的
模式。
(SOUND1的声音具有更强的冲击力,
而SOUND2的声音则比较柔和。)
3.使用TEMPO拨盘设置拍速,以及使用
BEAT键设置节拍。若要载入编程设定,
可使 用PROGRAM 键 或是 REMOTE
脚踏开关调出所需的程序编号。
4.将各个控制旋钮调整到合适的位置。
5.按下 START/STOP 键,启动节 拍器。
启动后扬声器会传出声音,LED指示灯
开始闪烁。
6.听到声音传出后,可以调整音符的平衡、
节拍音量以及整体音量。
7.再次按下 START/STOP 键,停止节拍器。
节拍器操作•–•STAGE•模式
按照舞台现场所表演的节目单的准确顺序,
预先设定好每首歌曲的拍速、节拍及声音,
当您以预备拍开始歌曲时,此模式将助您
一臂之力。
1.按下MODE键并选择STAGE模式。
2.调出第一首歌曲的程序。
3.按下 START/STOP 键,启动节 拍器。
启动后扬声器会传出声音,LED指示灯
开始闪烁。
4.奏响8个小节后,节拍器将自动停止,
程序编号会增加1,节拍器将处于待机
状态。
5.次按下START/STOP键,均将重复上
述的步骤3-4。
打拍定速功能的操作
打拍定速功能够测量任何所需的拍速,并
将此拍速应用到节拍器。
1. 使用 以下节奏按 下TAP TEMPO 键,输
入拍速。在拍打了5次时,将显示测量
出的拍速。
2.当您拍打6次及以上次数时,设备将显
示最后4次拍打的平均拍速。
3.如果您持续约2.5 秒未按下TAP
TEMPO键,则将结束拍速测量,拍速
值将在LCD显示屏上闪烁。
4.如果测量出的拍速超出了 =30~250/
分钟的范围,则将显示错误消息。如果
拍速低于30,则将显示消息“Lo”,且
拍速会自动设置为30。如果拍速高于
250,则将显示消息“Hi”,且拍速会自
动设置为250。
恢复出厂设置
按下BACKLIGHT/STORE键的同时打开
电源。
OCT14986 COPYRIGHT 2014 PRINTED IN CHINA
Other Tama Drum manuals