T&D RTR-500DC User manual

Introductory Manual
Thank you for purchasing our product.
This manual explains in brief how to get an
RTR-500DC Unit ready for use and how to install
the software.
© Copyright T&D Corporation. All rights reserved.
2015. 08 16504780056 (7th Edition)
Details about how to use the software
"RTR-500DC for Windows" and its functions can
be found in the software "Operation Guide
(Help)".

Introduction
2
Important Notices and Disclaimers
In order to properly use this product, please carefully read this manual
before using.
T&D Corporation accepts no responsibility for any malfunction of and/
or trouble with this product or with your computer that is caused by
the improper handling of this product and will deem such trouble or
malfunction as falling outside the conditions for free repair outlined in
the attached warranty.
- All rights of this Manual belong to T&D Corporation.
- It is prohibited to use, duplicate and/or arrange a part or whole of this manual
without the permission of T&D Corporation.
- Microsoft® and Windows® are registered trademarks of Microsoft Corporation
USA and are binding in the USA, Japan and all other countries.
- Windows Vista is either a registered trademark or trademark of Microsoft
Corporation in the United States, Japan, and/or other countries.
- All registered trademarks, company names, product names and logos mentioned
herein or for products being used are the properties of T&D Corporation or of their
respective owners.
- Specications, design and other contents outlined in this manual are subject to
change without notice.
- Please follow the safety precautions outlined in the manual carefully.
- We cannot guarantee nor are we responsible for safety if this product is used in any
manner other than was intended.
- On-screen messages in this document may vary slightly from the actual messages.
- Please notify the shop where you purchased this product or T&D Corporation of
any mistakes, errors or unclear explanations in this manual.
- T&D Corporation accepts no responsibility for any damage or loss of income
caused by the use of our product.
- This product has been designed for private and/or industrial use only. It is not for
use in situations where strict safety precautions are necessary such as in
connection with medical equipment, whether directly or indirectly.
- We are not responsible for any malfunction or trouble caused by the use of our
product or by any problem caused by the use of measurement results of our
product. Please be fully aware of this before using our product.
- This Manual cannot be reissued, so please keep it in a safe place.
- Please read the warranty and provisions for free repair carefully.

3
Introduction
Software User’s Agreement
Disclaimers
- Although T&D Corporation has made operational tests on our software
"RTR-500DC for Windows", we cannot guarantee that all operations will work
properly under all conditions.
- T&D Corporation shall not accept any responsibility for any damage whether direct
or indirect that results from the usage of "RTR-500DC for Windows".
- Specications of "RTR-500DC for Windows" may be subject to change and service
may be terminated without advance notice to the user. In such a case T&D
Corporation shall not be responsible for any damages whether direct or indirect
from the inability to use "RTR-500DC for Windows".
- T&D Corporation has no obligation to correct any defects found in
"RTR-500DC for Windows".
Copyright
- The Copyright for RTR-500DC for Windows, including the program and relevant
documents, belongs solely to T&D Corporation.
- The reprinting or redistribution for commercial purposes whether in part or in
whole, in magazines or as a part of any product is strictly forbidden without the
expressed consent of T&D Corporation. Any inquires concerning commercial
redistribution should be directed to the Sales Department of T&D Corporation.
- Please do not attempt to make any changes or modications to
RTR-500DC for Windows.

Table of Contents
Introduction
Introductory Manual ----------------------------------------1
Important Notices and Disclaimers ------------------------2
Software User’s Agreement --------------------------------3
Table of Contents --------------------------------- 5
Table of Contents --------------------------------- 5
Safety Precautions and Instructions ------------- 6
Explanation of Symbols ------------------------------------6
What is "RTR-500DC"? --------------------------12
Outline ----------------------------------------------- 12
Features of Wireless Communication Function -------- 12
Features of the RTR-500DC ------------------------------ 13
Before Using this Product ----------------------14
What are "Base Units", "Remote Units" and
"Repeaters"? ---------------------------------------------- 14
Basic Procedures --------------------------------16
Getting Ready
Package Contents -------------------------------18
Connect the Antenna ------------------------------------- 18
Appearance Diagram and Part Names ---------19
Install the Battery ---------------------------------20
Other Power Sources Available for Use ----------------- 20
Battery Replacement ------------------------------------- 20
Sleep Mode 20
Power and Auto Power Off Function -----------21
Turning ON the Power ------------------------------------ 21
Turning OFF the Power ----------------------------------- 21
Auto Power Off Function --------------------------------- 21
Operations via Buttons and Operation Dial-----22
Using the Operation Dial ---------------------------------- 22
Button Functions ----------------------------------------- 22
About the Icons and Abbreviations -------------23
Installing the Software ---------------------------24
Before Installing the Software: --------------------------- 24
Installing the USB Device Driver -----------------27
Carrying out Registration, Settings,
and Operation
Process of Making Registrations and Settings -30
1. Make Settings for Base Units ------------------------- 30
2. Register Data Loggers as Remote Units ------------- 30
3. Register Repeaters (when necessary) ---------------- 30
4. Check Wireless Signal Strength and Make Wireless
Route Settings --------------------------------------------- 31
Launcher Window and Applications ------------32
How to Open ---------------------------------------------- 32
Communication between RTR-500DC and PC -----
33
Operations which require RTR-500DC PC
Communication ------------------------------------------- 33
Communication between Remote Unit / Repeater
and PC -------------------------------------------34
Operations which require Remote Unit / Repeater PC
Communication ------------------------------------------- 34
Wireless Communication between RTR-500DC
and Remote Unit ---------------------------------35
Operations which require RTR-500DC Remote Unit
Wireless Communication -------------------------------- 35
Operating Remote Units via Multiple RTR-500DC Units -
----------------------------------------------- 35
How to Register the Same Remote Unit to Multiple
RTR-500DC Units ----------------------------------------- 35
Optical and Cable Communication between RTR-
500DC and Remote Units ------------------------36
Operations which require RTR-500DC Remote Unit
Optical and Cable Communication --------------------- 36
Optical Communication: RTR-501 / 502 / 503 / 505 / 507
----------------------------------------------- 36
Cable Communication: RTR-574 / 576 ----------------- 36
Communication Functions
Downloading Data by Group --------------------38
Wireless Communication:[ Gather Data] ------- 38
Reading Judgement Results in the “Gathering Result”
Window ----------------------------------------------- 40
Downloading Data from a selected Remote Unit -
------------------------------------------------------41
Wireless Communication:[ Gather Data] ------- 41
Optical / Cable Communication: [ Gather Data] 42
Table of Contents
Monitoring -----------------------------------------43
Gather Current Readings and Current Status of Remote
Unit : [ Monitor Mode] ---------------------------- 43
Communication Conditions for Monitoring ------------- 44
Viewing a Monitoring Window ------------------45
Warning Monitoring ------------------------------48
Target Remote Units for Warning Monitoring ---------- 48
Warning Conditions --------------------------------------- 48
Warning Buzzer -------------------------------------------- 48
Starting / Stopping Remote Unit Recording ---49
Wireless Communication: [ Record Settings] - 49
Optical / Cable Communication: [ Record
Settings] ----------------------------------------------- 50
Registering and Unregistering Remote Units for "Visitor
Entry"
-----------------------------------------------51
[ Visitor Entry] ------------------------------------- 51
Registration Error Messages ----------------------------- 51
Communication with Remote Units registered for "Visitor
Entry" ----------------------------------------------- 52
Communication Errors ---------------------------53
When the memory capacity is full: [Memory Full] ------ 53
When the Signal Strength is weak: ---------------------- 54
Application related Communication Errors ------------- 54
Viewing Functions
Viewing Data Stored in RTR-500DC ------------56
Viewing a Data List: <List> button / [Data List] --------- 56
Data Lists for RTR-574 / 576 ----------------------------- 56
Detailed Information of Data: <List> button / [Data List] 57
Viewing the Graph --------------------------------59
Graph Display: <List> button / [Data List] --------------- 59
How to Read the Graph ---------------------------------- 59
Data Range Check and Judgement --------------------- 61
Viewing RTR-574 / 576 Data in a Graph ---------------- 62
Data Downloaded via Wireless Communication ------- 62
Data Downloaded via Cable Communication ---------- 62
Operating the Graph ------------------------------63
Changing the Channel on Display ----------------------- 63
Enlarged View---------------------------------------------- 63
Checking the Highest / Lowest Readings--------------- 63
Deleting Selected Data ---------------------------64
Deleting Selected Data : [Data List] / <List> button ---- 64
Making RTR-500DC Unit Settings /
Others
Operational Settings for RTR-500DC ----------66
Changing Unit of Temperature --------------------------- 66
Adjusting the Backlight ----------------------------------- 66
Adjusting Contrast ---------------------------------------- 67
Checking Memory ----------------------------------------- 67
Deleting All Data ------------------------------------------- 67
Making Clock and Time Zone Settings via RTR-500DC
Operations 68
Figuring Out Your Time Zone ----------------------------- 69
Using the RTR-500DC in Areas that Observe Daylight
Savings Time ---------------------------------------------- 69
Setting the Buzzer OFF ----------------------------------- 70
Checking Battery Status of the RTR-500DC ----------- 70
Monitoring Radio Waves --------------------------------- 71
Menu List -----------------------------------------72
[ Gather Data] ------------------------------------- 72
[ Monitor Mode] ----------------------------------- 72
[ Record Settings] -------------------------------- 73
[ Visitor Entry] ------------------------------------- 74
[ Gather Data] ------------------------------------- 74
[ Record Settings] -------------------------------- 74
[Data List] ----------------------------------------------- 75
[Set Functions] --------------------------------------------- 75
FAQ ------------------------------------------------76
Q&A about RTR-500DC ---------------------------------- 76
Q&A about Settings --------------------------------------- 77
Q&A about Operations after Settings-------------------- 79
Specications -------------------------------------82
Software (RTR-500DC for Windows) -------------------- 83
Options --------------------------------------------84

Introduction
6
Safety Precautions and Instructions
The following items should be strictly obeyed for the safe usage of this
Unit, and for protecting yourself and other people from bodily harm
and/or damage to property. Before using this product, please read the
following carefully and fully understand the contents.
Explanation of Symbols
Explanation of Warning Symbols
DANGER
These entries are actions that absolutely under no
circumstance should be taken. The taking of such an
action may cause serious personal physical damage or
death.
CAUTION These entries are actions that if taken may lead to
physical injury or damage to persons or things.
Explanation of Picture Symbols
Denotes an important warning or caution.
Denotes a forbidden action.
Denotes an action that must be taken.

7
Introduction
DANGER
When installing and using this Unit, make sure to follow all warnings and
directions from your computer manufacturer.
Do not take apart, repair or modify the Unit.
Doing so may cause re or electrocution.
If water or a foreign body enters the Unit, immediately disconnect cables,
remove batteries, and stop using.
Continued use may cause re or electrocution.
Do not use this Unit in wet or humid places, such as a bathroom.
Doing so may cause re, electrocution, and/or malfunction.
Store the Unit and Accessories out of the reach of children.
Not doing so may result in unexpected accidents and injury from playing with or swallowing
parts.
Do not connect any communication cables connected to the Unit to telephone
line outlets.
Continued use may cause re or electrocution.
If any smoke or strange smells are emitted from the Unit, immediately
disconnect the power and communication cables.
Continued use may cause re or electrocution.
Do not drop or expose the Unit to a strong impact. If that happens to the Unit,
immediately disconnect the power and communication cables and stop using.
Continued use may cause re or electrocution.
Make sure to periodically remove dust and dirt from the AC adaptor plug.
When performing maintenance please make sure to disconnect the plug from
the outlet.
If dust is allowed to accumulate on the plug, moisture may cause poor insulation and result
in re.
Do not remove the battery or unplug the AC adaptor with wet hands.
This may cause electrocution.
Introduction
8
CAUTION
Please note that this Introductory Manual has been written based on the
presupposition that details about set-up of any necessary equipment to
enable network connection have already been taken care of by the user and
that connection has been conrmed as workable.
T&D Corporation shall not be responsible for any damages which a contractor, a user or a
third party may suffer, whether direct or indirect, due to the inability to communicate or
use communication devices.
Further, T&D is not responsible for any damage, malfunction or trouble,
whether direct or indirect, caused by the use of our products.
This Unit has been designed for private and/or industrial use only.
It is not for use in situations where strict safety precautions are necessary
such as in connection with medical equipment, whether directly or indirectly.
Harmful gases or chemicals may cause corrosion and/or other danger to the
Unit. Also, coming in contact with hazardous substances, may cause harm to
people handling the Unit. Therefore, do not use or store the Unit in any
environment that is exposed to chemicals and/or harmful gases.
This Unit is not waterproof.
If the Unit gets dirty, wipe it with a clean cloth.
Do not store, leave, or use the Unit in any place exposed to direct sunlight,
high temperature, extremely low temperatures, or high humidity.
This may cause deformation to both the outside casing and the inside. It may also cause
condensation on the inside of the Unit leading to re or electrocution.
Battery terminals may provide insufcient contact due to age or vibration.
This may lead to data loss.
Battery terminals may provide insufcient contact due to age or vibration.
This may lead to data loss.
Battery life varies depending upon the type of battery, the measuring environment,
frequency of communication, ambient temperature in which it is used, and battery
performance.
If the Unit is not to be used for a long period of time, for safety reasons please
remove the battery.
Leaving batteries inside the Unit may cause battery leakage and malfunction.
Do not use an AC adaptor other than one that is specied for use with the
Unit.
Doing so may cause re or malfunction.
Please do not insert ngers or foreign objects into cable connection jacks.
Make sure that all cable plugs are inserted fully, so as not to cause an
improper connection. Also, when unplugging cables from the Unit, do not pull
the cord, but hold the connector to disconnect.
9
Introduction
Do not cut or process the cords for the AC adaptor or the communication
cables. Also, do not twist, pull on or swing any of the cords.
To prevent damage to the Unit from static electricity, remove static electricity
from your body by touching metal around you (door knob, window frame)
before touching the Unit.
Static electricity may cause not only damage to the Unit, but may cause breaks in or a
loss of data.
Do not disconnect the communication cable during wireless communication
or USB communication.
Doing so may cause adverse effects to the Unit and/or PC.
We shall not guarantee the Unit's operation if it has been connected to a PC
using a USB hub or a USB extension cable.
Do not use or store the Unit in the following places.
Doing so may cause electrocution, re and/or other adverse effects to the
Unit and/or other surrounding devices.
-Areas exposed to direct sunlight
This will cause the inside of the Unit to become overheated and may cause re,
deformation, and/or other damage including malfunction.
-Areas exposed to strong magnetic elds
This may cause damage including malfunction.
- Areas exposed to water leakage
This may cause electrocution or other damage including malfunction.
- Areas exposed to static electricity.
This may cause damage including malfunction.
- Areas exposed to excessive vibration
This may cause injury, malfunction, damage or loss of proper electrical contact.
- Areas that are not at or level
This may cause the Unit to fall and result in injury and/or damage.
- Areas near re or exposed to excessive heat
This may cause damage including malfunction and deformation.
- Areas exposed to excessive dust, dirt and smoke
This may cause damage including malfunction.

Introduction
10
Notes and Precautions for Installing Wireless
Communication Devices
When installing wireless communication devices take special care in selecting locations so as
to ensure proper communication.
Note that even after a successful installation, due to changes in environmental conditions,
communication errors may occur when restarting the system.
As far as possible, try to keep wireless communication devices away from metals and set
them up in high unobstructed positions.
- Please take note that in many instances, walls, oors, stairs, fences
and desks will contain metals. In order to carry out communication
between indoor and outdoor units, please locate indoor units near a
window so that radio waves can be easily transmitted.
- Please install these devices more than 30cm away from walls or boards
containing metal.
- If wireless communication units are placed in a metal container such as
a freezer or refrigerator, the possible wireless communication range will
be shortened. In most cases radio waves are transmitted via doors
and door openings so place devices as near to doors as possible.
Repeater
(RTR-500)
Place so that the antenna is
away from objects or walls.
As far as possible, keep the devices away from noise-emitting sources.
- Equipment such as some industrial instruments, electronic devices or uorescent lamps generate noise.
Please place Units more than 1 meter away from such devices.
- Please place Units more than 1 meter away from computers and other devices which emit noise.
- Keep all wires as far away from wireless communication devices as possible. Please be careful about plac-
ing near any wiring or cables such as power supply cables, telephone wires or LAN cables.
Objects which contain lots of water, such as plants or soil, absorb radio waves. We highly
recommend that such materials should not be placed between or near wireless communica-
tion Units.
- When measuring temperature in a greenhouse it has been reported that as plants grew, communication er-
rors also increased.
- Do not place Units directly on the ground.
Do not place devices which are using the same communication frequency channel in the
same area.
- If the same channel is used for multiple devices not only will more communication errors occur, but battery
life will also be shortened.
- If there is a possibility that devices with the same frequency channel will be in wireless communication at the
same time, please make sure to make changes to the frequency channels so they are not the same.
After having made an installation, check the wireless signal strength.
Checking from the software:
The supplied software application includes a feature to check for wireless signal strength. In the RTR-500DC
Settings Utility, in the [Wireless Route Settings] menu it is possible to check signal strength.
Checking from the RTR-500DC:
In the Main Menu of the RTR-500DC, open [Monitor Mode] - [Specify Remote Unit]; check the signal
strength by looking at the antenna icons displayed in the monitoring window.

11
Introduction
Compliance Information
CE Statement
This device complies with technical specications required
under EN 301 489 (with battery and AC Adaptor), EN
300-220, and EN 60950-1.
Important Notice
Wireless products cannot be used in countries other than where those products have been
approved for use, according to that country's wireless regulations.
T&D Corporation shall in no manner whatsoever take responsibility for the usage of these
products, nor be liable in any manner for legal consequences stemming from the usage of
these wireless products in unapproved areas.

Introduction
12
What is "RTR-500DC"?
Outline
The RTR-500DC is a user-friendly wireless communication Data
Collector designed for hand-held portability. Without having to
manually gather the data loggers, it is possible, via wireless communi-
cation, to collect data from data loggers that have been registered as
Remote Units.
The data can then be easily displayed in graph form in the LCD display
of the Data Collector enabling the immediate on-the-spot checking of
data.
The RTR-500DC is compatible with any wireless Data Loggers in our
RTR-500 Series.
Compatible Data Loggers
RTR-501 / 502 / 503 / 505 / 507 / 574 / 576
* RTR-505 is a collective name for RTR-505-TC, 505-Pt, 505-V, 505-mA, and 505-P.
Features of Wireless Communication Function
Downloading Data via Wireless Communication
The wireless communication range between a Data Logger and an RTR-500DC
is about 150 meters (500 ft). It is possible to download data from Data Loggers
without having to handle them. Moreover, by setting up a Repeater, it is possible
to extend the wireless communication range.
Monitoring / Warning Monitoring Function
Using the monitoring function, the RTR-500DC carries out wireless communica-
tion at a set interval with the registered Data Loggers (Remote Units) to monitor
Current Readings and Remote Unit Status. If a warning occurs in a Remote Unit
for which the monitoring function is active, users will be notied by "beeping"
sound.
Registering up to 224 Data Loggers to one RTR-500DC
Up to 224 Data Loggers can be registered into one RTR-500DC. Data Logger
registration is carried out in Groups, each is assigned a frequency channel for
communication. Groups can be made and registered to match your purpose: by
location, by item and so on.
Operating Remote Units via Multiple RTR-500DC Units
Not only can one RTR-500DC unit be set up to manage a large number of
Remote Units, but multiple RTR-500DC units can be used to communicate, via
wireless communication, with one Remote Unit. The same Remote Unit can be
registered to multiple Base Units (RTR-500DC), either by using the software
"RTR-500DC for Windows" and copying the Base Unit registration information

13
Introduction
into a multiple number of Base Units, or by using the "Visitor Entry" function by
having the Base Unit read the Remote Unit info directly without using the
software. In this way it is not necessary to repeat the Remote Unit registration
process.
Starting and Stopping Recording
It is possible to set to start and stop recording for a Data Logger from the
RTR-500DC.
Features of the RTR-500DC
Graph Display of Recorded Data on High Quality LCD
It is possible to view the data collected from Data Loggers in graph form on the
RTR-500DC LCD. Here you can check whether a set Upper / Lower Limit has
been exceeded or not, as well as, the highest and lowest readings.
Holds up to 15 Remote Units at Full Storage Capacity
When downloading units at non-full storage capacity, it can store and manage
up to 250 downloading sessions.
Easy One-Hand Operation
The handy Operation Dial makes the operation of the RTR-500DC simple;
moving the dial up and down displays the various menu selections which can be
easily selected by pressing in on the dial.
Data Backup Function
When battery power becomes low, the Unit will automatically go into sleep mode
in order to protect the data. After going into sleep mode, the Unit can retain
recorded data for about a month.
Various Power Supplies and Energy Saving Function
It is possible to supply power to the RTR-500DC from any of the following: AAA
alkaline batteries, AAA Ni-MH batteries, USB bus power, or AC adaptor
(optional).The energy saving function will automatically turn off the Unit to save
battery power if the Unit is not used for about three minutes.
Firmware Update Function
The rmware can be easily updated by connecting the target RTR-500DC with a
USB communication cable to the computer. As newly compatible devices are
released, rmware updates will be periodically released to support these
changes. For more about how to update rmware and the latest update
information, visit our T&D website (http://www.tandd.com/).

Introduction
14
Before Using this Product
What are "Base Units", "Remote Units" and "Repeaters"?
The following terms are used throughout this Manual. The denitions
of the terms are as follows:
Base Unit
This term is used to refer to any RTR-500DC unit that has been set up as Base
Unit. A Base Unit collects current readings and data measured by and recorded
in Remote Units via wireless communication as well as carries out monitoring.
Remote Unit
This term is used to refer to any RTR-500 Series Data Logger that has been
registered as a Remote Unit. A Remote Unit measures and records various items
such as temperature, humidity and so on. The wireless communication range
between a Remote Unit and a Base Unit, if unobstructed and direct, is about 150
meters (500 ft).
RTR-501 / 502 : Temperature
RTR-503 / 507 : Temperature and Humidity
RTR-574 : Illuminance, UV Intensity, Temperature, and Humidity
RTR-576 : CO2 Concentration, Temperature, and Humidity
RTR-505 *
RTR-505-TC / 505-Pt ----------------- Temperature (Thermocouple / Pt100, Pt1000)
RTR-505-V ----------------------------- Voltage
RTR-505-mA -------------------------- 4-20mA
RTR-505-P ----------------------------- Pulse
* RTR-505-TC, 505-Pt, 505-V, 505-mA, and 505-P are collectively referred to as the
"RTR-505".
Repeater
This term is used to refer to any RTR-500 unit that has been registered as a
Repeater. If wireless communication cannot successfully be carried out due to
obstacles, or if you wish to extend the wireless communication range, please
add Repeater(s) between Remote Unit(s) and the Base Unit.
Remote Unit(s)
150m(500ft) 150m(500ft) 150m(500ft)
Remote Unit(s)
Base Unit Repeater
RTR-500
By registering and making settings with the dedicated software
"RTR-500DC for Windows" it is possible to create a system whereby wireless
communication will be possible between the registered Base Units, Remote
Units, and Repeaters.

15
Introduction
About Groups
When registering Remote Units and Repeaters to a Base Unit, it is helpful to
organize and register them in Groups depending on location, purpose or either
criteria. Each Group can then be assigned a communication frequency channel.
Remote Units and Repeaters cannot be registered to more than one Group.
Group 2
Group 1
About Number of Possible Registrations
Number of Groups : Up to 7 Groups per RTR-500DC Unit
Number of Remote Units: Up to 32 units per Group (16 units for RTR-505 / 574 /
576)
Number of Repeaters: Up to 15 units per Group
- Even if the number of Groups is reduced, the maximum number of Remote Units /
Repeaters per Group does not change.
- Even if the number of Remote Units / Repeaters is reduced, the maximum number
of Groups per RTR-500DC unit does not change.
Introduction
16
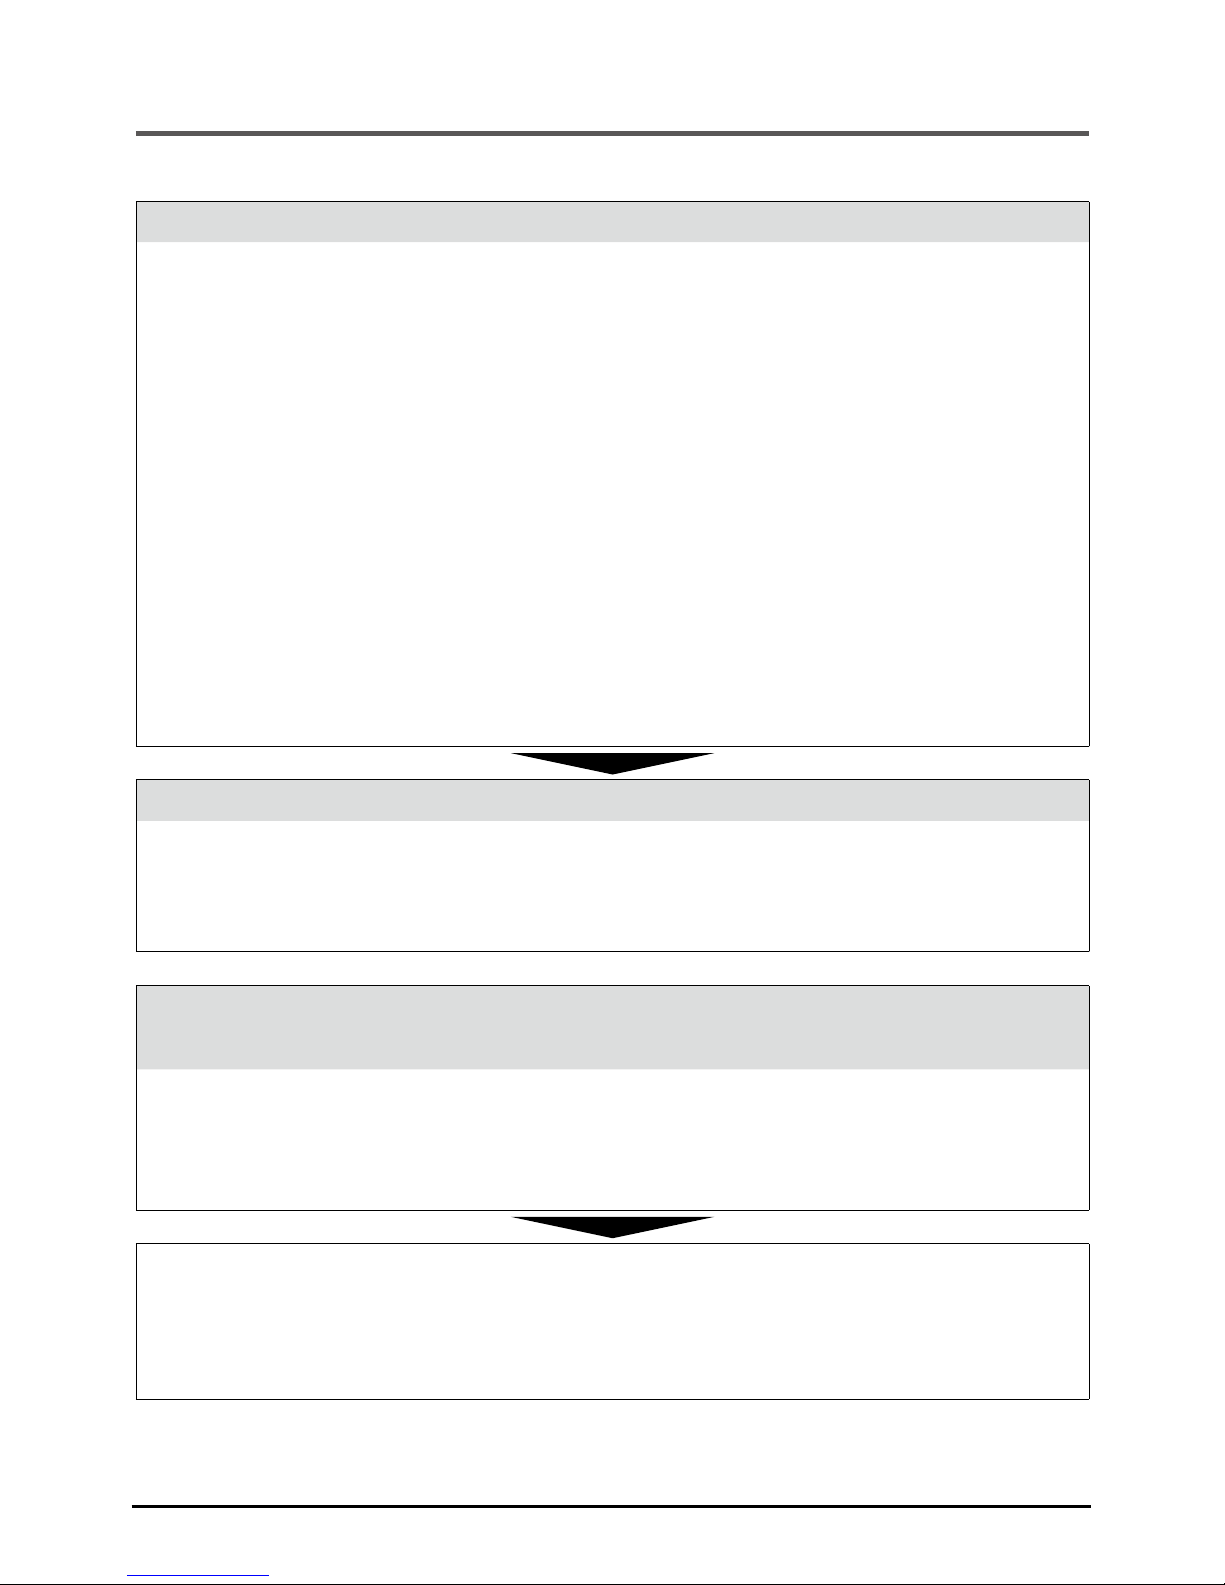
Basic Procedures
The following shows the basic ow of procedures.
Getting Ready
1. Check the Base Unit
Check the Package Contents and Inspect the Unit
Check the Basic Operations
- Install the Battery
- Operations via Buttons and Operation Dial
- About the Icons and Abbreviations
2. Install the software "RTR-500DC for Windows"
Precautions before Installation and Installation Procedure
Software Operating Environment
3. Install the USB Device Driver
Installation Procedure
Check the USB Device Drivers for Base Units, Remote Units and Repeaters
4. Get Ready the Remote Units and Repeaters (where necessary)
Follow directions in the User's Manual that accompanies the Remote Unit or
Repeater.
Notes about Operation
Check the Communication Methods
- Communication between RTR-500DC and PC
- Communication between Remote Unit / Repeater and PC
- Communication between RTR-500DC and Remote Unit
Registering Devices and Making Settings
(using "RTR-500DC for Windows")
Opening Applications and Checking the Menu
Checking the Process of Making Registrations and Settings
- For details including info about the settings window, please see the "Operation
Guide" in the software or the "Help" menu in the Settings Utility.
Using RTR-500DC Functions
- Communication Functions between the RTR-500DC and the Remote Unit
(Monitoring, Downloading Data, etc.)
- Viewing Functions (Graph, Data List, etc.)

Getting Ready
This section explains what needs to be done before registrations and
settings can be made.
Getting Ready
18
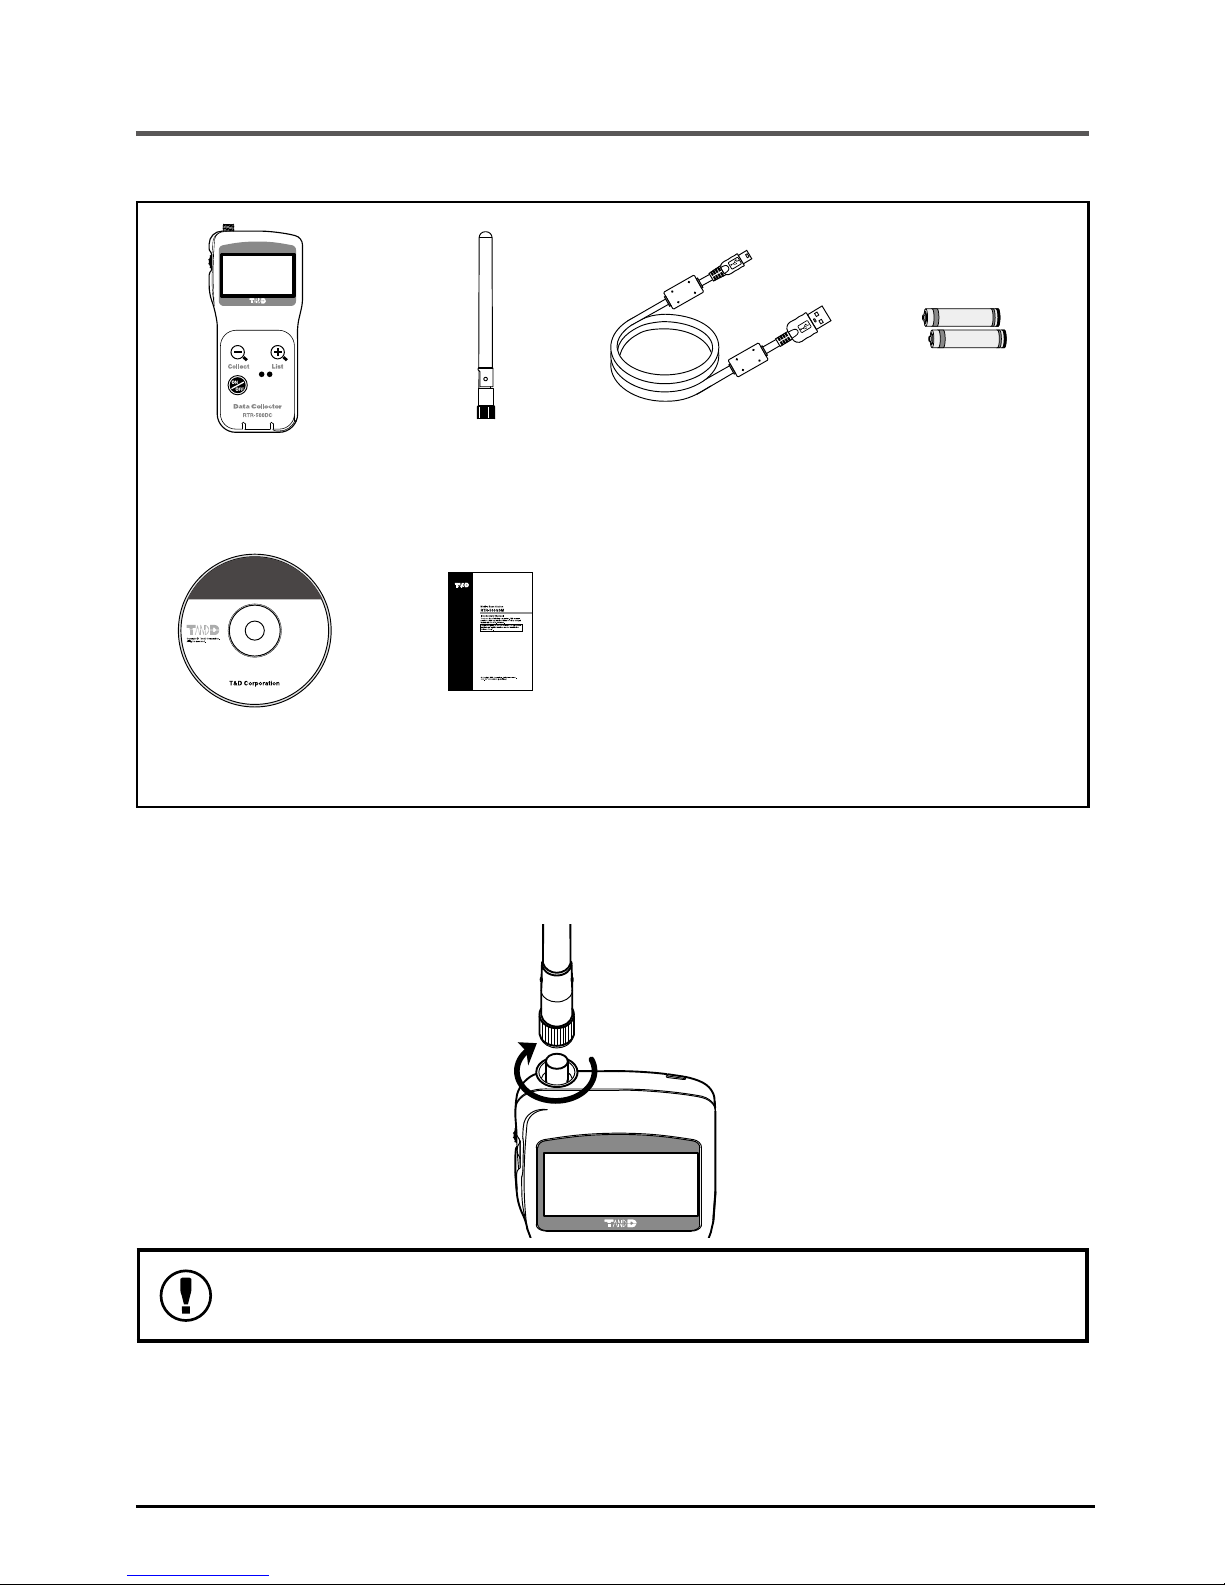
Package Contents
Check the contents of the package.
RTR-500DC x1 Antenna x 1 USB Mini-B Cable
x 1
AAA Alkaline Battery
(LR03) x 2
Software
CD-ROM x1
Introductory Manual
(Warranty) x 1
Connect the Antenna
Connect the supplied antenna to the antenna connector.
Make sure to install the software before connecting an
RTR-500DC to a PC with the USB cable.

Getting Ready 19
Appearance Diagram and Part Names
109
125
58
26.3
(Unit: mm)
Antenna Connector
Operation Dial
LCD Display
<List> Button
<Collect> Button
<Power> Button
Optical Communication Area
Slitted Area
Antenna
USB Communication Cable Jack
RS-232C Communication Cable Jack
AC Adaptor Jack
Battery Cover
From hereafter in this manual, the RTR-500DC will be referred to as
the "Unit".

Getting Ready
20
Install the Battery
Remove the battery cover from the back of the Unit, and insert two
AAA alkaline batteries.
- Make sure to use the new and same kind
of batteries.
- Make sure that + and - are in the correct
direction.
- The RTR-500DC cannot recharge batteries.
- Do not insert or change batteries with wet
hands.
Other Power Sources Available for Use
AAA Ni-MH Batteries
AC Adaptor AD-06C1 (sold separately)
USB Bus Power
Battery Replacement
If the Unit is left without a battery or battery power is lost for more
than 5 minutes, all recorded data may be erased.
When battery power becomes low, a battery life warning mark [ ]
will appear in the Unit's LCD display. When this mark appears, try to
replace the batteries with new ones as soon as possible.
Sleep Mode
If the batteries are not changed and power becomes even lower, the
Unit will automatically go into sleep mode in order to save data. In
sleep mode, the Unit cannot be turned on or operated as usual.
Other manuals for RTR-500DC
2
Table of contents
Other T&D Handheld manuals


