manuals.online logo
Brands
  1. Home
  2. •
  3. Brands
  4. •
  5. TANSUN LIMITED
  6. •
  7. Heater
  8. •
  9. TANSUN LIMITED Sorrento IP Triple User manual

TANSUN LIMITED Sorrento IP Triple User manual

TANSUN LIMITED
Spectrum House, Ridgacre Road, West Bromwich, West Midlands, B71 1BW, England
Tel: +44 (0)121 580 6200 - Fax: +44 (0)121 580 6222
Email: sales@tansun.com - Website: www.tansun.com
Due to our policy of ongoing improvement, we reserve the right to make changes without notice.
© 2018 TANSUN LIMITED
Ref No. 042222 Issue No. F
IMPORTANT - SAVE THESE
INSTRUCTIONS FOR FUTURE REFERENCE
The use of this symbol indicates that this product may not be treated as household waste.
By ensuring this product is disposed of correctly, you will help prevent potential negative
consequences for the environment and human health, which could otherwise be caused by
inappropriate waste handling of this product. For more detailed information about recycling
of this product, please contact your local council, your household waste disposal service or
the shop where you purchased the product.
I N F O RM AT I O N F O R E U - M E M BE R S TAT E S :
D E C L A R AT I O N O F C O N F O R M I T Y
This product complies with the Harmonised European Standard: EN 60335-1:2012 in
conjunction with EN 60335-2-30:2009 + A11 and EN 62233 and the European Standard
Electromagnetic Compatibility EEC Directives 2004/108/EC and 89/336/EEC and the RoHS
Directive 2011/65/EU
Reference Manual
Sorrento IP
Triple
UK & EUROPEAN MODELS:
SORT-030IP-SW, SORT-030IP-UK, SORT-030IP-EU (3.0kW / 230V
SORT-045IP-SW, SORT-045IP-UK, SORT-045IP-EU (4.5kW / 230V
SORT-060IP-SW, SORT-060IP-UK, SORT-060IP-EU (6.0kW / 230V
Spectrum House, Ridgacre Road, West Bromwich,
West Midlands, B71 1BW, England
Tel: +44 (0)121 580 6200 - Fax: +44 (0)121 580 6222
Email: [email protected] - Website: www.tansun.com
SORRENTO IP HEATERS ARE DESIGNED AND MANUFACTURED FOR OUTDOOR USE.
THEY CAN BE USED INDOORS BUT SHOULD BE USED IN CONJUNCTION WITH SUITABLE
ENERGY SAVING CONTROLLERS TO COMPLY WITH EU 2015/118
(PLEASE CONTACT TANSUN FOR DETAILS
CAUTION
When using Tansun electrical heaters, basic precautions should always be
followed to reduce the risk of fire, electric shock, and injury to persons,
including the following:
Read all instructions before using this heater.
•Before using this appliance:
- Check that the voltage indicated on the type plate corresponds to the
mains supply voltage.
- Ensure that the heater has been securely fastened in it
s final mounting
position.
•Do not locate the heater immediately below a socket outlet.
•This appliance can be used by children aged from 8 years and above
and persons with reduced physical, sensory or mental capabilities or
lack of experience and knowledge if they have been given supervision
or instruction concerning use of the appliance in a safe way and
un
derstand the hazards involved. Children shall not play with the
appliance. Cleaning and user maintenance shall not be made by
children without supervision.
•Children of less than 3 years should be kept away unless continually
supervised.
•Children aged from 3 years and less than 8 years shall only switch on/
off the appliance provided that it has been placed or installed in its
in
tended normal operating position and they have been given
supervision or instruction concerning use of the appliance in a safe way
and understand the hazards involved. Children aged from 3 years and
less than 8 years shall not plug in, regulate and clean the appliance or
perform user maintenance.
•CAUTION - Some parts of the product can become very hot and
cause burns. Particular attention has been given where children
and vulnerable people are present.
•Remove the plug from the mains socket (or disconnect pole switch)
dur
ing installation, cleaning and/or replacing the lamp emitter and
always ensure that the lamp emitter is cool.
•Do not use an extension cord with this product because the extension
cord may overheat and cause a risk of fire.
2 11
C H A I N H AN G I N G C O N F I G U R AT I O N S - AT A G L AN C E
1 × Sorrento IP Triple Unit 2 × Sorrento IP Triple Units
WA L L M O U N T E D C O N F I G U R AT I O N S - AT A G L A N C E
1 × Sorrento IP Triple Unit
Fig. T Fig. U
7. Remove the screw (Fig. U) from the side reflector and lift it up away from the heater to remove it. Repeat at
opposite end to remove other side reflector.
8. The lamp emitter wires should be pulled out of the side slots and the lamp emitter can be lifted up
completely (Fig. V). The wires should be gently pulled so they come out from behind the reflector.
9. The lamp emitter should now be removed from the heater as shown in Fig. X.
10. Refit the new lamp emitter in reverse order ensuring that no wires get trapped and all screws are fully
tightened.
Fig. X Fig. V
10
•Keep the mains supply cord away from the body of the heater which will
get hot during use.
•Arrange the mains supply cord so it cannot be tripped over or damaged.
•Do not cover or obstruct the heater while it is in use.
•Do not insert any object through any slot or opening in the heater.
•Do not use if a guard is not present.
•Do not install less than the minimum mounting distance from the floor.
•WARNING: This heater should only be installed with an energy saving
device to control the room temperature and operated by users capable
of using the device. Do not use this heater in small rooms when they
are occupied by persons not capable of leaving the room on their own,
unless constant supervision is provided.
•Do not touch the heater when it is turned on, as the body gets hot.
•Do not use the heater in a bathroom,
laundry areas and similar
locations. Never locate the heater where it may fall into a bathtub or
other water container.
•A heater has hot parts inside. Do not use it in areas where petrol, paint,
or flammable liquids are used or stored.
•If the supply cord becomes damaged, it must be replaced by the
manufacturer, its service agent or a similar qualified person in order to
avoid a hazard.
•WARNING: This appliance must be connected to a supply that is
earthed!
I M P O R TA N T -
S AV E T H E S E I N S T R U C T I O N S F O R F U T U R E R E F E R E N C E
Keep combustible material such as furniture, papers,
clothes and curtains at least 1.8m (6ft) away from the
sides and rear.
W A R N I N G : R I S K O F F I R E
W A R N I N G : R I S K O F F I R EW A R N I N G : R I S K O F F I R E
W A R N I N G : R I S K O F F I R E
1.8m
(6ft)
3
I N T R O D U C T I O N
The Sorrento IP Triple heater produces radiant heat like the sun, warming people and objects rather than the
air in between. It is mounted on an adjustable bracket that allows the heat to be directed exactly where it is
required. Its attractive, lightweight design means that it is effective yet unobtrusive. The Sorrento IP Triple
heater is weatherproof so is suitable for outdoor use or can be used indoors in conjunction of a suitable energy
saving control device (contact Tansun for details).
Please read the following instructions carefully before use. The safety of this heater is guaranteed only
by its correct usage in accordance with these instructions, therefore it is recommended that they are
retained for future reference.
Note: Use MCB Type 3 or Type C.
S P E C I FI C AT I O N
T a b l e 1 . U K a n d E u r o p e a n T r i p l e H e a t e r s
4
No. of
Units x
Model
Type
Voltage
(V)
Emitters
x Power
(kW)
Total
Power
(kW)
Current
(A) per
emitter
Total
Current
(A) of
unit
Min.
height
from
floor
(m)
Min.
dist.
from
ceiling
(m)
Min.
dist.
from
side
Wall
(m)
Dimensions (inc.
bracket & bars max.
pos.) W x H x D
(mm)
Weight
(kg)
1 x SOR
210IPT 230 3 x 1.0 3.0 4.3 13.0 3.0 0.5 1.0 1178 × 227 × 323 8.0 IP55
1 x SOR
215IPT 230 3 x 1.5 4.5 6.5 19.6 3.5 0.5 1.0 1178 × 227 × 323 8.0 IP55
1 x SOR
220IPT 230 3 x 2.0 6.0 8.7 26.1 4.5 0.5 1.5 1178 × 227 × 323 8.0 IP55
2 x SOR
210IPT 230 6 x 1.0 6.0 4.3 26.1 4.5 0.5 1.5 1178 × 460 × 142 16.0 IP55
2 x SOR
215IPT 230 6 x 1.5 9.0 6.5 39.1 5.0 0.5 1.5 1178 × 460 × 142 16.0 IP55
2 x SOR
220IPT 230 6 x 2.0 12.0 8.7 52.2 5.0 0.5 1.5 1178 × 460 × 142 16.0 IP55
Ingress
Protection
(IP)
9
1. Ensure the heater and lamp emitter are cool and the power supply is disconnected by removing the plugs
from the socket outlet - all plugs must be removed even if only one emitter is to be replaced or disconnect
large pole switch(es).
2. Remove the screws from the terminal box at the back of the emitter you wish to replace and lift off the lid -
see Fig. P.
3. Disconnect the lamp emitter from the connector blocks by unscrewing the screws highlighted above in
Fig. Q and remove the lamp emitter wires from the terminal block.
4. At the back of the heater, remove the plate holding the terminal box by removing the two fixing screws as
shown in Fig. R.
Fig. P Fig. Q
5. Pull the lamp emitter wires one at a time through the plate to remove as shown in Fig. S.
6. At the front of the heater, the guard in front of the lamp emitter should be removed by gently pulling it away
from the heater so it prises out of its locating holes at each end (Fig. T).
Fig. R Fig. S
If you are in any doubt about following the procedure below, please contact us for technical
assistance. The mains power should be disconnected before any attempts are made to replace a
lamp emitter. The following should be carried out with compliance to the latest electrical regulations.
If you are unfamiliar with installing such fixtures, contact a qualified electrician to carry out.
C A U T I O N
C A U T I O NC A U T I O N
C A U T I O N
R E P L AC I N G A L AM P E M I T T E R
continued...
8
M AI N TE N AN C E
In the event of heater failure, or for spare parts or advice, please contact the manufacturer in the first
instance.
Disconnect from the mains before commencing any maintenance procedure including cleaning.
To ensure optimum heat effectiveness, it is recommended that that the guard is removed and the reflector is
wiped with a lint-free cloth should the reflector show considerable signs of dust or dirt.
H A N D L I N G T H E R E P L AC E M E N T L A M P E M I T T E R
Your new lamp emitter should not be handled with bare hands.
Remove finger marks with a soft cloth and methylated spirits or rubbing alcohol. Finger marks
will burn into the quartz glass causing it to fail prematurely.
Y O U R R E P L AC E M E N T L AM P E M I T T E R
It is very important that your replacement lamp emitter is exactly the same as the one it was supplied with.
Failure to fit the exact same type could cause the heater to fail or even become dangerous especially when
used in an outdoor environment.
Please contact Tansun Limited to purchase your replacement lamp emitter and state the model number of
the heater you wish to fit the lamp emitter to.
P R O D U C T G U AR A N T E E - P L E AS E R E AD C AR E F U L LY
This product carries a full 24 month warranty from original date of purchase when used in accordance with
these instructions. This excludes lamp emitter* when used in a commercial application which then carry a 30
day warranty from original date of purchase. This is subject to the heater being installed correctly. Should you
be in any way uncertain, please call our CUSTOMER HELPLINE on +44 (0)121 580 6200 between 9.00am
and 5.00pm (GMT) Monday to Friday. Please quote the serial number, model number, rating and date/place
of purchase.
Should your product be faulty, please contact the distributor your purchased it from in the first instance.
Always retain your receipt as proof of purchase.
*(excludes breakages)
C O N F I G U R AT I O N S
The Sorrento IP Triple heater is a single unit that contains 3 × lamp emitters. It can be installed as an
individual unit or joined to one or two more units (for chain hanging only) using joining bars (available
separately) to increase the size and output of the installation. Please read the section ‘joining individual
heaters together’ for information on how this should be done.
I N S TA L L AT I O N - AL L C O N F I G U R AT I O N S
Warning - this appliance must be connected to an earthed supply.
The wired versions (030IP-UK, 030IP-EU, 045IP-UK, 045IP-EU, 060IP-UK & 060IP-EU) are fitted with 3 ×
supply cables 3.0 metres long with moulded plugs, therefore it is unnecessary to remove the terminal box
in order to carry out normal installation of these models.
All unwired versions (030IP-SW, 045IP-SW & 060IP-SW) should be installed by a suitably qualified
electrician, following the instructions below.
All installations must be in accordance with the latest electrical safety regulations.
We recommend using a RCD where applicable.
If self wiring, a large double pole switch with a 3.0mm contact disconnection should be fitted.
Please observe the minimum safe distance between the heater body and any inflammable surfaces.
When the electrical connection is outside, it is recommended that a waterproof socket is used for the
connection/terminal. Otherwise, the plug should be connected to a socket indoors.
When installing indoors the heater should be connected to a suitable energy saving controller (please
contact Tansun for details).
If in any doubt, please contact a suitably qualified electrician.
1. Unscrew the terminal box cover at the back of the heater
and feed the supply cable through the compression gland
ensuring the rubber seal is on the cable.
2. Use a minimum of 1.0mm2H05RN-F supply cable with 2
poles and earth and sleeve with silicon glass fibre braided
(250°C) Sleeving. The live and neutral wires must be
connected to the terminal block. See Fig 1.
3. The green/yellow wire should be connected to the clamp
marked with the earth symbol using a suitable wire terminal. Fit
cord grip and terminal box saddle once wired.
4. Tighten the barrel nut of the compression gland so that the
rubber seal grips the cable (Fig 2).
5. To prevent water ingress, ensure that the cover is secured
well by hand tightening all for screws evenly.
N
Fig. 1
Fig. 2
E
L
5
•The Sorrento IP Triple heater should only be wall mounted in a horizontal
manner or hung from a ceiling from chains (not supplied).
•When wall mounting the Sorrento IP Triple heater in a horizontal manner,
do not position the heater at an angle more than 90° and less than 30°
as shown in Fig. A.
•When ceiling hanging the Sorrento IP Triple heater, ensure the minimum
distance from the ceiling is adhered to as shown in Fig. B.
•Always allow the heater to cool before attempting to reposition/move.
Never attempt to move the heater while it is switched on!
•Observe the minimum safe distance between the heater body and
inflammable surfaces and objects when mounting.
•Please refer to Table 1 for the recommended positioning of the heater
with regards to minimum distances. Do not install the heater in a corner!
•Keep out of the reach of children.
Fig. B
6
M O U N T I N G - I N D I V I D U AL U N I T (WALL MOUNTING OR CHAIN
HANGING)
1. When wall mounting, securely fasten the L-shaped wall brackets to the
mounting surface using both of the fixing holes in the short part of the
bracket (see Fig. D for mounting hole centres). Please refer to Table 1 for
recommended positioning of the heater. Please note. Wall fixings are not
supplied. They should be selected to substantially support the weight of the
installation. If in doubt contact a professional for advice! When hanging
from a ceiling two equal length and gauge chains are required and should
be selected with fixings that are more than adequate to hold the weight of
the heater. Again, if in doubt contact a professional for advice!
2. The heater should be mounted with the terminal box at the bottom of the
heater when being wall mounted.
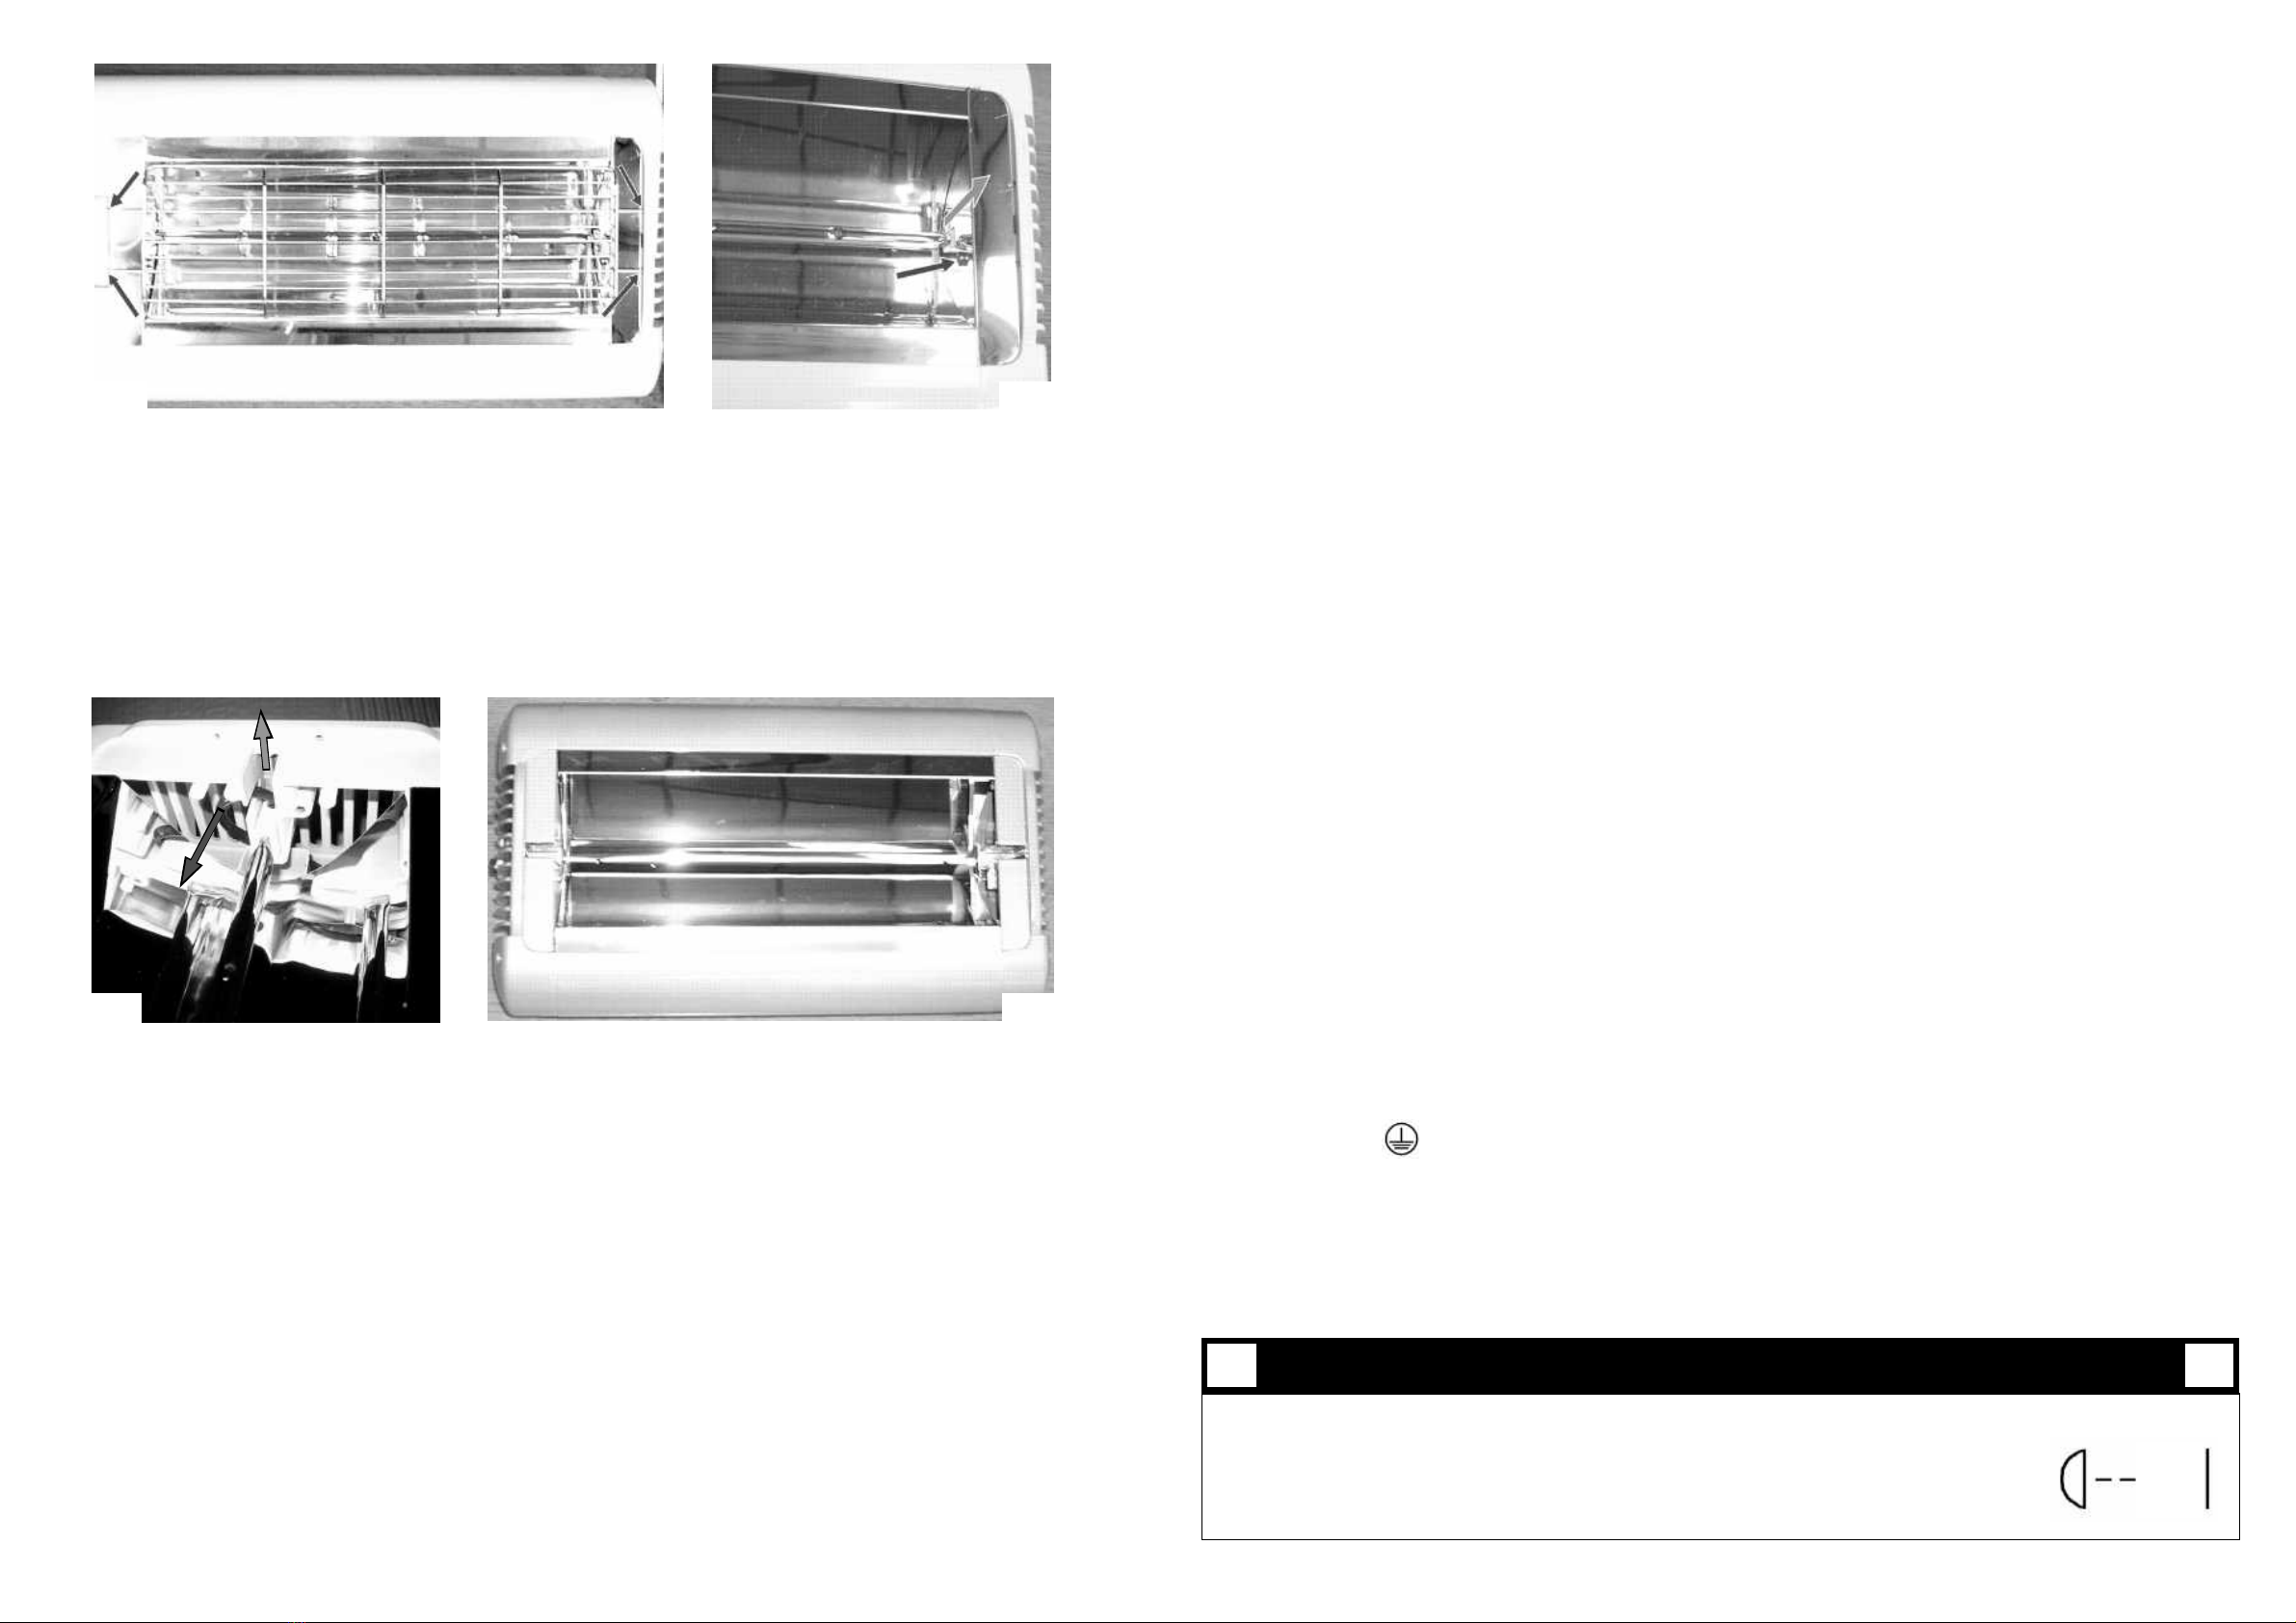
3. When wall mounting, fix in the required angular position by tightening the
fixing bolts on the brackets at the rear of the heater as shown in Fig. C. The
heater should face directly down when hanging.
4. Secure the supply cable so it is not resting on the body or obstructing the
air-vents.
Always isolate the heater from the mains supply when adjusting the
position.
Fig. A
Fig. D
Fig. C
A S S E M B L I N G - T W O I N D I V I D U AL H E AT E R S J O I N E D
1.Take the first heater and place it face down on a flat surface.
2.Take the second heater and place it face down and positioned parallel to the first heater.
3.Push the M8 bolts (used to hold the wall brackets through the hole in the brackets on the rear heaters and
slide a shake-proof washer on all the threads from the protruding side.
4.Slide the joining bars on each bolt and fit a washer and nut – do not fully tighten at this point.
5.Ensure the second heater is still parallel to the first and sitting flat.
6.Slide the joining bars on each protruding bolt of the other heater to connect them together and fit the
washers and nuts.
7. Again, ensuring the heaters remain flat, fully tighten all four nuts to secure the joining bars in place.
7
J O I N I N G I N D I V I D U A L H E AT E R S T O G E TH E R
The Sorrento IP Triple heater can be joined to other Sorrento IP Triple heaters using the joining bars which are
available as an optional accessory. A maximum of three individual heaters can be joined in one installation.
When two Sorrento IP Triple heaters are joined they should
only be hung from a ceiling on chains - do not wall mount!
Always allow the heater to cool before attempting to
reposition/move. Never attempt to move the heater while it is
switched on!
Observe the minimum safe distance between the heater body
and inflammable surfaces and objects when mounting.
Please refer to Table 1 for the recommended positioning of
the heater with regards to minimum distances. Do not install
the heater in a corner!
Keep out of the reach of children.
1. Please refer to Table 1 for recommended positioning of the
heater. When hanging from a ceiling two chains of equal
length and gauge are required and should be selected with
fixings that are more than adequate to hold the weight of t h e
heater. If in doubt contact a professional for advice!
2. Fix the heater assembly to the chains via the hole in the
centre of the joining bar as shown in Fig. E. and ensure the
heater faces directly down when hanging.
3. Secure the supply cable so it is not resting on the body or
obstructing the air-vents.
Always isolate the heater from the mains supply when
adjusting the position.
Fig. E
C E I L I N G H A N G I N G - T W O I N D I V I D U A L H E AT E R S J O I N E D

This manual suits for next models

9

Other TANSUN LIMITED Heater manuals

TANSUN LIMITED Rio Grande RF GRAS-015RF-HW User manual

TANSUN LIMITED

TANSUN LIMITED Rio Grande RF GRAS-015RF-HW User manual

Popular Heater manuals by other brands

EQUATION 3276000644903 Assembly, Use, Maintenance Manual

EQUATION

EQUATION 3276000644903 Assembly, Use, Maintenance Manual

Empire Comfort Systems VEP-40B Installation and owner's guide

Empire Comfort Systems

Empire Comfort Systems VEP-40B Installation and owner's guide

ATC Electrical & Mechanical Sienna 2.2 Installation, operation and maintenance manual

ATC Electrical & Mechanical

ATC Electrical & Mechanical Sienna 2.2 Installation, operation and maintenance manual

Tylo SENSE PLUS user guide

Tylo

Tylo SENSE PLUS user guide

Liberator RMH-1 owner's manual

Liberator

Liberator RMH-1 owner's manual

Runtal FOLIO Installation and operating manual

Runtal

Runtal FOLIO Installation and operating manual

Master CT 50 P owner's manual

Master

Master CT 50 P owner's manual

NuTone 112 user guide

NuTone

NuTone 112 user guide

Adax CLEA H Series installation manual

Adax

Adax CLEA H Series installation manual

Hayward H250FDN Service & installation manual

Hayward

Hayward H250FDN Service & installation manual

Profile ATLAS manual

Profile

Profile ATLAS manual

Eagle Group RedHots RHHL Series Operating manual and instructions

Eagle Group

Eagle Group RedHots RHHL Series Operating manual and instructions

ARDESTO IHS-1650 instruction manual

ARDESTO

ARDESTO IHS-1650 instruction manual

Helo SAGA ELECTRO Installation and user manual

Helo

Helo SAGA ELECTRO Installation and user manual

Sealey CD2013 instructions

Sealey

Sealey CD2013 instructions

Sunbeam SFH610 Instruction

Sunbeam

Sunbeam SFH610 Instruction

STEELE PRODUCTS SP-HI1200BP owner's manual

STEELE PRODUCTS

STEELE PRODUCTS SP-HI1200BP owner's manual

Mercury 450.017UK user manual

Mercury

Mercury 450.017UK user manual

manuals.online logo
manuals.online logoBrands
  • About & Mission
  • Contact us
  • Privacy Policy
  • Terms and Conditions

Copyright 2025 Manuals.Online. All Rights Reserved.