TaoTronics TT-EE006 User manual

ELECTRIC PRESSURE COOKER
User Guide
TT-EE006
EUROPE
E-mail:
support.uk@taotronics.com(UK)
support.de@taotronics.com(DE)
support.fr@taotronics.com(FR)
support.es@taotronics.com(ES)
support.it@taotronics.com(IT)
EU Importer: ZBT International Trading GmbH
Address: Halstenbeker Weg 98C, 25462 Rellingen, Deutschland
NORTH AMERICA
E-mail : support@taotronics.com(US)
support.ca@taotronics.com(CA)
Tel : 1-888-456-8468 (Monday-Friday: 9:00 – 17:00 PST)
US Distributor: SUNVALLEYTEK INTERNATIONAL INC.
Address:46724 Lakeview Blvd, Fremont, CA 94538
Manufacturer: Shenzhen NearbyExpress Technology Development Co.,Ltd.
Address: 333 Bulong Road, Shenzhen, China, 518129
MANUFACTURER
Learn more about the EU Declaration of Conformity:
https://www.taotronics.com/downloads-TT-EE006-CE-Cert.html
ASIA PACIFIC
E-mail: support.jp@taotronics.com(JP)
Tel:03-5542-0907(10-18時/土日祝除く)
JPImporter:株式会社SUNVALLEYJAPAN
〒104-0032東京都中央区八丁堀3丁目18-6PMO京橋東9F
www.taotronics.com

Important
When using electric appli-
ance, basic safety precau-
tions should always be fol-
lowed. Please read the user
manual thoroughly and keep
it properly for future reference.
1. Don’t touch hot surfaces. Use handles or knobs.
2. Don’t immerse cord, plug, appliance in water or other liquid to avoid
electric shock. If the unit accidentally falls or gets immersed in water,
unplug it from power immediately. Never reach into water.
3.This unit is not intended for use by children. Close supervision is
necessary when used near children.
4. Unplug from the power source when not in use and before cleaning.
Allow cooling before putting on or taking off parts.
5. If malfunction occurs during use, unplug it immediately. Don’t attempt
to repair it.
6. Don’t operate the appliance if it is damaged in any manner including
breakage of the cable.Ask authorized person for repair.
7. Use of accessories not recommended by the manufacturer may
cause injuries.
8.Always operate the unit on a stable surface.
9.This appliance is for household use only.
10. Don’t use the unit outdoors.
11. Don’t let the cord hang over edge of the table or counter. Keep it
away from hot surfaces.
12. Keep this appliance away from hot gas, electric burner, or heated
oven.
13. Pay special attention when moving the pot with hot oil or any other
liquid.
14. Plug the power cord into the unit rst before connect it to the wall
outlet.To disconnect, turn the unit off, then remove the plug from wall
outlet.
15. Don’t use the unit for other than the intended purpose.
16. Cook only in the inner pot to reduce the risk of electric shock.
17.This unit cooks under high pressure. Improper use may result in
scalding injury.
18. Don’t exceed the max line marked in the inner pot.
19. It is not recommended to cook food such as applesauce, cranberries,
pearl barley, oatmeal or other cereals, split peas, noodles, macaroni,
rhubarb or spaghetti which are tend to foam, froth, and sputter, that
may block the steam release device. Handle with care when using
any of these ingredients.
20.Always check the steam release devices for clogging before use.
Always make sure that the Steam Release Handle is installed properly
before use, incorrect assembly may prevent the pressure cooker
building up pressure or allow steam to come out from rim of the lid.
21. Don’t use the unit to pressure fry with oil.
22. Don’t open the pressure cooker until it has cooled off and all pressure
inside the pot has been released. If the Float Valve is still up or the lid
is difcult to open, it is an indication that the cooker is still pressurized,
don’t force it open.
23. Never force the pressure cooker open to avoid pressure built up in the
cooker to cause hazard. Follow the instructions in the “Pressure
01/02
Release” section. If you follow the quick pressure release method,
protect your skin from any contact with escaping steam. Once all the
pressure has been released, remove the lid with care, keep it away
from you to avoid skin contact with the remaining heat or steam.
24.This unit generates heat and escaping steam during use.All
necessary precautions should be followed to avoid re, burns, or
other personal injury during its operation. Never use or place the unit
near ammable materials such as dishtowels, paper plates, napkins,
curtains, paper towels, etc. Allow sufcient space around all sides of
the unit including top and bottom to ensure proper airow.
25.This appliance is not intended for use by persons with reduced
physical, sensory or mental capabilities, or lack of experience and
knowledge, unless they are under the supervision of a responsible
person or have been given proper instruction in using the appliance.
This appliance is not intended for use by children.Any person who
has not fully read and understood all operating and safety
instructions contained in this instruction manual is not qualied to
operate or clean this electric pressure cooker.
26.When cooking doughy food, gently shake the cooker before opening
the lid to avoid food ejection.
27.The heating plate surface is subject to residual heat after use.
28.The appliance is not intended to be operated by an external timer or
a separate remote control system.
Special Cord Set Instructions
A short cord is provided to reduce the hazard resulting from
entanglement or tripping from a longer cord. Longer cords and
extension cords are available and may be used if the marked electrical
rating of the longer cord is at least as great as the electrical rating of the
appliance, and if care is taken to arrange the longer cord so that it will
not drape over the counter top or table where it can be pulled by
children or tripped over accidentally.
Precautions
1. Before use each time, make sure to check the anti-block shield, oat
valve, and Steam Release Handle for obstructions; wipe the surface of
the inner pot and heating plate to conrm they are free of any foreign
object, and make sure the Steam Release Handle is in the sealing
location.
2.After cooking, wait until the cooker cools down for a while and release
the pressure by the Steam Release Handle. Pay special attention when
removing the lid to avoid serious burns resulting from steam inside the
unit.
3. Stop using the appliance if any malfunction occurs including
breakage of the cable or plug and consult the troubleshooting and
warranty sections.
4. Insert the plug into the socket rmly to avoid incomplete insertion
causing electric shock or short circuit.
5. Remove any dirt or water attached to the plug to avoid re. Unplug the
cord from the power outlet when not in use.
6. Care must be taken on the seals to avoid deformation.

Important
When using electric appli-
ance, basic safety precau-
tions should always be fol-
lowed. Please read the user
manual thoroughly and keep
it properly for future reference.
1. Don’t touch hot surfaces. Use handles or knobs.
2. Don’t immerse cord, plug, appliance in water or other liquid to avoid
electric shock. If the unit accidentally falls or gets immersed in water,
unplug it from power immediately. Never reach into water.
3.This unit is not intended for use by children. Close supervision is
necessary when used near children.
4. Unplug from the power source when not in use and before cleaning.
Allow cooling before putting on or taking off parts.
5. If malfunction occurs during use, unplug it immediately. Don’t attempt
to repair it.
6. Don’t operate the appliance if it is damaged in any manner including
breakage of the cable.Ask authorized person for repair.
7. Use of accessories not recommended by the manufacturer may
cause injuries.
8.Always operate the unit on a stable surface.
9.This appliance is for household use only.
10. Don’t use the unit outdoors.
11. Don’t let the cord hang over edge of the table or counter. Keep it
away from hot surfaces.
12. Keep this appliance away from hot gas, electric burner, or heated
oven.
13. Pay special attention when moving the pot with hot oil or any other
liquid.
14. Plug the power cord into the unit rst before connect it to the wall
outlet.To disconnect, turn the unit off, then remove the plug from wall
outlet.
15. Don’t use the unit for other than the intended purpose.
16. Cook only in the inner pot to reduce the risk of electric shock.
17.This unit cooks under high pressure. Improper use may result in
scalding injury.
18. Don’t exceed the max line marked in the inner pot.
19. It is not recommended to cook food such as applesauce, cranberries,
pearl barley, oatmeal or other cereals, split peas, noodles, macaroni,
rhubarb or spaghetti which are tend to foam, froth, and sputter, that
may block the steam release device. Handle with care when using
any of these ingredients.
20.Always check the steam release devices for clogging before use.
Always make sure that the Steam Release Handle is installed properly
before use, incorrect assembly may prevent the pressure cooker
building up pressure or allow steam to come out from rim of the lid.
21. Don’t use the unit to pressure fry with oil.
22. Don’t open the pressure cooker until it has cooled off and all pressure
inside the pot has been released. If the Float Valve is still up or the lid
is difcult to open, it is an indication that the cooker is still pressurized,
don’t force it open.
23. Never force the pressure cooker open to avoid pressure built up in the
cooker to cause hazard. Follow the instructions in the “Pressure
03/04
Release” section. If you follow the quick pressure release method,
protect your skin from any contact with escaping steam. Once all the
pressure has been released, remove the lid with care, keep it away
from you to avoid skin contact with the remaining heat or steam.
24.This unit generates heat and escaping steam during use.All
necessary precautions should be followed to avoid re, burns, or
other personal injury during its operation. Never use or place the unit
near ammable materials such as dishtowels, paper plates, napkins,
curtains, paper towels, etc. Allow sufcient space around all sides of
the unit including top and bottom to ensure proper airow.
25.This appliance is not intended for use by persons with reduced
physical, sensory or mental capabilities, or lack of experience and
knowledge, unless they are under the supervision of a responsible
person or have been given proper instruction in using the appliance.
This appliance is not intended for use by children.Any person who
has not fully read and understood all operating and safety
instructions contained in this instruction manual is not qualied to
operate or clean this electric pressure cooker.
26.When cooking doughy food, gently shake the cooker before opening
the lid to avoid food ejection.
27.The heating plate surface is subject to residual heat after use.
28.The appliance is not intended to be operated by an external timer or
a separate remote control system.
Special Cord Set Instructions
A short cord is provided to reduce the hazard resulting from
entanglement or tripping from a longer cord. Longer cords and
extension cords are available and may be used if the marked electrical
rating of the longer cord is at least as great as the electrical rating of the
appliance, and if care is taken to arrange the longer cord so that it will
not drape over the counter top or table where it can be pulled by
children or tripped over accidentally.
Precautions
1. Before use each time, make sure to check the anti-block shield, oat
valve, and Steam Release Handle for obstructions; wipe the surface of
the inner pot and heating plate to conrm they are free of any foreign
object, and make sure the Steam Release Handle is in the sealing
location.
2.After cooking, wait until the cooker cools down for a while and release
the pressure by the Steam Release Handle. Pay special attention when
removing the lid to avoid serious burns resulting from steam inside the
unit.
3. Stop using the appliance if any malfunction occurs including
breakage of the cable or plug and consult the troubleshooting and
warranty sections.
4. Insert the plug into the socket rmly to avoid incomplete insertion
causing electric shock or short circuit.
5. Remove any dirt or water attached to the plug to avoid re. Unplug the
cord from the power outlet when not in use.
6. Care must be taken on the seals to avoid deformation.
05/06
Package Contents
• 1 x TaoTronics Electric Pressure Cooker (Model:TT-EE006)
• 1 x Spare Silicone Sealing Ring
• 1 x Measuring Cup
• 1 x Meal Spoon
• 1 x Soup Spoon
• 1 x Condensation Collector
• 1 x Steam Rack
• 1 x Recipe
• 1 x User Manual
• 1 x Quick Start Guide
Specications
Model
Voltage
Power
Inner Pot Volume
Working Pressure
Inner Pot Material
TT-EE006
AC 120V / 60Hz
1000W
6 Quart
40-50 Kpa (low pressure)
70-80 Kpa (high pressure)
304 Stainless Steel
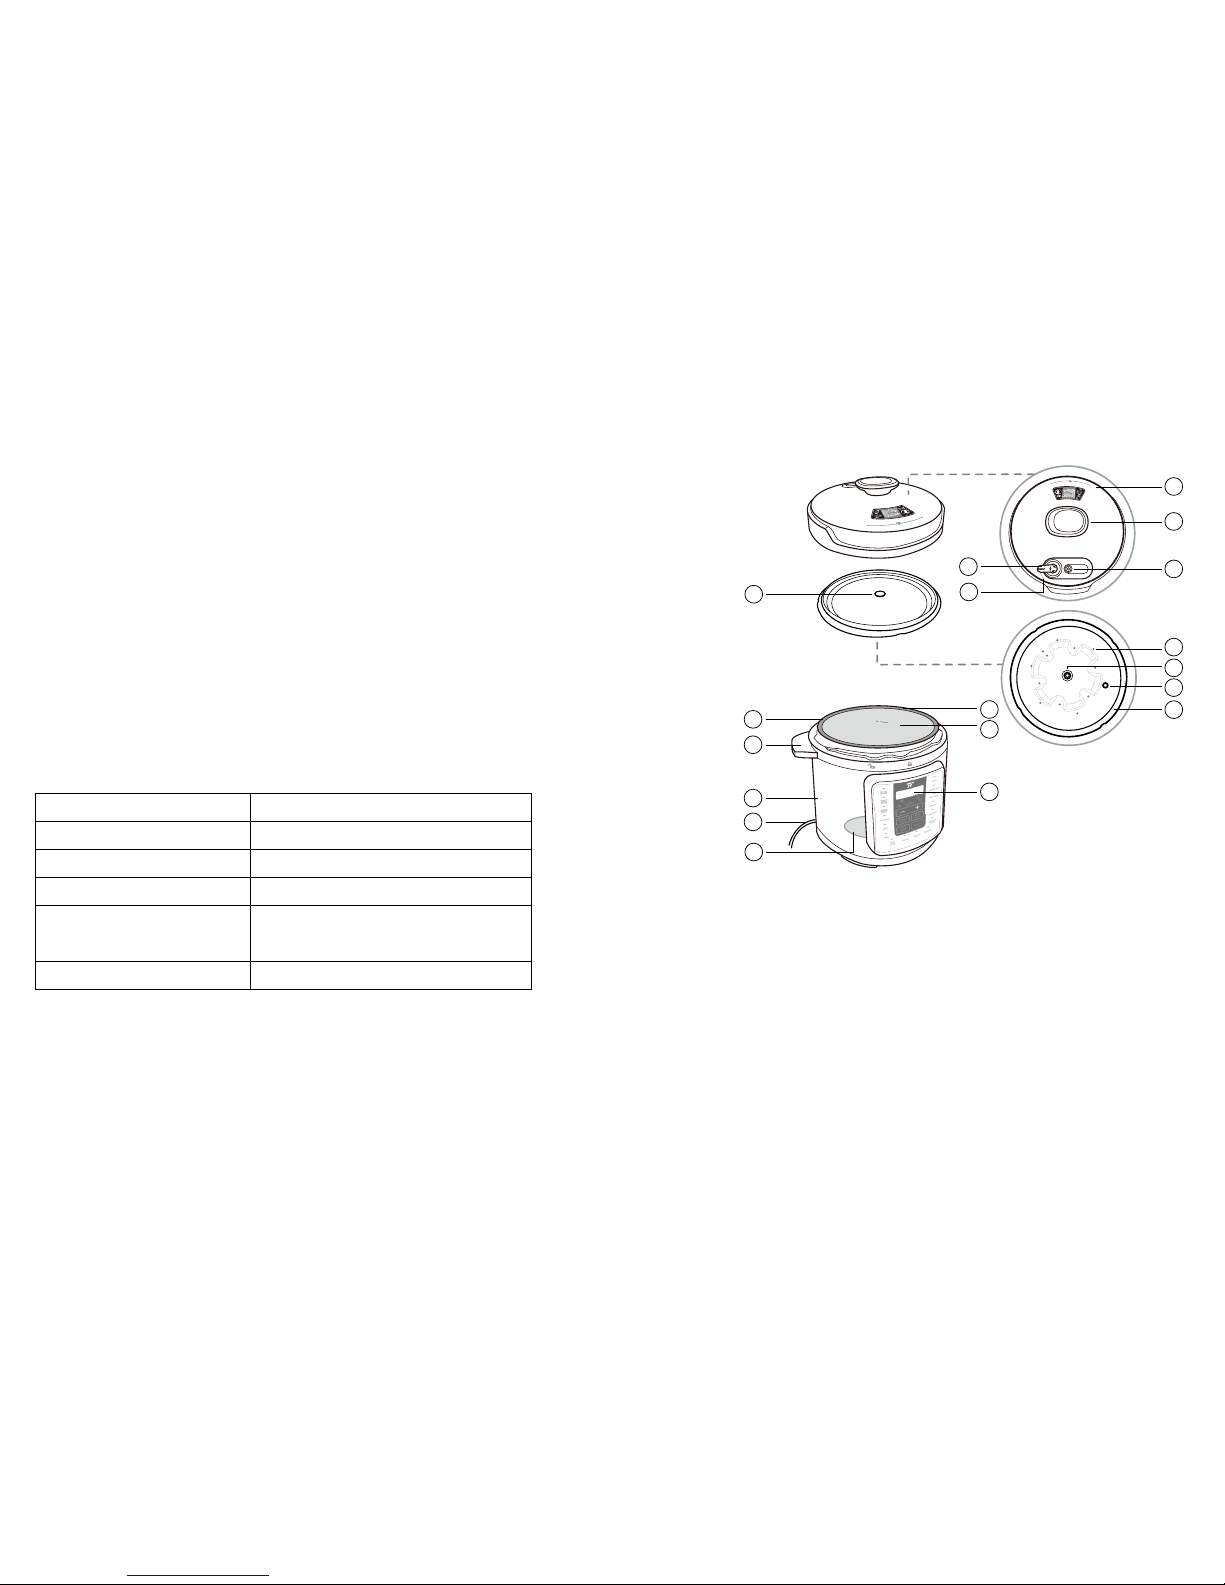
Product Diagram
1. Lid Position Mark
2. Lid Handle
3. Float Valve
4. Steam Release Handle
Position Mark
5. Steam Release Handle
6.Anti-block Shield
7.Anti-block Shield Fix Hole
8.Anti-block Shield Removal Pin
9. Silicone Sealing Ring
10.Anti-block Shield Fix Pin
11. Inner Pot
12. Ingredients Level Line
13. Control Panel
14. Heating Plate
15. Power Cord
16. Body
17. Cooker Handle
18. Condensation Collector
UNLOCK
LOCK
SEAL
CLOSE
OPEN
OPEN
CLOSE
1
2
3
4
5
6
7
8
9
10
11
12
13
14
15
16
17
18
MAX PRESSURE
2
3COOK

07/08
Control Panel
1. LED Display
2. Program Indicators
3. Program Buttons
4. Pressure Indicators
5. Mode Indicators
6. Cooking Time +
7. Keep Warm
8. Cancel Button
9. Delay Start Button
10. Pressure Level Button
11. Cooking Time –
Before First Use
1. Make sure the anti-block shield and the sealing ring are well mounted
prior to each use and remove any foreign object after each use.
2. Keep the unit clean to avoid odors.
3. Never pull the seal with force to avoid deformation. Stop using the seal
and replace it if it is damaged.
How to Use
Pressure Cooking
Pressure Release Instructions
1. Disconnect from power.
2. Release pressure:
A. Quick releasing (For non-uid food):
• Put the Steam Release Handle to vent position.
• Put a wet towel on the lid for faster cooling until the Float Valve drops
fully.
B. Normal releasing:
• Wait until the Float Valve drops fully, then open the lid.
Caution
1. Don’t open the lid until the pressure inside the pot is fully released.
2. Never pull the Steam Release Handle when it is releasing pressure.
3. For uid food, don’t pull the Steam Release Handle when cooking is
just nished to avoid uid splashing causing burns.
4.When a large quantity of food is cooked, don’t try to release the
pressure immediately after cooking is done.
5. Don’t hold the Steam Release Handle or any other hot areas to avoid
burning.
1
2
3
4
5
6
7
8
9
10
11

09/10
Install / Remove the Anti-block Shield
1. Install the silicone sealing ring.
2.Align the x hole with the pin, gently push into place.
3. Pull the removal pin to remove.
UNLOCK
LOCK
UNLOCK
LOCK
1
2
UNLOCK
LOCK
OPEN
CLOSE
UNLOCK
LOCK
OPEN
CLOSE

Note:
1. Never ll the cooker more than 4/5 or less than 1/5 full. For rice and
vegetables that expand during cooking, don’t ll over 3/5 full.
2. Don’t put anything other than the inner pot into the body or onto the
heating plate.
3.Temperature of the keep warm mode is 60 – 80 °C / 140 – 176 °F.
11/12
1
2
Operating Instructions
1. Hold the lid handle and turn the lid clockwise to the unlock position to
remove it.
2.Take out the inner pot and put the ingredients into it.
3. Dry the inner pot and the heating plate, put the inner pot back into the
body. Rotate it slightly for better contact with the heating plate.
4.Align the arrow on the lid with the unlock icon on the body and rotate
the lid counterclockwise until it is aligned with the lock icon on the
body to lock in place.
5. Install the condensation collector onto the body.
6. Set the Steam Release Handle to SEAL position. Make sure the Float
Valve is down before turning on the unit.
7. Connect to an appropriate power source, the product enters standby
mode with a beep sound.The LED display shows OFF.
8. Press the corresponding Program Button as per your food recipe, the
LED indicator will light up accordingly.
9.The cooker will enter keep warm mode automatically when cooking is
done, the keep warm indicator will light up.
5
4
5
3
5
1
Cooking Program Options
Programs
Soup / Broth
Modes Cooking Options Remark
Meat / Stew
Less
Normal
More
Soup without meat
Soup with meat
Rich bone broth
The soup / broth remains
clear due to lack of
boiling motion under
pressure cooking
Less
Normal
More
Soft texture
Very soft texture
Fall-off-the-bone
meat texture
Choose different modes
based on the meat
texture desired
Less
Normal
More
Bean / Chili
Less soft texture
Soft texture
Very soft texture
Choose different modes
based on the bean
texture desired

13/14
Poultry
Less
Normal
More
Soft texture
Very soft texture
Fall-off-the-bone
meat texture
Choose different modes
based on the meat
texture desired
Cake
Less
Normal
More
Lighter moist cakes
Denser moist cakes
New York style
cheesecakes
Adjust cooking time for
different recipes
Egg
Less
Normal
More
Soft boiled eggs
Medium boiled
eggs
Hard boiled eggs
Pre-set times are intended
for extra large eggs.Adjust
cooking time to account
for different egg sizes
Less
Slow cook Normal
More
Corresponds to
LOW setting in
some temperature
controlled slow
cookers
Corresponds to
MEDUIM setting in
some temperature
controlled slow
cookers
Corresponds to
HIGH setting in
some temperature
controlled slow
cookers
Non-pressure cooking
program
Simmer, thickening
and reducing
liquids
Pan searing
Stir-frying or
browning meat
Less
Normal
More
Sauté
Never have the lid on
when sautéing. Max time
is 30 minutes as a safety
precaution
Yogurt
A sweet fermented
glutinous rice
desert
Default fermentation
time: 24 hours
Fermenting milk
when making
yogurt
Pasteurizing milk
when making
yogurt
Less
Normal
More The LED display will
show “Boil”
Reheat
Heating the food
to 160 °F
Adjust the cooking
mode as per the food
you want to reheat
Heating the food
to 210 °F
Heating the food
to 250 °F
Less
Normal
More
Pressure
Cook
Manual
programming of
pressure level and
cooking time as
per your favorite
recipes or cooking
habits
Refer to the instructions
to set the cooking time
and pressure
Less
Normal
More

15/16
Sterilize
Pasteurization of
diary products
Adjust the mode
according to your food
recipe
Less
Normal
More
Sterilization of
utensils and
canning of acidic
fruits and
vegetables
Sterilization of
utensils and
canning of acidic
fruits and
vegetables
Porridge
Oatmeal
Don’t use quick release
to avoid liquid
splashing
White rice
porridge
white porridge
with a mixture of
various grains
Less
Normal
More
Multigrain
Wild rice,brown
rice, mung beans Choose different modes
based on the type of
grains and desired
texture
Less
Normal
More
Wild rice,brown
rice, mung beans
Tough grains or a
mixture of grains
and beans
Less
Normal
More
Rice
Al dente white rice
Normal texture
white rice
Softer texture
white rice
Choose the proper
mode as per your food
recipe
Select the Program
Press the Program Button as per your food recipe, the program / mode /
pressure indicators will keep ashing for 5 seconds rst, then turn solid on
with 3 beep sounds to start cooking.The LED display will show the
cooking time rst then start the circular display, when the pressure inside
the pot has reached the desired level, the LED display will show the
cooking time and start to count down by minute.
Note:
1.You can change the program set before the ashing ends, or you can
press Cancel Button to cancel the program set and select the desired
program.
2.The following programs are non-pressure ones: sauté, slow cook, yogurt,
and Reheat. Refer to “Non-pressure Cooking” section for instructions.
Adjust the Pressure Level
Press the Pressure Level Button to select the pressure between low and
high levels.The pressure indicator will light up accordingly.
Set the Cooking Time
Press the Cooking Time + / - Buttons to increase / decrease the cooking
time with a change of 1 minute in each press.

17/18
Adjust the Cooking Mode
Press the desired program button once, the program / mode / pressure
indicators will keep ashing, before the ash ends, keep pressing the
same program button to adjust the cooking mode between less /
normal / more modes.
Set the Delay Start Time
After selection of the program and before cooking starts, press the Delay
Start Button, the hour on the LED display will start ashing. Press the
Cooking + / - Buttons to set the hour before the ashing ends, press the
Delay Start Button again to conrm the hour setting. Once the hour is set,
the minute on the LED display will start ashing, adjust the minute setting
the same way as that of the hour setting. Once set, 3 beep sounds will
be heard and the LED display will show the set delay start time and
count down by minute.
Note:
1.The delay start time can be set up to 24 hours, but it is not
recommended to set it more than 12 hours.
2. Don’t leave perishable foods such as meat, poultry, sh, cheese and
other dairy products in room temperature for more than 2 hours or no
longer than 1 hour if the room temperature is above 32 °C / 89 °F.
Non-pressure Cooking
Sauté
1. Remove the lid, place the inner pot into the body, connect to a power
source, the unit enters standby mode with the LED display shows OFF.
2. Press Sauté Button to enter sauté mode.The corresponding mode and
program indicators will keep ashing. Before the ash ends, press the
Sauté Button to change the cooking temperature between Normal (for
regular browning), Less (for simmering or thickening sauce) and More
(for stir-frying or blackening meat) modes as per your food recipe.
Sauté starts with the circular display and three beep sounds.
3.Add food into the inner pot and sauté.
4. Press Cancel Button when nishing.
Note:
1. Never cap on the lid during sauté.
2.As a safety precaution, the unit will turn off automatically after 30
minutes in sauté mode.
Slow Cook
Bring the product into standby mode as previously instructed.
1. Move the steam release handle to vent position. Put ingredients into
the inner pot, place the lid onto the body. Press Slow Cook Button.
The corresponding program / mode indicators will light up. Set the
cooking time / delay start time / cooking mode as per your need.
2. Cooking will start with 3 beep sounds with the LED display showing
cooking time and countdown by minute.
Yogurt
Bring the product into standby mode as previously instructed.
1.Add ingredients into the inner pot, close the lid.
2. Press Yogurt Button, adjust the time and cooking mode as desired.
Cooking will start with 3 beep sounds.
Note:
In Yogurt mode you can place the steam release handle in SEAL or VENT
position.
Turn On / Off the Sound
1. In standby mode, press and hold the Cooking – Button until 2 beep
sounds are heard to turn off the beep sound.
2. In standby mode, press and hold the Cooking + Button until 2 beep
sounds are heard to turn on the beep sound.
Memory Function
This unit is a programmed smart cooker that preset cooking instructions
for different food ingredients and cooking methods. It also remembers
your most recent setting per cooking program for a most personalized
cooking experience.
Return Factory Default Setting
1. For a specic cooking program: press and hold the program button
until the cooker beeps and displays OFF.
2. For a full reset of all cooking programs: in standby mode, press and
hold the Cancel Button until the cooker beeps.
Cleaning and Maintenance
1. Unplug the power cord before cleaning.
2.Wipe the base with wet towel or towel dampened with moderate
detergent if necessary. Never immerse the body into water or other
liquid.
3. Remove and clean the condensation collector and place it back.
4. Clean the lid thoroughly including the anti-block shield, silicone
sealing ring, oat valve, steam release handle and rinse under tap
water.
5.To hand wash the inner pot, use a sponge or a soft non-metal brush
and wipe it with clean towel. Be careful not to damage the interior
coating.

Non-pressure Cooking
Sauté
1. Remove the lid, place the inner pot into the body, connect to a power
source, the unit enters standby mode with the LED display shows OFF.
2. Press Sauté Button to enter sauté mode.The corresponding mode and
program indicators will keep ashing. Before the ash ends, press the
Sauté Button to change the cooking temperature between Normal (for
regular browning), Less (for simmering or thickening sauce) and More
(for stir-frying or blackening meat) modes as per your food recipe.
Sauté starts with the circular display and three beep sounds.
3.Add food into the inner pot and sauté.
4. Press Cancel Button when nishing.
Note:
1. Never cap on the lid during sauté.
2.As a safety precaution, the unit will turn off automatically after 30
minutes in sauté mode.
Slow Cook
Bring the product into standby mode as previously instructed.
1. Move the steam release handle to vent position. Put ingredients into
the inner pot, place the lid onto the body. Press Slow Cook Button.
The corresponding program / mode indicators will light up. Set the
cooking time / delay start time / cooking mode as per your need.
2. Cooking will start with 3 beep sounds with the LED display showing
cooking time and countdown by minute.
Yogurt
Bring the product into standby mode as previously instructed.
1.Add ingredients into the inner pot, close the lid.
2. Press Yogurt Button, adjust the time and cooking mode as desired.
Cooking will start with 3 beep sounds.
Note:
In Yogurt mode you can place the steam release handle in SEAL or VENT
position.
Turn On / Off the Sound
1. In standby mode, press and hold the Cooking – Button until 2 beep
sounds are heard to turn off the beep sound.
2. In standby mode, press and hold the Cooking + Button until 2 beep
sounds are heard to turn on the beep sound.
Memory Function
This unit is a programmed smart cooker that preset cooking instructions
for different food ingredients and cooking methods. It also remembers
your most recent setting per cooking program for a most personalized
cooking experience.
Return Factory Default Setting
1. For a specic cooking program: press and hold the program button
until the cooker beeps and displays OFF.
2. For a full reset of all cooking programs: in standby mode, press and
hold the Cancel Button until the cooker beeps.
Cleaning and Maintenance
1. Unplug the power cord before cleaning.
2.Wipe the base with wet towel or towel dampened with moderate
detergent if necessary. Never immerse the body into water or other
liquid.
19/20
3. Remove and clean the condensation collector and place it back.
4. Clean the lid thoroughly including the anti-block shield, silicone
sealing ring, oat valve, steam release handle and rinse under tap
water.
5.To hand wash the inner pot, use a sponge or a soft non-metal brush
and wipe it with clean towel. Be careful not to damage the interior
coating.
Troubleshooting Guide
Lid doesn’t lock
Problems Cause Solution
The sealing ring is not
properly installed
Install the sealing ring
properly
Fail to open the lid after
air inside the pot is fully
released
The Float Valve is
still up
Press the Float Valve
down
Air escapes from the
rim of the lid
Sealing ring not installed
Food residue on the
sealing ring
Sealing ring worn out
Lid not locked properly
Install the sealing ring
Clean the sealing ring
Replace the sealing ring
Close the lid properly
Air escapes from the
oat valve
Food stuck on the sealing
ring of the oat valve
Clean the sealing ring
of the oat valve
The sealing ring of the
Float Valve worn out
Replace the sealing
ring of the oat valve
Not enough food
and water
Food residue on the
sealing ring
Put in enough quantity
Call the customer
service center
The Float Valve
won’t rise

Display Error Indicator
Indicator Code
E1
E3
E4
E5
Problems / Causes
Pressure Switch Malfunction
Short Circuit of Sensor
Circuit Breakage of Sensor
Overheating
Warning - Any other servicing should be performed by an authorized
service representative.

尺寸:100*120mm
装订成册
材质:封面128克铜版纸 内页80克书纸
Model:
TT-EE006
Table of contents
Popular Electric Pressure Cooker manuals by other brands


Drew & Cole
Drew & Cole Pressure King Pro user manual

Toastmaster
Toastmaster TM-670PC instruction manual

FIRST AUSTRIA
FIRST AUSTRIA FA-5130 instruction manual

BERGNER
BERGNER San Ignacio COOKTECH Instrucions for Use | Recipes

Cook's essentials
Cook's essentials CEPC800 owner's manual

InstantPot
InstantPot Lux Mini user manual


