Tapworks AD10 User guide

User and Installer Handbook
Tapworks Softener Models AD10 & Ultra 15
Thank you for choosing Tapworks to supply your soft
water. We are confident that you will be pleased with your
purchase and would encourage you to read this installation
and instruction handbook thoroughly to ensure maximum
performance from your water softener.
If you should experience any difficulty with your water softener
please refer to the Troubleshooting Checklist at the back of this handbook.
This will help to prevent unnecessary and expensive callouts.
For service support or technical advice please call our service
desk on 01494 48 48 48.
Please retain this handbook for future reference

2
Unpacking Your Water oftener
Please Remember – Only use Tablet or Pellet Salt in Your Softener!
1Control Valve Cover & Electronic Faceplate
2Salt Lid
3Salt Cabinet
4Water Softener Valve & Motor
5Resin Cylinder
6Brine Well and Cover
7Overflow Connection
8Drain Connection
Notes
1 Serial Number and Date Code are under the Salt Lid
2 Remove all packaging parts from inside the unit.
3 If you need to remove the valve cover for ease of installation follow
the instructions carefully.
Release the two catches either side of the valve cover and tilt top end
towards you slowly, taking care not to pull off the wire connections
Please note that the valve cover is connected to the valve motor,
so cannot be removed fully
8
7
6
3
2
1
5
4

3
Unpacking Your Water oftener (cont)
Please Remember – Only use Tablet or Pellet Salt in Your Softener!
Description Quantity
1 Easy Install Tees 1pair G0817
2 Drain/Overflow Tubing 1 7108118
3 Overflow Elbow 1 1103200
4 Overflow Grommet 1 9003500
5 Hose Clips 2 900431
6 Water Hardness Test Kit 1 800005
7 Transformer 1 98124612
8 Adapter Clips 2 1205500
9 Adapter ‘O’ Rings 2 900535
10 Adapter Elbows (3⁄4”) 2 7106328
11 ilicone Grease 1 n/a
12 Bypass et 1 555021
13 Inlet/Outlet Hoses 2 803186
14 Hose Gaskets 2 803188
15 Filter Discs 2 803187
Part
Ref
Part
Number

Installation of Your Water oftener
4Please Remember – Only use Tablet or Pellet Salt in Your Softener!
PLANNING & SITING THE INSTALLATION
The installation of a water softener is relatively easy to carry out but we
recommend that this work is undertaken by a plumber or an experienced
DIY handyman. Where possible the water softener should be sited close to
the rising main allowing for any required hard water draw off points
i.e. drinking tap and outside tap. Keep the drain run as short as possible
and allow for ease of service and salt access. If installed next to a boiler
or hot water cylinder you may have to protect against condensation.
When siting the softener please consider the engineer and customer.
Sufficient space should be left behind the unit to allow easy access for
repairs and cleaning.
FREEZING
The installation of all water fittings should be in accordance with local water
byelaws and the water softener and all associated pipework must be protected
against freezing. Take special care where the drain runs outside. Freezing
will prevent recharge and cause overflowing.
LEAD PIPEWORK
Where lead pipework exists downstream of the proposed location of the
water softener we advise you ask the local water authority for advice on
the replacement of lead pipework. Grants may be available. Homes built
since 1976 will not have lead pipework.
ELECTRICAL REQUIREMENTS
The water softener requires a 240 volt 50 Hz electrical supply taken
off a power supply not a lighting circuit. Power is supplied via a 24 volt
50 Hz transformer.
HARDWATER TAP
Water Authority byelaws require that one tap in the house remains
unsoftened. It is also recommended that the garden tap is left with
a hard water supply.
PRESSURE
Low or high pressure could lead to damage or non-operation of the water
softener. If the daytime pressure exceeds 4.76 BAR (70 psi) a pressure-
reducing valve should be fitted. If daytime pressure is less than 25 psi
a pressure pump is required.
Note: Night-time pressure will be much higher than daytime.
FLOW RATES
The water flow must be at least 1 litre per minute for the water softener
to work as originally designed.
Maximum flow is 53 litres per minute (peak).
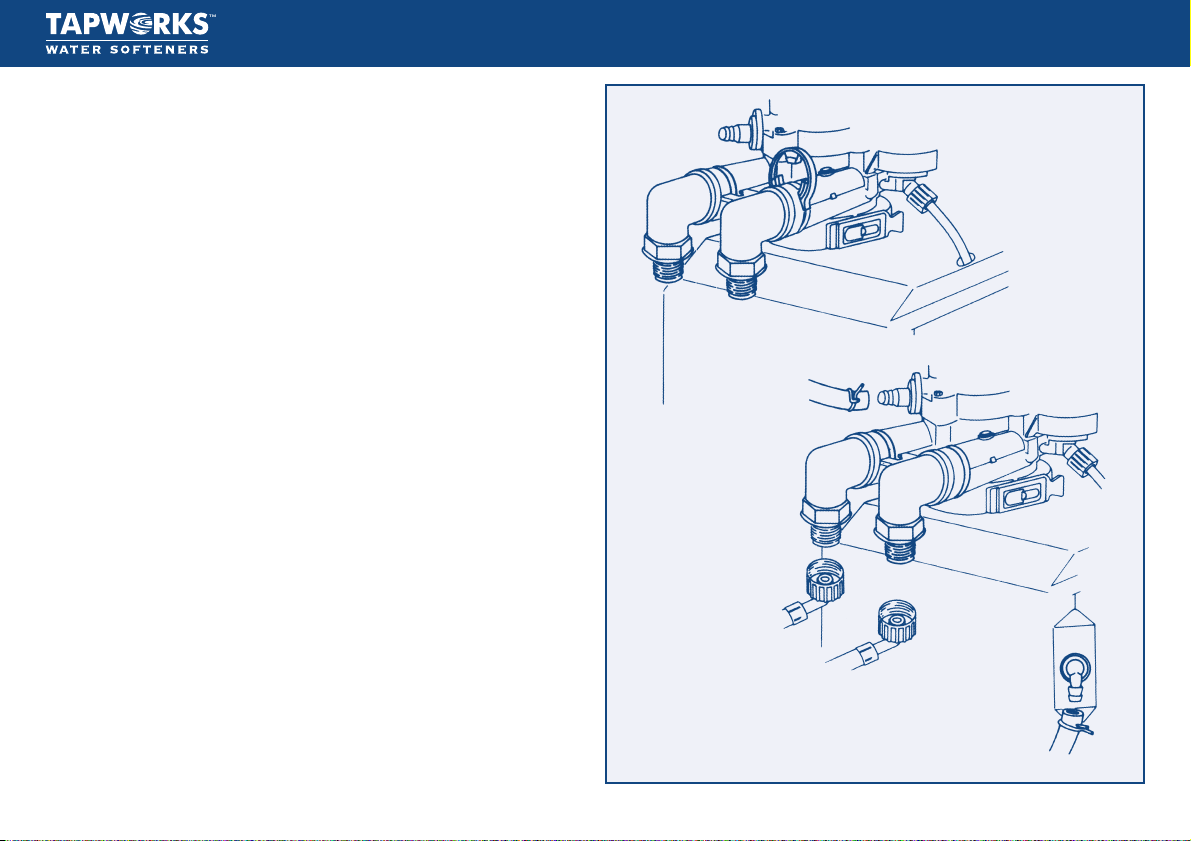
PLUMBING COMPONENTS NEEDED
The Installation Kit provides the basic plumbing components but additional
piping and connectors (capillary and/or compression copper fittings) should
be used as required.
WARNING: FAILURE TO MEET THE FOLLOWING REQUIREMENT
CAN CAU E DAMAGE TO THE WATER OFTENER, OR RE TRICT
IT OPERATION.

SPECIFICATION REQUIREMENTS
Maximum Water Temperature 49°C (120°F)
Maximum Daytime working pressure 4.76 BAR (70 psi)
Minimum working pressure 1.7 BAR (25 psi)
Minimum system flow 0.06m3/hr
Maximum system flow 3.18m3/hr
If a pressure-reducing valve is required this may be ordered from Tapworks:
Quote Part No. 800220 for 1⁄2” or 15mm pipework
Quote Part No. 800223 for 3⁄4” or 22mm pipework
UNVENTED OR DIRECT SYSTEMS
Connection to the water softener should be made with 22mm or 28mm
copper pipe and not with flexible hoses supplied to ensure that a
satisfactory flow rate is maintained. You will also require a suitably sized
bypass set and check valve. Full flow valves are recommended. Large
bore flexible hoses are available from Tapworks.
DRAIN HOSE
We recommend that the maximum length of drain line is 3 feet before
entering an air gap. Also any rise in height of the drain should not be
above 3 feet.
CENTRAL HEATING SYSTEMS
Central heating systems should always be treated with a proprietary
corrosion inhibitor regardless of being filled with softened or hard water.
Systems containing aluminium should always be filled with hard water
unless instructed otherwise by the manufacturer.
Installation of Your Water oftener (cont)
5
Please Remember – Only use Tablet or Pellet Salt in Your Softener!
APressure Reducing Valve (if required)
BBypass Valve
CInlet Valve
DOutlet Valve
A
B
CD

tep By tep Guide To Plumbing The oftener
6Please Remember – Only use Tablet or Pellet Salt in Your Softener!
PLUMBING
Turn off the water supply at the incoming main and begin plumbing as per
the installation instructions on pages 4 & 5.
FIT THE BYPASS KIT
Cut off the rising main and install the inlet tee with check valve. Next plumb
the bypass inlet and outlet valves so that the water supply can be turned
back on. Use the red valve for the inlet the blue valve for the outlet and the
grey valve as the bypass. Before turning the water back on make sure the
bypass is open and the inlet and outlet valves are closed. This will allow
water to pass directly to the household system without it diverting to the
water softener. (The use of the plastic plumbing fittings with copper pipe may
affect the electrical earthing or bonding of the copper pipe. If in doubt we
advise that you contact a qualified electrician for advice).
Bypass Closed
Inlet Tee
Incorporating
Check Valve
Open
From
Mains
Outlet
Open
To
ystem
From Water
oftner
To Water
oftner Inlet
Valve ervice Position
Bypass Open
Inlet Tee
Incorporating
Check Valve
Closed
From
Mains
Outlet
Closed
To
ystem
From Water
oftner
To Water
oftner Inlet
Hard Water Bypass Position

FIT THE INLET AND OUTLET ADAPTOR ELBOWS
Remove the plastic plug from the outlet port on the water softener valve
if present. Fit the ‘O’ rings to the outer groove of each adaptor elbow.
Push the adaptors into the valve inlet as far as they will go. Lightly lubricate
using the silicone grease provided.
NOTE: Do not use petroleum jelly or oil based lubricants.
tep By tep Guide To Plumbing The oftener (cont)
7
Please Remember – Only use Tablet or Pellet Salt in Your Softener!
Inlet
Outlet
‘O’ Ring
‘O’ Ring

tep By tep Guide To Plumbing The oftener (cont)
8Please Remember – Only use Tablet or Pellet Salt in Your Softener!
SECURE THE ADAPTOR ELBOW
Snap the two large hold clips into place from the top down (see top illustration
opposite). Be sure they snap firmly into place so that the adaptors will not pull
out. Pull on the adaptors to assure a tight fit has been achieved.
INLET AND OUTLET CONNECTIONS
(For unvented or direct systems refer to page 5). Use the connecting hoses
provided with the elbow unions to make the inlet and outlet
connections. For ease of connection the straight ends may be connected
to isolating valves or elbow unions. Fit the filter discs into the straight union
end of the inlet/outlet hoses.
DRAIN OUTLET/OVERFLOW CONNECTION
Insert the rubber grommet into the overflow socket situated 2⁄3of the way up
the rear of the water softener cabinet. Only insert the overflow adaptor
using the silicone grease provided once the grommet is secure.
Cut two lengths of hose as required to make the drain and overflow
connections. Fit one length of hose onto the overflow adaptor and one
length onto the drain line adaptor. Turn the drain line adaptor so that
a straight connection can be made. The drain hose and overflow hose must
be secured with the supplied metal clamps (see bottom illustration opposite).
Pass the overflow hose through a hole in an outside wall so that its end can
be seen. The drain hose may be connected directly into an open drain or
via the waste outlet similar to a washing machine. The drain and overflow
must be kept straight and not kinked.
On some tight fitting installations it may be
a benefit to make all connections up before
inserting the elbow into the valve ports.

ELECTRICAL INSTALLATION
The water softener works on a 24 volt 50 Hz electric power supply.
You must plug the transformer into a 240 volt outlet only. Be sure that the
electrical outlet you plug the transformer into is inside as the transformer
is not designed for outdoor use.
To connect the transformer to the valve push the female end plugs on to
the male connectors as indicated below. The two flat ends of the female
connectors should face each other to allow for an easy connection.
Should the faceplate fail to display or indicate an error code please check
that the connections are as per the diagram below you will need to remove
the valve cover to do this.
tep By tep Guide To Plumbing The oftener (cont)
9
Please Remember – Only use Tablet or Pellet Salt in Your Softener!

etting Up
10 Please Remember – Only use Tablet or Pellet Salt in Your Softener!
Your water softener has an advanced volume controlled system which
allows you to achieve important salt and water savings during regeneration:
a) LCD display and user friendly buttons.
b) An extended power back up (48 hours). The memory retains all settings
for extended periods during any power loss and beyond that time only
requires the time setting to be reprogrammed.
c) Regeneration is based on patterns established for volumes of water used
giving you the maximum conservation of water and salt usage.
Note: To alter settings during normal operation press ELECT until desired
function is reached.

When the transformer is first plugged in the display will flash 12.00am.
NOTE: Each time you press a button on the fascia panel display a beeper
sounds. One beep signals that a change is accepted. If the beeper sounds
continually then a different button is required to effect the required opera-
tion.
SET THE PRESENT TIME
The display will continue to flash and the time can be advanced or moved
backwards using the or buttons. Holding down the buttons advances
the time at a faster rate.
If the time requires changing during normal operation press the ELECT
button once. The display will flash and indicate present time. You may use
the or buttons as described above to alter the time. Once the required
time is displayed the time may be set by pushing the ELECT button once
more.
SET THE WATER HARDNESS CALCULATION
The display will flash “19 hardness” (this is a pre-set factory setting).
Hardness varies from one location to another. Use the kit provided to
determine your water hardness in ppm. If necessary change to the unit
setting indicated.
Programming
11
Please Remember – Only use Tablet or Pellet Salt in Your Softener!
PRESENT TIME
AM
12
:00
WATER HARDNE
ppm Unit Setting
(200) 12
(220) 13
(240) 15
(260) 16
(280) 17
(300) 18
(320) 19
(340) 20
(360) 21
(380) 22
(400) 23
(420) 24
(440) 25
(460) 30
(480) 30
(500) 35

Programming (cont)
12 Please Remember – Only use Tablet or Pellet Salt in Your Softener!
To advance or reduce the displayed number to your required setting use the
or buttons.
Once the required setting is displayed it may be set by pushing the ELECT
button once more.
SET THE REGENERATION TIME
The display will flash 02.00 recharge time which is the pre-set factory
setting. If you wish to change this time then proceed as follows: (if not
press ELECT and proceed to the next section).
NOTE: 2.00 am is chosen because any household water used during
recharge will be replaced with hard water. Consequently a time is required
when very little if any water will be used. To select a different regeneration
time use the or buttons to adjust one hour at a time. Once the
required setting is displayed it may be set by pressing the ELECT button
once more. Recharge will last for approximately 1 hour.
HARDNESS
19
RECHARGE TIME
AM
2:00

Your unit should now be fully plumbed and ready to programme.
NOTES TO THE INSTALLER BEFORE YOU LEAVE
1Having programmed your unit you will wish to ensure that the unit is
functioning properly before you leave the site.
2Our Service Department will offer you advice. If you have any queries
do not hesitate to call us.
3Open the inlet and outlet valve and close the bypass as indicated in the
diagram (page 6). Check that all the plumbing connections are secure
and that there are no leaks.
4Check that the time of day is correct.
5Initiate a Regeneration
Hold down the TOUCH/HOLD button for about 3 seconds until
RECHARGE flashes in the display. After a few minutes a small amount
of water will enter the Salt Cabinet. This process will take approximately
4-8 minutes.
Fill with Salt
6Once the water has run to drain fill the cabinet with salt and check your
drain connections. You will require a 25kg bag of Pellet salt or Tablet
salt. DO NOT use granular salt. Make sure that the brine well cover is
in place and secure as salt must not be allowed to enter the brine well.
Do not fill salt above the overflow. (See Unit explosion diagram page 2).
7The whole regeneration procedure will take approximately 1 hour. Once
complete softened water will gradually replace the hard water in the
storage tank over a period of normally 7 days. However this can take
longer in larger houses.
8Advise the customer that any water fed from the storage tank will not
be softened immediately. Any water drawn directly from the softener
following regeneration will be soft.
9Ensure that the customer is left with all literature relating to the unit.
10 Return the Guarantee Registration Card to Tapworks.
IMPORTANT – TAPWORK WATER OFTENER HAVE 12 MONTH
PART & LABOUR WARRANTY. YOU CAN EXTEND THI TO
2 YEAR BY RETURNING THE GUARANTEE REGI TRATION CARD.
WE WILL END YOU (WITHIN 28 DAY ) YOUR WARRANTY
CERTIFICATE DETAILING YOUR 2 YEAR GUARANTEE.
If you are a regular user of water softeners you will benefit from joining our
Tapworks Installer Club loyalty scheme. Call 01494 480621 for details.
Thank you for choosing Tapworks.
Finishing Installation
13
Please Remember – Only use Tablet or Pellet Salt in Your Softener!

User Information
14 Please Remember – Only use Tablet or Pellet Salt in Your Softener!
TO REGENERATE TONIGHT
The unit can be programmed to regenerate at the next pre-programmed
time regardless of its remaining capacity. This is particularly beneficial to
ensure a sufficient softened water supply for an expected heavy water
usage the next day.
Simply press the TOUCH/HOLD button once. Recharge tonight will flash
on the display. To cancel recharge tonight press the TOUCH/HOLD button
once and immediately release. The display will return to the time display.
TO REGENERATE NOW
Alternatively an automatic regeneration can be initiated at any time.
Simply press the TOUCH/HOLD button and hold it down for approximately
3 seconds until a beep sounds. Recharge will flash on the display. The
process will take a few minutes to begin and last approximately 1 hour.
It cannot be cancelled once started.
Use as little water as possible during this time period as hard water will
bypass the water softener. Once the regeneration is complete the recharge
display will disappear.
NOTE: The unit will automatically flash “recharge tonight” once the
computer calculates that a regeneration is required. This is for information
only – no action is required. At the next programmed regeneration time the
cycle will automatically begin. Once a regeneration is initiated a flashing
“recharge” replaces the flashing “recharge tonight”.
RECHARGE TONIGHT
AM
9:
10
RECHARGE
AM
11:00

POWER CUTS
If the electrical power to the water softener is interrupted the time display
is blank but the ‘memory’ built into the electronics will keep the correct time
for up to 48 hours.
The water softener will not regenerate but will pass softened water. In the
case of a power cut your demand for water will be less as most appliances
will not work and so a recharge should not be necessary. When electrical
power is returned one of two things will happen:
1 Power off up to 48 hours
The display returns and is steady. No operation is necessary.
2 Power off over 48 hours
The display returns and flashes. Only the time requires re-setting. The hardness
and regeneration time will not have been lost as they are stored. Even if the
time is incorrect after a certain period the water softener will continue to
work but will regenerate at what it believes the time to be. Re-set the time as
described in the Programming Section (see page 11).
hould an error code appear …
Check electrical connections are as per configuration on page 9.
aUnplug transformer.
bCheck direct connections.
cReplug transformer.
dWait for 6 minutes. If the error code is rectified the error code will
not re-appear.
NOTE: Softener may regenerate immediately following a cleared error code.
BUILDING A HISTORY
Because it has no historical data to base its logic on your water softener
will regenerate quite frequently when first used to ensure continuous softened
water. Within a few months it will settle into a more regular pattern.
SALT USAGE
Because your Automatic Demand water softener uses proportional brining
more frequent regenerations are not at the expense of high salt usage.
However if you are a low water using household you will find after a few
months that your water softener will become increasingly efficient as it
adapts to suit your water usage.
LARGE INFLUXES OF GUESTS
If you have people to stay and use more water than normal you will find
that your Automatic Demand water softener regenerates more frequently.
As your household water usage returns to normal so too will the
regeneration frequency.
User Information (cont)
15
Please Remember – Only use Tablet or Pellet Salt in Your Softener!
ERRO1

Diagnostic Data Transfer
16 Please Remember – Only use Tablet or Pellet Salt in Your Softener!
Tapworks Water Softeners come fitted with our unique diagnostic data
transfer system.
Our Automated Service Evaluation System enables your water softener to
'talk' directly to the Service Centre and communicate data which otherwise
might only be accessed by a site visit to your home.
The data received is reviewed by a technician and if there is a problem
it may be possible to correct it by telephone. If a service call is necessary
the engineer will be likely to know in advance what parts and repairs
are required.
DIAGNOSTIC DATA TRANSFER
• Can provide you with information on the efficiency and performance
of your water softener.
• Can save you the cost and inconvenience of an unnecessary call-out.
• Can save time and money in the event of a call-out.
USING THE DIAGNOSTIC DATA TRANSFER
• You Will need a portable telephone.
• Have your softener service number to hand. This is found under the
salt lid.
• Dial the Service Centre Dedicated telephone number 09068 615355.
• When connected the Service Centre will ask you to follow
a simple procedure.
• Hold the telephone mouthpiece about 1" from the symbol
on the faceplate below the screen. (see illustration opposite).
• Simultaneously press the UP and DOWN buttons.
• A constant beeping pattern is emitted.
• Release the buttons the data message will continue to transmit for about
20 seconds.
• When the beeping stops finish your call.
Your call will then be processed by the Service Centre.
Don’t forget to leave your details if you expect a reply!
Speaker

If you are experiencing poor water flow please check all plumbing first
as it is extremely rare for a softener to cause flow rate problems.
ave money by ensuring an engineer is not called out
unnecessarily. However, if the solution to the problem is not
successful, please call for service and advise us what you
have tried. Call our Direct ervice Line on: 01494 484848
Troubleshooting
17
Please Remember – Only use Tablet or Pellet Salt in Your Softener!
Checklist Solution
PROBLEM: Hard Water or, Intermittently Hard Water
1Is there a minimum of 6 inches 1Fill the cabinet with salt. p13
of salt in the cabinet?
2Is the bypass valve closed and 2Close the bypass valve and p6
the inlet and outlet valves open?open the inlet and outlet valves.
3Is the hardness setting correct?3Reset the unit setting as per table p11
open the inlet and outlet valves.
Important Note: If any of the above requires action add 4 litres of
clean water to the salt and initiate a “regenerate now”
PROBLEM: No Water
1Is the water mains open?1Open water mains. p5
2Are the inlet and outlet valves open?2Open the inlet and outlet valves. p6
PROBLEM: Unit regenerates at incorrect time of Day
1Is the present time correct?1Reset the present time. p11
2Is the regeneration time correct?2Reset the regeneration time. p12
3Has there been a power cut?p15
PROBLEM: No regeneration occuring or, little or no salt usage
1Is the water soft?1If yes no action is required.
2Is the water level in the salt 2if yes check the drain link is not. p14
cabinet high?frozen or blocked. Initiate an
immediate regeneration.
Page
Ref

Troubleshooting (cont)
18 Please Remember – Only use Tablet or Pellet Salt in Your Softener!
Checklist Solution
PROBLEM: Excessive alt Usage
1Check the Hardness. 1Reduce the unit setting if incorrect. p11
PROBLEM: No Water in Cabinet or Very Low
1This is quite normal. Unlike 1No action necessary.
conventional water softeners only a
few inches of water is at the bottom
of the cabinet.
PROBLEM: High Water Level in Cabinet
1Is the water level in the salt 1Initiate an immediate regeneration. p14
cabinet high?If the problem does not return
there is nothing wrong.
PROBLEM: Water Running Down the Overflow
1Is the water level in the salt 1If yes bypass the water softener and p6
cabinet high?call for service.
PROBLEM: Water Running Down the Drain Line Constantly
1Is the unit in regeneration mode?1If yes wait until it finishes check p11/12
the present time and regeneration
time settings and adjust if incorrect.
2Does an error code appear eg. 2Check all electrical connections p9
“ERR 01” are secure. Turn the power off for ten
seconds and then switch back on.
Important Note: If the problem persists bypass the softener and call for service
Page
Ref Checklist Solution
PROBLEM: Electronic Faceplate
1Is the faceplate blank?1Check the power is turned on and p9
all conections are secure.
2Is the display stuck on one function?2Turn the power off for ten seconds
and then switch back on.
3Does an error code appear 3Check all the connections are secure. p15
eg. “ERR03” Turn the power off for ten seconds.
and then switch back on.
Page
Ref

All Tapworks Domestic Water ofteners are fully covered by
one year parts and labour guarantee against manufacturing
defect from the date of purchase.
This guarantee does not effect the statutory rights of the consumer.
Any faults which are not attributable to the water softener
but to faulty installation or operation will be chargeable.
The following which are not attributable to the water softener but to faulty
installation or operation will be chargeable.
1Water softeners installed where pressure or flow rates are not within
the limits stated in the user and installer handbook.
2Faults arising from misuse or neglect.
3Failure to replenish salt or not using tablet/pellet salt.
4Resetting the programmer in the event of a power failure
or incorrect programming.
5Resetting the programmer when the influent water hardness or the
number of people in the household changes.
6Water softeners are not installed in accordance with local regulations.
7Any fault arising from repairs or alterations to the water softener carried
out by anyone other than our own engineers.
8Water softeners installed outside the mainland counties of England.
9Faults arising from faulty installation plumbing or electrical.
10 Any defect or damage occasioned by fire lightning explosion flood
storm tempest impact or other extraneous causes.
11 Water softener installed on bore hole well water or a non-standard
installation not covered by the instruction book may be subject to
limitations on the warranty provided.
12 Units installed in such a way that access for servicing is restricted.
General information
SALT
Salt is used as the regenerate (cleansing agent) for your water softener’s
resin bed. The salt cabinet will need to be refilled from time to time.
It is essential that approximately 6 inches of salt is maintained
as a minimum to ensure operating efficiency.
Failure to replenish salt will prevent the unit from cleansing itself on its
recharge cycle and consequently it will be unable to soften water. Pour the
salt slowly into the cabinet. Ensure that the brine well cap is secure as no
salt should be allowed to enter here. DO NOT use granular salt. ONLY
U E TABLET ALT OR PELLET ALT.
Your local water softener stockist will stock salt.
NOTE: During the cleaning process salt does not enter the water supply.
Salt is rinsed to drain.
CLEANING
Your unit may be cleaned with a damp cloth and detergent. Do not use
bleaches solvents or spirits as this may cause damage.
WATER LEVEL
The water level will vary. Generally there will be no more than two inches
of water in the cabinet. During re-charge this will increase. Water may
normally be visible only when the salt level is very low.
Guarantee, ervice & General Information
19
Please Remember – Only use Tablet or Pellet Salt in Your Softener!
RETURN YOUR REGI TRATION CARD TODAY!
TO BENEFIT FROM YOUR FREE 2 YEAR GUARANTEE

General Information (cont)
20
Tapworks, Mill Road, tokenchurch, Bucks, HP14 3TP
Tel: 01494 480 621 Fax: 01494 484 396 Direct ervice Line: 01494 484848
www.tapworks.net
As part of our policy of ongoing research and development, we reserve the right to alter design and specification without prior notice
THE USE OF SOFTENED WATER
WASHING MACHINES
You will need much less soap powder. In most washes one tablespoon will
be sufficient. Too much lather and clothes will not rinse properly.
DISHWASHERS
If your dishwasher is on a softened water supply you will no longer need to
fill your unit with salt. The salt was used to soften the water in the dishwasher.
STEAM IRONS/CAR BATTERIES
Only used distilled or deionised water not softened water.
Always follow manufacturers instructions.
COPPER STAINING
In some cases small amounts of blue copper deposits may be noticed
after installation. This will be caused by new pipework and should
disappear after a short time. Simply wipe away any deposit.
If this persists poor earthing may be allowing electrolytic corrosion.
Contact an electrical engineer.
CLEANING SINKS, BATHS AND BASINS
You will find that your cleaning chores are reduced as cleaning becomes
a quick wipe around. Occasionally ‘spotting’ may result but this is easily
rinsed off and nothing to worry about.
HOW SOFTENED IS MY WATER?
Test the water hardness from the softened supply using the test kit supplied.
Your water should change the colour of the test with one drop of solution.
If your unit has been installed for a short period of time it may be 2-3 weeks
before the softened water completely replaces the hard water in your
storage tank.
HARD WATER
One household tap and any garden taps should be left on a hard water
supply. Softened water contains a small amount of sodium. In four pints of
softened water the sodium content is about the same as in 1⁄4pint of milk. If
you are concerned about the quality of your drinking water supply ask your
local stockist about the benefits of a Tapworks Drinking Water System.
Code 300502
This manual suits for next models
1
Table of contents
Other Tapworks Water Dispenser manuals
Popular Water Dispenser manuals by other brands

Brita
Brita Elemaris XL Instructions for use

Youngwoo Waterline
Youngwoo Waterline Portable H2 Server User manual & warranty

Signature Hardware
Signature Hardware BOLAND Installation

Elkay
Elkay EWTLA8 1C Series Installation, care & use manual

Therma Q
Therma Q Designer Tap Installation and operation instructions

Pure-Pro
Pure-Pro JA-703 user manual

Pure Water
Pure Water Fountain Classic Installation and owner's manual

Spring Well
Spring Well SS+ installation instructions

Pure-Pro
Pure-Pro ERO-M7 user manual

RED-RING
RED-RING SB2 Installation & operating instructions

Magic Chef
Magic Chef MCWD40BB manual

HomePlus
HomePlus ClearPlus Premium Series owner's manual