Task Lighting LCDMXSD-D3-L User manual
LED SPECIALISTS
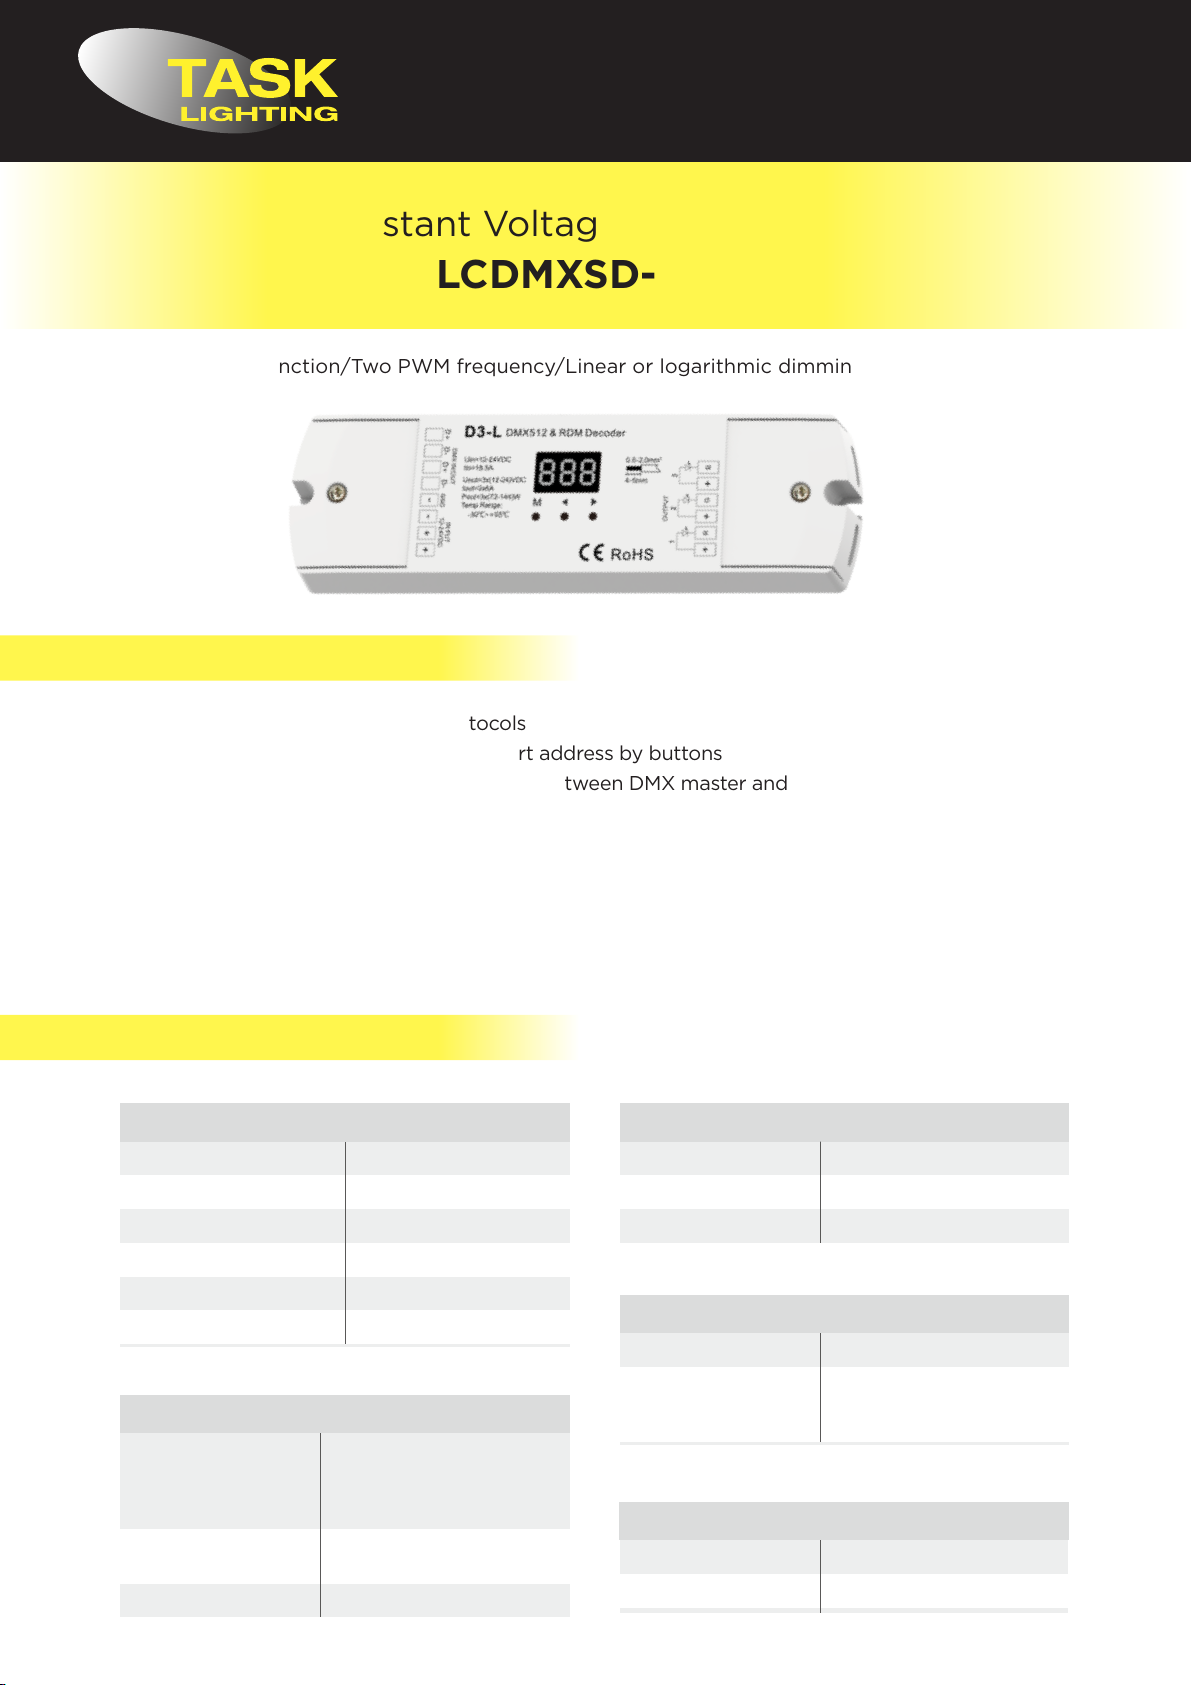
3 Channel Constant Voltage DMX512 & RDM Decoder
LCDMXSD-D3-L
Features
• Comply with the DMX512 standard protocols
• Digital numeric display, set DMX decode start address by buttons
• RDM function can realize intercommunication between DMX master and decoder. For example, DMX decoder
address can be set by DMX master console
• PWM frequency 2000/500Hz selectable
• Logarithmic or linear dimming curve selectable
• Stand-alone RGB mode and 3 channel dimmer mode selectable, which be controlled by buttons with built-in
programs, instead of DMX signal
• Over-heat / Short circuit protection, recover automatically.
Technical Parameters
RDM/Stand-alone function/Two PWM frequency/Linear or logarithmic dimming/Numeric display
23mm
170mm
50mm
Comply with the DMX512 standard protocols.
Digital numeric display, set DMX decode start address by buttons.
RDM function can realize intercommunication between
DMX master and decoder. For example,
DMX decoder address can be set by DMX master console.
PWM frequency 2000/500Hz selectable.
Logarithmic or linear dimming curve selectable.
Stand-alone RGB mode and 3 channel dimmer mode selectable,
which be controlled by buttons with built-in programs, instead of DMX signal.
Over-heat / Short circuit protection, recover automatically.
D+D-D-
D+
DM X
M a s ter
A C 1 0 0 -2 4 0 V
P ow e r S upp ly
1 2 -2 4 VDC
C o ns ta nt Vo lta ge
R G B L ED s tri p
Output type Constant voltage
Output power 3 x (72-144)W
Output voltage 3 x (12-24)VDC
Output current 3CH,6A/CH
Input voltage 12-24VDC
Input current 18.5A
User Manual Ver 1.0.7
Technical Parameters
In p ut a nd O utput
Wa rranty a nd P rotec ti on
5 years
Protection
Reverse polarity
Over-heat
Short circuit
Warranty
Operation temperature
Case temperature (Max.)
E nvi ro n m en t
IP rating IP20
Ta: -30
O
C ~ +55
O
C
Tc:
+85
O
C
Model No.: D3-L
Features
Page 1
Mechanical Structures and Installations
RDM/Stand-alone function/Two PWM frequency/Linear or logarithmic dimming/Numeric display
3 C hannel C ons ta nt Voltag e D M X5 1 2 & R DM D ec oder
D3-L 3 Channel Constant Voltage DMX512 & RDM Decoder
D+D- D-D+
DMX input +
DMX input -
DMX output -
DMX output +
GND/Power input -
Power input -
Power input +
Power input +
Output LED +
Output LED +
Output LED +
Output Red LED -
Output Green LED -
Output Blue LED -
Setting key
LVD
Digital display
Wiring Diagram
Installation rack
S a fety a nd E M C
EMC standard (EMC)
Certification CE,EMC,LVD
Safety standard(LVD)
EN55032:2015,
EN61000-3-2:2014,
EN61000-3-2:2013,
EN55024 :2010/A1:2015
EN 61347-1:2015
EN 61347-2-11:2015
Note:
1. An DMX signal amplifier is needed if more than 32 decoders are connected, or use overlong signal line,
signal amplification should not be more than 5 times continuously.
2. If the recoil effect occurs because of longer signal line or bad line quality, please try to connect 0.25W
90-120Ωterminal resistor at the end of each DMX signal line.
Wei g ht
0.100k g
Gross weight
Net weight
0.122k g
23mm
170mm
50mm
Comply with the DMX512 standard protocols.
Digital numeric display, set DMX decode start address by buttons.
RDM function can realize intercommunication between
DMX master and decoder. For example,
DMX decoder address can be set by DMX master console.
PWM frequency 2000/500Hz selectable.
Logarithmic or linear dimming curve selectable.
Stand-alone RGB mode and 3 channel dimmer mode selectable,
which be controlled by buttons with built-in programs, instead of DMX signal.
Over-heat / Short circuit protection, recover automatically.
D+D-D-
D+
DM X
M a s te r
A C 1 0 0 -2 4 0 V
P o w e r S u ppl y
1 2 -2 4 VDC
C on s ta n t Vol ta g e
R G B L E D s tri p
Output type Constant voltage
Output power 3 x (72-144)W
Output voltage 3 x (12-24)VDC
Output current 3CH,6A/CH
Input voltage 12-24VDC
Input current 18.5A
User Manual Ver 1.0.7
Technical Parameters
In put a nd O utput
Wa rranty a n d P ro tec ti on
5 years
Protection
Reverse polarity
Over-heat
Short circuit
Warranty
Operation temperature
Case temperature (Max.)
E n vi ro n m en t
IP rating IP20
Ta: -30
O
C ~ +55
O
C
Tc: +85
O
C
Model No.: D3-L
Features
Page 1
Mechanical Structures and Installations
RDM/Stand-alone function/Two PWM frequency/Linear or logarithmic dimming/Numeric display
3 C hann el C on s ta nt Voltag e D M X5 1 2 & R DM D ec oder
D3-L 3 Channel Constant Voltage DMX512 & RDM Decoder
D+D- D -D+
DMX input +
DMX input -
DMX output -
DMX output +
GND/Power input -
Power input -
Power input +
Power input +
Output LED +
Output LED +
Output LED +
Output Red LED -
Output Green LED -
Output Blue LED -
Setting key
LVD
Digital display
Wiring Diagram
Installation rack
S afe ty a n d E M C
EMC standard (EMC)
Certification CE,EMC,LVD
Safety standard(LVD)
EN55032:2015,
EN61000-3-2:2014,
EN61000-3-2:2013,
EN55024 :2010/A1:2015
EN 61347-1:2015
EN 61347-2-11:2015
Note:
1. An DMX signal amplifier is needed if more than 32 decoders are connected, or use overlong signal line,
signal amplification should not be more than 5 times continuously.
2. If the recoil effect occurs because of longer signal line or bad line quality, please try to connect 0.25W
90-120Ωterminal resistor at the end of each DMX signal line.
Wei g h t
0.100kg
Gross weight
Net weight
0.122kg

Mechanical Structures and Installations
23mm
170mm
50mm
Comply with the DMX512 standard protocols.
Digital numeric display, set DMX decode start address by buttons.
RDM function can realize intercommunication between
DMX master and decoder. For example,
DMX decoder address can be set by DMX master console.
PWM frequency 2000/500Hz selectable.
Logarithmic or linear dimming curve selectable.
Stand-alone RGB mode and 3 channel dimmer mode selectable,
which be controlled by buttons with built-in programs, instead of DMX signal.
Over-heat / Short circuit protection, recover automatically.
D+D-D-
D+
DM X
M a s te r
A C 1 0 0 -2 4 0 V
P ow e r S u pply
1 2 -2 4 VDC
C o ns ta nt Vo lta g e
R G B L ED s trip
Output type Constant voltage
Output power 3 x (72-144)W
Output voltage 3 x (12-24)VDC
Output current 3CH,6A/CH
Input voltage 12-24VDC
Input current 18.5A
User Manual Ver 1.0.7
Technical Parameters
In p ut a n d O utp ut
Wa rra nty a n d P rotec ti on
5 years
Protection
Reverse polarity
Over-heat
Short circuit
Warranty
Operation temperature
Case temperature (Max.)
E n vi ro n m en t
IP rating IP20
Ta: -30
O
C ~ +55
O
C
Tc:
+85
O
C
Model No.: D3-L
Features
Page 1
Mechanical Structures and Installations
RDM/Stand-alone function/Two PWM frequency/Linear or logarithmic dimming/Numeric display
3 C ha nnel C ons ta nt Voltag e D M X5 1 2 & R DM D ec oder
D3-L 3 Channel Constant Voltage DMX512 & RDM Decoder
D+D- D -D+
DMX input +
DMX input -
DMX output -
DMX output +
GND/Power input -
Power input -
Power input +
Power input +
Output LED +
Output LED +
Output LED +
Output Red LED -
Output Green LED -
Output Blue LED -
Setting key
LVD
Digital display
Wiring Diagram
Installation rack
S a fety a nd E M C
EMC standard (EMC)
Certification CE,EMC,LVD
Safety standard(LVD)
EN55032:2015,
EN61000-3-2:2014,
EN61000-3-2:2013,
EN55024 :2010/A1:2015
EN 61347-1:2015
EN 61347-2-11:2015
Note:
1. An DMX signal amplifier is needed if more than 32 decoders are connected, or use overlong signal line,
signal amplification should not be more than 5 times continuously.
2. If the recoil effect occurs because of longer signal line or bad line quality, please try to connect 0.25W
90-120Ωterminal resistor at the end of each DMX signal line.
Wei ght
0.100kg
Gross weight
Net weight
0.122kg
Wiring Diagram
23mm
170mm
50mm
Comply with the DMX512 standard protocols.
Digital numeric display, set DMX decode start address by buttons.
RDM function can realize intercommunication between
DMX master and decoder. For example,
DMX decoder address can be set by DMX master console.
PWM frequency 2000/500Hz selectable.
Logarithmic or linear dimming curve selectable.
Stand-alone RGB mode and 3 channel dimmer mode selectable,
which be controlled by buttons with built-in programs, instead of DMX signal.
Over-heat / Short circuit protection, recover automatically.
D+D-D-
D+
DM X
M a s te r
A C 1 0 0 -2 4 0 V
P ow e r S u pply
1 2 -2 4 VDC
C ons ta nt Vo lta g e
R G B L ED s tri p
Output type Constant voltage
Output power 3 x (72-144)W
Output voltage 3 x (12-24)VDC
Output current 3CH,6A/CH
Input voltage 12-24VDC
Input current 18.5A
User Manual Ver 1.0.7
Technical Parameters
In p ut a nd O utput
Wa rranty a nd P rotec ti o n
5 years
Protection
Reverse polarity
Over-heat
Short circuit
Warranty
Operation temperature
Case temperature (Max.)
E n vi ro n m en t
IP rating IP20
Ta: -30
O
C ~ +55
O
C
Tc: +85
O
C
Model No.: D3-L
Features
Page 1
Mechanical Structures and Installations
RDM/Stand-alone function/Two PWM frequency/Linear or logarithmic dimming/Numeric display
3 C ha nnel C ons ta nt Voltage D M X5 1 2 & R DM D ec od er
D3-L 3 Channel Constant Voltage DMX512 & RDM Decoder
D+D- D -D+
DMX input +
DMX input -
DMX output -
DMX output +
GND/Power input -
Power input -
Power input +
Power input +
Output LED +
Output LED +
Output LED +
Output Red LED -
Output Green LED -
Output Blue LED -
Setting key
LVD
Digital display
Wiring Diagram
Installation rack
S afety a n d E M C
EMC standard (EMC)
Certification CE,EMC,LVD
Safety standard(LVD)
EN55032:2015,
EN61000-3-2:2014,
EN61000-3-2:2013,
EN55024 :2010/A1:2015
EN 61347-1:2015
EN 61347-2-11:2015
Note:
1. An DMX signal amplifier is needed if more than 32 decoders are connected, or use overlong signal line,
signal amplification should not be more than 5 times continuously.
2. If the recoil effect occurs because of longer signal line or bad line quality, please try to connect 0.25W
90-120Ωterminal resistor at the end of each DMX signal line.
Wei gh t
0.100k g
Gross weight
Net weight
0.122k g
Note:
1. An DMX signal amplifier is needed if more than 32 decoders are connected, or use overlong signal line,
signal amplification should not be more than 5 times continuously.
2. If the recoil eect occurs because of longer signal line or bad line quality, please try to connect 0.25W
90-120Ωterminal resistor at the end of each DMX signal line.

Operation
System Parameter Setting
• Long press M and key in the same time for 2s, prepare for setup system parameter: output PWM
frequence, output brightness curve, automatic blank screen. short press M key to switch three item.
• Output PWM frequence: short press or key to switch 500Hz(“F-L”) or 2KHz(“F-H”).
Higher PWM frequency, will cause lower output current, higher power noise, but more suitable for
camera(No flickers for video).
• Output brightness curve: short press or key to switch linear curve(“C-L”) or logarithmic curve(“C-E”).
• Automatic blank screen: short press or key to switch enable (“bon”) or disable(“boF”) automatic
blank screen.
• Long press M key for 2s or timeout 10s, quit system parameter setting.
User Manual Ver 1.0.7 Page 2
D3 -L 3 C hannel Constant Voltage DMX512 & R DM Decoder
Dimming curve setting
Linear dimming curve Logarithmic dimming curve
100
90
80
70
60
50
40
30
20
10
PWM duty(%)
100
90
80
70
60
50
40
30
20
10
PWM duty(%)
50 60 70 80 90 100
Brightness(%)
10 2 0 3 0 40
Gamma=1.6
50 6 0 7 0 80 90 1 00
Brightness(%)
10 2 0 3 0 40
Gamma=1.0
100
90
80
70
60
50
40
30
20
10
PWM duty(%)
Long press ◀and ▶key for 2s, restore factory default parameter, display "RES".
Factory default parameter: DMX decode mode, DMX decode start address is 1, high PWM frequence output,
logarithmic brightness curve, RGB mode number is 1, dimmer mode number is 1, disable automatic blank screen.
Enter stand-alone dimmer mode onlywhen DMX signal is disconnected or lost.
Short press Mkey, when display L-1~L-8, enter stand-alone dimmer mode.
Press ◀or ▶key to change dimmer mode number(L-1~L-8).
Each dimmer mode can adjust each channel brightness independently.
Long press M key for 2s , prepare for setup three channel brightness.
Short press M key to switch three channel(100~1FF, 200~2FF, 300~3FF).
Press ◀or ▶key to setup brightness value of each channel.
Long press M key for 2s, or timeout 10s, quit setting.
Stand-alone dimmer mode
(L- 1~L- 8)
Malfunctions analysis & troubleshooting
1. Wrong connection of R/G/B wires.
2. DMX decode address error.
Causes
1. Output cable is too long.
2. Wire diameter is too small.
3. Overload beyond power supply capability.
4. Overload beyond controller capability.
Wrong colour
Malfunctions
Uneven intensity
between front and
rear, with voltage drop
No light
RGB change mode list
No. Name
P01
P02
P03
P04
P05
P06
P07
P08
P09
P10
Static red
Static green
Static blue
Static yellow
Static cyan
Static purple
Static white
RGB jump
7 colour jump
Red strobe
No. Name No. Name
P11
P12
P13
P14
P15
P16
P17
P18
P19
P20
P21
P22
P23
P24
P25
P26
P27
P28
P29
P30
Green strobe
Blue strobe
White strobe
RGB strobe
7 colour strobe
Red fade in and out
Green fade in and out
Blue fade in and out
White fade in and out
RGBW fade in and out
Red yellow smooth
Green cyan smooth
Blue purple smooth
Blue white smooth
RGB+W smooth
RGBW smooth
RGBY smooth
Yellow cyan purple smooth
RGB smooth
6 colour smooth
Stand-alone RGB mode
Enter stand-alone RGB mode onlywhen DMX signal is disconnected or lost.
Short press Mkey, when display P01~P30, enter stand-alone RGB mode.
Press ◀or ▶key to change dynamic mode number(P01~P30).
Each mode can adjust speed and brightness.
Long press M key for 2s , prepare for setup mode speed and brightness.
Short press M key to switch two item.
Press ◀or ▶key to setup value of each item.
Mode speed: 1-10 level speed(S-1, S-9, S-F).
Mode brightness: 1-10 level brightness(b-1, b-9, b-F).
Long press M key for 2s, or timeout 10s, quit setting.
Speed
(8 level)
Brightness
(10 level,100%)
(P01~P30)
1. Reconnect R/G/B wires.
2. Set corrrect decode address.
Troubleshooting
1. Reduce cable or loop supply.
2. Change wider wire.
3. Replace higher power supply .
4. Add power repeater.
1.Check the power.
2.Check the connection.
Stand-alone dimmer mode
Restore factory default parameter
Stand-alone RGB mode
Short press M key, when display 001~999, enter DMX mode.
Press ◀or ▶key to change DMX decode star t address(001~999 ),
long press for fast adjustment.
If there is a DMX signal input, will enter DMX mode automatically.
DMX Dimming: Each D3-L DMX decoder occupy 3 DMX address
when connecting the DMX console.
For example, the defaulted start address is 1,
their corresponding relationship in the form:
DMX mode
DMX mode
(001~999)
Long press M and ◀key in the same time for 2s, prepare for setup system parameter: output PW M frequence, output brightness
curve, automatic blank screen. short press M key to switch three item.
Output PW M frequence: short press ◀or ▶key to switch 500Hz("F-L")or 2KHz("F-H").
Higher PW M frequency, will cause lower output current, higher power noise, but more suitable for camera(No flickers for video).
Output brightness curve: short press ◀or ▶key to switch linear curve("C-L") or logarithmic curve("C-E").
Automatic blank screen: short press ◀or ▶key to switch enable ("bon") or disable("boF") automatic blank screen.
Long press M key for 2s or timeout 10s, quit system parameter setting.
Operation
System parameter setting
CH1 0-255
CH2 0-255
CH3 0-255
CH1 PWM 0-100% (LED R)
DMX Console DMX Decoder Output
CH2 PWM 0-100% (LED G)
CH3 PWM 0-100% (LED B)
1. No power.
2. Wrong connection or insecure.
DMX Mode
• Short press M key, when display 001~999, enter DMX mode.
• Press or key to change DMX decode start
address(001~999), long press for fast adjustment.
• If there is a DMX signal input, will enter DMX mode
automatically.
• DMX Dimming: Each D3-L DMX decoder occupy 3 DMX
address when connecting the DMX console.
For example, the defaulted start address is 1, their
corresponding relationship in the form:
User Manual Ver 1.0.7 Page 2
D3 -L 3 C hannel Constant Voltage DM X512 & RDM Decoder
Dimming curve setting
Linear dimming curve Logarithmic dimming curve
100
90
80
70
60
50
40
30
20
10
PWM duty(%)
100
90
80
70
60
50
40
30
20
10
PWM duty(%)
50 60 70 80 90 100
Brightness(%)
10 20 3 0 4 0
Gamma=1.6
50 60 7 0 8 0 9 0 100
Brightness(%)
10 20 3 0 4 0
Gamma=1.0
100
90
80
70
60
50
40
30
20
10
PWM duty(%)
Long press ◀and ▶key for 2s, restore factory default parameter, display "RES".
Factory default parameter: DMX decode mode, DMX decode start address is 1, high PWM frequence output,
logarithmic brightness curve, RGB mode number is 1, dimmer mode number is 1, disable automatic blank screen.
Enter stand-alone dimmer mode onlywhen DMX signal is disconnected or lost.
Short press Mkey, when display L-1~L-8, enter stand-alone dimmer mode.
Press ◀or ▶key to change dimmer mode number(L-1~L-8).
Each dimmer mode can adjust each channel brightness independently.
Long press M key for 2s, prepare for setup three channel brightness.
Short press M key to switch three channel(100~1FF, 200~2FF, 300~3FF).
Press ◀or ▶key to setup brightness value of each channel.
Long press M key for 2s, or timeout 10s, quit setting.
Stand-alone dimmer mode
(L- 1~L- 8)
Malfunctions analysis & troubleshooting
1. Wrong connection of R/G/B wires.
2. DMX decode address error.
Causes
1. Output cable is too long.
2. Wire diameter is too small.
3. Overload beyond power supply capability.
4. Overload beyond controller capability.
Wrong colour
Malfunctions
Uneven intensity
between front and
rear, with voltage drop
No light
RGB change mode list
No. Name
P01
P02
P03
P04
P05
P06
P07
P08
P09
P10
Static red
Static green
Static blue
Static yellow
Static cyan
Static purple
Static white
RGB jump
7 colour jump
Red strobe
No. Name No. Name
P11
P12
P13
P14
P15
P16
P17
P18
P19
P20
P21
P22
P23
P24
P25
P26
P27
P28
P29
P30
Green strobe
Blue strobe
White strobe
RGB strobe
7 colour strobe
Red fade in and out
Green fade in and out
Blue fade in and out
White fade in and out
RGBW fade in and out
Red yellow smooth
Green cyan smooth
Blue purple smooth
Blue white smooth
RGB+W smooth
RGBW smooth
RGBY smooth
Yellow cyan purple smooth
RGB smooth
6 colour smooth
Stand-alone RGB mode
Enter stand-alone RGB mode onlywhen DMX signal is disconnected or lost.
Short press Mkey, when display P01~P30, enter stand-alone RGB mode.
Press ◀or ▶key to change dynamic mode number(P01~P30).
Each mode can adjust speed and brightness.
Long press M key for 2s, prepare for setup mode speed and brightness.
Short press M key to switch two item.
Press ◀or ▶key to setup value of each item.
Mode speed: 1-10 level speed(S-1, S-9, S-F).
Mode brightness: 1-10 level brightness(b-1, b-9, b-F).
Long press M key for 2s, or timeout 10s, quit setting.
Speed
(8 level)
Brightness
(10 level,100%)
(P01~P30)
1. Reconnect R/G/B wires.
2. Set corrrect decode address.
Troubleshooting
1. Reduce cable or loop supply.
2. Change wider wire.
3. Replace higher power supply .
4. Add power repeater.
1.Check the power.
2.Check the connection.
Stand-alone dimmer mode
Restore factory default parameter
Stand-alone RGB mode
Short press M key, when display 001~999, enter DMX mode.
Press ◀or ▶key to change DMX decode star t address(001 ~999 ),
long press for fast adjustment.
If there is a DMX signal input, will enter DMX mode automatically.
DMX Dimming: Each D3-L DMX decoder occupy 3 DMX address
when connecting the DMX console.
For example, the defaulted start address is 1,
their corresponding relationship in the form:
DMX mode
DMX mode
(001~999)
Long press M and ◀key in the same time for 2s, prepare for setup system parameter: output PW M frequence, output brightness
curve, automatic blank screen. short press M key to switch three item.
Output PW M frequence: short press ◀or ▶key to switch 500Hz("F-L")or 2KHz("F-H").
Higher PW M frequency, will cause lower output current, higher power noise, but more suitable for camera(No flickers for video).
Output brightness curve: short press ◀or ▶key to switch linear curve("C-L") or logarithmic curve("C-E").
Automatic blank screen: short press ◀or ▶key to switch enable ("bon") or disable("boF") automatic blank screen.
Long press M key for 2s or timeout 10s, quit system parameter setting.
Operation
System parameter setting
CH1 0-255
CH2 0-255
CH3 0-255
CH1 PWM 0-100% (LED R)
DMX Console DMX Decoder Output
CH2 PWM 0-100% (LED G)
CH3 PWM 0-100% (LED B)
1. No power.
2. Wrong connection or insecure.
Stand-alone RGB Mode
• Enter stand-alone RGB mode only when DMX signal is disconnected or lost.
• Short press M key, when display P01~P30, enter stand-alone RGB mode.
• Press or key to change dynamic mode number(P01~P30).
• Each mode can adjust speed and brightness.
Long press M key for 2s, prepare for setup mode speed and brightness.
Short press M key to switch two item.
Press or key to setup value of each item.
Mode speed: 1-10 level speed(S-1, S-9, S-F).
Mode brightness: 1-10 level brightness(b-1, b-9, b-F).
Long press M key for 2s, or timeout 10s, quit setting.
User Manual Ver 1.0.7 Page 2
D3 -L 3 C hannel Constant Voltage DM X512 & RDM Decoder
Dimming curve setting
Linear dimming curve Logarithmic dimming curve
100
90
80
70
60
50
40
30
20
10
PWM duty(%)
100
90
80
70
60
50
40
30
20
10
PWM duty(%)
50 60 70 80 90 100
Brightness(%)
10 20 3 0 4 0
Gamma=1.6
50 60 7 0 8 0 9 0 100
Brightness(%)
10 20 3 0 4 0
Gamma=1.0
100
90
80
70
60
50
40
30
20
10
PWM duty(%)
Long press ◀and ▶key for 2s, restore factory default parameter, display "RES".
Factory default parameter: DMX decode mode, DMX decode start address is 1, high PWM frequence output,
logarithmic brightness curve, RGB mode number is 1, dimmer mode number is 1, disable automatic blank screen.
Enter stand-alone dimmer mode onlywhen DMX signal is disconnected or lost.
Short press Mkey, when display L-1~L-8, enter stand-alone dimmer mode.
Press ◀or ▶key to change dimmer mode number(L-1~L-8).
Each dimmer mode can adjust each channel brightness independently.
Long press M key for 2s, prepare for setup three channel brightness.
Short press M key to switch three channel(100~1FF, 200~2FF, 300~3FF).
Press ◀or ▶key to setup brightness value of each channel.
Long press M key for 2s, or timeout 10s, quit setting.
Stand-alone dimmer mode
(L- 1~L- 8)
Malfunctions analysis & troubleshooting
1. Wrong connection of R/G/B wires.
2. DMX decode address error.
Causes
1. Output cable is too long.
2. Wire diameter is too small.
3. Overload beyond power supply capability.
4. Overload beyond controller capability.
Wrong colour
Malfunctions
Uneven intensity
between front and
rear, with voltage drop
No light
RGB change mode list
No. Name
P01
P02
P03
P04
P05
P06
P07
P08
P09
P10
Static red
Static green
Static blue
Static yellow
Static cyan
Static purple
Static white
RGB jump
7 colour jump
Red strobe
No. Name No. Name
P11
P12
P13
P14
P15
P16
P17
P18
P19
P20
P21
P22
P23
P24
P25
P26
P27
P28
P29
P30
Green strobe
Blue strobe
White strobe
RGB strobe
7 colour strobe
Red fade in and out
Green fade in and out
Blue fade in and out
White fade in and out
RGBW fade in and out
Red yellow smooth
Green cyan smooth
Blue purple smooth
Blue white smooth
RGB+W smooth
RGBW smooth
RGBY smooth
Yellow cyan purple smooth
RGB smooth
6 colour smooth
Stand-alone RGB mode
Enter stand-alone RGB mode onlywhen DMX signal is disconnected or lost.
Short press Mkey, when display P01~P30, enter stand-alone RGB mode.
Press ◀or ▶key to change dynamic mode number(P01~P30).
Each mode can adjust speed and brightness.
Long press M key for 2s, prepare for setup mode speed and brightness.
Short press M key to switch two item.
Press ◀or ▶key to setup value of each item.
Mode speed: 1-10 level speed(S-1, S-9, S-F).
Mode brightness: 1-10 level brightness(b-1, b-9, b-F).
Long press M key for 2s, or timeout 10s, quit setting.
Speed
(8 level)
Brightness
(10 level,100%)
(P01~P30)
1. Reconnect R/G/B wires.
2. Set corrrect decode address.
Troubleshooting
1. Reduce cable or loop supply.
2. Change wider wire.
3. Replace higher power supply .
4. Add power repeater.
1.Check the power.
2.Check the connection.
Stand-alone dimmer mode
Restore factory default parameter
Stand-alone RGB mode
Short press M key, when display 001~999, enter DMX mode.
Press ◀or ▶key to change DMX decode star t address(001 ~999 ),
long press for fast adjustment.
If there is a DMX signal input, will enter DMX mode automatically.
DMX Dimming: Each D3-L DMX decoder occupy 3 DMX address
when connecting the DMX console.
For example, the defaulted start address is 1,
their corresponding relationship in the form:
DMX mode
DMX mode
(001~999)
Long press M and ◀key in the same time for 2s, prepare for setup system parameter: output PW M frequence, output brightness
curve, automatic blank screen. short press M key to switch three item.
Output PW M frequence: short press ◀or ▶key to switch 500Hz("F-L")or 2KHz("F-H").
Higher PW M frequency, will cause lower output current, higher power noise, but more suitable for camera(No flickers for video).
Output brightness curve: short press ◀or ▶key to switch linear curve("C-L") or logarithmic curve("C-E").
Automatic blank screen: short press ◀or ▶key to switch enable ("bon") or disable("boF") automatic blank screen.
Long press M key for 2s or timeout 10s, quit system parameter setting.
Operation
System parameter setting
CH1 0-255
CH2 0-255
CH3 0-255
CH1 PWM 0-100% (LED R)
DMX Console DMX Decoder Output
CH2 PWM 0-100% (LED G)
CH3 PWM 0-100% (LED B)
1. No power.
2. Wrong connection or insecure.
Stand-alone Dimmer Mode
• Enter stand-alone dimmer mode only when DMX signal is disconnected or lost.
• Short press M key, when display L-1~L-8, enter stand-alone dimmer mode.
• Press or key to change dimmer mode number(L-1~L-8).
• Each dimmer mode can adjust each channel brightness independently.
Long press M key for 2s, prepare for setup three channel brightness.
Short press M key to switch three channel(100~1FF, 200~2FF, 300~3FF).
Press or key to setup brightness value of each channel.
Long press M key for 2s, or timeout 10s, quit setting.
User Manual Ver 1.0.7 Page 2
D3 -L 3 C hannel Constant Voltage DM X512 & RDM Decoder
Dimming curve setting
Linear dimming curve Logarithmic dimming curve
100
90
80
70
60
50
40
30
20
10
PWM duty(%)
100
90
80
70
60
50
40
30
20
10
PWM duty(%)
50 60 70 80 90 100
Brightness(%)
10 20 3 0 4 0
Gamma=1.6
50 60 7 0 8 0 9 0 100
Brightness(%)
10 20 3 0 4 0
Gamma=1.0
100
90
80
70
60
50
40
30
20
10
PWM duty(%)
Long press ◀and ▶key for 2s, restore factory default parameter, display "RES".
Factory default parameter: DMX decode mode, DMX decode start address is 1, high PWM frequence output,
logarithmic brightness curve, RGB mode number is 1, dimmer mode number is 1, disable automatic blank screen.
Enter stand-alone dimmer mode onlywhen DMX signal is disconnected or lost.
Short press Mkey, when display L-1~L-8, enter stand-alone dimmer mode.
Press ◀or ▶key to change dimmer mode number(L-1~L-8).
Each dimmer mode can adjust each channel brightness independently.
Long press M key for 2s, prepare for setup three channel brightness.
Short press M key to switch three channel(100~1FF, 200~2FF, 300~3FF).
Press ◀or ▶key to setup brightness value of each channel.
Long press M key for 2s, or timeout 10s, quit setting.
Stand-alone dimmer mode
(L- 1~L- 8)
Malfunctions analysis & troubleshooting
1. Wrong connection of R/G/B wires.
2. DMX decode address error.
Causes
1. Output cable is too long.
2. Wire diameter is too small.
3. Overload beyond power supply capability.
4. Overload beyond controller capability.
Wrong colour
Malfunctions
Uneven intensity
between front and
rear, with voltage drop
No light
RGB change mode list
No. Name
P01
P02
P03
P04
P05
P06
P07
P08
P09
P10
Static red
Static green
Static blue
Static yellow
Static cyan
Static purple
Static white
RGB jump
7 colour jump
Red strobe
No. Name No. Name
P11
P12
P13
P14
P15
P16
P17
P18
P19
P20
P21
P22
P23
P24
P25
P26
P27
P28
P29
P30
Green strobe
Blue strobe
White strobe
RGB strobe
7 colour strobe
Red fade in and out
Green fade in and out
Blue fade in and out
White fade in and out
RGBW fade in and out
Red yellow smooth
Green cyan smooth
Blue purple smooth
Blue white smooth
RGB+W smooth
RGBW smooth
RGBY smooth
Yellow cyan purple smooth
RGB smooth
6 colour smooth
Stand-alone RGB mode
Enter stand-alone RGB mode onlywhen DMX signal is disconnected or lost.
Short press Mkey, when display P01~P30, enter stand-alone RGB mode.
Press ◀or ▶key to change dynamic mode number(P01~P30).
Each mode can adjust speed and brightness.
Long press M key for 2s, prepare for setup mode speed and brightness.
Short press M key to switch two item.
Press ◀or ▶key to setup value of each item.
Mode speed: 1-10 level speed(S-1, S-9, S-F).
Mode brightness: 1-10 level brightness(b-1, b-9, b-F).
Long press M key for 2s, or timeout 10s, quit setting.
Speed
(8 level)
Brightness
(10 level,100%)
(P01~P30)
1. Reconnect R/G/B wires.
2. Set corrrect decode address.
Troubleshooting
1. Reduce cable or loop supply.
2. Change wider wire.
3. Replace higher power supply .
4. Add power repeater.
1.Check the power.
2.Check the connection.
Stand-alone dimmer mode
Restore factory default parameter
Stand-alone RGB mode
Short press M key, when display 001~999, enter DMX mode.
Press ◀or ▶key to change DMX decode star t address(001 ~999 ),
long press for fast adjustment.
If there is a DMX signal input, will enter DMX mode automatically.
DMX Dimming: Each D3-L DMX decoder occupy 3 DMX address
when connecting the DMX console.
For example, the defaulted start address is 1,
their corresponding relationship in the form:
DMX mode
DMX mode
(001~999)
Long press M and ◀key in the same time for 2s, prepare for setup system parameter: output PW M frequence, output brightness
curve, automatic blank screen. short press M key to switch three item.
Output PW M frequence: short press ◀or ▶key to switch 500Hz("F-L")or 2KHz("F-H").
Higher PW M frequency, will cause lower output current, higher power noise, but more suitable for camera(No flickers for video).
Output brightness curve: short press ◀or ▶key to switch linear curve("C-L") or logarithmic curve("C-E").
Automatic blank screen: short press ◀or ▶key to switch enable ("bon") or disable("boF") automatic blank screen.
Long press M key for 2s or timeout 10s, quit system parameter setting.
Operation
System parameter setting
CH1 0-255
CH2 0-255
CH3 0-255
CH1 PWM 0-100% (LED R)
DMX Console DMX Decoder Output
CH2 PWM 0-100% (LED G)
CH3 PWM 0-100% (LED B)
1. No power.
2. Wrong connection or insecure.

While every eort has been made to ensure the accuracy of all information provided Task Lighting can not be held responsible for
any errors. Task Lighting also reserves the right to modify/delete product details without notice.
www.tasklighting.co.nz PH: 09 820 0004
RGB Change Mode List
Restore Factory Default Parameter
• Long press and key for 2s, restore factory default parameter, display”RES”.
• Factory default parameter: DMX decode mode, DMX decode start address is 1, high PWM frequence
output, logarithmic brightness curve, RGB mode number is 1, dimmer mode number is 1, disable automatic
blank screen.
User Manual Ver 1.0.7 Page 2
D3 -L 3 C hannel Constant Voltage DM X512 & RDM Decoder
Dimming curve setting
Linear dimming curve Logarithmic dimming curve
100
90
80
70
60
50
40
30
20
10
PWM duty(%)
100
90
80
70
60
50
40
30
20
10
PWM duty(%)
50 60 70 80 90 100
Brightness(%)
10 20 30 40
Gamma=1.6
50 60 70 80 90 100
Brightness(%)
10 20 30 40
Gamma=1.0
100
90
80
70
60
50
40
30
20
10
PWM duty(%)
Long press ◀and ▶key for 2s, restore factory default parameter, display "RES".
Factory default parameter: DMX decode mode, DMX decode start address is 1, high PWM frequence output,
logarithmic brightness curve, RGB mode number is 1, dimmer mode number is 1, disable automatic blank screen.
Enter stand-alone dimmer mode onlywhen DMX signal is disconnected or lost.
Short press Mkey, when display L-1~L-8, enter stand-alone dimmer mode.
Press ◀or ▶key to change dimmer mode number(L-1~L-8).
Each dimmer mode can adjust each channel brightness independently.
Long press M key for 2s, prepare for setup three channel brightness.
Short press M key to switch three channel(100~1FF, 200~2FF, 300~3FF).
Press ◀or ▶key to setup brightness value of each channel.
Long press M key for 2s, or timeout 10s, quit setting.
Stand-alone dimmer mode
(L- 1~L- 8)
Malfunctions analysis & troubleshooting
1. Wrong connection of R/G/B wires.
2. DMX decode address error.
Causes
1. Output cable is too long.
2. Wire diameter is too small.
3. Overload beyond power supply capability.
4. Overload beyond controller capability.
Wrong colour
Malfunctions
Uneven intensity
between front and
rear, with voltage drop
No light
RGB change mode list
No. Name
P01
P02
P03
P04
P05
P06
P07
P08
P09
P10
Static red
Static green
Static blue
Static yellow
Static cyan
Static purple
Static white
RGB jump
7 colour jump
Red strobe
No. Name No. Name
P11
P12
P13
P14
P15
P16
P17
P18
P19
P20
P21
P22
P23
P24
P25
P26
P27
P28
P29
P30
Green strobe
Blue strobe
White strobe
RGB strobe
7 colour strobe
Red fade in and out
Green fade in and out
Blue fade in and out
White fade in and out
RGBW fade in and out
Red yellow smooth
Green cyan smooth
Blue purple smooth
Blue white smooth
RGB+W smooth
RGBW smooth
RGBY smooth
Yellow cyan purple smooth
RGB smooth
6 colour smooth
Stand-alone RGB mode
Enter stand-alone RGB mode onlywhen DMX signal is disconnected or lost.
Short press Mkey, when display P01~P30, enter stand-alone RGB mode.
Press ◀or ▶key to change dynamic mode number(P01~P30).
Each mode can adjust speed and brightness.
Long press M key for 2s, prepare for setup mode speed and brightness.
Short press M key to switch two item.
Press ◀or ▶key to setup value of each item.
Mode speed: 1-10 level speed(S-1, S-9, S-F).
Mode brightness: 1-10 level brightness(b-1, b-9, b-F).
Long press M key for 2s, or timeout 10s, quit setting.
Speed
(8 level)
Brightness
(10 level,100%)
(P01~P30)
1. Reconnect R/G/B wires.
2. Set corrrect decode address.
Troubleshooting
1. Reduce cable or loop supply.
2. Change wider wire.
3. Replace higher power supply .
4. Add power repeater.
1.Check the power.
2.Check the connection.
Stand-alone dimmer mode
Restore factory default parameter
Stand-alone RGB mode
Short press M key, when display 001~999, enter DMX mode.
Press ◀or ▶key to change DMX decode star t address(001 ~999 ),
long press for fast adjustment.
If there is a DMX signal input, will enter DMX mode automatically.
DMX Dimming: Each D3-L DMX decoder occupy 3 DMX address
when connecting the DMX console.
For example, the defaulted start address is 1,
their corresponding relationship in the form:
DMX mode
DMX mode
(001~999)
Long press M and ◀key in the same time for 2s, prepare for setup system parameter: output PW M frequence, output brightness
curve, automatic blank screen. short press M key to switch three item.
Output PW M frequence: short press ◀or ▶key to switch 500Hz("F-L")or 2KHz("F-H").
Higher PW M frequency, will cause lower output current, higher power noise, but more suitable for camera(No flickers for video).
Output brightness curve: short press ◀or ▶key to switch linear curve("C-L") or logarithmic curve("C-E").
Automatic blank screen: short press ◀or ▶key to switch enable ("bon") or disable("boF") automatic blank screen.
Long press M key for 2s or timeout 10s, quit system parameter setting.
Operation
System parameter setting
CH1 0-255
CH2 0-255
CH3 0-255
CH1 PWM 0-100% (LED R)
DMX Console DMX Decoder Output
CH2 PWM 0-100% (LED G)
CH3 PWM 0-100% (LED B)
1. No power.
2. Wrong connection or insecure.
Dimming Curve Setting
User Manual Ver 1.0.7 Page 2
D3 -L 3 C hannel Constant Voltage DMX512 & RDM Decoder
Dimming curve setting
Linear dimming curve Logarithmic dimming curve
100
90
80
70
60
50
40
30
20
10
PWM duty(%)
100
90
80
70
60
50
40
30
20
10
PWM duty(%)
50 60 70 80 90 100
Brightness(%)
10 20 30 4 0
Gamma=1.6
50 60 70 8 0 9 0 100
Brightness(%)
10 20 30 4 0
Gamma=1.0
100
90
80
70
60
50
40
30
20
10
PWM duty(%)
Long press ◀and ▶key for 2s, restore factory default parameter, display"RES".
Factory default parameter: DMX decode mode, DMX decode start address is 1, high PWM frequence output,
logarithmic brightness curve, RGB mode number is 1, dimmer mode number is 1, disable automatic blank screen.
Enter stand-alone dimmer mode onlywhen DMX signal is disconnected or lost.
Short press Mkey, when display L-1~L-8, enter stand-alone dimmer mode.
Press ◀or ▶key to change dimmer mode number(L-1~L-8).
Each dimmer mode can adjust each channel brightness independently.
Long press M key for 2s , prepare for setup three channel brightness.
Short press M key to switch three channel(100~1FF, 200~2FF, 300~3FF).
Press ◀or ▶key to setup brightness value of each channel.
Long press M key for 2s, or timeout 10s, quit setting.
Stand-alone dimmer mode
(L- 1~L- 8)
Malfunctions analysis & troubleshooting
1. Wrong connection of R/G/B wires.
2. DMX decode address error.
Causes
1. Output cable is too long.
2. Wire diameter is too small.
3. Overload beyond power supply capability.
4. Overload beyond controller capability.
Wrong colour
Malfunctions
Uneven intensity
between front and
rear, with voltage drop
No light
RGB change mode list
No. Name
P01
P02
P03
P04
P05
P06
P07
P08
P09
P10
Static red
Static green
Static blue
Static yellow
Static cyan
Static purple
Static white
RGB jump
7 colour jump
Red strobe
No. Name No. Name
P11
P12
P13
P14
P15
P16
P17
P18
P19
P20
P21
P22
P23
P24
P25
P26
P27
P28
P29
P30
Green strobe
Blue strobe
White strobe
RGB strobe
7 colour strobe
Red fade in and out
Green fade in and out
Blue fade in and out
White fade in and out
RGBW fade in and out
Red yellow smooth
Green cyan smooth
Blue purple smooth
Blue white smooth
RGB+W smooth
RGBW smooth
RGBY smooth
Yellow cyan purple smooth
RGB smooth
6 colour smooth
Stand-alone RGB mode
Enter stand-alone RGB mode onlywhen DMX signal is disconnected or lost.
Short press Mkey, when display P01~P30, enter stand-alone RGB mode.
Press ◀or ▶key to change dynamic mode number(P01~P30).
Each mode can adjust speed and brightness.
Long press M key for 2s , prepare for setup mode speed and brightness.
Short press M key to switch two item.
Press ◀or ▶key to setup value of each item.
Mode speed: 1-10 level speed(S-1, S-9, S-F).
Mode brightness: 1-10 level brightness(b-1, b-9, b-F).
Long press M key for 2s, or timeout 10s, quit setting.
Speed
(8 level)
Brightness
(10 level,100%)
(P01~P30)
1. Reconnect R/G/B wires.
2. Set corrrect decode address.
Troubleshooting
1. Reduce cable or loop supply.
2. Change wider wire.
3. Replace higher power supply .
4. Add power repeater.
1.Check the power.
2.Check the connection.
Stand-alone dimmer mode
Restore factory default parameter
Stand-alone RGB mode
Short press M key, when display 001~999, enter DMX mode.
Press ◀or ▶key to change DMX decode star t address(001 ~999 ),
long press for fast adjustment.
If there is a DMX signal input, will enter DMX mode automatically.
DMX Dimming: Each D3-L DMX decoder occupy 3 DMX address
when connecting the DMX console.
For example, the defaulted start address is 1,
their corresponding relationship in the form:
DMX mode
DMX mode
(001~999)
Long press M and ◀key in the same time for 2s, prepare for setup system parameter: output PW M frequence, output brightness
curve, automatic blank screen. short press M key to switch three item.
Output PW M frequence: short press ◀or ▶key to switch 500Hz("F-L")or 2KHz("F-H").
Higher PW M frequency, will cause lower output current, higher power noise, but more suitable for camera(No flickers for video).
Output brightness curve: short press ◀or ▶key to switch linear curve("C-L") or logarithmic curve("C-E").
Automatic blank screen: short press ◀or ▶key to switch enable ("bon") or disable("boF") automatic blank screen.
Long press M key for 2s or timeout 10s, quit system parameter setting.
Operation
System parameter setting
CH1 0-255
CH2 0-255
CH3 0-255
CH1 PWM 0-100% (LED R)
DMX Console DMX Decoder Output
CH2 PWM 0-100% (LED G)
CH3 PWM 0-100% (LED B)
1. No power.
2. Wrong connection or insecure.
Malfunctions Analysis & Troubleshooting
User Manual Ver 1.0.7 Page 2
D3 -L 3 C hannel Constant Voltage DM X5 1 2 & RDM Decoder
Dimming curve setting
Linear dimming curve Logarithmic dimming curve
100
90
80
70
60
50
40
30
20
10
PWM duty(%)
100
90
80
70
60
50
40
30
20
10
PWM duty(%)
50 60 70 80 90 100
Brightness(%)
10 20 30 40
Gamma=1.6
50 60 70 80 90 1 0 0
Brightness(%)
10 20 30 40
Gamma=1.0
100
90
80
70
60
50
40
30
20
10
PWM duty(%)
Long press ◀and ▶key for 2s, restore factory default parameter, display"RES".
Factory default parameter: DMX decode mode, DMX decode start address is 1, high PWM frequence output,
logarithmic brightness curve, RGB mode number is 1, dimmer mode number is 1, disable automatic blank screen.
Enter stand-alone dimmer mode onlywhen DMX signal is disconnected or lost.
Short press Mkey, when display L-1~L-8, enter stand-alone dimmer mode.
Press ◀or ▶key to change dimmer mode number(L-1~L-8).
Each dimmer mode can adjust each channel brightness independently.
Long press M key for 2s, prepare for setup three channel brightness.
Short press M key to switch three channel(100~1FF, 200~2FF, 300~3FF).
Press ◀or ▶key to setup brightness value of each channel.
Long press M key for 2s, or timeout 10s, quit setting.
Stand-alone dimmer mode
(L- 1~L- 8)
Malfunctions analysis & troubleshooting
1. Wrong connection of R/G/B wires.
2. DMX decode address error.
Causes
1. Output cable is too long.
2. Wire diameter is too small.
3. Overload beyond power supply capability.
4. Overload beyond controller capability.
Wrong colour
Malfunctions
Uneven intensity
between front and
rear, with voltage drop
No light
RGB change mode list
No. Name
P01
P02
P03
P04
P05
P06
P07
P08
P09
P10
Static red
Static green
Static blue
Static yellow
Static cyan
Static purple
Static white
RGB jump
7 colour jump
Red strobe
No. Name No. Name
P11
P12
P13
P14
P15
P16
P17
P18
P19
P20
P21
P22
P23
P24
P25
P26
P27
P28
P29
P30
Green strobe
Blue strobe
White strobe
RGB strobe
7 colour strobe
Red fade in and out
Green fade in and out
Blue fade in and out
White fade in and out
RGBW fade in and out
Red yellow smooth
Green cyan smooth
Blue purple smooth
Blue white smooth
RGB+W smooth
RGBW smooth
RGBY smooth
Yellow cyan purple smooth
RGB smooth
6 colour smooth
Stand-alone RGB mode
Enter stand-alone RGB mode onlywhen DMX signal is disconnected or lost.
Short press Mkey, when display P01~P30, enter stand-alone RGB mode.
Press ◀or ▶key to change dynamic mode number(P01~P30).
Each mode can adjust speed and brightness.
Long press M key for 2s, prepare for setup mode speed and brightness.
Short press M key to switch two item.
Press ◀or ▶key to setup value of each item.
Mode speed: 1-10 level speed(S-1, S-9, S-F).
Mode brightness: 1-10 level brightness(b-1, b-9, b-F).
Long press M key for 2s, or timeout 10s, quit setting.
Speed
(8 level)
Brightness
(10 level,100%)
(P01~P30)
1. Reconnect R/G/B wires.
2. Set corrrect decode address.
Troubleshooting
1. Reduce cable or loop supply.
2. Change wider wire.
3. Replace higher power supply .
4. Add power repeater.
1.Check the power.
2.Check the connection.
Stand-alone dimmer mode
Restore factory default parameter
Stand-alone RGB mode
Short press M key, when display 001~999, enter DMX mode.
Press ◀or ▶key to change DMX decode star t address(001~999 ),
long press for fast adjustment.
If there is a DMX signal input, will enter DMX mode automatically.
DMX Dimming: Each D3-L DMX decoder occupy 3 DMX address
when connecting the DMX console.
For example, the defaulted start address is 1,
their corresponding relationship in the form:
DMX mode
DMX mode
(001~999)
Long press M and ◀key in the same time for 2s, prepare for setup system parameter: output PW M frequence, output brightness
curve, automatic blank screen. short press M key to switch three item.
Output PW M frequence: short press ◀or ▶key to switch 500Hz("F-L")or 2KHz("F-H").
Higher PW M frequency, will cause lower output current, higher power noise, but more suitable for camera(No flickers for video).
Output brightness curve: short press ◀or ▶key to switch linear curve("C-L") or logarithmic curve("C-E").
Automatic blank screen: short press ◀or ▶key to switch enable ("bon") or disable("boF") automatic blank screen.
Long press M key for 2s or timeout 10s, quit system parameter setting.
Operation
System parameter setting
CH1 0-255
CH2 0-255
CH3 0-255
CH1 PWM 0-100% (LED R)
DMX Console DMX Decoder Output
CH2 PWM 0-100% (LED G)
CH3 PWM 0-100% (LED B)
1. No power.
2. Wrong connection or insecure.
Popular Media Converter manuals by other brands


M-system
M-system JAPD2 instruction manual

Cobalt Digital Inc
Cobalt Digital Inc 5590 owner's manual

TR-Electronic
TR-Electronic CEH802M-8192/4096 SSI NTS 25H7N KRF manual

Faderfox
Faderfox micromodul EC4 user manual

J Tech Photonics
J Tech Photonics Pic-Convert instructions

TRENDnet
TRENDnet TFC-1000 Quick installation guide


