Blooming NB-R1260E User manual

Contents
Troubleshooting
Product Specifications
21
22
Warranty 23
Water Tank Drainage 20
Trial Operation
Detachment
Maintenance 18
16
17
Installation 12
Important Safeguards
Parts Identification
Basic Instructions
Functions & Operation
2
8
5
7
This product was manufactured for household use only.
Read all operating instructions before installation and use.
Please save this operating instruction manual and place it in an easily accessible location.
External appearance and specifications are subject to change for the improvement of
a product without notice.
NB-R1260E
NB-R1260R
Personal Hygiene Appliance

Do not use while bathing.
Do not place or store product where it can fall or be pulled into a tub or sink.
Do not place in or drop into water or other liquid.
Do not reach for a product that has fallen into the water. Unplug immediately.
Keep the cord away from heated surfaces.
Never block the air openings of the product or place it on a soft surface, such as a bed
or couch, where the air openings may be blocked. Keep the air openings free of lint,
hair, and the like.
Never use while sleeping or drowsy.
Never drop or insert any object into any opening or hose.
Do not use outdoors. or operate where aerosol(spray) products are being used or were
oxygen is being administered.
Connect this product to a properly grounded outlet only.
See Grounding Instructions.
Any other servicing should be performed by an authorized service representative.
Do not dismantle, repair, or alter the unit.
Do not pour or spray water on to the unit.
The unit must be grounded.
Do not touch the power plug with wet hands.
Properly connect the power cord to the electrical outlet corresponding to the rated
voltage of the unit.
Never operate this product if it has a damaged cord or plug, if it is not working properly,
if it has been dropped or damaged, or dropped into water.
Return the product to a service center for examination and repair.
Use this product only for its intended use as described in this manual.
Do not use any attachments unless recommended by the manufacturer.
Close supervision is necessary when this product is used by, on, or near children or invalids.
WARNING To reduce the risk of burns, electrocution,
fire or injury to persons.
To reduce the risk of electrocution.
DANGER
Do not use a damaged or loose power cord.
Do not use steam cleaner.
Keep the unit away from fires or inflammable substance.
READ ALL INSTRUCTIONS BEFORE USING.
Important Safeguards
2

3
To reduce the risk of burns, electrocution, fire or injury to persons.
To reduce the risk of injury to persons or damage to the product or the property.
Réduire les risques de blessures aux personnes ou de dommages au produit ou aux biens.
ATTENTION
WARNING
CAUTION
Do not connect the main water supply to the hot water pipe or supply.
(only connect to the cold water supply)
Do not open/close the seat or seat cover with excessive force.
Exercise caution that urine does not come into contact with the product - failure to do so may
result in bad odors or malfunction.
If the product will not be used for a long period of time, unplug the power cord, close the main
water supply valve, and drain any water in the water tank.
Do not pull out the bidet hose using excessive force.
Do not use thinner, benzene, acidic chemicals, chloride, or hydrochloric acid detergent on or
near the product. This may result in corrosion to the metal parts or discoloration or scratches
to the bidet body.
This appliance is not intended for use by persons (including children and seniors) with
reduced physical, sensory, or mental capabilities, or lack of experience and knowledge,
unless they have been given supervision or instruction concerning the use of the appliance
by a person responsible for their safety.
Children should be supervised to ensure that they do not play with the appliance.
After the installation, make sure to check all water supply connections for leaks.
Rubber washers should be in place for the water connection hoses & T-Valve.
Do not connect to the industrial water supplies.
Replace damaged power code and plug by authorized service center.
Caution against low-temperature burns.
Before removing the unit from the toilet bowl, disconnect the power plug first.
Do not connect other electrical appliances to the same power socket connected to the unit.
CONSERVEZ CES INSTRUCTIONS
SAVE THESE INSTRUCTIONS
Ne raccordez pas l'alimentation principale en eau à la conduite d'eau chaude.
(raccordez-la uniquement à la conduite d'eau froide)
Après l'installation, n'oubliez pas de vérifier la présence de fuites dans tous les raccords d'alimentation
en eau. Des rondelles de caoutchouc doivent être posées à chaque raccordement des tuyaux et autour
de la valve en T.
N'abaissez pas et ne relevez pas le siège ou le couvercle du siège en utilisant une force excessive.
Veillez à ce que l'urine n'entre pas en contact avec le produit. Tout manquement pourrait entraîner de
mauvaises odeurs ou une défaillance.
Lorsque le produit ne sera pas utilisé pendant une longue période, débranchez le câble d'alimentation,
coupez l'alimentation principale en eau et videz l'eau du réservoir.
Ne tirez pas sur le tuyau du bidet en utilisant une force excessive.
N'utilisez pas de diluant, de benzène, de produits chimiques acides, de chlorure ou de détergent
à l'acide chlorhydrique sur le produit ou à proximité de celui-ci. Cela peut entraîner la corrosion des
pièces métalliques, ou encore des égratignures ou une décoloration du bidet.
Cet appareil n'est pas conçu pour être utilisé par des personnes (notamment des enfants et des
personnes âgées)présentant des capacités physiques, sensorielles ou mentales réduites, ou un manque
d'expérience et de connaissances, sauf si elles sont supervisées ou informées sur l'utilisation de
l'appareil par une personne responsable de leur sécurité.
Les enfants doivent être surveillés pour s’assurer qu’ils ne jouent pas avec l’appareil.

4
This product should be grounded. In the event of an electrical short circuit, grounding
reduces the risk of electric shock by providing an escape wire for the electric current.
This product is equipped with a cord having a grounding wire with a grounding plug.
The plug must be plugged into an outlet that is properly installed and grounded.
DANGER - Improper use of the grounding plug can result in a risk of electric shock.
If repair or replacement of the cord or plug is necessary, do not connect the grounding
wire to either flat blade terminal. The wire with insulation having an outer surface
that is green with or without yellow stripes is the grounding wire. Check with a
qualified electrician or serviceman if the grounding instructions are not completely
understood, or if in doubt as to whether the product is properly grounded.
This product is for use on a nominal 120 V circuit, and has a grounding plug that looks
like the plug illustrated in Figure A. A temporary adapter, which looks like the adapter
illustrated in Figure B and C, may be used to connect this plug to a 2-pole receptacle
as shown in Figure B if a properly grounded outlet is not available. The temporary
adapter should be used only until a properly grounded outlet (Figure A) can be
installed by a qualified electrician. The green colored rigid ear, lug, and the like
extending from the adapter must be connected to a permanent ground such as a
properly grounded outlet box cover. Whenever the adapter is used, it must be held in
place by the screw.
If it is necessary to use an extension cord, use only a three wire extension cord that
has a three-blade grounding plug, and a three-slot receptacle that will accept the plug
on the product. Replace or repair a damaged cord.
GROUNDING INSTRUCTIONS
(Grounded PIN) (Metal Screw) (Grounded OUTLET Box) (Tap For Grounding Screw)
(Grounded OUTLET) (Adapter) (Adapter)
(Fig.A) (Fig.B) (Fig.C)

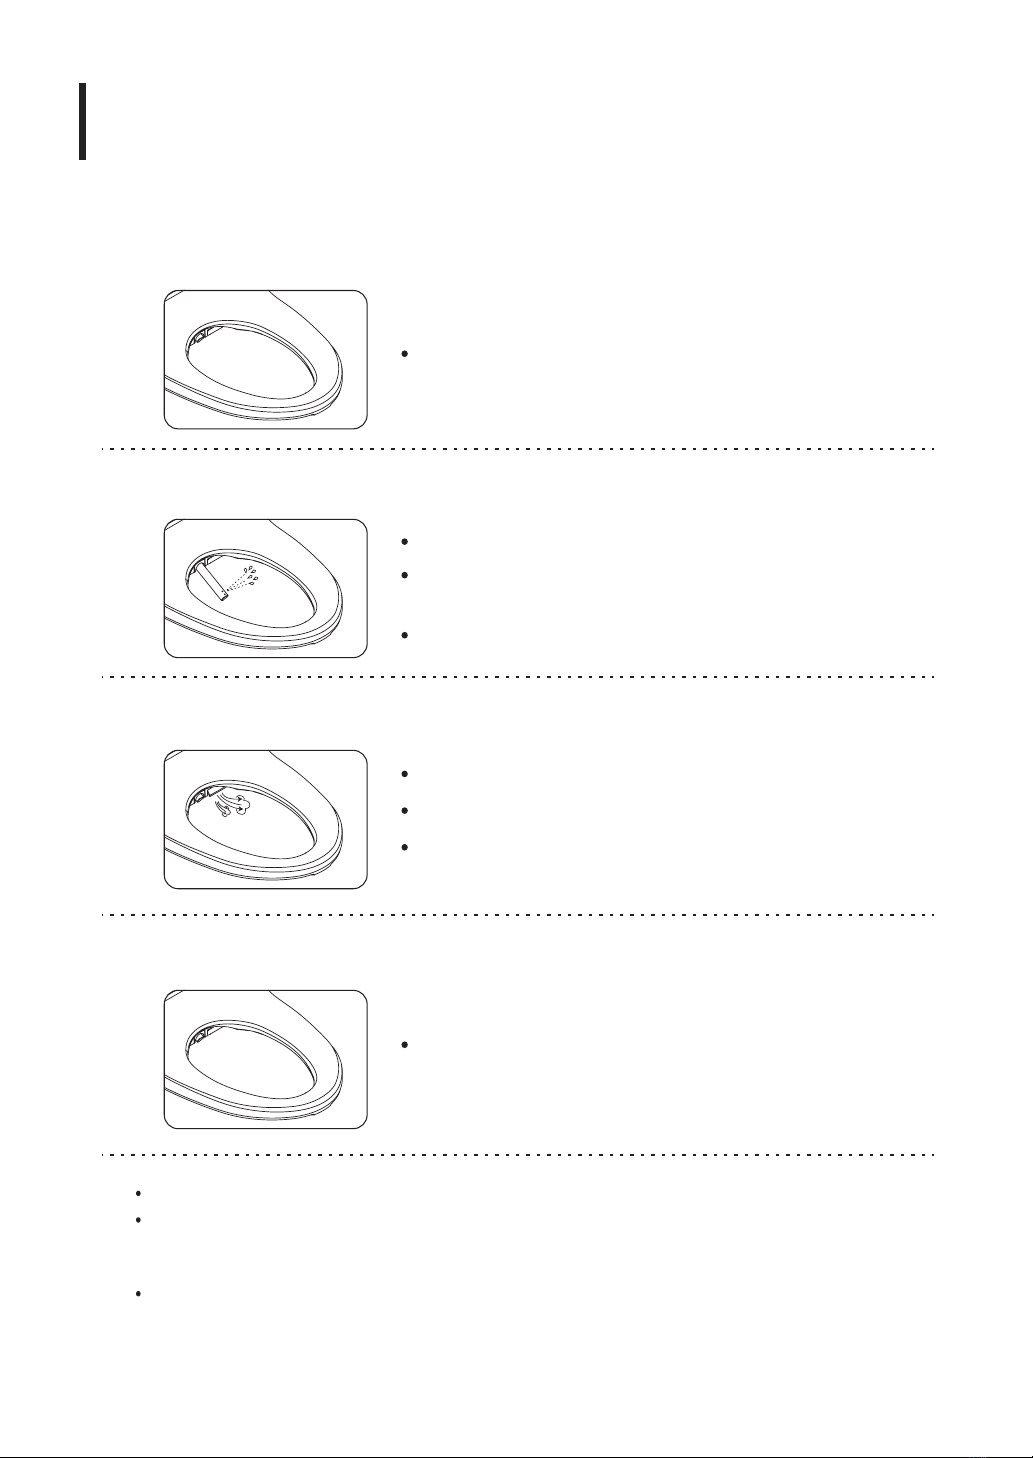
·Main Unit
Cleansing
Nozzle
Seat Sensor
Outlet of warm air dryer
Bidet
Nozzle
Seat
Control
Panel
Water
Inlet
Lid
Power Plug
Night Light
Lamp
Parts Identification
5
Remote
control
receiver

·Accessory Parts
Catch Plate
T-valve
PVC Flexible Hose
(for Main Unit)
Fastening Bolts
Rubber Grommets
Washers
Fastening Nuts
Remote control
& Mounting plate Batteries
6
·Control Panel
Remote control Unit control panel
Brackets
*For the installation on
toilets with top tighten the bolt
(Refer to installation)
1. Sit on the seat
Basic Instructions
Sit in center.
3. Press the 「DRYER」button.
The function will operate for 3 minutes.
It beeps if the dryer function is over.
Drying operation can be maximized by gently wiping
the wet area with toilet paper.
4. Press the 「STOP」button.
Stops all operating functions.
2. Press the 「CLEANSING」or「BIDET」button.
Operate either the"CLEANSING"or the"BIDET" function.
It beeps if the cleansing or bidet function is over.
Move cleansing runs by pressing "CLEANSING" or
"BIDET"button while using.
When using the unit, please sit in the center.
The seat sensor is installed on the inside of the seat part. The unit begins to operate only when
a user's skin touches the seat sensor. In case of a seat cover or something on the seat, the seat
sensor may not operate because the seat sensor can't sense a user's skin.
If the "CLEANSING" or "BIDET" function is operated for a long time, water temperature will drop
gradually. To regain warm water, resume operation after 3 minutes.
7

Move
(Oscillating Wash)
Functions & Operation
Move cleansing runs by pressing the "CLEANSING" or "BIDET" button while
cleansing or bidet cleansing.
Nozzle stops by pressing the "CLEANSING" or "BIDET" button again.
8
Auto Cleansing
To activate the automatic cleansing function, press the "AUTO CLEAN" button.
The move(oscillating) wash function and warm air dryer will operate for 1 minute
each after activation.
Can return to the previous auto-clean function that was set up when canceling
auto-clean function or pressing the stop button.
This function is useful for individuals with impairments that make it difficult to
select custom settings. It is also convenient for use with children.
A buzzer will sound when the auto cleansing function is finished.
Default settings for this function are Level 3 for water pressure, Level 2 for warm
air drying temperature and Level 3 for the nozzle position. These settings may be
adjusted to suit user preference.
When activated, the auto cleansing function will revert settings for both water and
seat temperature to "Medium" by default. Setting may be adjusted to suit user
preference.
Massage
Press the "MASSAGE" button for pulsating water, while cleansing or bidet function
is activated. (Massage is not available on the lowest level of water pressure.)
Stop the massage function by pressing the "MASSAGE" button again.
Auto Drain
If the product is not used for a long time, Press the "AUTO DRAIN" button.
Then, the water in the water tank drains for 3 minutes and clean water flows into
the water tank.
Press the "STOP" button to stop.

Water Temperature Adjustment
Press the "WATER TEMP." button to adjust the water temperature level.
There are 3 temperature settings to choose from.
·Low : 93.2℉(34℃) ·Medium : 98.6℉(37℃) ·High : 104℉(40℃)
Warm Seat Temperature Adjustment
Press the "SEAT TEMP." button to adjust the seat temperature level.
There are 3 temperature settings to choose from.
·Low : 95℉(35℃) ·Medium : 100.4℉(38℃) ·High : 104℉(40℃)
※ The unit remembers the water and seat temperature settings even if the power is shut off.
No need to readjust the temperature settings after a power failure.
9
Nozzle Position Adjustment
Press the " " or " " button to adjust the nozzle position during the CLEANSING or
BIDET function.
The unit remembers the last nozzle position settings.
Water Pressure Adjustment
The unit remembers the last water pressure settings.
Water pressure can be adjusted by pressing the " " or " " button. (Levels 1~5)
When the seat is unoccupied, the indication of water pressure level goes out.
Warm Air Dryer Temperature Adjustment
The unit remembers the most recent warm air temperature setting.
Press the " " or " " button to adjust the temperature of the warm air. (Levels 1~5)

AUTO Eco-Mode
Press the
"
ECO MODE
"
button on the seat control panel to activate the AUTO mode.
The water temperature and seat temperature are maintained at 86℉(30℃).
Temperature of Heated seat and Water are automatically adjusted to user’s original
settings during the seat is occupied and AUTO Eco-mode starts again once
unoccupied.
SMART Eco-Mode
Press the "ECO MODE" button on the seat control panel to activate the SMART mode.
Temperature of Heated seat and Water are automatically adjusted to user’s original
settings during the seat is occupied and SMART Eco-mode starts again once
unoccupied.
10
Power On/Off
Press the "CLEANSING/STOP" button for more than 4 seconds and then the power
indication light goes off. The unit will be power off completely.
Press any button to start the power on.
The unit remembers all of the prior settings in spite of an electrical outage so no
need to reset functions after power is back.
In SMART Eco-Mode, Eco-mode programs analyze user’s time zones of use and control
the temperature of heated seat and water as follows:
- The seat temperature is maintained at 86℉(30℃) in analyzed time zones of use.
- The seat temperature is maintained at 77℉ (25℃) in analyzed time zones of not using.
- Water temperature is maintained at 68℉ (20℃) during the whole cycles of SMART Eco-mode.
Burn protecting system at the low temperature
The seat temperature will automatically lower when set to the highest setting if the
seat is occupied for more than 30 minutes to protect the user against low-grade
burns.(May cause burns at the low temperature in case sitting on the seat for a long time.)
It returns to the setpoint when resetting or moving away from the seat.
※ Eco-Mode is available when LED indications of SEAT TEMP. and WATER TEMP. on remote control
are ON.
※ To cancel the Eco-mode function, press the ECO MODE until LED indications of AUTO and
SMART both turn off.

11
LED Nightlight
LED Nightlight activates by pressing the "NIGHT LIGHT" button and the LED
Nightlight function runs automatically when getting dark. To cancel the LED
Nightlight function, press the "NIGHT LIGHT" button again, and LED goes OFF.
When the LED Nightlight function runs, Bidet senses automatically toilet light and
LED Nightlight goes on. Users can use conveniently a bidet without toilet light.
Electric power consumption is little and uses the LED Nightlight function without
care about the electric charge.
Self Nozzle Cleaning
Before and after each operation, the self nozzle cleaning function runs and
sanitizes the nozzle head.
SMART Nozzle-Cleaning
When SMART Eco-mode is activated, the Eco-mode programs analyze user’s time
zones of use and operate Nozzle-Cleaning function for 4 times automatically
during not using.
Possible to stop the operation of SMART Nozzle-Cleaning if pressing "STOP"
button or sitting on the seat.
Nozzle Cleaning
Press the "NOZZLE CLEANING" button. The nozzle moves for 2 minutes back and
forth, the wash water comes out and the nozzle is cleaned.
Press the "NOZZLE CLEANING" button for more than 3 seconds. The nozzle comes
out and stops. Clean the nozzle manually with a soft brush.
Press the "STOP" button and the nozzle returns to its storage position, then
self-cleaning function is operated.
Installation
Detach the water supply hose on the part of
the shut off valve, then install the T-valve.
In case of a rigid pipe, T-valve cannot
be installed.
Needs to purchase and install the
separate flexible hose(for water tank).
Caution before installation
Check whether the size and shape of the toilet seat are suitable for installation.
A ground connection should be done by authorized service personnel only.
Do not connect the power until installation is finalized.
Check all the accessory parts are in place.
Remove the existing toilet seat.
Remove the existing toilet seat and lid by
unfastening fastening nuts underneath.
Keep the detached seat,
lid and nuts for later use.
Drain toilet water tank completely after turning off the water supply
by turning the shut off valve clockwise.
Rubber
grommets
Washers
Fastening
nuts
1.
2.
3.
Water
Supply
pipe
Water
Supply
pipe
Shut off Valve
Flush
Drain
T-valve
12
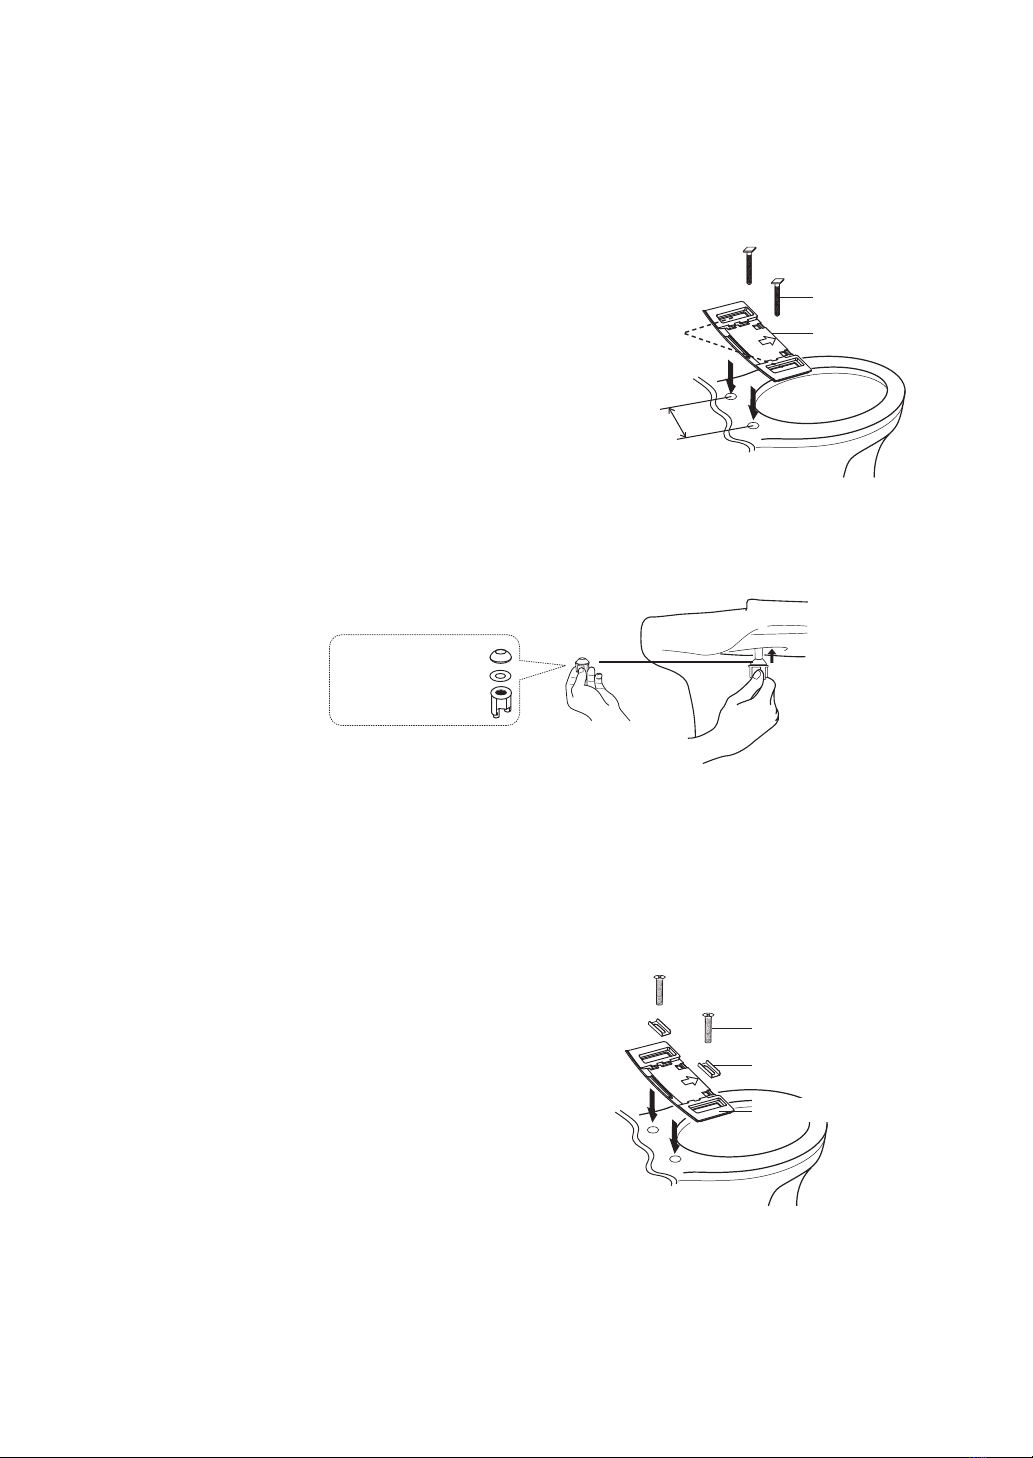
(2) Insert fastening bolts through the bolt slots and into the bolt
holes in the toilet.
Rubber grommets
Washers
Fastening nuts
5.5”
(140mm)
Fastening bolts
Catch Plate
Bolt
slots
13
Fastening bolts
Brackets
Catch Plate
(1) Line up the bolt slots in the catch plate with the bolt holes
in the toilet bowl.
4-A.
* 5.5”(140mm) hole spacing is required
for a typical installation.
* If your bolt hole spacing is different,
a custom solution is needed to affix
catch plate bracket to the toilet.
Contact us for additional details.
< Install Mounting Plate for Standard Installation >
Fasten the catch plate with fastening bolts after setting in place
the brackets on the catch plate.
4-B.
* This method will use a combination
of the included Brackets and the original
toilet seat fastening bolts.
< Install Mounting Plate for top-mounted toilet seats >
< 4-A. (1) >
< 4-A. (2) >
< 4-B. >

Connect the flexible hose to the T-valve.
7.
Slide the bidet unit onto the catch plate by aligning the grooves
under the bidet unit.
6.
Connect the flexible hose to the bidet.
5.
T-valve
The bidet seat should slide all the way back
and lock into the mounting bracket.
It should not be able to slide forward
once locked.
If you choose to install a water filter,
install it between the t-valve and
supply hose.
14
Water inlet Flexible hose
15
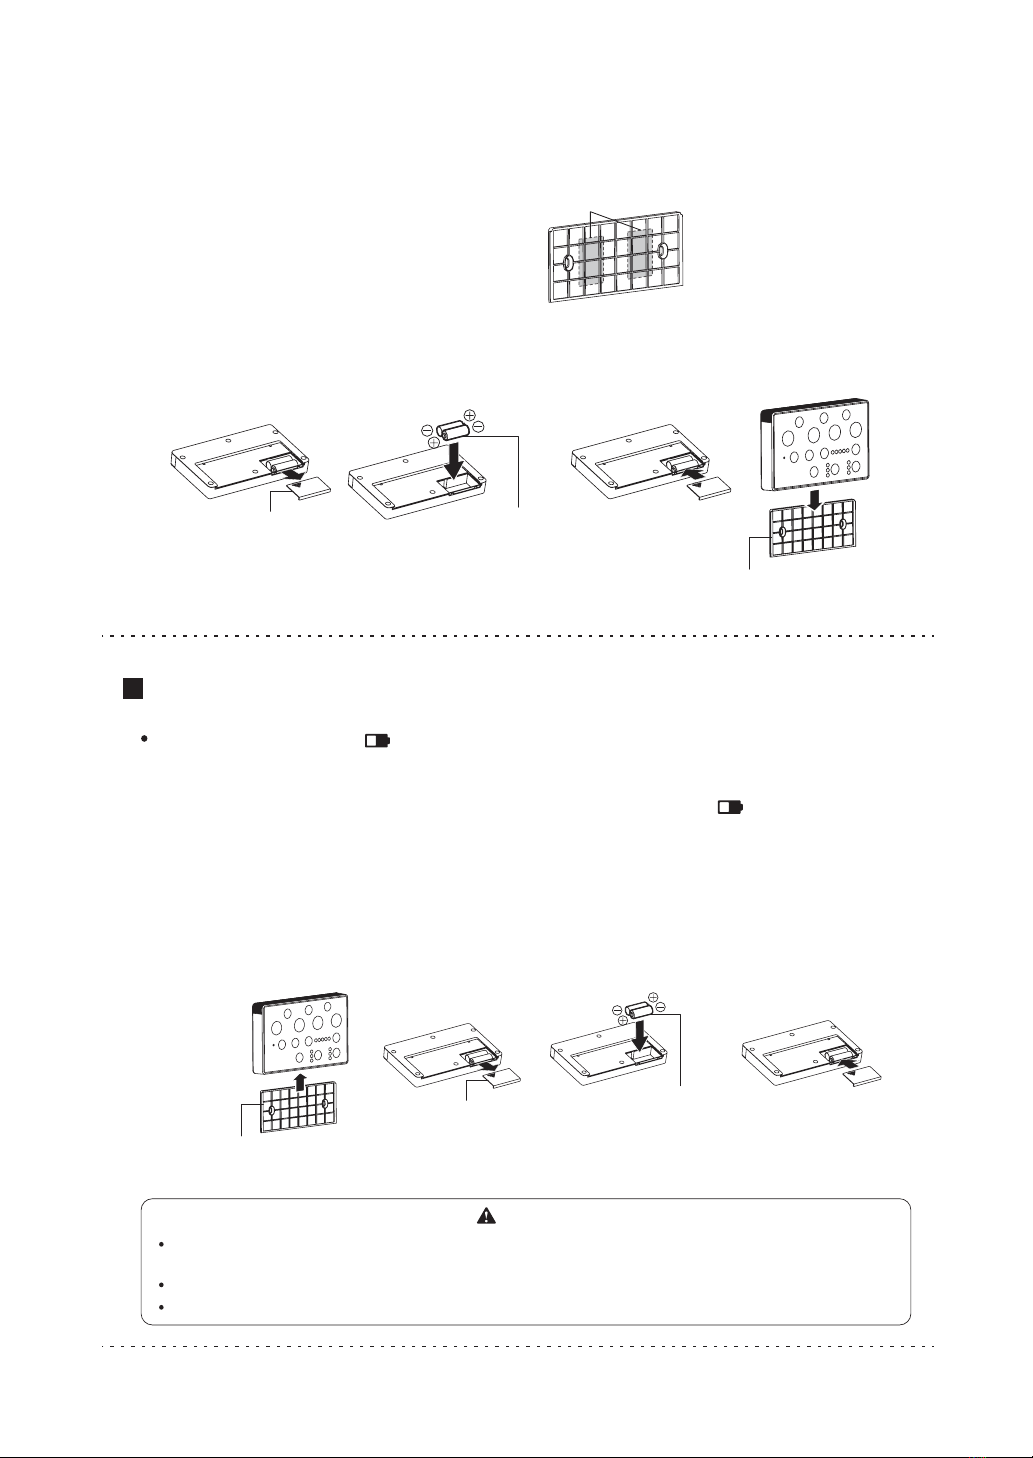
Changing batteries of remote control
When the battery sign( ) indicator blinks on and off, remote buttons will not work
properly and it is time to replace the batteries. However, the batteries may
discharge quickly under certain operating conditions, such that the remote control
unit may be disabled before the user notices the battery sign( ) indicator is
blinking.
1. Remove remote control from the remote control mounting plate.
2. Open the battery cover and replace batteries with new ones.
(Battery life is about 1 year.)
3. Close the battery cover and insert remote control back into the remote control
mounting plate.
Use only AA(LR6)/1.5V batteries. There is a risk of explosion if battery is replaced with the
wrong type. Dispose of used batteries properly according to battery manufacturers instructions.
Insert the batteries according to the (+), (-) indications marked on the remote control.
Do not use the used battery and new one together.
Double-sided tape
Battery cover AA(LR06)type
/1.5V batteries
Remote control
mounting plate
Remote control
mounting plate
Battery cover AA(LR06)type
/1.5V batteries
CAUTION
8.
9.
Attach the remote control mounting plate to the wall with double-side
adhesive tape.
Insert batteries into the remote control unit, as shown below, and
mount the unit to the mounting plate.

Trial Operation
Open the shut-off valve by
turning counterclockwise.
Check for any water leakage
from hose connections.
Plug in the power cord.
If the power indicator light does not turn on after plugging in the power cord,
press any button to turn it on manually.
(Except “ ”, “ ”, “ ”, “ ” button on the remote control)
To test the water spray operation,
press the "CLEANSING/STOP"
button while placing your hand
on the seat sensor.
Do not invert or otherwise move the bidet while it is connected to power and water.
Doing so may cause damage to the unit.
*Get ready to cover the nozzle with your
other hand to prevent water spraying out
of the bowl.
※ WARNING
1.
2.
3.
5.
Shut-off valve
To fill the water reservoir press the "CLEANSING" or "BIDET" button
on the remote control. One long beep is emitted when the tank is full.
4.
16

Detachment
To detach or move the unit, follow the instructions shown below.
Unplug the power cord.
Shut off the water supply by turning the shut-off valve clockwise.
Then completely drain the toilet water tank.
Disconnect the flexible hose from the T-valve, detach the bidet unit
from the catch plate, and unfasten the catch plate from the toilet.
Unfasten the drain plug underneath the unit and drain the water
completely in the water tank.
Disconnect the PVC flexible hose and T-valve.
Connect the water-supply hose to the shut off valve.
Open the shut off valve by turning counterclockwise and
check any leakages on the connections.
Reinstall the original seat and lid to the toilet.
1.
2.
3.
4.
5.
6.
7.
8.
To detach the unit, pull forward
pressing the lever as shown on the
illustration.
①
②
Drain plug
17

Maintenance
Close the water supply by turning the shut off valve clockwise and
drain the toilet water tank completely.
Detach the PVC flexible hose from the water inlet.
In case of an uncommon toilet bowl, the hose may not be detached
easily. On this occasion, detach the body of a unit from the toilet bowl
first, and detach the hose from the water inlet.
1.
2.
Begin by detaching the strainer from the water inlet, clean and insert
it again.
(In case that it is hard to detach the strainer with a hand, try again
with a kind of nippers)
After attaching the hose to the water inlet, turn the water supply
valve to the left and have it opened.
3.
4.
Cleaning the Water Strainer
18
Water inlet Flexible hose
Strainer

Cleaning the Nozzle
External Cleaning
The external case of the unit is made of plastic which may be damaged by
scrubbers, chemicals, etc. Do not use any chemicals.
Clean the unit with a tightly wrung wet soft cloth. Do not spray water the unit.
Disconnect the power plug when cleaning. Please be careful not to splash the
water into the plug or socket.
Touching the power socket with wet hands can cause an electric shock.
Press the "NOZZLE CLEANING" button. The nozzle moves for 2 minutes back and
forth, the wash water comes out and the nozzle is cleaned.
Press the "NOZZLE CLEANING" button for more than 3 seconds. The nozzle comes
out and stops. Clean the nozzle manually with a soft brush.
Press the "STOP" button and the nozzle returns to its storage position, then
self-cleaning function is operated.
Detergent
Benzene
Insecticide Sand paper
19

Water Tank Drainage
Disconnect the power plug first.
Close the shut off valve by turning clockwise.
1.
2.
After placing a basin (2ℓ) under the drain hose,
unfasten the drain plug and drain the water tank completely.
3.
Connect the power plug and check if the unit power is on.
Do not turn off the “WATER TEMP” level and adjust water temperature
to “Low” or higher.
1.
2.
If not in use for a long time, drain the water tank.
3.
Freeze Prevention during Winter
20
Drain plug
(Low)
(Medium)
(High)
This manual suits for next models
1
Table of contents
Other Blooming Toilet manuals


Popular Toilet manuals by other brands


American Standard
American Standard CONCEPT Cube TF-2704 installation manual

BIOLAN
BIOLAN ECO Instructions for installation, use and maintenance

Thetford
Thetford C260 Series user manual

KELISS
KELISS T162A Series instruction manual

Silent Venus
Silent Venus SVP600 Installation & maintenance

Kohler
Kohler K-22241K Installation and care guide