Taylor Made Pontoon Enclosure User manual

An easy way to add additional shade or privacy area on your Pontoon Boat. Enclosure accommodates both 96” and 102”
width boats and is supported by shock-corded fiberglass pole framework that breaks down for convenient storage. After
initial installation of permanently mounted hardware to your playpen rail, the Enclosure sets up and attaches easily and
comes down in minutes. This product is designed to only be in place on your boat when at idle speed or when
anchored. NEVER leave this product up and assembled on your boat when underway! Never leave the Pontoon
Enclosure in place when unattended or for any prolonged periods.
You will need full access in and
around the boat for initial installation.
It can be done with the boat in the
water, but best acomplished on the
trailer, with a helper.
Pontoon Enclosure
Includes:
Fabric Enclosure, Three 8-Section frame pieces, One 3-Section Center Frame piece, Six Side Mounting Brackets, (12)-#10
x 3/4” screws, (16) #8 Self-Tapping male snaps, (14) Short Webbing Snap/Straps, (2) Long Webbing Snap/Strap Assem-
blies, Storage bag and instructions.
Step 1:
Check to be sure that all the components listed above are there. If not, please call Customer Service at (518) 773-9400.
Step 2:
Determine the position on the boat that you desire to enclose. The top itself provides approximately 6 feet of coverage bow
to stern by the width of the playpen rail; so you will need at least that amount of open space. This will vary slightly by the
actual fit to your boat. Note that the mounting brackets will be permanently attached to the outside of the top playpen railing
about 5 feet apart, on each side of the boat - so be sure that the area you choose is clear of entry way doors, BiminiTops, other
obstructions, etc. The sides of the enclosure are designed to accommodate seating along the sides of the playpen.
Step 3:
Attach the Side Mounting Brackets. Determine the appro-
priate position for the first bracket on one side of your top
playpen railing. The back portion of the enclosure will
accommodate a range of radii for the corners of your playpen
rail so the first mounting bracket should be located at the
very beginning of the bend (radius) on the top rail - make
sure that the open socket portion of the bracket is flush to the top of the railing. Mark screw locations with pen or marker;
Drill mounting holes with 5/32” bit. Secure bracket using two #10 x 3/4” screws and Phillips screwdriver. Measure along
that same railing, 28” from the center of the first bracket, to locate the second mounting bracket. Position that bracket and
secure to the rail with screws as above. Repeat for a third mounting bracket - again located 28” on center from the second.
Step 4:
Secure the remaining three mounting brackets on the opposite side of the playpen railing - directly across from those previ-
ously attached.
Step 5:
Unfold and assemble together one of the 8-Section fiberglass Shock-cord pole assemblies (ferruled end from one section
slips into the non-ferruled end of the next and so on). Insert one end into a mounting bracket, gently bend pole to insert the
Pontoon Enclosure
Instructions
Tools Required:
Phillips Screwdriver
Drill and 5/32” drill bit
(a cordless drill works best)

Step 5: (cont.)
other end (of the pole) into the bracket on the opposite side of the
boat from that amount. BE VERY CAREFULAS YOU BEND
THE POLE - IT WILL FLEX BACK STRAIGHT VERY
QUICKLY IF NOT HELD SECURELY. Repeat for the second
and third 8-Section pole and the other mounting brackets.
Step 6:
Unfold Pontoon Enclosure. The underside has several pieces of
Hook & Loop fastener stitched into the fabric, that align with the
support poles. Place the top up and over the poles (Velcro side towards the poles - zippered door panel towards the interior of
the playpen area) and center it over the pole at that location and hook the Velcro back onto itself to secure around the pole. If
the poles have slid out of position while placing the fabric, simply slide them back into place.
Once all the Velcro pieces have been secured around the poles, re-align the top to the frame to properly center it.
Step 7:
Unfold and assemble together the 3-Section center pole. The Top has two pockets stitched
into it, front and rear. From underside of the Top, slide the pole over the top of the three
bent poles and position one end of the pole into the larger of the pockets. Slightly stretch
the material to allow the other end of the pole to slide into the smaller of the pockets. This
now supports the center section of the Top. There is a short section of Velcro strap in the
center of the enclosure. Wrap this arund both the center support pole and the top support
pole and secure onto itself.
Step 8:
Spaced around the outside perimeter of the enclosure
you will find several sewn-in adjustable buckles. You
will be securing the fabric to the stern and sides of the
playpen area on your boat and installing the self-
tapping male snaps into the outside of the lower playpen
railing. These snaps will connect to the buckles using
the webbing snap/strap assemblies. it is best to start in
the rear section at the mounting bracket locations and
work your way evenly for one side of the boat. Insert
several of the shorter webbing/snap assemblies into the
sewn-in buckles on the enclosure - per the illustration.
Pulling the fabric taut and straight, locate the position on the railing where the female snap on the first strap will fall - these
should all be in line with the side mounting brackets. Install a male screw snap into the center of the railing where deter-
mined. Position the snaps together and pull the webbing strap to snug the fabric.
Adjustable BuckleAssembly Instructions:
Thread webbing through adjustable buckle. Insert the
end
from the backside of the buckle, through the middle opening
on buckle as shown in the picture. Now insert
end of web-
bing through the bottom opening of the buckle (from the
front side) and pull down until the strap is tightened securely
as in the pictures to the right.

Step 8: (cont.)
Repeat this procedure for each of the straps on both sides
of the front section of the enclosure and on the back
section - these will all be the shorter straps - keep fabric
tight and evenly centered over the playpen on the boat.
Note: If possible, do not install strap/snap into the frame
of entry doors on the boat.
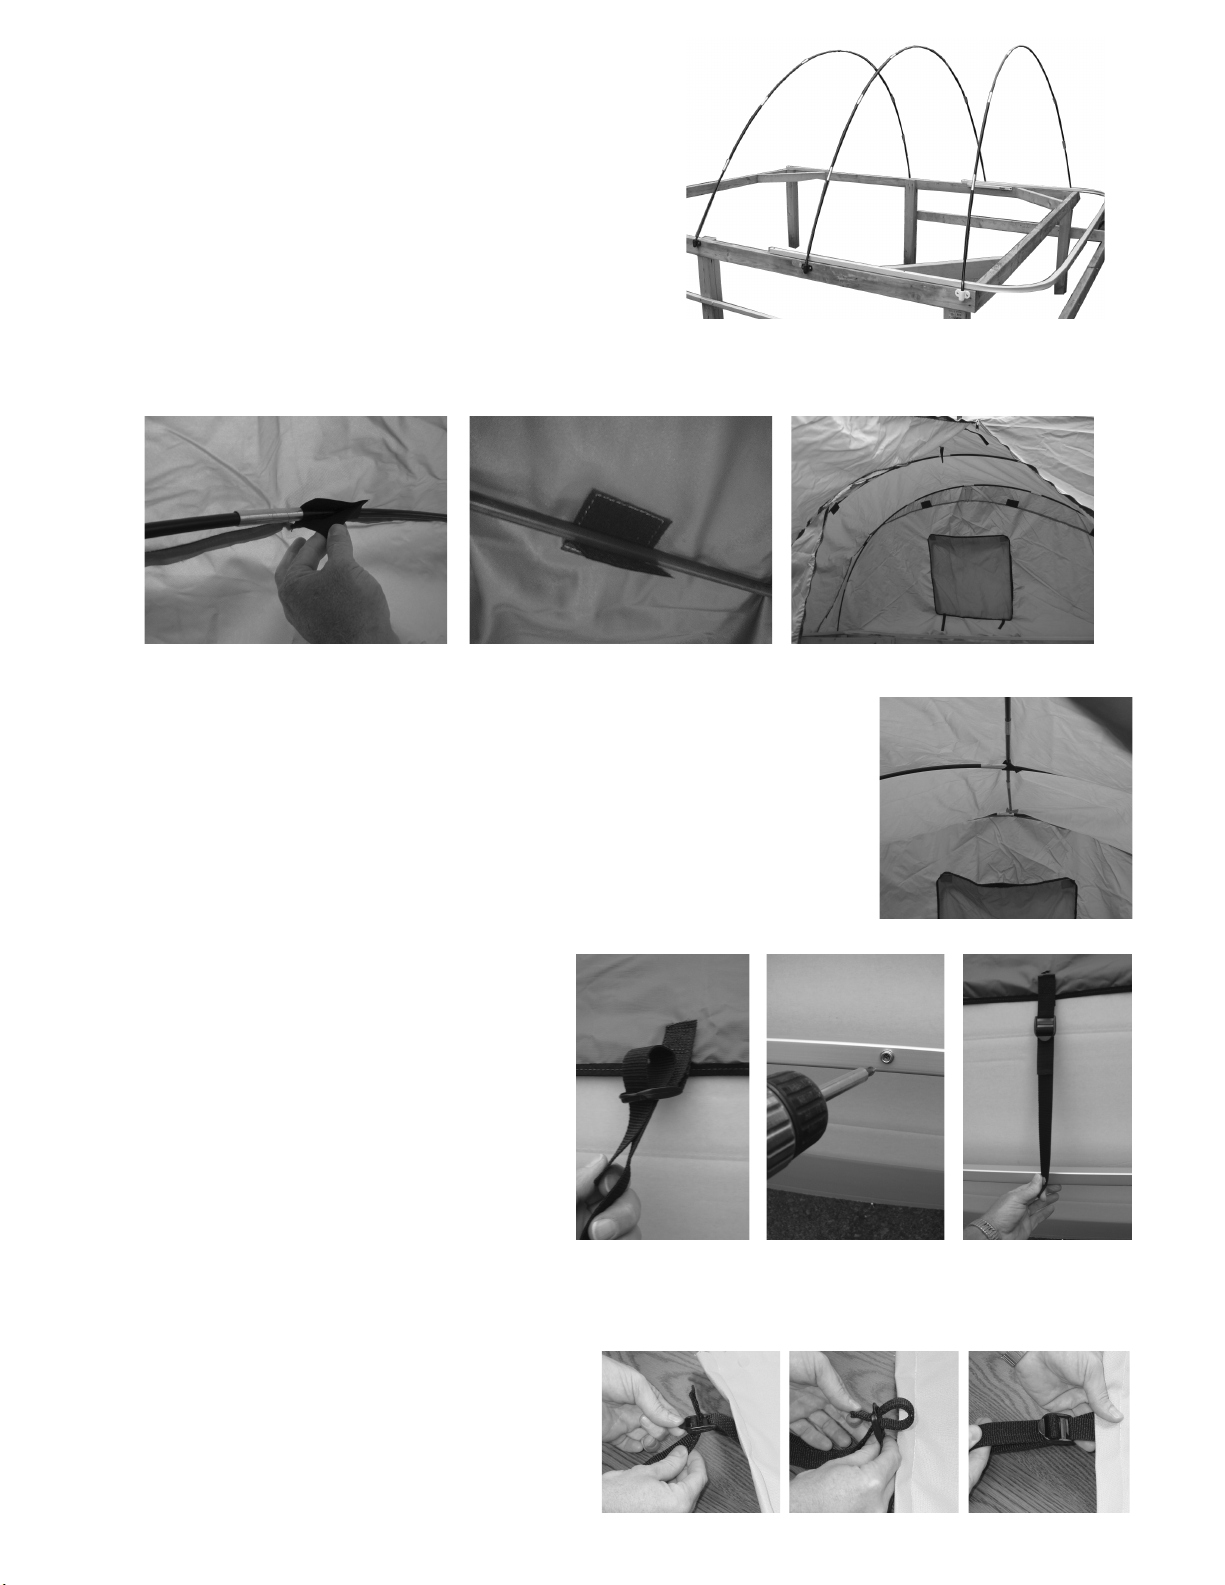
Step 9:
At each of the two stern corners on the outside of the enclosure, you will find an adjust-
able buckle and sewn-in strap that run parallel to the bottom outside edge of teh enclosure.
These straps allow the fabric to be tightened or loosened at the radius of the frame corners,
to fit properly. Position the end of the webbing into the adjustable buckle and snug to
tighten up fabric from the sides to the rear of the enclosure.
Step 10:
In the front section of the enclosure, zip closed
both sides of the entry way door. The sides are
designed to drape around the interior seating on
your boat. The bottom edges have the adjustable
buckles and webbing snap/strap assemblies;
designed to secure to any convenient location
on the base of the seats or back to the bottom
of the playpen railing base.
Use the two longer
strap assemblies as necessary
, depending on
what snap locations are available. Determine the
best location for the installation of the male
self-tapping snaps for your applications.These locations should keep the bottom of the enclosure straight and taut, without
putting undue stress on the entry way door zippers. It is best NOT to install the snaps directly onto the deck of the boat.
The initial assembly of your Pontoon Enclosure is now complete. Note that the windows and doorway can be rolled up and
out of the way when desired - held in place with Hook & Loop straps.
To remove enclosure for storage or when your boat is underway, simply follow these easy steps:
• Unhook the snaps around the perimeter of the enclosure-leave the webbing in the buckles “as is” for ease of re-installation.
• Release the Hook & Loop fasteners from around the poles on the underside.
• Remove the center (3-Section) pole from the underside of the enclosure - disassemble and fold up pole sections.
• Pull the top down off the three main frame poles - fold up and place aside (for long term storage - never pack up a wet
or damp Top).
• Gently pull one end of one pole from the
mounting bracket - gently allow the pole to
straighten out. BE VERY CAREFULAS YOU
MANUVER THE POLE - IT WILL FLEX
BACK STRAIGHT VERY QUICKLY IF
NOT HELD SECURELY. Disassemble and
fold up the pole sections. Repeat for the second
and third 8-Section pole.
• A convenient storage bag has been provided for your Pontoon Enclosure.
TAYLOR MAKES NO EXPRESS OR IMPLIED WARRANTIES OTHER THAN WARRANTIES SET FORTH HEREIN, INCLUDING,WITHOUT LIMI-
TATION, THE WARRANTIES OF MERCHANTABILITY, FITNESS FOR A PARTICULAR PURPOSE, OR FROM ANY COURSE OF DEALING OR
TRADE USAGE.
TAYLOR SHALL NOT BE LIABLE FOR SPECIAL, INDIRECT, INCIDENTAL, PUNITIVE OR CONSEQUENTIAL DAMAGES, INCLUDING, WITH-
OUT LIMITATION, DAMAGES FOR LOSS OF OPPORTUNITY OR BUSINESS PROFITS, BUSINESS INTERRUPTION OR ANY OTHER LOSS
EVEN IF TAYLOR HAS BEEN ADVISED OF THE POSSIBILITY OF SUCH DAMAGES.
IN NO EVENT SHALL TAYLOR BE LIABLE FOR ANY AMOUNT IN EXCESS OF THE PURCHASE PRICE PAID.
ADDITIONAL WARRANTY INFORMATION
Taylor Made Products
65 Harrison Street
Gloversville, NY 12078
Made in China
A Member of The Taylor Made Group
www.taylormadeproducts.com
®Taylor Made is a registered trademark of the Nelson A. Taylor Co., Inc.
Table of contents
Other Taylor Made Boating Equipment manuals

Taylor Made
Taylor Made Pontoon Quick-Shade Gazebo User manual

Taylor Made
Taylor Made 88125 Installation instructions

Taylor Made
Taylor Made Inflatable Quick-Shade Top User manual

Taylor Made
Taylor Made Trailerite User manual

Taylor Made
Taylor Made BIMINI User manual

Taylor Made
Taylor Made 12008 User manual

Taylor Made
Taylor Made LIPPERT Installation instructions

Taylor Made
Taylor Made Convertable Binimi Top User manual