Taylor Made Convertable Binimi Top User manual

Convertable Binimi Top
Assembly and Instruction Guide

Taylor Made Convertible Bimini Top Assembly and Instruction Guide:
This Kit contains the following components: If you are missing any of the listed
parts please contact Customer Service at (800)-628-5188 before proceeding
with the installation.
(1) Sewn Tops and storage boot
(2) Hardware bag that includes:
a. (12) #8 x 5/8” SS sheet metal screws
b. (8) #10 x 1” SS sheet metal screws
c. (2) Universal deck mounts
d. (2) SS eye straps
e. (20) SS windshield clips
f. (2) Webbing Tie-down Straps with SS dog snaps
(3) Aluminum Frame Components:
a. Two-Bow Frame
i. (2) A- Bow Assemblies with attached Jaw-slides (longest) Left/ Right
ii. (2) B- Bows (second longest)
iii. (2) Center Bows
b. Three-Bow Frame
i. (2) A- Bow Assemblies with attached Jaw-slides (longest) Left/Right
ii. (2) B- Bows (second longest)
iii. (3) Center Bows
iv. (2) C-Bows (shortest)
Important Notice – This top is for installation on
aluminum V hull shing boats with walk-thru
windshields only. It includes 7/8” Windshield clips –
if your windshield frame is a different size or design,
you’ll need to purchase the correct size clips before
assembly and installation.
Tools required: Phillips head screw driver, Drill and 5/32” bit and tape
measure.Before you begin, you’ll need a clean at workplace and the job is
best done with a helper.
1

Step 1: Attach B & C Bows (Three Bow Tops only) to A Bow Assembly
Locate Left Side A Bow and place to workplace with Jawslides facing
upward. Remove screws from jawslide temporarily while you place the
eye-end of one C Bow into jawslide closest to the large bend in the A Bow –
replace screw and tighten. Repeat this process for a B Bow into the lower
jawslide on the A Bow. Note: For Two Bow style tops, you would only need to
attach the B-Bows in this manner.
Repeat this step for the Right Side A – B – C Bow assembly – set aside.
STEP 2: Assemble Centers to A, B and C Bows (3 Bow Tops only)
Slide end portion of a Center bow into the Left side A Bow assembly.
Two holes on bows should align with holes on center. Secure using two
#8 x 5/8” screws.
Continue the assembly process by securing two more Center Bows to the
left side C Bow (shortest – for Three Bow tops only) and B Bow with the #8
screws. The left side of the frame is now completed.
2

Step 3: Feeding the Fabric Top onto the Frame
Unpack the top itself and lay it out upside down on a clean at surface. Locate
the sewn-in identication label – it should be facing up and to the rear edge of
the top. Take the Center on the left side A Bow and slide into the rear sewn
pocket on the top – slide all the way onto the center until it reaches the ABow.
Slide the Center on the C Bow through the smaller middle sewn pocket on the
top (three Bow Tops Only) and the Center on the left B Bow through the sewn
pocket just above the window section at the front of the top
From the other side of the top, secure the Right Side A-B-C Bow assembly to
the Center Bows – using the #8 Screws as in Step 2. This will complete the
fabric to the frame assembly.
3
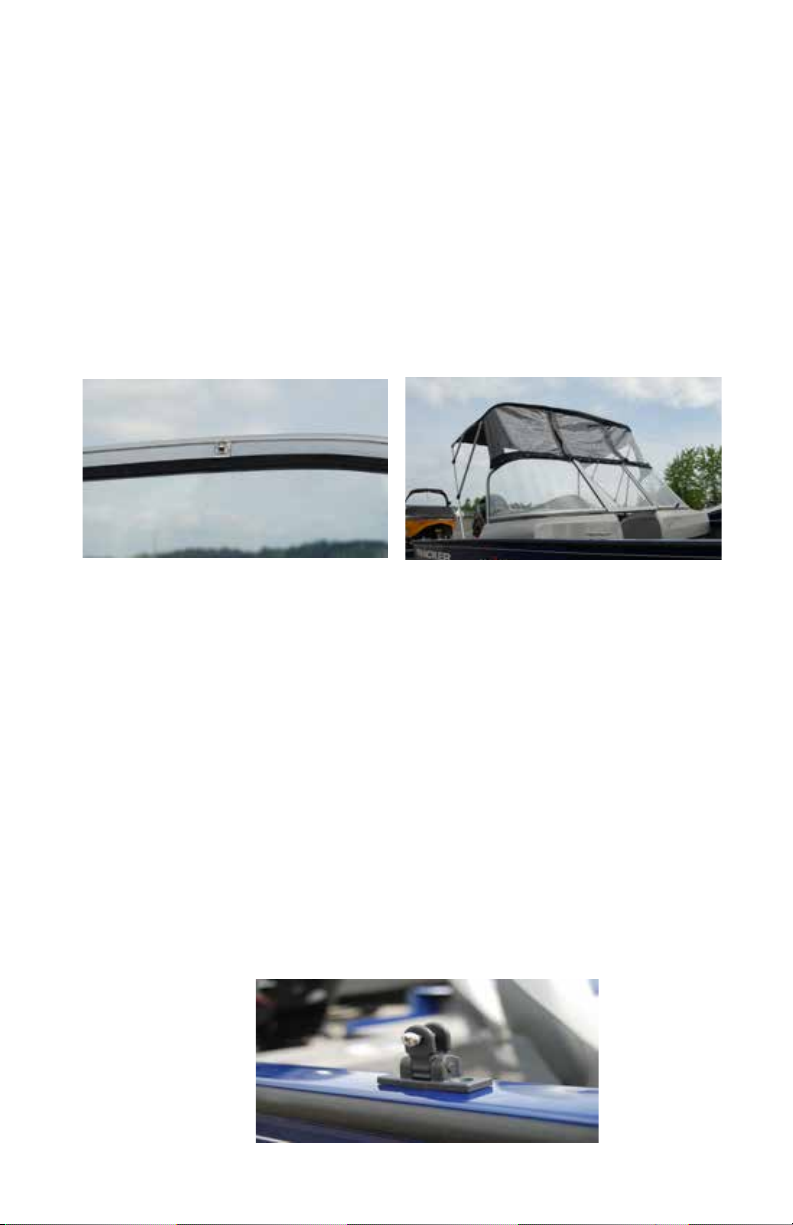
Step 4: Securing Top to the Boat – Installing windshield Clips - Best to
have a helper during this step.
Stand up the top on the boat deck. One person should hold the
frame and the other should hold the windshield section of the top. Make
sure that the fabric skin is centered on the frame and aligned to the boat
windshield. Align snaps on lower portion of the top with upper edge of boat
windshield. This will provide a relative location for the installation of the
windshield clips. Begin installing the bottom of the clips into the rubber strip
or channel – aligning with the snaps on the fabric before fully snapping clip
in. Start at the center of the windshield and work outward until all the snaps
are located and secured. Snap each of the clips onto the fabric top.
Step 5: Locating the Deck Hinges
Take note of the position of the bottom of the A-Bow eye-end when
the windshield snaps are all installed, as this will indicate the deck hinges.
This location will vary depending on the make & model of your boat and may
be on the top or the side of the gunnels. Make any adjustments to this loca-
tion to insure that the top is level and that the front panels follow the angle of
the windshield.
Mark the location of the deck hinge holes on the boat deck – measu-
re to be sure that both sides are the same. Check under the mount locations
to be sure it’s free of cables or other obstructions. Carefully drill the deck
hinge mounting holes using a 5/32 drill bit. Secure one side hinge with #10 x
1” screws – do not overtighten. Verify position of other side hinge – drill and
secure as before.
4

Step 5 Continued
With deck hinges in place, remove holding screw and insert eye-end from
A-Bow into deck hinge – aligning holes. Replace screw and secure – repeat
for other side.
Step 6: Install Eye Straps for Tie-Down Straps
Pull the Tie-down straps (from rear Bows) toward the stern of the
boat, angling away from the back of the top to determine mounting location
for the eye straps. Make sure there is room for adjustment. Locate and mark
the holes for the eye straps. Before drilling with the 5/32” drill bit, check area
below the mounting location is free from cables or other obstructions. Care-
fully drill the holes and secure eye straps with #10x1” screws. Do not overti-
ghten.
Secure dog snaps on tie-down straps to eye straps and tighten adjuster
buckle. Straps should be even and top should remain centered and taunt on
the frame.
5

The center section of the top panel will open for easy access thru the walk-
thru windshield. Simply unsnap and unzip the center panel. Roll the panel up
tightly so that the snaps at the top of the panel meet – snap to secure it up
and out of the way.
Care and Cleaning your convertible Bimini Top:
• Top should not be left up when boat is not being used and should
NEVER be left up while trailering the boat.
• Fabric should always be completely dry before folding up and storing in
the boot.
• Do not allow water to pool or collect on the top. If water does pool -
gently push up from underneath to remove water.
• Never operate your boat over 25 MPH with the top up or damage
may occur.
• Use a mild detergent solution and a soft brush or sponge to clean the
top and rinse thoroughly.
• The clear PVC windows may be cleaned in the same manner – do not
use any harsh chemical cleaners or vinyl protectants.
• If top ever develops seam leakage, apply some parafn wax (like a white
candle) to the troublesome area.
• Taylor made Products is not responsible for any injuries to persons or
damages to boats during the assembly and installation of this product.
6

2 YEAR LIMITED WARRANTY
Taylor Made Products warrants its Bimini BoaTop® to be free from defects in workmanship and
material.
Under the terms of this warranty, any Taylor★Made® Bimini BoaTop® found defective 12 months
from the date of purchase, will be repaired or replaced, at Taylor Made Products’ option, at no
charge. Any Bimini Top proven defective from 13 months to 24 months from the date of purchase
will be pro-rated. Repairs will be made and a charge for labor and materials may apply. Bimini Tops
requiring full replacement will carry a maximum replacement cost NOT TO EXCEED 50% of the
current suggested list price of the item.
All Bimini Tops must be returned to Taylor Made Products to qualify for warranty. DO NOT RETURN
PRODUCTS TO YOUR DEALER. Proof of purchase must be included. Transportation charges to
Taylor Made Products are the responsibility of the customer. Before returning the defective product,
please call 1-800-628-5188 for a return authorization number.
This warranty does not cover damage caused by improper use, accidents, or acts of nature. Bimini
Tops that are allowed to pocket water or ice, come into contact with chemicals or tree sap, or Bimini
Tops that are not properly tied down are not covered under this warranty.
TAYLOR MAKES NO EXPRESS OR IMPLIED WARRANTIES OTHER THAN WAR-
RANTIES SET FORTH HEREIN, INCLUDING, WITHOUT LIMITATION, THE WARRANTIES OF
MERCHANTABILITY, FITNESS FOR A PARTICULAR PURPOSE, OR FROM ANY COURSE OF
DEALING OR TRADE USAGE.
TAYLOR SHALL NOT BE LIABLE FOR SPECIAL, INDIRECT, INCIDENTAL, PUNITIVE OR
CONSEQUENTIAL DAMAGES, INCLUDING, WITHOUT LIMITATION, DAMAGES FOR LOSS OF
OPPORTUNITY OR BUSINESS PROFITS, BUSINESS INTERRUPTION OR ANY OTHER LOSS
EVEN IF TAYLOR HAS BEEN ADVISED OF THE POSSIBILITY OF SUCH DAMAGES.
IN NO EVENT SHALL TAYLOR BE LIABLE FOR ANY AMOUNT IN EXCESS OF THE
PURCHASE PRICE PAID.
65 Harrison St., Gloversville, NY 12078
A Member of the Taylor Made Group
www.taylormadeproducts.com
©2016 Taylor Made Group, LLC • Gloversville, NY 12078
Table of contents
Other Taylor Made Boating Equipment manuals

Taylor Made
Taylor Made Pontoon Enclosure User manual

Taylor Made
Taylor Made Pontoon Quick-Shade Gazebo User manual

Taylor Made
Taylor Made 12008 User manual

Taylor Made
Taylor Made BIMINI User manual

Taylor Made
Taylor Made Inflatable Quick-Shade Top User manual

Taylor Made
Taylor Made LIPPERT Installation instructions

Taylor Made
Taylor Made 88125 Installation instructions

Taylor Made
Taylor Made Trailerite User manual


