® Taylor★Made is a registered trademark of the Nelson A. Taylor Co., Inc.
© 2006 Nelson A. Taylor Co., Inc.
Taylor Made Products • 65 Harrison St., Gloversville, NY 12078 • www.taylormadeproducts.com
Step 6:
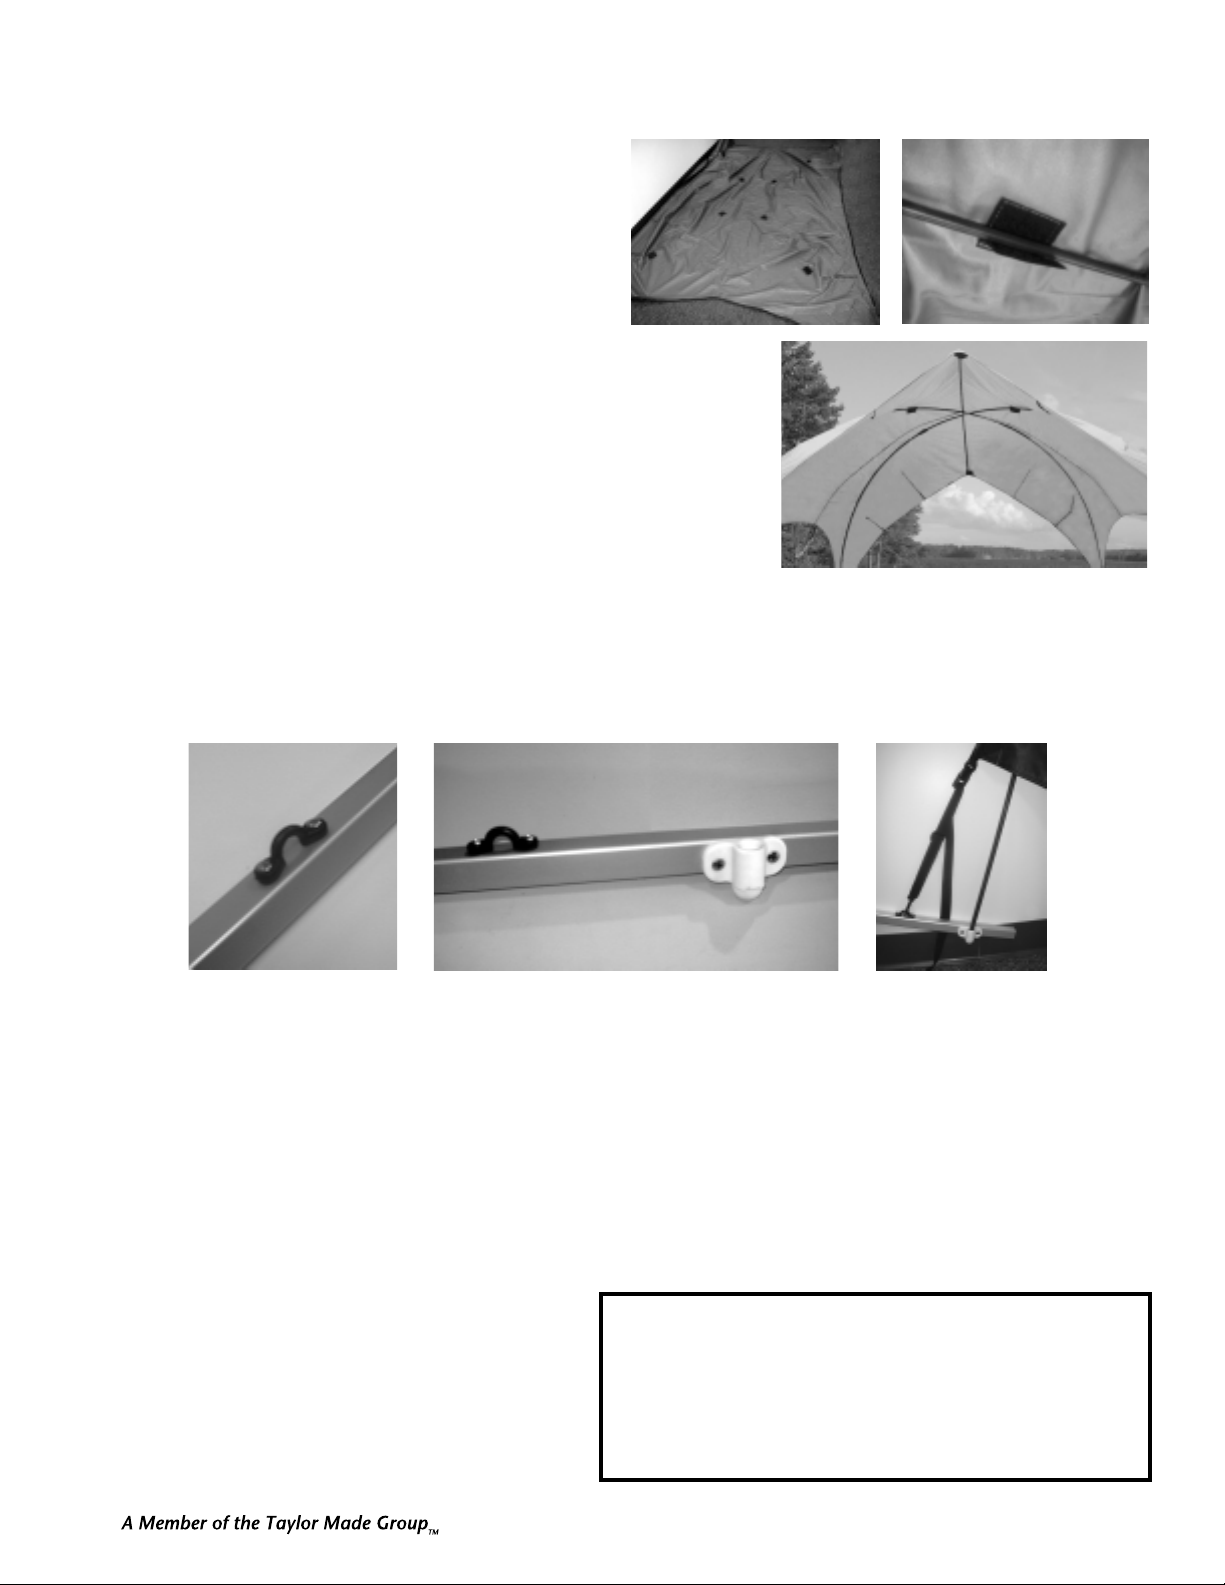
Unfold the Pontoon Shade Top. The under side has several pieces of hook and loop fastener stitched into the fabric, in the
"X" formation, to align with the support poles. Place the top up and over the poles (Velcro side towards the poles) and
center it over the poles both from side to side and front to
back. Peel each of the Velcro pieces apart, place over the
pole at the location and hook the Velcro back onto itself
to secure around the pole. Once all the Velcro pieces have
been secured around the poles, re align the top to the
frame to properly center it.
Step 7:
Unfold and assemble together the 4 Section Center Pole. The top has two
pockets stitched into it, front and rear. From underside of the top, slide the pole
over the two bent poles and position one end of the pole into the larger of the
pockets. Slightly stretch the material to allow the other end of the pole to slide
into the smaller of the pockets. This now supports the center section of the top.
Step 8:
Once again, it is necessary to slide the top fabric on the poles to get it centered
and position properly. At each corner of the top, you will find an adjustable
Tie down Strap. These straps will keep the fabric top positioned onto the frame
properly and help secure the pole ends into the mounting brackets. Starting at one corner, locate and position one of the
plastic eye straps, on top (or on the side) of the playpen railing, approximately 4 6" from the mounting bracket at the
corner. Mark and drill the mounting holes for the eye strap using the 1/8" drill bit. Secure the eye strap using two of the #8
x 5/8" screws. Take the Tie down strap and adjust the length by pulling the webbing from the quick release buckle. Attach
the "dog snap" to the eye end and pull the webbing to tighten the strap and secure. Don't over tighten the strap as this will
tend to pull the top out of position on the frame.
Repeat this procedure for each of the three corners for the top and frame. NOTE: that any "extra" webbing that may be
present after each of the Tie down straps have been installrd and adjusted, may be cut off. Burn the raw edges of the
webbing to prevent un raveling.
The initial assembly of your Pontoon Gazebo is now complete. To remove the top for storage or when your boat is under
way, simply follow these easy steps:
• Un hook the 4 dog snaps at each corner of the top at the tie down straps.
• Release the Hook & Loop fasteners from around the poles on the underside of the top.
• Remove the center (4 section) Pole from the underside of the top, disassemble and fold up pole sections.
• Pull the top down off the two main frame poles, fold up and place aside (for long term storage, never pack up a wet or
damp Top).
• Gently pull one end of one pole from the mounting bracket. Gently allow the pole to straighten out. BE VERY CARE
FUL AS YOU MANUEVER THE POLE IT WILL
FLEX BACK STRAIGHT VERY QUICKLY IF NOT
HELD SECURELY. Disassemble and fold up the pole
sections. Repeat for the second 11 Section pole.
• A convenient storage bag has been provided for your
Pontoon Gazebo.
TAYLOR MAKES NO EXPRESS OR IMPLIEDWARRANTIES OTHER THANWARRANTIES SET FORTH
HEREIN,INCLUDING,WITHOUT LIMITATION,THE WARRANTIES OF MERCHANTABILITY,FITNESS
FOR A PARTICULAR PURPOSE, OR FROM ANY COURSE OF DEALING OR TRADE USAGE.
TAYLOR SHALL NOT BE LIABLE FOR SPECIAL,INDIRECT,INCIDENTAL,PUNITIVE OR CONSEQUEN-
TIAL DAMAGES, INCLUDING, WITHOUT LIMITATION, DAMAGES FOR LOSS OF OPPORTUNITY
OR BUSINESS PROFITS, BUSINESS INTERRUPTION OR ANY OTHER LOSS EVEN IF TAYLOR HAS
BEEN ADVISED OF THE POSSIBILITY OF SUCH DAMAGES.
IN NO EVENT SHALL TAYLOR BE LIABLE FOR ANY AMOUNT IN EXCESS OF THE PURCHASE
PRICE PAID.
ADDITIONAL WARRANTY INFORMATION


