TCi amena70-XS User manual

Interior Systems
Handbuch
amena
Version 1.7
Artikel-Nr./Part-No.: 8966
Ludwig-Rinn-Straße 10-14 • D- 35452 Heuchelheim/Gießen • Phone: +49 6 41-9 62 84-0 • Fax: +49 6 41-9 62 84-28 • www.tci.de Ludwig-Rinn-Straße 10-14 • D- 35452 Heuchelheim/Gießen • Phone: +49 6 41-9 62 84-0 • Fax: +49 6 41-9 62 84-28 • www.tci.de
Seite 2 von 40 Seite 3 von 40
Inhaltsverzeichnis
1. HAFTUNG/COPYRIGHT 4
2. BEVOR SIE BEGINNEN
2.1 WILLKOMMEN 6
2.2 SICHERHEIT 6
2.3 SICHERHEITSHINWEISE 8
3. PRODUKTBESCHREIBUNG
3.1 AMENA - TECHNISCHE DATEN 10
3.2 MONTAGE AMENA70 12
3.3 SCHNITTSTELLEN UND SENSOREN DES AMENA70 14
3.4 ENDMONTAGE/REINIGUNG 16
3.5 INBETRIEBNAHME ALLGEMEIN 18
3.6 INSTALLATION/ERSTE INBETRIEBNAHME MIT aCSetup (NUR C70-CE) 18
3.7 SYNCHRONISIERUNG DATUM/ZEIT 18
3.8 KALIBRIERUNG DES TEMPERATURSENSORS 20
3.9 NACHINSTALLATION EINES CLIENTS (NUR CE-VARIANTEN) 22
3.10 EG-KONFORMATIONSERKLÄRUNG 26
4. LIEFERUMFANG 28
5. SUPPORT
5.1 SUPPORT 30
5.2 RÜCKSENDNUNG 30
5.3 HERSTELLERGARANTIE 32
6. TECHNISCHE ZEICHNUNG 34
7. STARTER-KIT 36
List of Content
1. LIABILITY / COPYRIGHT 5
2. BEFORE YOU BEGIN
2.1 WELCOME 7
2.2 SAFETY 7
2.3 SAFETY INSTRUCTIONS 9
3. PRODUCT DESCRIPTION
3.1 AMENA - TECHNICAL DATA 11
3.2 MOUNTING AMENA70 13
3.3 INTERFACES AND SENSORES OF THE AMENA70 15
3.4 FINAL ASSEMBLY/CLEANING 17
3.5 COMMISSIONING GENERAL 19
3.6 FIRST INSTALLATION WITH aCSetup (C70-CE ONLY) 19
3.7 SYNCHRONIZATION OF DATE/TIME 19
3.8 CALIBRATION OF THE TEMPERATURE SENSOR 21
3.9 SUBSEQUENT INSTALLATION OF A CLIENT (CE-MODELS ONLY) 23
3.10 EC-DECLARATION OF CONFORMITY 27
4. SCOPE OF DELIVERY 29
5. SUPPORT
5.1 SUPPORT 31
5.2 DISPATCH 31
5.3 MANUFACTURER‘S GUARANTEE 33
6. TECHNICAL DRAWING 34
7. STARTER-KIT 37

Ludwig-Rinn-Straße 10-14 • D- 35452 Heuchelheim/Gießen • Phone: +49 6 41-9 62 84-0 • Fax: +49 6 41-9 62 84-28 • www.tci.de Ludwig-Rinn-Straße 10-14 • D- 35452 Heuchelheim/Gießen • Phone: +49 6 41-9 62 84-0 • Fax: +49 6 41-9 62 84-28 • www.tci.de
Seite 4 von 40 Seite 5 von 40
1. Haftung / Copyright
Redaktion Florian Schiller
Copyright tci GmbH, Ludwig-Rinn-Str. 10-14, 35452 Heuchelheim,
Deutschland
Dieses Handbuch, sowie die Hard- und Software, die es
beschreibt, ist urheberrechtlich geschützt und darf ohne
ausdrückliche schriftliche Genehmigung der tci GmbH in keiner
Weise vervielfältigt, übersetzt oder in eine andere Darstellungs-
form gebracht werden.
Warenzeichen Windows, Windows XP embedded und Windows 7 embedded
sind eingetragene Warenzeichen der Microsoft Corp.
Diejenigen Bezeichnungen in dieser Publikation von Erzeugnissen
und Verfahren, die zugleich Warenzeichen sind, wurden nicht
besonders kenntlich gemacht. Solche Namen sind Warenzeichen
der jeweiligen Warenzeicheninhaber. Aus dem Fehlen der Markie-
rung ® kann nicht geschlossen werden, dass diese Bezeichnun-
gen freie Warennamen sind.
Hinweis Herausgeber, Übersetzer und Autoren dieser Publikation haben
mit größter Sorgfalt die Texte, Abbildungen und Programme
erarbeitet. Dennoch können Fehler nicht völlig ausgeschlossen
werden. Die tci GmbH übernimmt daher weder eine Garantie
noch eine juristische Verantwortung oder Haftung für Folgen, die
auf fehlerhafte Angaben zurückgehen. Mitteilungen über
eventuelle Fehler werden jederzeit gerne entgegengenommen.
Die Angaben in diesem Handbuch gelten nicht als Zusicherung
bestimmter Produkteigenschaften. Änderungen, die dem
technischen Fortschritt dienen, bleiben vorbehalten.
Haftung Die tci GmbH haftet nicht für unmittelbare Schäden, die im
Zusammenhang mit der Lieferung oder dem Gebrauch der
Dokumentation stehen. Wir haften zudem auch nicht für etwaige
Fehler in dieser Publikation. Wir verpflichten uns in keiner Weise,
die in dieser Dokumentation enthaltenen Informationen auf den
aktuellsten Stand zu bringen oder auf dem neuesten Stand zu
halten.
Alle Rechte vorbehalten • Printed in Germany
Gedruckt auf chlorfrei gebleichtem Papier.
1. Liability / Copyright
Edited by Florian Schiller
Copyright tci GmbH, Ludwig-Rinn-Str. 10-14, D-35452 Heuchelheim,
Germany
This manual, as well as the hard and software, which it describes
is protected by copyright and may not be duplicated, translated
or presented in any form without the written consent of tci GmbH.
Trademark Windows, Windows XP embedded and Windows 7 embedded are
registered trademarks of Microsoft Corp.
Those designation of products and procedures in this publication,
which are also trademarks, have not been expressly stated as
such. These names are trademarks of the respective trademark
owners. However, the absence of the ® symbol, implies in no way
that the designations are exempt from such rights.
Note Publisher, translators and authors of this publication have
carefully developed the texts, illustrations and programs.
However, errors can not be completely ruled out. tci GmbH, shall
neither warrant nor be held legally responsible for consequences
which occur due to incorrect data. Information concerning errors
are welcome at any time.
The information in this operating manual does not guarantee
definite product properties. Modifications concerning the support
of technical progress will be reserved.
Liability tci GmbH shall not be held liable for immediate damage occurring
in connection with the supply or utilization of the documents.
In addition, we shall not be held liable for any errors found in this
publication. We are not obliged in any way to update the
information contained in this document to latest standards.
All rights reserved • Printed in Germany
Printed on chlorine-free, bleached Paper.

Ludwig-Rinn-Straße 10-14 • D- 35452 Heuchelheim/Gießen • Phone: +49 6 41-9 62 84-0 • Fax: +49 6 41-9 62 84-28 • www.tci.de Ludwig-Rinn-Straße 10-14 • D- 35452 Heuchelheim/Gießen • Phone: +49 6 41-9 62 84-0 • Fax: +49 6 41-9 62 84-28 • www.tci.de
Seite 6 von 40 Seite 7 von 40
2. Bevor Sie beginnen
2.1 Willkommen
Vielen Dank, dass Sie sich für ein Markenprodukt der Firma tci entschieden haben.
Auf den folgenden Seiten erhalten Sie grundlegende Informationen über das von Ihnen
gewählte Produkt.
Lesen Sie diese Informationsbroschüre bitte sorgfältig. Informationen über die
eingebauten Komponenten erhalten Sie über die mitgelieferten Handbücher der
einzelnen Hersteller.
2.2 Sicherheit
Die erste Anforderung an einen Industrie-Computer ist: Sicherheit. Dies steht bei
unserem Handeln im Vordergrund. Unsere Systeme bieten Ihnen größtmögliche
Sicherheit durch präzise Fertigung. Jedes Gerät verlässt erst nach einer Abnahme
mit Prüfprotokoll unsere Produktion. Alle Rechner-Systeme werden einem Burn-in -
Test unterzogen.
Sicherheit mit System:in unseren Produkten und durch die Arbeitsweise unserer
Mitarbeiter.
Das Gerät erfüllt die Anforderungen der geltenden EMV-Richtlinien und harmonisierten
europäischen Normen sowie RoHS-Richtlinie 2002/95/EG. Alle von uns an Sie geliefer-
ten Produkte halten die Anforderungen der REACH-Verordnung in der jeweils gültigen
Fassung ein (EU-Verordnung 1907/2006/EG REACH).
Unsere Produkte, die dem ElektroG entsprechen, sind vor dem Inverkehrbringen bei der
EAR (Elektro Altgeräte Register) durch uns registriert und gekennzeichnet worden.
Unsere Registrierungsnummer: WEEE-Reg.-Nr. DE.13433209.
Die Betriebsspannung des Gerätes darf nur in den spezifizierten Bereichen liegen.
Der Kontakt mit Wasser oder anderen Flüssigkeiten ist zu vermeiden. Beachten Sie
hierzu die Angaben im Kapitel [Produktbeschreibung]. Beachten Sie bei der Montage
eine lot-rechte Ausrichtung des Systems zur Wand. Das Gerät ist nicht für den Einsatz im
Nuklear- und Ex-Bereich geeignet. Ein Verdecken der Lüftungsschlitze kann zu tempera-
tur-bedingten Defekten führen. Vor dem Öffnen des Gehäuses den Netzstecker ziehen.
Wir wünschen Ihnen viel Freude mit Ihrem neu erworbenen Gerät,
Ihr tci-Team
2. Before you begin
2.1 Welcome
Thank you for choosing a tci product. On the following pages, you will find fundamental
information about the product you have chosen. Please read the information brochure
carefully.
The operating manuals provided by the individual manufacturers contain Information on
the built-in components.
2.2 Safety
The first demand on an industrial computer is: safety. This is our first priority.
Apart from safety achieved by precise production, we offer our systems after
an acceptance test and with inspection reports. All computer systems are subject
to a burn-in test.
A systematic approach to safety:in our products and in the way our employees work.
The unit fulfils the valid requirements of EMC directives and harmonized European
standards also RoHS Directive 2002/95/EC. All products according the requirements of
the current REACH Regulation (EU REACH Regulation 1907/2006/EC). Before marketing
our products according to the ElektroG are registrated and labeled by the EAR (Elektro
Altgeräte Register). Our registration number: WEEE-Reg.-No. DE.13433209.
The operating voltage of the unit is to be confined within the specified ranges.
Do not let the unit encounter water or other liquids. In addition to that issue, please note
the chapter [Product description]. Please attend, that the chassis must be
mounted perpendicular to the wall. The product is not usable for nuclear areas and
Ex-areas. Covering the ventilation slots can lead to defects caused by overheating.
Pull the power plug before opening the housing.
We hope you will enjoy your new unit,
your tci-team

Ludwig-Rinn-Straße 10-14 • D- 35452 Heuchelheim/Gießen • Phone: +49 6 41-9 62 84-0 • Fax: +49 6 41-9 62 84-28 • www.tci.de Ludwig-Rinn-Straße 10-14 • D- 35452 Heuchelheim/Gießen • Phone: +49 6 41-9 62 84-0 • Fax: +49 6 41-9 62 84-28 • www.tci.de
Seite 8 von 40 Seite 9 von 40
2.3 Sicherheitshinweise
Bedeutung der Warnsymbole
Gefährliche Spannung: Das Blitzsymbol mit einem Pfeil am Ende in einem
gleichseitigem Dreieck warnt Sie vor nicht isolierter gefährlicher Spannung
innerhalb des Produkts, die einen elektrischen Schlag verursachen kann.
Hinweise: Das Ausrufungszeichen in einem Dreieck macht Sie auf wichtige
Bedienungs- und Wartungshinweise für Ihr Gerät aufmerksam.
Sicherheitshinweise [ 1) je nach Schutzart, 2) nur Systeme der Gebäudeautomation ]
1) Lesen Sie diese Hinweise sorgfältig durch und Bewahren Sie diese Hinweise gut auf.
2) Befolgen Sie alle Warnungen und allen Anweisungen.
3) Verwenden Sie das Gerät nicht in der Nähe von Wasser oder Feuchtigkeit.1)
4) Achten Sie auf die Reinigungshinweise. Blockieren Sie keine Lüftungsöffnungen.
5) Halten Sie das Gerät von Feuchtigkeit, übermäßigem Staub und Wärmequellen wie z.B. Heizkör-
pern, Wärmespeichern, Öfen oder anderen wärmeerzeugenden Geräten (inkl. Verstärker) fern.
6) Entfernen Sie nicht die Gehäuseverkleidungen. Es gibt keine vom Benutzer einzustellenden Teile
im Inneren des Gerätes.2)
7) Lassen Sie bitte eine passende Verkabelung von einem Elektriker anbringen.
8) Achten Sie bei der Verkabelung auf die Beschriftung der Anschlüsse.
9) Verwenden Sie nur vom Hersteller angegebene Kabel, Stecker und Zubehörartikel. Achtung
mitgelieferte Netzteile sind nur zur Inbetriebnahme geeignet, nicht für den Dauereinsatz!
10) Verwenden Sie nur einen vom Hersteller empfohlenen oder mit dem Gerät zusammen
angebotenen Unterputzgehäuse.2)
11) Trennen Sie das Gerät vom Netz, wenn ein Gewitter zu erwarten ist oder das Gerat über eine
längere Zeit hinaus nicht verwendet wird.
12) Überlassen Sie alle Instandsetzungsarbeiten nur ausgebildeten Servicepersonal.
Eine Instandsetzung ist notwendig, wenn das Gerät irgendwie beschädigt wurde. Dies kann z.B.
ein beschädigtes Netzkabel oder Stecker sein, ein Eindringen von Flüssigkeit oder Gegenstän-
den in das Gerät, ein nass werden durch Regen oder Feuchtigkeit, ein Schaden durch
Herunterfallen des Gerätes oder bei Funktionsstörungen.
13) Lassen Sie keine Flüssigkeiten auf das Gerät tropfen oder spritzen. Stellen Sie keine
Gegenstände mit Flüssigkeit auf das Gerät.1)
14) In diesem Handbuch finden Sie entsprechende Warnhinweise, die vor elektrischen Schlägen warnen.
15) Die Wandmontage des Gerätes darf nur nach den Herstelleranweisungen ausgeführt werden.
Verwenden Sie nur vom Hersteller empfohlene Montagevorrichtungen. Dies ist ein wichtiger
Sicherheitshinweis.
16) Bei diesem Gerät muss außerhalb der Einrichtung eine leicht zugängliche Trennvorrichtung
vorhanden sein. Beispiele hierfür sind zweipolige Schalter oder Sicherungsautomaten.
17) Bei diesem Gerät muss außerhalb der Einrichtung eine Überstromschutzeinrichtung mit <4A
vorhanden sein. Die Scheinleistung der Stromquelle darf max. 250VA betragen.
18) Öffnen Sie das Gerät niemals, wenn es unter Spannung steht!
WARNUNG: Setzen Sie das Gerät weder Regen noch Feuchtigkeit aus, um einen Brand
oder einen Kurzschluss zu vermeiden.
VORSICHT: Schäden, die durch unsachgemäße Behandlung oder Montage entstehen, sind
nicht durch die Hersteller Gewährleistung abgedeckt.
Die PoE-Funktion kann durch Unterschiedliche Erdungspotentiale beeinträchtigt werden.
In diesen Fällen kann es vorkommen, dass PoE nicht verwendbar ist.
Vorsicht! Explosionsgefahr bei unsachgemäßem Austausch der Batterie.
Gemäß der WEEE-Bestimmungen darf dieses Gerät in Europa nicht als
Hausmüll entsorgt werden.
Verbrauchte Batterien gehören nicht in den Hausmüll! Bitte entsorgen
Sie diese in Ihrer örtlichen Batteriesammelstelle.
!
!
2.3 Safety instructions
Explanation of WARNING Symbols
The lightning flash with arrowhead symbol, within an equilateral triangle, is intended to alert
the user to the presence of uninsulated „dangerous voltage“ within the product‘s enclosure
that may be sufficient to constitute a risk of electrical shock.
The exclamation point within an equilateral triangle is intended to alert the user to the
presence of important operating and servicing instructions.
Safety instructions [ 1) According to protection class, 2) Building automation systems only ]
1) Read and keep these instructions.
2) Heed all warnings and instructions.
3) Do not use this sytem near water or moisture.1)
4) Heed all cleaning instructions. Do not block any ventilation openings.
5) Keep your system away from moisture, excessive dust and any heat sources, such as radiators,
heat registers, stoves, or any other apparatus (including amplifiers) that produce heat.
6) Do not remove the back cover. There are no parts that need to be adjusted or maintained by
the user.2)
7) Let an authorized electrician care for a suitable wiring.
8) Pay heed to the labeling of the connectors for a correct wiring.
9) Only use cables, connectors, attachments and accessories that are part of the delivery or
specified by the manufacturer. Provided power supplies are suited for commissioning only,
not for ongoing use!
10) Only use built-in boxes specified by the manufacturer, or sold with the device.2)
11) Unplug the device during thunderstorms or when unused for long periods of time.
12) Refer all servicing to qualified service personnel-- Servicing may be required if the device has
been damaged in any way, such as power-supply cord or plug damage, liquid has been spilled
or objects have fallen into the device, the device has been exposed to rain or moisture, does not
operate normally, or has been dropped.
13) Do not expose your device to dripping or splashing, and do not place objects filled with liquids
on it.1)
14) The Shock Hazard Marking and Associated Graphical Symbol are provided in this manual.
15) Wall or ceiling assembly: When mounting the product on a wall or ceiling, be sure to install the
product according to the method recommended by the manufacturer. Only use the mounting
hardware recommended by the manufacturer. This is an important safety information.
16) It is imperative that the unit is supplied via an isolating device which can be controlled by an
external and easily accessible safety system. Examples for this are 2-pole switches and circuit
breaker.
17) It is imperative that the unit is supplied via an external overcurrent protective device less than
4A. The apparent power of the current source must not exceed 250VA.
18) Never open the device while it is connected to the mains!
WARNING: To reduce the risk of fire or electric shock, do not expose this device to rain
or moisture.
CAUTION: Any damage caused by incorrectly attempting to mount this device is not
covered under the terms of the manufacturers warranty.
The PoE function can be affected by different ground potentials. In these cases it may
occur that the PoE can not be used.
CAUTION: Danger of explosion if battery is incorrectly replaced.
According to WEEE regulation, this product must not be handled as normal
trash in Europe.
Used batteries are hazardous waste and must be disposed at the appropria-
te collection points provided by the public waste authorities!
!
!
Ludwig-Rinn-Straße 10-14 • D- 35452 Heuchelheim/Gießen • Phone: +49 6 41-9 62 84-0 • Fax: +49 6 41-9 62 84-28 • www.tci.de Ludwig-Rinn-Straße 10-14 • D- 35452 Heuchelheim/Gießen • Phone: +49 6 41-9 62 84-0 • Fax: +49 6 41-9 62 84-28 • www.tci.de
Seite 10 von 40 Seite 11 von 40
3. Produktbeschreibung
3.1 Technische Daten:
amena70-CE amena70-XS
Touch 7“, WVGA
800 x 480
7“, WVGA
800 x 480
ARM9 CPU •
ARM7 CPU •
128MB System-Memory +
128MB Storage-Memory
•
LAN • •
USB verdeckt, frontseitig -
Lautsprecher • Buzzer
Spannungsversorgung 10-28VDC 10-48VDC
Power-over-Ethernet (PoE)
[option]
• •
WLAN [option] • -
Schutzklasse IP20 IP20
Gehäuse erfüllt die Bestimmungen der Brandsicherheit nach UL.94 (Flam Class: V-0/1
und 5VB)
Spezifikationen Betriebstemperatur: 0°C bis 35°C
Lagertemperatur: -20°C bis 60°C
Relative Luftfeuchtigkeit: 20% bis 80%
nicht kondensierend
Montage Unterputzmontage/ Hohlraummontage
Kühlung Konvektionskühlung, keine beweglichen Teile, dadurch
geräuschlos, langlebig und zuverlässig
Leistungsaufnahme/Energiemanagement (CE)
Betriebszustand P in
(W)
Reaktivierung (1) Zeit (2)
Betrieb, Volllast 7,2 - -
Betrieb, Idle-Loop 4,8 - -
Betrieb, Display aus 1,2 Touch 1 ms
(1) Verlassen des Energiesparmodus
(2) Abhängig von der Installation
3. Product Description
3.1 Technical data:
amena70-CE amena70-XS
Touch 7“, WVGA
800 x 480
7“, WVGA
800 x 480
ARM9 CPU •
ARM7 CPU •
128MB System-Memory +
128MB Storage-Memory
•
LAN • •
USB covered, front side -
Speakers • Buzzer
Power input 10-28VDC 10-48VDC
Power-over-Ethernet (PoE)
[optionally]
• •
WLAN [optionally] • -
Protection class IP20 IP20
Housing meets fire safety for UL.94 (Flam Class: V-0/1 and 5VB)
Specification Working temperature: 0°C up to 35°C
Storage temperature: -20°C up to 60°C
Relative humidity: 20% up to 80 %,
not condensing
Mounting Built-in box
Cooling convection cooling with no moving parts, thus noiseless,
long-living and reliable
Power consumption/energy management (CE)
Operating status P in
(W)
Reactivation (1) Time (2)
Operate under full load 7,2 - -
Operate under Idle-Loop 4,8 - -
Operate , display off 1,2 Touch 1 ms
(1) Leave the energy save mode
(2) Depends of installation

Ludwig-Rinn-Straße 10-14 • D- 35452 Heuchelheim/Gießen • Phone: +49 6 41-9 62 84-0 • Fax: +49 6 41-9 62 84-28 • www.tci.de Ludwig-Rinn-Straße 10-14 • D- 35452 Heuchelheim/Gießen • Phone: +49 6 41-9 62 84-0 • Fax: +49 6 41-9 62 84-28 • www.tci.de
Seite 12 von 40 Seite 13 von 40
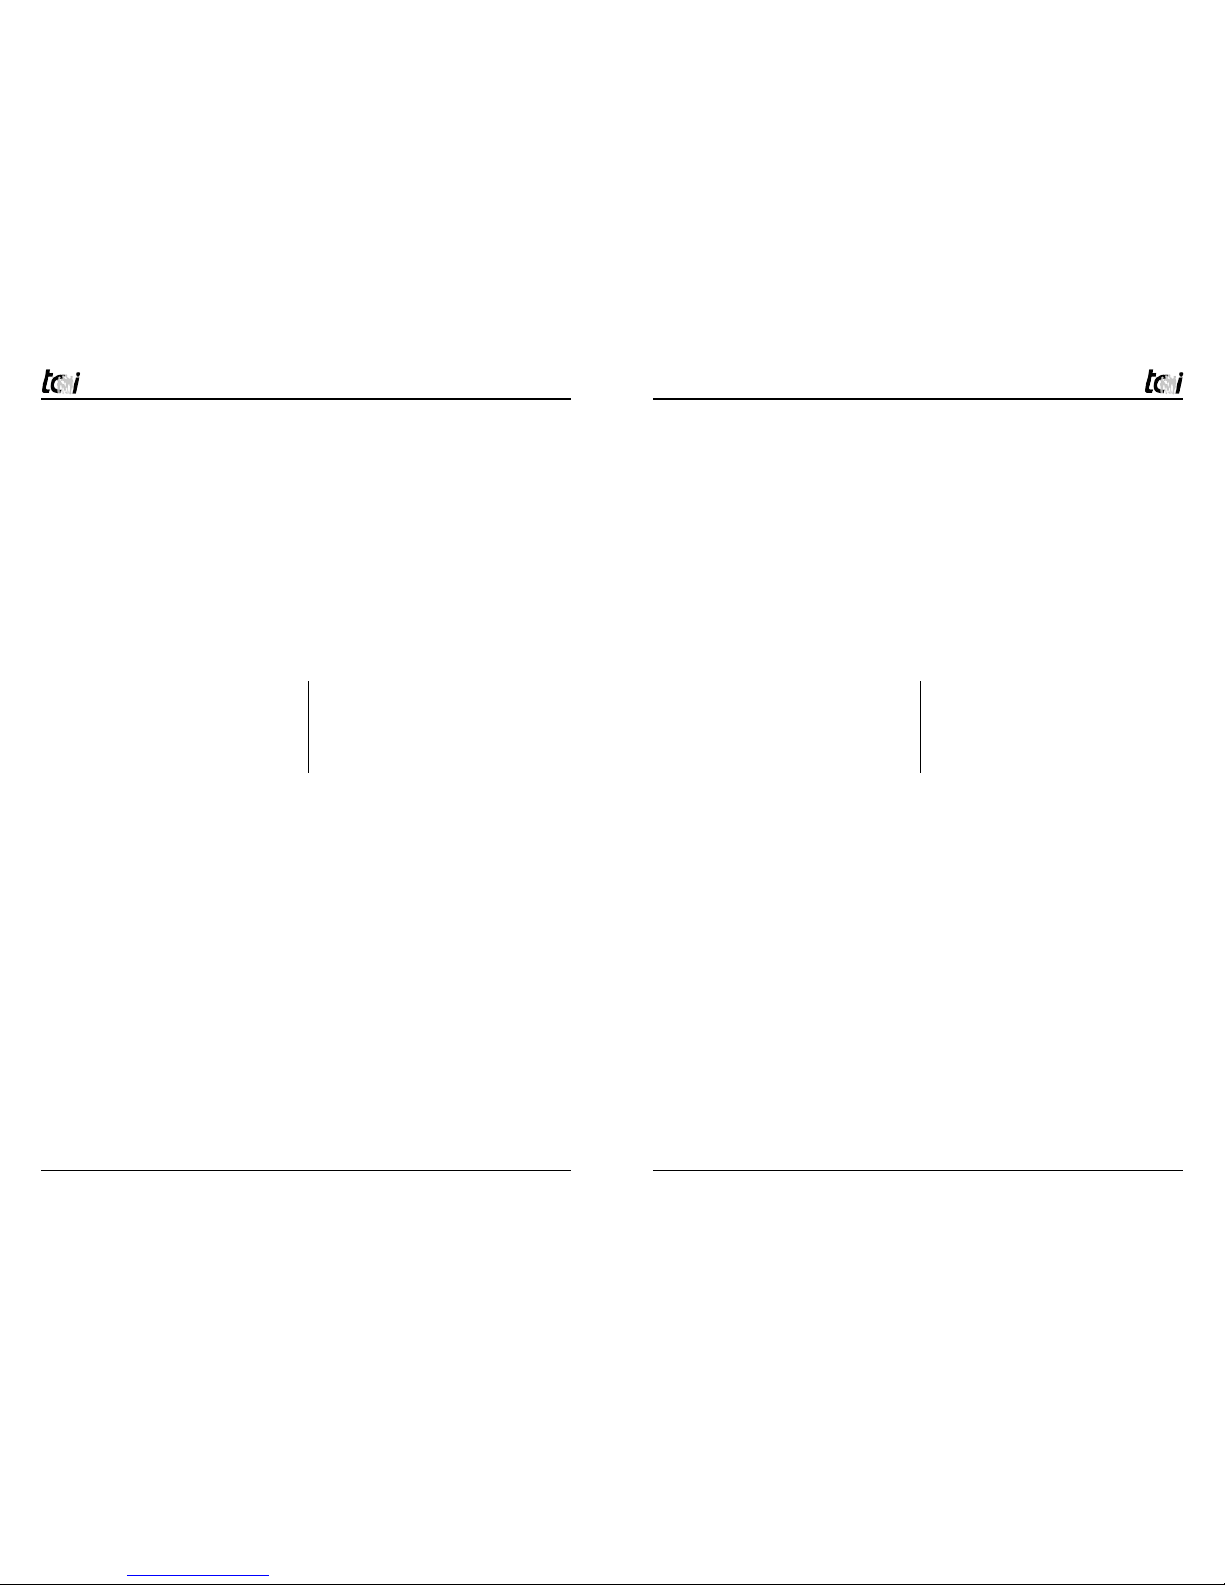
3.2 Montage amena70
!Einbau des Wmura nur durch autorisiertes Fachpersonal und Elektriker. Die tci GmbH
kann keine Haftung für montierte Unterputzgehäuse und deren Funktion übernehmen. Eine
Prüfung durch Fachpersonal ist erforderlich.
Montage nur im spannungsfreien Zustand der Zuleitungen.
PE Erdung muss unbedingt angeschlossen werden! Es besteht Lebensgefahr durch einen
elektrischen Schlag, wenn z.B. die Außenhülle der Zuleitung beschädigt ist und das
Gehäuse berührt
Empfehlung zur Positionierung des Unterputzgehäuses:
Die richtige Position des Unterputzgehäuse hängt von Körpergröße des Benutzers ab.
Wir empfehlen: Displaymitte ~ 1650 mm vom fertigen Fußboden.
ACHTUNG: Einbautiefe 45 mm!
Demontage der Front:
Entfernen Sie zunächst die Front vom amena: Sie benötigen dazu kein Werkzeug!
Fassen Sie Oben und Unten mit beiden Händen die Front an und ziehen Sie gleichmäßig
daran. Die „Schnapp“-Verbindungen löst sich.
Montage
Mounting
Schrauben im Lieferumfang
Screws are part of delivery
Bei beiden Montagevarianten
steht das Gerät ca. 5 mm vor der Wand!
At both mounting variants the unit
stands approx. 5 mm before the wall!
Wand
Wall
176 mm
130 mm
1. Ausschnitt/Cutout
ohne Unterputzgehäuse
without built-in box
3. Einbau pureKNX direkt in die Wand/
Mounting pureKNX directly into the wall
Diese Löcher nutzen!
Use these holes!
2. Reinigen Sie den den Ausschnitt
Clean the mounting hole
Wand
Wall
Wand
Wall
181 mm
136 mm
1. Ausschnitt/Cutout
mit Unterputzgehäuse
with built-in box
2. Einbau UPG/Mounting UPG
Wand
Wall
UPG
UPG-Öffnung muss mit
fertiger Wand abschließen!
UPG opening must be end
with the surface of the wall!
3. Einbau pureKNX in UPG/
Mounting pureKNX into UPG
Wand
Wall
Diese Löcher nutzen!
Use these holes!
3.2 Mounting of the amena70
!Mounting of the Wmura only by authorized technical personnel and electrician. The tci
GmbH assumes no liability for installed built-in boxes and
their function. An examination by technical personnel is necessary.
Assembling only in de-energized condition.
PE ground must be connected! There is mortal danger by an electrical impact, if the
insulation of the supply line is damaged and comes into contact with the housing e.g.
Introduction about position of the built-in box:
The position of the built-in box depends of the body height of the user. We introduce:
Display middle ~ 1650 mm from the finished ground floor.
ATTENTION: mounting depth 45 mm!
Removing the front:
Remove first the front from of the amena: They need for it no tools! Touch laterally with
both hands the top and the bottom of the front and pull you evenly on it. „Snatch “- con-
nections solves itself.
Montage
Mounting
Schrauben im Lieferumfang
Screws are part of delivery
Bei beiden Montagevarianten
steht das Gerät ca. 5 mm vor der Wand!
At both mounting variants the unit
stands approx. 5 mm before the wall!
Wand
Wall
176 mm
130 mm
1. Ausschnitt/Cutout
ohne Unterputzgehäuse
without built-in box
3. Einbau pureKNX direkt in die Wand/
Mounting pureKNX directly into the wall
Diese Löcher nutzen!
Use these holes!
2. Reinigen Sie den den Ausschnitt
Clean the mounting hole
Wand
Wall
Wand
Wall
181 mm
136 mm
1. Ausschnitt/Cutout
mit Unterputzgehäuse
with built-in box
2. Einbau UPG/Mounting UPG
Wand
Wall
UPG
UPG-Öffnung muss mit
fertiger Wand abschließen!
UPG opening must be end
with the surface of the wall!
3. Einbau pureKNX in UPG/
Mounting pureKNX into UPG
Wand
Wall
Diese Löcher nutzen!
Use these holes!

Ludwig-Rinn-Straße 10-14 • D- 35452 Heuchelheim/Gießen • Phone: +49 6 41-9 62 84-0 • Fax: +49 6 41-9 62 84-28 • www.tci.de Ludwig-Rinn-Straße 10-14 • D- 35452 Heuchelheim/Gießen • Phone: +49 6 41-9 62 84-0 • Fax: +49 6 41-9 62 84-28 • www.tci.de
Seite 14 von 40 Seite 15 von 40
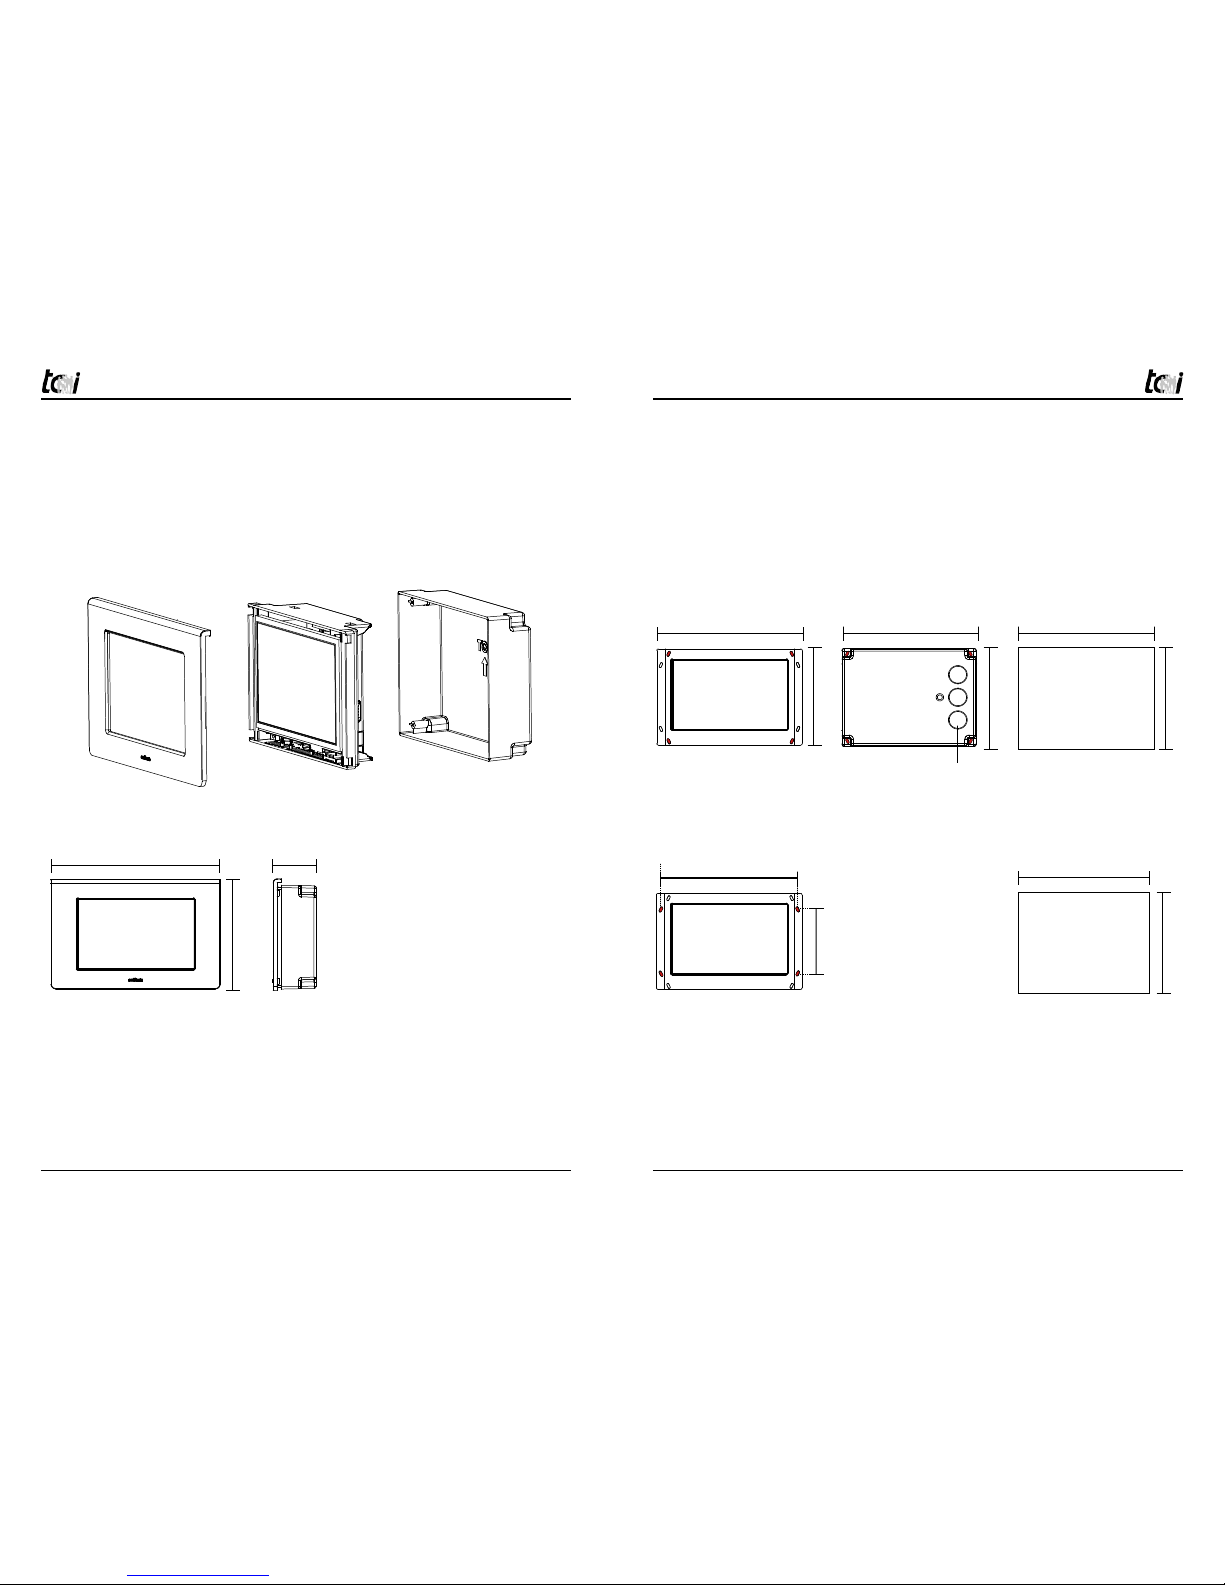
3.3 Schnittstellen und Sensoren
Anschluss der Versorgungsleitungen:
Bevor Sie das Gerät in den Unterputzgehäuse einbauen, müssen alle benötigten
Versorgungsleitungen gemäß dieser Abbildung anschließen. Bitte achten Sie auf den
korrekten Anschluss der Stromversorgung, der passende Anschlussstecker ist im Liefer-
umfang enthalten. Bei Systemen mit PoE (Power-over-Ethernet) muss der Netzwerk-Hub
PoE fähig sein, damit die Spannungsversorgung mit dem Ethernet-Kabel/Anschluss zur
Verfügung steht.
Setzen Sie jetzt die Zuleitung wieder unter Spannung. Das Gerät sollte bei
einwandfreier Spannungs- bzw. Netzwerkversorgung nach dem Einschalten
starten.
!
1) Bei der Option WLAN, wird die USB-Port-Funktion limitiert.
2) DCIn und PoE können gleichzeitig verwendet werden, wird aber nicht
empfohlen.
Touchscreen
10-28 VDC in
LAN, optional PoE
USB
Reset
Helligkeitssensor
Mic
Temperatursensor
KNX (Option)
Factory Reset
Lautsprecher
Seitenansicht amena70-CE
Side view amena70-CE
LAN/PoE
optional
DC-IN
10-28 VDC
+
-
Function
button
Seitenansicht amena70-XS
Side view amena70-XS
LAN/PoE
DC-IN
10-48 VDC
+
-
Seitenansicht amena70-CE
Side view amena70-CE
LAN/PoE
optional
DC-IN
10-28 VDC
+
-
Function
button
Seitenansicht amena70-XS
Side view amena70-XS
LAN/PoE
DC-IN
10-48 VDC
+
-
3.3 Interfaces and sensors
Connecting the cables
Before you assemble the amena into the built-in box, all necessary supply lines must be
attached in accordance with the illustration below. Please ensure that the connection of
the power supply is correct, which is included in scope of delivery. If systems are used
with PoE (power over Ethernet) the network hub has to be PoE able, so that the Ethernet
cable/connection provides the power supply.
Now you can connect the device to the power supply. The unit will start auto-
matically after pushing the power button.
!
1) The optional WLAN limits the USB port function.
2) DCIn and PoE can be used at the same time, but it is inadvisable.
Touchscreen
10-28 VDC in
LAN, optional PoE
USB
Reset
Brightness sensor
Mic
Temperature sensor
KNX (optional)
Factory Reset
Speakers

Ludwig-Rinn-Straße 10-14 • D- 35452 Heuchelheim/Gießen • Phone: +49 6 41-9 62 84-0 • Fax: +49 6 41-9 62 84-28 • www.tci.de Ludwig-Rinn-Straße 10-14 • D- 35452 Heuchelheim/Gießen • Phone: +49 6 41-9 62 84-0 • Fax: +49 6 41-9 62 84-28 • www.tci.de
Seite 16 von 40 Seite 17 von 40
3.4 Endmontage/Reinigung
Sie können jetzt die Schutzfolie von der Front entfernen.
amena70
Reinigung
Nur mit einem Tuch, angefeuchtet mit kaltem Wasser.
Hier muss die Front einrasten!
Here the front must engage!
Magnetverbindung
Magnetic connection
3.4 Final assembly/cleaning
Now you can remove the protection foil.
amena70
Cleaning
Please only use a cloth, dampened with cold water to clean the device.
Hier muss die Front einrasten!
Here the front must engage!
Magnetverbindung
Magnetic connection

Ludwig-Rinn-Straße 10-14 • D- 35452 Heuchelheim/Gießen • Phone: +49 6 41-9 62 84-0 • Fax: +49 6 41-9 62 84-28 • www.tci.de Ludwig-Rinn-Straße 10-14 • D- 35452 Heuchelheim/Gießen • Phone: +49 6 41-9 62 84-0 • Fax: +49 6 41-9 62 84-28 • www.tci.de
Seite 18 von 40 Seite 19 von 40
3.5 Inbetriebnahme allgemein
Bei der Inbetriebnahme kommt es darauf an, welche Software-Lösung mit dem System
ausgeliefert wurde:
Software -CE/EOS: Embedded Operation Software beschreibt Systeme, die mit
einem Embedded Betriebssystem ausgestattet sind z.B. CE 6.0,
weitere Schritte finden Sie im Handbuch 5138 Embedded Software.
Software XS: XS-Technologie beschreibt Systeme die ohne Betriebssystem
auskommen und mit Microbrowser von ininet ausgestattet sind,
weitere Schritte finden Sie im Handbuch 11597 XS-Technologie.
3.6 Installation/Erste Inbetriebnahme
mit aCSetup (nur CE)
Nachdem Sie das Gerät mit Spannung versorgt haben, startet automatisch erstmalig aCSetup.
aCSetup unterstützt sie bei der Erstkonfiguration ihres Systems. aCsetup kann jederzeit wieder über
Start/Programme aufgerufen werden.
Im Programm kalibrieren Sie den Touch und wählen den Clienttyp aus. Des weiteren können Sie vor-
handene Sensoren (z.B. Temperatur) anpassen. Die Software aCControl die zusammen mit aCSetup
gestartet wird bietet ihnen Zugriff auf diverse Hardwarefunktionen des Gerätes.
aCControl unterstützt folgende Gerätefunktionen:
• Helligkeitskontrolle/Abstimmung des Display mit Raumhelligkeit
• Abstimmung des Temperatursensors mit Raumtemperatur
• Hotkeys Funktionen zuweisen
• Remote Steuerung und Überwachung
Möchten sie diese Funktionen nutzen, müssen Sie aCControl im Betrieb (siehe Taskleiste) dauerhaft
verwenden. Bei Bedarf können wir Ihnen weitere Dokumentation zu aCControl z.B. Schnittstellendo-
kumentation zur Verfügung stellen.
Sollten Sie einen Eingabefehler gemacht haben, starten Sie aCSetup über Start/Programme neu.
3.7 Synchronisation Datum/Zeit (nur CE)
Um zwischen einem Zeitserver und dem amena Zeit und Datum zu synchronisieren, müssen Sie mit
einem Registry-Tool folgende Parameter anpassen:
HKEY_LOCAL_MACHINE\TIMESVC\Autostart auf 1 setzen.
Gegebenenfalls muss der HKEY_LOCAL_MACHINE\SERVICES\TIMESVC angepasst werden.
3.5 Commissioning general
During commissioning, it depends on which software solution is delievered with the
system:
Software -CE/EOS: Embedded Operation Software means systems equipped with an
embedded operating system e.g. CE 6.0. Please see manual 5138
„Embedded Software“ for further information.
Software XS: XS technology describes systems without an operating system
and equipped with a microbrowser from iniNet. For the next steps,
please see manual 11597 „XS technology“.
3.6 First installation with aCSetup (CE only)
When you energize the system for the first time aCSetup starts automatically. aCSetup supports you
with the installation and configuration of your system. aCsetup can be used again at any time. You
can find it in the folder start/programms.
With this program you can calibrate the touch and select the client type. In addition to this you can
adapt existing sensors (e.g. temperature). The software aCControl which is started together with
aCSetup offers access to various hardware functions of the system.
aCControl supports the following device functions:
• Brightness control of the display accordingly to the room brightness
• matching of the temperature sensor to the room temperature
• assigning hotkey functions
• remote control and surveillance
If you want to use these functions, you must use aCControl during operation permanently (see task
bar). If it is necessary we send you further documentation of aCControl e.g. interfaces.
If you have made an input error, start aCSetup over start/programms again.
3.7 Synchronization date/time (CE only)
To synchronize time and date between a time server and the amena, you must use a registry editing
tool to change the following parameters:
HKEY_LOCAL_MACHINE \ TIMESVC \ Startup set to 1.
If necessary, the HKEY_LOCAL_MACHINE \ SERVICES \ TIMESVC must be adjusted.

Ludwig-Rinn-Straße 10-14 • D- 35452 Heuchelheim/Gießen • Phone: +49 6 41-9 62 84-0 • Fax: +49 6 41-9 62 84-28 • www.tci.de Ludwig-Rinn-Straße 10-14 • D- 35452 Heuchelheim/Gießen • Phone: +49 6 41-9 62 84-0 • Fax: +49 6 41-9 62 84-28 • www.tci.de
Seite 20 von 40 Seite 21 von 40
3.8 Kalibrierung des Temperatursensors
Der Messwert des Temperatursensors wird von der Eigenerwärmug des Gerätes
beeinflusst und hängt hauptsächlich von der Erwärmung des TFT-Displays ab.
Wir empfehlen daher
a) das Display konstant eingeschaltet zu betreiben. Der Temperatursensor liefert nun nach
ca. 1 Std. Betrieb korrekte Werte oder
b) das Gerät mit überwiegend ausgeschaltetem Display zu verwenden.
Um in die Einstellungen des Energiemanagements zu gelangen halten Sie bitte Ihren
Finger einen Moment lang in einem freien Bereich auf das Display gedrückt. Damit öff-
nen Sie das Kontextmenü (Abbildung: 3.8.1 Kontextmenü). Wählen Sie nun den Eintrag
[Properties] und dann die Registerkarte [Backlight] aus (Abbildung: 3.8.2 Backlight). Hier
können Sie nun die Betriebsart wählen und die Zeit einstellen bis das Display bei Nicht-
Berührung in den Standby wechselt.
Abbildung: 3.8.1 Kontextmenü
Abbildung: 3.8.2 Backlight
3.8 Calibration of the temperature sensor
The measurement of the temperature sensor is affected by the units self-heating and that
especially depends on the TFT-Display‘s heating in turn.
Therefore we recommend
a) to use the display switched on permanently. The temperature sensor now delivers
reliable values (after about 1 hour) or
b) using the device for short ranges only so that it is in standby mode most of the time.
To alter the standby conditions settings please press and hold your finger on a free area of
the desktop for a moment. Now choose [Properties] from the appearing context menu
(figure: 3.8.3 Context menu). Within the [Backlight] tab you can change the displays
standby operation mode and idle timing (figure: 3.8.4 Backlight).
figure: 3.8.3 Context menu
figure: 3.8.4 Backlight
Ludwig-Rinn-Straße 10-14 • D- 35452 Heuchelheim/Gießen • Phone: +49 6 41-9 62 84-0 • Fax: +49 6 41-9 62 84-28 • www.tci.de Ludwig-Rinn-Straße 10-14 • D- 35452 Heuchelheim/Gießen • Phone: +49 6 41-9 62 84-0 • Fax: +49 6 41-9 62 84-28 • www.tci.de
Seite 22 von 40 Seite 23 von 40
3.9 Nachinstallation eines Clients (nur CE-Varianten)
Um nachträglich einen Client von einem USB-Stick zu installieren, gehen Sie bitte wie
folgt vor:
a) Verbinden Sie den USB-Stick mit der tci-Applikation mit Ihrem amena70
b) Führen Sie über [Start] -> [Programme] das Programm aCSetup aus. Im ersten
Schritt muss nun der Touch kalibriert werden
c) Wählen Sie [Custom Application] und bestätigen Sie mit [ >>>> ] (Abbildung: 3.9.1)
d) Ist kein USB-Stick eingesteckt oder enthält der Stick eine inkompatible Datei erscheint
eine Fehlermeldung (Abbildung: 3.9.2)
e) Ist der USB-Stick eingesteckt und wird die Applikation gefunden und erkannt,
bestätigen Sie die folgende Meldung bitte mit [YES], damit die Installation startet
(Abbildung: 3.9.3 u. 3.9.4)
f) Lassen Sie den USB-Stick bitte eingesteckt bis die Installation abgeschlossen ist und
beenden Sie das Setup nach der Installation mit [Exit] (Abbildungen: 3.9.5 u. 3.9.6.)
Abbildung/ figure: 3.9.1
3.9 Subsequent installation of a client (CE-models only)
To subsequent install a new client from an USB stick, please proceed as follows:
a) First connect your USB stick including the tci application to your amena70
b) Run aCSetup through [Start] -> [Programs]. As first step the setup program will now
request to calibrate the touch display
c) Please choose [Custom Application] and confirm with [ >>>> ] (figure: 3.9.1)
d) In case of no USB stick is plugged in or an incompatibillty of the file an error message
will appear (figure: 3.9.2)
e) If aCSetup recognizes and accepts the file, please click [YES] to start the installation
(figure: 3.9.3 and 3.9.4)
f) Please do not unplug the USB stick until the installation has been completed. Finally
quit the setup by clicking the [Exit] button (figure: 3.9.5 u. 3.9.6)
Abbildung/ figure: 3.9.2
Ludwig-Rinn-Straße 10-14 • D- 35452 Heuchelheim/Gießen • Phone: +49 6 41-9 62 84-0 • Fax: +49 6 41-9 62 84-28 • www.tci.de Ludwig-Rinn-Straße 10-14 • D- 35452 Heuchelheim/Gießen • Phone: +49 6 41-9 62 84-0 • Fax: +49 6 41-9 62 84-28 • www.tci.de
Seite 24 von 40 Seite 25 von 40
Abbildung/figure: 3.9.5
Abbildung/figure: 3.9.3
Abbildung/figure: 3.9.6
Abbildung/figure: 3.9.4
Ludwig-Rinn-Straße 10-14 • D- 35452 Heuchelheim/Gießen • Phone: +49 6 41-9 62 84-0 • Fax: +49 6 41-9 62 84-28 • www.tci.de Ludwig-Rinn-Straße 10-14 • D- 35452 Heuchelheim/Gießen • Phone: +49 6 41-9 62 84-0 • Fax: +49 6 41-9 62 84-28 • www.tci.de
Seite 26 von 40 Seite 27 von 40
Für das folgend bezeichnete Erzeugnis
wird die Übereinstimmung mit Bestimmungen der nachstehenden EG Richtlinien bestätigt.
- EMV-Richtlinie 2004/108/EG (bis 19.04.2016) und 2014/30/EU (ab 20.04.2016)
- Niederspannungsrichtlinie 2006/65/EG* (bis 19.04.2016) und 2014/35/EU* (ab 20.04.2016)
- RoHS Richlinie 2011/65/EU
Zur Beurteilung der elektromagnetischen Verträglichkeit des Erzeugnisses wurden
folgende Normen herangezogen:
IndustriesystemeGebäudesysteme
- EN 55022:2010 + AC:2011 Klasse A
- EN 55024:2010 + A1:2015
- EN 61000-6-2:2005 + AC:2005
- EN 61000-3-2:2014*
- EN 61000-3-3:2013*
- EN 55022:2010 + AC:2011 Klasse B
- EN 55024:2010 + A1:2015
- EN 61000-3-2:2014*
- EN 61000-3-3:2013*
Zur Beurteilung der elektrischen Sicherheit wurden folgende Normen herangezogen:
- EN 60950-1:2006 + A11:2009 + A1:2010 + A12:2011 + A2:2013 + AC:2011*
Zur Beurteilung der RoHS Anforderungen wurden folgende Normen herangezogen:
- EN 50581:2012
)* nur bei Geräten mit 230VAC intern
Jahr der CE Kennzeichnung: 2016
iese Erklärung wird verantwortlich für den Hersteller
tci Gesellschaft für technische Informatik mbH
Ludwig-Rinn-Straße 10 – 14
35452 Heuchelheim
abgegeben durch die Geschäftsleitung
Heuchelheim, 22.02.2016
is in conformity with the following EC directives.
- EMC directive 2004/108/EG (until 19.04.2016) and 2014/30/EU (from 20.04.2016)
- Low voltage directive 2006/65/EG* (until 19.04.2016) und 2014/35/EU* (from 20.04.2016)
- RoHS directive 2011/65/EU
To evaluate the electromagnetic compatibility of these products, the following standards
were taken into consideration:
Industrial systemsBuilding automation systems
- EN 55022:2010 + AC:2011 Class A
- EN 55024:2010 + A1:2015
- EN 61000-6-2:2005 + AC:2005
- EN 61000-3-2:2014*
- EN 61000-3-3:2013*
- EN 55022:2010 + AC:2011 Class B
- EN 55024:2010 + A1:2015
- EN 61000-3-2:2014*
- EN 61000-3-3:2013*
To evaluate the electrical safety of the products, the following standards were taken into
consideration:
- EN 60950-1:2006 + A11:2009 + A1:2010 + A12:2011 + A2:2013 + AC:2011*
To evaluate the RoHS requirements of the products, the following standards were taken
into consideration:
- EN 50581:2012
)* only with devices with 230VAC internal
Year of CE marking: 2016
This declaration is made under the sole responsibility of the producer
tci Gesellschaft für technische Informatik mbH
Ludwig-Rinn-Straße 10 – 14
35452 Heuchelheim
The Management
Heuchelheim, 22th February 2016
The product described as
3.10 EG-Konformitätserklärung
amena
3.10 EC-Declaration of Conformity
amena

Ludwig-Rinn-Straße 10-14 • D- 35452 Heuchelheim/Gießen • Phone: +49 6 41-9 62 84-0 • Fax: +49 6 41-9 62 84-28 • www.tci.de Ludwig-Rinn-Straße 10-14 • D- 35452 Heuchelheim/Gießen • Phone: +49 6 41-9 62 84-0 • Fax: +49 6 41-9 62 84-28 • www.tci.de
Seite 28 von 40 Seite 29 von 40
4. Lieferumfang
• amena70
• amena Kunststoff-Front oder Glas-Front
• Unterputzgehäuse
• Montagematerial
• Handbuch
• Touchstift
• Windows CE (optional):
- Windows Standard Shell
- .NET Framework 3.5
- Windows Media Player
- Internet Explorer
- Internet Explorer Kiosk
- VNC Server
- Kommando Zeile
- COM / DCOM
• optional USB-Stick mit Anwendungsclient
4. Scope of delivery
• amena70
• amena plastic front or glass front
• built-in box
• mounting assembly
• manual
• Touch pen
• Windows CE (optionally):
- Windows Standard Shell
- .NET Framework 3.5
- Windows Media Player
- Internet Explorer
- Internet Explorer Kiosk
- VNC Server
- command terminal
- COM / DCOM
• optionally USB stick with application client software

Ludwig-Rinn-Straße 10-14 • D- 35452 Heuchelheim/Gießen • Phone: +49 6 41-9 62 84-0 • Fax: +49 6 41-9 62 84-28 • www.tci.de Ludwig-Rinn-Straße 10-14 • D- 35452 Heuchelheim/Gießen • Phone: +49 6 41-9 62 84-0 • Fax: +49 6 41-9 62 84-28 • www.tci.de
Seite 30 von 40 Seite 31 von 40
5. Support
5.1 Support
Wir unternehmen im Vorfeld alles, um die Funktionsfähigkeit unserer Systeme zu ge-
währleisten. Sorgfältige Auswahl der Komponenten, aufwendige Tests und Prüfverfahren
stellen dies sicher. Dennoch kann es zu Ausfällen kommen. In einem solchen Fall
steht Ihnen unsere Hotline zur Verfügung. Wir helfen schnell und unkompliziert.
Rat und Hilfe bzw. Support erhalten Sie unter der
Telefonnummer E-Mail
0641-96284-55 [email protected]
Wir beantworten Ihre Fragen oder lösen Ihre Probleme so schnell wie möglich.
5.2 Rücksendung
Die richtige Verpackung ist der erste Schritt zur problemlosen Versendung eines Gerä-
tes. Verwenden Sie ausschließlich für Ihre Rücksendungen Original-Verpackungen von
tci, darin enthalten sind 2 Inletts und ein Umkarton. Sollten Sie keine Verpackung mehr
haben, wenden Sie sich bitte an unseren Support.
Unsachgemäß verpackte und dadurch beschädigte Geräte können von der Garantie
ausgeschlossen werden, wenn die Beschädigungen auf die unsachgemäße Verpackung
zurückzuführen ist. Wir empfehlen den Versand mit einer Spedition, da
erfahrungsgemäß hierbei weniger Schäden entstehen. Einen Verpackungshinweis und
einen Reparaturschein finden Sie unter www.tci.de/support.
5. Support
5.1 Support
It is our priority to guarantee the functionality of our systems. This is ensured by a
careful selection of components, extensive inspection and test procedure. However,
errors cannot be completely ruled out. If you should have any problems with your
unit, please do not hesitate to contact our hotline. We will assist you immediately
and without any complications.
You can reach our Support team at
Phone number E-Mail
+49-(0)641-96284-55 [email protected]
We will answer your questions or solve any problems you might have with your unit.
5.2 Dispatch
The right packaging is the first step for a trouble-free dispatch of a device. Please only use
the original tci protective packaging for your returns. Devices that get damaged due to
improper packaging can be excluded from guarantee.
We suggest to task a private forwarding agent with the shipment, because by our experi-
ence the devices get less damaged during the transport.
Further packaging information and a repair form you will find under www.tci.de/support.

Ludwig-Rinn-Straße 10-14 • D- 35452 Heuchelheim/Gießen • Phone: +49 6 41-9 62 84-0 • Fax: +49 6 41-9 62 84-28 • www.tci.de Ludwig-Rinn-Straße 10-14 • D- 35452 Heuchelheim/Gießen • Phone: +49 6 41-9 62 84-0 • Fax: +49 6 41-9 62 84-28 • www.tci.de
Seite 32 von 40 Seite 33 von 40
5.3 Herstellergarantie
Die tci - Gesellschaft für technische Informatik mbH (TCI) gewährt ihrem Käufer eine 12-monatige
Produktgarantie auf von TCI hergestellte Produkte.
Tritt bei einem von TCI hergestellten Produkt innerhalb von 12 Monaten nach Lieferung ein Mangel
auf, wird TCI diesen unter nachgenannten Voraussetzungen nach eigener Wahl entweder durch Liefe-
rung eines Neugerätes, Austausch von Teilen oder durch Reparatur beseitigen.
TCI trägt im Rahmen seiner Garantieleistungen während der Garantiezeit die mit dem Austausch oder
der Reparatur von Produkten oder Produktteilen verbundenen Kosten, soweit der Mangel im Rahmen
einer ordnungsgemäßen Nutzung der Produkte aufgetreten ist. Die Kosten zur Feststellung des Man-
gels beim Käufer sowie des Ein- oder Ausbaus sind vom Käufer zu tragen. Transport und Versand
von Produkten oder Produktteilen erfolgen auf Gefahr und Kosten des Käufers.
Garantiezeiten beginnen jeweils mit dem Tag, an dem die Lieferung des Produktes erfolgt. Die Erbrin-
gung von Garantieleistungen verlängern die Garantiezeiten nicht.
Die im oder zum Austausch gelieferten Produkte oder Produktteile sind neu oder neuwertig und in
einwandfreiem, funktionstüchtigem Zustand; ausgetauschte Produkte oder Produktteile werden mit
Absendung durch TCI oder Abholung der entsprechenden Austauschteile bei TCI deren Eigentum;
der Käufer garantiert, dass Rechte Dritter diesem Austausch und Eigentumsübergang nicht im Wege
stehen.
Ansprüche aus dieser Garantie sind innerhalb von einem Monat ab Kenntnis des Mangels schrift-
lich bei TCI anzumelden. Derzeitige Anschrift ist tci -Gesellschaft für technische Informatik mbH;
Ludwig-Rinn-Straße 10-14; 35452 Heuchelheim / Gießen. Weitergehende Ansprüche, insbesondere
Schadensersatzansprüche, sind von der Garantie nicht umfasst. Die gesetzliche Mängelhaftung bleibt
von der Garantie unberührt. Es gilt das Recht der Bundesrepublik Deutschland unter Ausschluss des
UN-Kaufrechts. Ist der Kunde Kaufmann, ist Gerichtsstand für Streitigkeiten aus dieser Garantie der
Sitz von TCI.
Voraussetzungen für Garantieleistungen:
1. Es handelt sich um einen Mangel, der nach
dem Kauf entstanden ist.
2. Das betreffende Produkt ist über die Serien-
nummer eindeutig identifizierbar.
3. Vorlage des Kaufbelegs.
4. Äußere Faktoren, wie z.B. Brand, Vanda-
lismus, nicht autorisierte Eingriffe, zu hohe
Temperaturen etc., oder normaler Verschleiß
sind als Ursache ausgeschlossen.
5. Das Produkt wurde nicht verändert, ausge-
nommen von autorisierten TCI-Mitarbeitern
/-Partnern.
6. Das Produkt wurde ausschließlich sachgemäß
entsprechend der Bedienung¬sanleitung und
Dokumentation angewendet.
7. Die Installation, Bedienung, Reparatur und
Wartung erfolgt gemäß den von TCI zur Ver-
fügung gestellten Vorgaben. Dies bedeutet im
Einzelnen:
a. Installation, Aufbau und Montage erfolgen
gemäß der Bedienungs- und Montageanlei-
tung und durch eine entsprechende Fachkraft.
b. Eine im Garantiefall notwendige
Reparatur
wird ausschließlich von einem TCI-Mitarbeiter/-
Partner oder mit von tci zur Verfügung gestell-
ten Ersatzteile durchgeführt.
c. Das betreffende Produkt wird ausschließ-
lich in Verbindung mit kompatiblen Produkten
angewendet.
Nicht von der Garantie umfasst:
1. Maßnahmen zur Beseitigung von Störungen,
die auf Bedienungsfehlern, sonstiger unsach-
gemäßer Behandlung, technischen Eingriffen
seitens des Käufers oder Dritter oder auf
äußeren, nicht von TCI zu vertretenden Ein-
flüssen beruhen.
2. Kosten von Austauschteilen, die einem
besonderen Verschleiß unterliegen, von Ver-
brauchsmaterial und von Datenträgern.
3. Instandsetzung von Zubehör, Änderungen,
Anbauten oder sonstigen Einrichtungen, die
nicht von tci geliefert wurden.
4. Instandsetzungsarbeiten, wenn die Umge-
bungs-bedingungen lt. der Dokumentation
nicht eingehalten wurden.
5. Mängel, die durch mangelhafte Systemausle-
gung, Systemkonfiguration und Montageart,
durch den Betrieb unter ungeeigneten Umge-
bungsbedingungen oder sonstigen ungeeig-
neten Betriebsmethoden, durch ungeeignete
Wartung oder ungeeig¬nete Te sts oder durch
Einflüsse wie Verunreinigungen bedingt sind.
5.3 Manufacturer’s Guarantee
tci Gesellschaft für technische Informatik mbH (TCI) provides a 12-month product guarantee to the
purchaser, which covers products manufactured by TCI.
Should a defect be determined with a product manufactured by TCI within 12 months after delivery,
then TCI will remove this defect at their own option either by providing a new product, or by replacing
parts or by repairing the product subject to the conditions defined below.
Within the scope of the guarantee, TCI will bear all costs related to the replacement of parts or the
repair of products or product parts during the term of this guarantee, insofar as the defect has oc-
curred during proper use of the product. Any costs incurred for the determining of the defect as well
as costs of mounting and demounting at the customer’s premises are to be borne by the purchaser.
Delivery and dispatch of products or product parts will be effected at the purchaser’s risk and expen-
se. The term of guarantee shall begin from the date of delivery of the product. Any services provided
within the scope of the guarantee do not extend the term of guarantee.
All products or product parts delivered as or for a replacement are new or equivalent to new and in
perfect operative condition; replaced products or product parts will become property of TCI as soon
as they are sent off to or collected by TCI; the purchaser guarantees that there are not any legal im-
pediments to such transfer of product and ownership which might result from third-party rights.
Any claims under this guarantee are to be made to TCI in writing within one month after cognizance
of the defect. Current address: tci -Gesellschaft für technische Informatik mbH; Ludwig-Rinn-Strasse
10-14; 35452 Heuchelheim / Giessen Germany. Any further claims, claims for damages in particular,
are excluded from this guarantee. Statutory liability for defects remains unaffected of this guarantee.
The German law shall apply to all matters related to this guarantee. In case the purchaser is a mer-
chant, place of jurisdiction for any litigation resulting from this guarantee shall be the location of the
registered office of TCI.
Terms of guarantee:
1. Only defects that have occurred after the
purchase are covered by this guarantee.
2. The product in question must be clearly iden-
tifiable by its serial number.
3.
The voucher of the purchase has to be submitted.
4. External factors, e.g. fire, vandalism, unau-
thorized handling, excessive temperatures
etc., or normal wear are excluded from the
guarantee.
5. The product must not have been modified,
ex-
cept by authorized TCI employees or partners.
6. The product has been used exclusively in a
competent way according to the operating
manual and documentation.
7.
Installation, operation, repair, and maintenance
have been performed according to the instructions
and the operating documentation the purchaser
has obtained from TCI. This means in particular:
a. Installation, setup, and mounting have been
performed according to the installation and
operating instructions in the documentation
and by a competent professional.
b. Necessary repair work during the term of
guarantee has been performed exclusively by
a TCI employee or authorized partner or with
spare parts provided by TCI.
c. The product concerned has been used
exclusively in connection with compatible
products.
Excluded from this guarantee are:
1. All measures for the removal of defects that
have been caused by operating mistakes,
other incompetent handling, technical inter-
vention on the part of the purchaser or any
third party or any other external influence TCI
can not be held responsible for;
2. Costs of replacement parts subject to
extreme wear and of consumables and data
carriers;
3. Maintenance or repair of accessories, modi-
fied parts, added parts or any other part that
have not been delivered by TCI;
4. Repair work that has become necessary
because the limits of the environmental spe-
cifications in the documentation have been
exceeded;
5. Defects that have resulted from an inadequate
system layout, system configuration, and type
of mounting, or from operation under inappro-
priate environmental conditions or from other
inappropriate operating methods or from
incompetent maintenance or inappropriate
tests or from influences like contamination.
Ludwig-Rinn-Straße 10-14 • D- 35452 Heuchelheim/Gießen • Phone: +49 6 41-9 62 84-0 • Fax: +49 6 41-9 62 84-28 • www.tci.de Ludwig-Rinn-Straße 10-14 • D- 35452 Heuchelheim/Gießen • Phone: +49 6 41-9 62 84-0 • Fax: +49 6 41-9 62 84-28 • www.tci.de
Seite 34 von 40 Seite 35 von 40
6. Technische Zeichnung / Technical drawing
Front
amena70
Front
amena built-in box
cable entry
Cutout
181 mm
179 mm
223 mm
194 mm
58 mm
128 mm
136 mm
134 mm
144 mm
Mounting with built-in box
amena Cutout
176 mm
183 mm
130 mm
88 mm
Mounting without built-in box
EBT: 45 mm
Unterputzkasten
built-in box
Unterputzgehäuse
Kabelzuführung
Ausschnitt
Montage mit Unterputzgehäuse
Ausschnitt
Montage ohne Unterputzgehäuse
Front
amena70
Front
amena built-in box
cable entry
Cutout
181 mm
179 mm
223 mm
194 mm
58 mm
128 mm
136 mm
134 mm
144 mm
Mounting with built-in box
amena Cutout
176 mm
183 mm
130 mm
88 mm
Mounting without built-in box
EBT: 45 mm
Unterputzkasten
built-in box
Unterputzgehäuse
Kabelzuführung
Ausschnitt
Montage mit Unterputzgehäuse
Ausschnitt
Montage ohne Unterputzgehäuse
Ludwig-Rinn-Straße 10-14 • D- 35452 Heuchelheim/Gießen • Phone: +49 6 41-9 62 84-0 • Fax: +49 6 41-9 62 84-28 • www.tci.de Ludwig-Rinn-Straße 10-14 • D- 35452 Heuchelheim/Gießen • Phone: +49 6 41-9 62 84-0 • Fax: +49 6 41-9 62 84-28 • www.tci.de
Seite 36 von 40 Seite 37 von 40
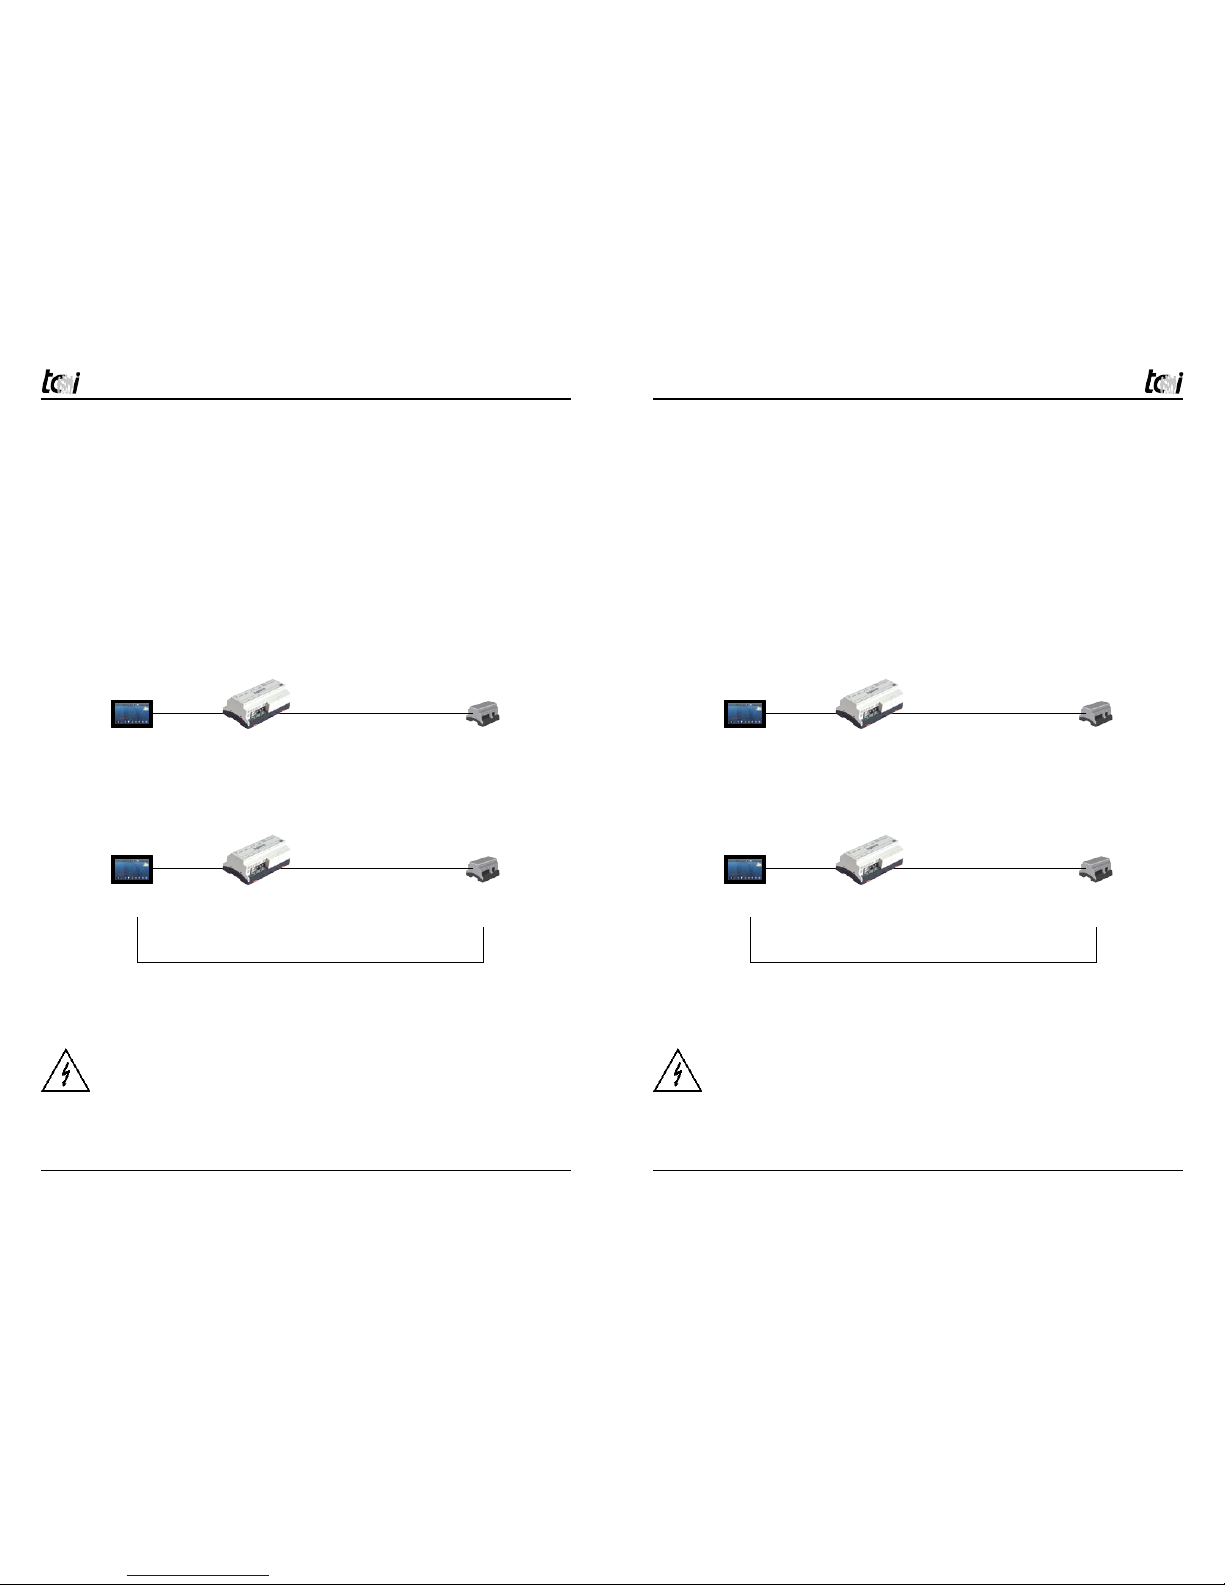
7. Starter-kit
Inbetriebnahme:
Das Starter-kit besteht aus einem logico-hs als Server und einen amena als Client, so-
wie einen Hutschienennetzteil und einem Ethernet-Kabel. Die Software zum Betrieb ist
vorinstalliert! Der Client sollte an LAN2 des logico-hs angeschlossen werden.
Detailierte Beschreibungen zu den o.g. Produkten entnehmen Sie bitte den beiliegenden
Handbüchern der Geräte
Aufbau:
Hinweiß zum Hutschienennetzteil: Nur verwendbar im Schaltschrank, da das Netzteil
mit 230 VAC betrieben werden muss. Montage nur durch einen Elektriker.
amena70-EOS
+ SmartVoyager VNET Hutschienennetzteil
Top hat rail mounting power
supply 24VDC
logico-hs
+ VoyagerServer
Starter Direct(KNX)
IP Spannungsversorgung
power cable
Betrieb mit PoE fahiges Netzwerk:
Installation with PoE network:
amena70-EOS
+ SmartVoyager VNET Hutschienennetzteil
Top hat rail mounting power
supply 24VDC
logico-hs
+ VoyagerServer
Starter Direct(KNX)
IP Spannungsversorgung
power cable
Spannungsversorgung
power cable
Betrieb ohne PoE fahiges Netzwerk:
Installation without PoE network:
7. Starter-kit
Installation:
The Starter-kit consist of logico-hs as server and amena as client, additional to this an
top hat rail mounting power supply and ethernet cable The software is installed! The
client shoud be connect to LAN 2 of the logico-hs.
Detailed information about the products please see the manuals of the units
Installation:
Attention about the top hat rail mounting power supply. Only useable in electronical
cabinet, because power input 230 VAC. Mounting only by electrician.
amena70-EOS
+ SmartVoyager VNET Hutschienennetzteil
Top hat rail mounting power
supply 24VDC
logico-hs
+ VoyagerServer
Starter Direct(KNX)
IP Spannungsversorgung
power cable
Betrieb mit PoE fahiges Netzwerk:
Installation with PoE network:
amena70-EOS
+ SmartVoyager VNET Hutschienennetzteil
Top hat rail mounting power
supply 24VDC
logico-hs
+ VoyagerServer
Starter Direct(KNX)
IP Spannungsversorgung
power cable
Spannungsversorgung
power cable
Betrieb ohne PoE fahiges Netzwerk:
Installation without PoE network:

Ludwig-Rinn-Straße 10-14 • D- 35452 Heuchelheim/Gießen • Phone: +49 6 41-9 62 84-0 • Fax: +49 6 41-9 62 84-28 • www.tci.de Ludwig-Rinn-Straße 10-14 • D- 35452 Heuchelheim/Gießen • Phone: +49 6 41-9 62 84-0 • Fax: +49 6 41-9 62 84-28 • www.tci.de
Seite 38 von 40 Seite 39 von 40
Raum für Ihre Notizen: this page is intentionally left blank
This manual suits for next models
2
Table of contents
Other TCi Touchscreen manuals


Popular Touchscreen manuals by other brands


InTouch
InTouch KIO-LITE-215P user manual

Elo TouchSystems
Elo TouchSystems E700813 user guide

Winmate
Winmate W10L100-PCH1-PoE user manual

Russound
Russound Sphere E Series installation manual

Thinget Electronics
Thinget Electronics MP Series Operation manual

Seedsware
Seedsware TM Series Product specification

EDRO
EDRO DYNATROL HMI manual

Touch Revolution
Touch Revolution K21A Series user guide

ASYS
ASYS Totech EU SUPER DRY XSDB-1402-53 1416 201 Operation manual

Cincoze
Cincoze CS-100 Series user manual

Pixsys
Pixsys HMI series installation manual

DMC
DMC Analog Resistive Touchscreen ATP/AST Series Product specifications